If you play shapez.io and looking for a solution for Bulk Conveyor System, this guide will explain it to you, let’s check it out.
Introduction
When designing things in Shapez.io, I tend to favor systems that pair optimal conveyor efficiency while keeping the area to a minimum. This just means that at the end of the day if there is a full line carrying 30 items/sec, I want any systems I design to handle that input and output an equal 30 items/sec all while keeping the area taken up to a minimum. I define the area of a system or factory as the box the machine would take up, not the total number of tiles used to incentivise compact designs. That being said, a few of my designs in this guide sacrifice some ease of use for aesthetics and minimal area. This is particularly apparent in the cornering section. Also none of these I’m sure are completely perfect, if you have any improvements to them I would love to see them!
With that out of the way, lets get into the designs!
PS sorry for the poor quality screenshots, for some reason I cant seem to get clean ones with any of the tools I use…
Conveyor Lines and Why They Rock
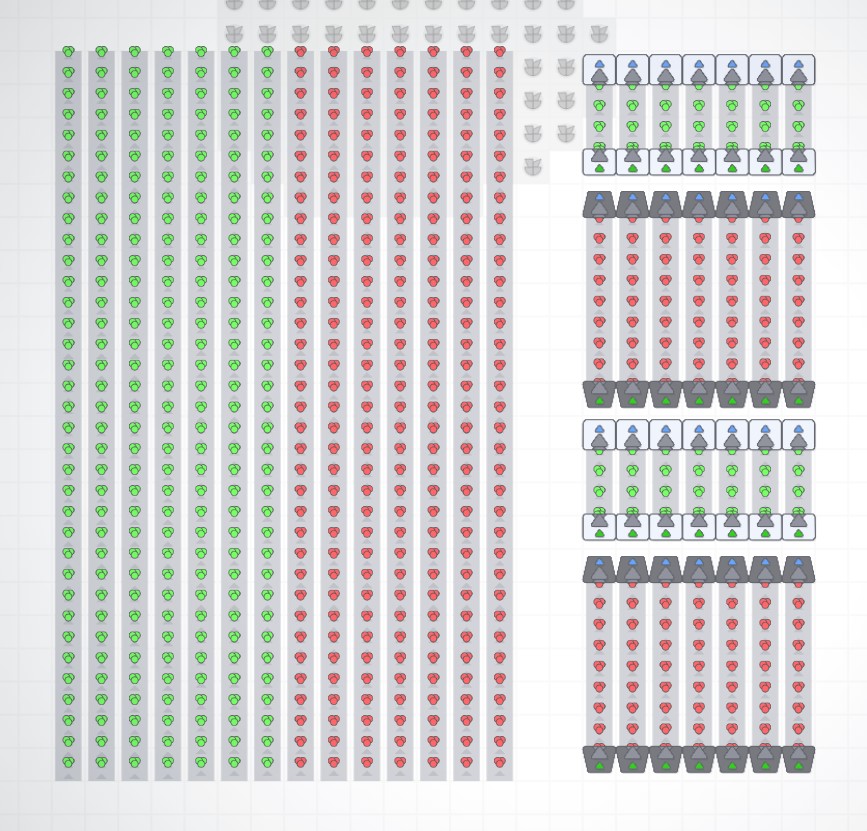
A 7(14) conveyor line is a 7 wide, 14 line compact conveyor system. Below is an image of how ‘weaving’ conveyor lines can reduce the area they take up to half! This is the most useful design I’ve come up with for compacting lines, but there is a less useful, more compact version we will go over in a moment.
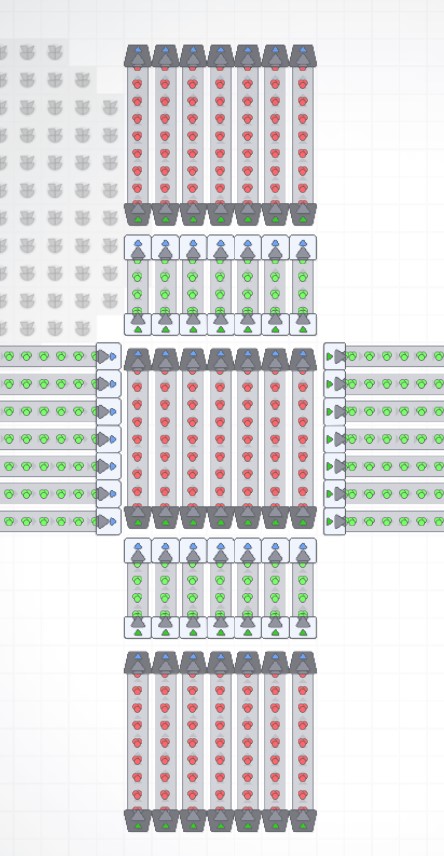
Why 7 wide? Well that has to do with the maximum length of a tier 2 tunnel. If for whatever reason you needed to get a single line of materials across this compacted line, having it be at a maximum of 7 wide allows any conveyor to skip under it with ease. Below is a visual of just that.
Finally, the more compact, less useful design for a belt consists of 2 belts going in one direction and 1 belt going in the opposite. The issue with this design is that it isn’t really scaleable. With only one tile to input and output lines, a 7 wide expanded system is impossible. We would be able to fit 4 if the tier one tunnel reached farther but that is a limitation that makes the game a game so I’m willing to live with it. I wanted to include this here in case anyone found it useful for some obscure reason I have been unable to come up with.

Regular Conveyor Cornering System
Well that’s all great but how do you adjust the line once it gets going? It would be a pretty useless system if all it did was go in a straight line. Luckily for you there is a solution for this problem! Enter the 7(14) regular conveyor cornering mechanism. I specify ‘regular’ because there are two types of cornering mechanisms in this system, but the other one will need a later introduction.
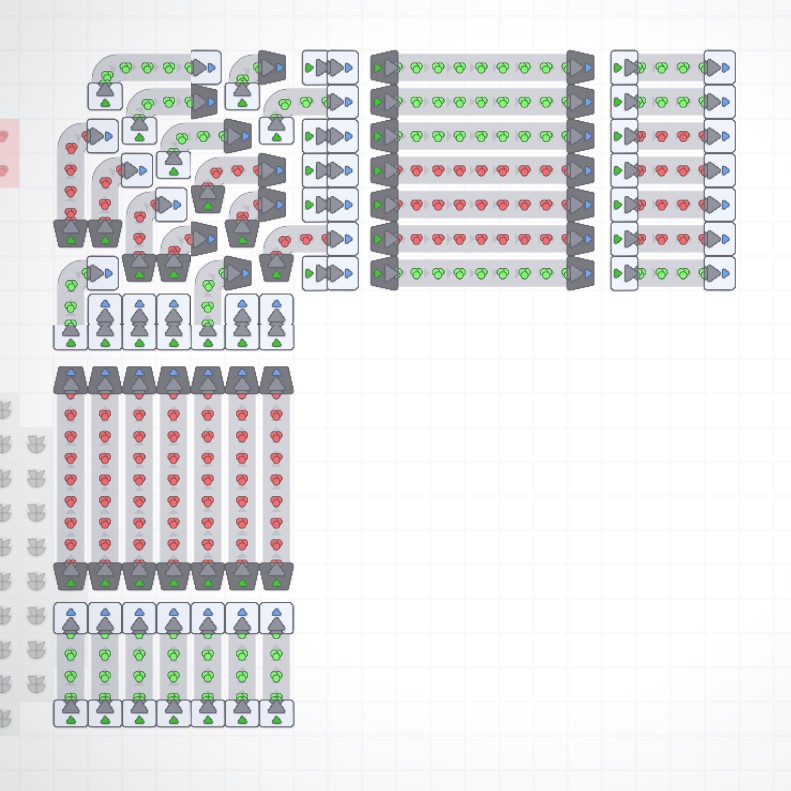
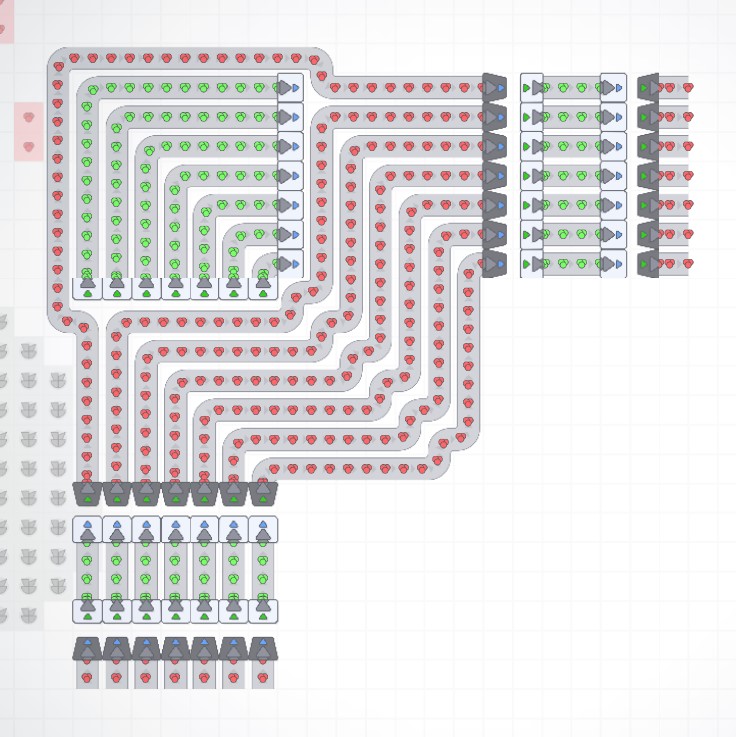
81 tiles was the smallest are I could get this down to, and in doing that I ended up having to scramble the lines a bit. you will have to decide if the scrambling is worth the smaller area, but compared to a design (below) that keeps the lines the same at the cost of greater area, I know which one I’m picking.
Conveyor Intersection System
Well what if you need two 7(14) lines to cross? Well boy do i have a solution for you. This is by far my favorite design as I was struggling with it for a while and the solution turned out to be so simple and elegant. Below you will see how weaving is taken from 2 to 4 layers. each tile in the crossover has four lines going through it!
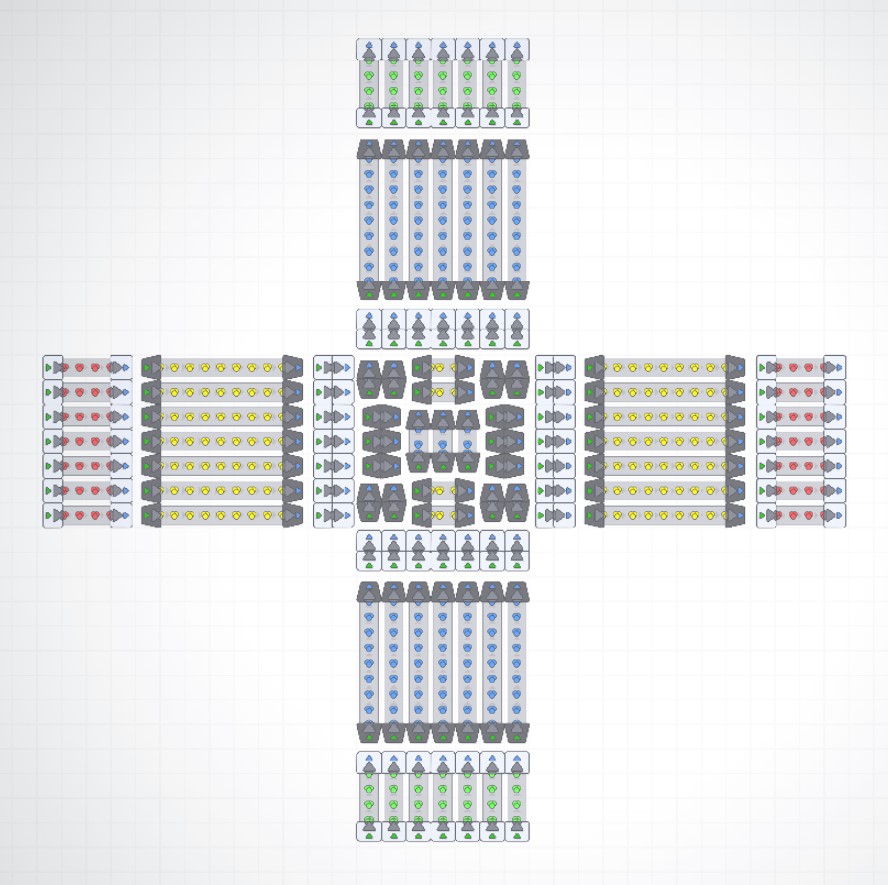
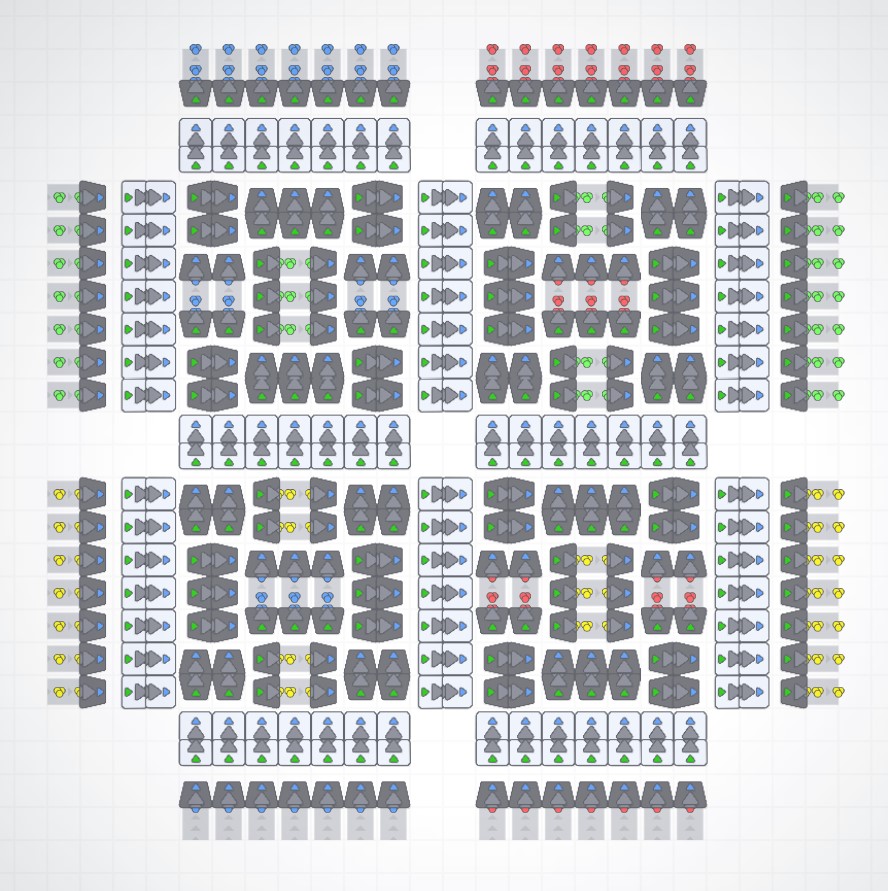
This design is not only crazy compact but also does not scramble any lines all while being expandable! All while keeping within an 11 by 11 area so that the occasional stray line can weave its way through if necessary. One thing to keep in mind when using this design is to rotate the inner part of the intersection each time it is copied. This will allow the tier 1 tunnels to reach (just barely) the next intersection.
Intersection Cornering System
The next thing that could be a problem is having to make a turn in a lattice of intersections. This can be achieved with an intersection corner. the regular corner will unfortunately not work as it relies on the tier 1 tunnels being as close as possible to the system when it starts. Inside a group of intersections the problem of cornering gets a little more tricky. This is because the tier 1 tunnels are staggered inside the intersection. Some ore as close as possible while others are two tiles further away. This means that certain tier 1 tunnels have to be placed as close as possible to the outside of the system, or they wont be able to reach or be reached by the next intersection. Hopefully the image makes this a bit more clear if I am failing to describe the problem.
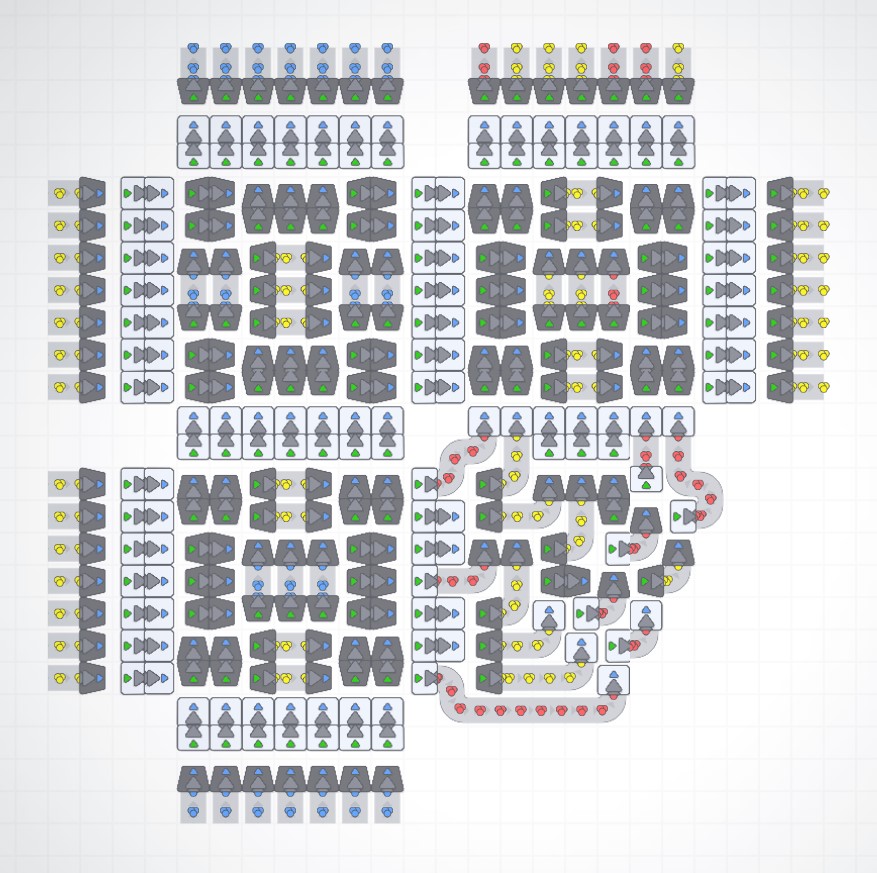
Keeping in mind that the intersection systems have to be rotated 90 degrees to mesh with each other in the minimum amount of space, two different types of staggered tier 1 tunnels appear. This means that depending on the orientation of the intersections, a different corner system will have to be used. both are included below.
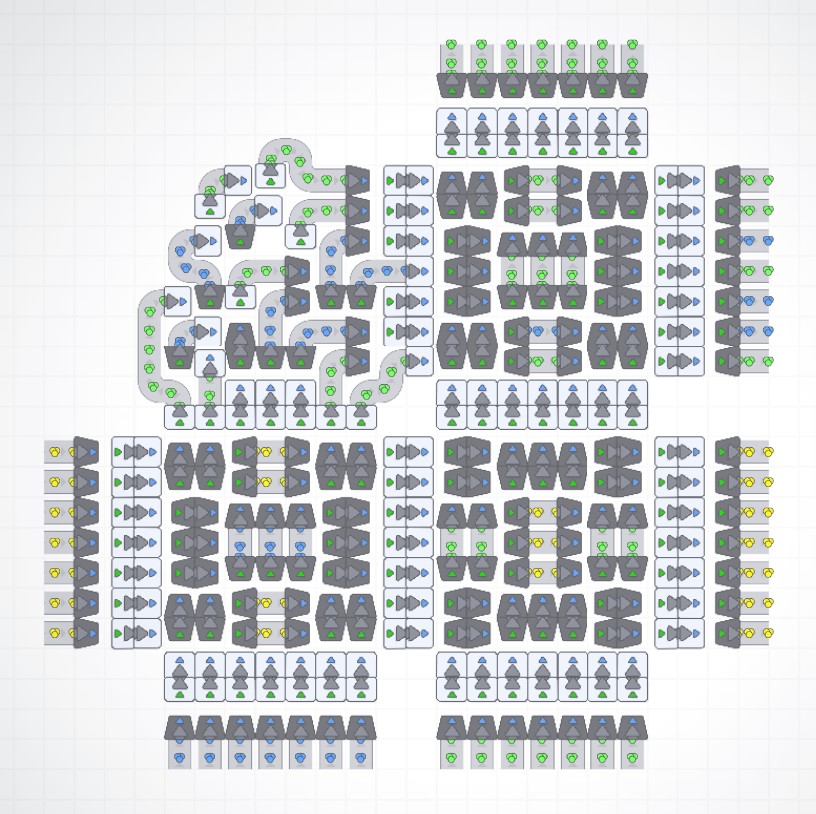

both these intersection cornering systems scramble the lines a bit, but if you can figure out how to get them this compact without doing a bit of scrambling, I will bow down to my new god.
Where These Solutions Might Be Useful
That’s all we are sharing today in shapez.io Bulk Conveyor System Solutions (BCSS), if there are anything you want to add please feel free to leave a comment below and we’ll see you soon.
Credit to Sol

Hello, this is absolutely awesome. I just love the weaving of the belts and compact design. I got an idea / problem I would like to discuss with you. I got my own solution for it but seeing that you are an genious and I am not really satisfied with the compactness of my solution, maybe you can take a look ? How can i reach you ?
Cheers !