

Every Halo veteran knows the frustration: you boot up The Master Chief Collection on PC, expecting the crisp, clean visuals of the original games, and instead get a muddy, vaseline-on-the-lens mess. The culprit isn’t your monitor or your GPU. It’s a trio of aggressive post-processing effects—film grain, chromatic aberration, and temporal accumulation—that the game applies by default. This guide walks you through editing the engine.ini file to disable those blur-inducing settings, so Halo: MCC on PC looks sharp again.
The Problem: Why Halo MCC Looks Blurry on PC
The blur isn’t a bug; it’s a design choice that doesn’t translate well to high-resolution PC monitors. Default post-processing effects like film grain add artificial noise, chromatic aberration creates color fringing that softens edges, and temporal accumulation settings can smear frames together for a smoother but less distinct image. Together, they rob the game of its native clarity. The fix is to bypass the in-game menu and manually override these settings at the engine level.
Step-by-Step: Creating the engine.ini Fix
This process requires editing a configuration file. Do not skip the “Read-only” step, or the game will overwrite your changes on launch.
- Open File Explorer and navigate to the following path:
This PC > C: > Users > [Your Username] > AppData > Local > [Halo: Campaign Evolved](https://steamah.com/) > Saved > Config > Windows- If you cannot see the
AppDatafolder, clickViewin the top toolbar, thenShow, and checkHidden items.
- If you cannot see the
- Locate the file named
GameUserSettings.iniin theWindowsfolder. - Right-click
GameUserSettings.iniand selectCopy. Right-click an empty space in the same folder and selectPasteto create a copy. - Right-click the copied file and select
Rename. Change its name toengine.ini. - Double-click the new
engine.inifile to open it in a text editor (Notepad works fine). - Delete all existing content inside the file. It must be completely blank before you paste the new settings.
- Copy the following block of settings exactly as written:
[SystemSettings] ; Film grain r.FilmGrain=0 r.Tonemapper.GrainQuantization=0 ; Chromatic aberration r.SceneColorFringeQuality=0 ; Extra cleanup r.Tonemapper.Quality=0 ; Mild Lumen denoising help r.Lumen.ScreenProbeGather.Temporal.MaxFramesAccumulated=12 r.Lumen.DiffuseIndirect.Temporal.MaxFramesAccumulated=12 - Paste the settings into the now-empty
engine.inifile.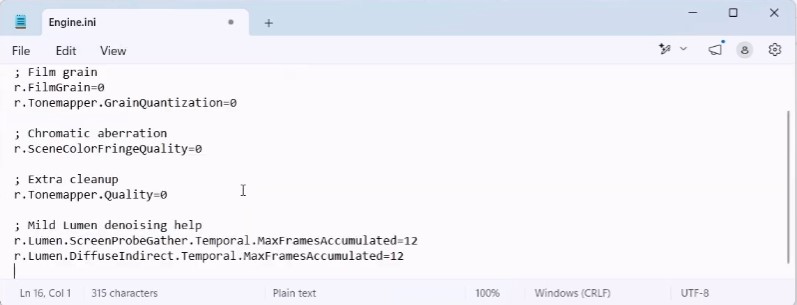
- Go to
File > Saveto save the file. - Right-click
engine.iniand selectProperties. At the bottom of the Properties window, check the box labeledRead-only. ClickApply, thenOK.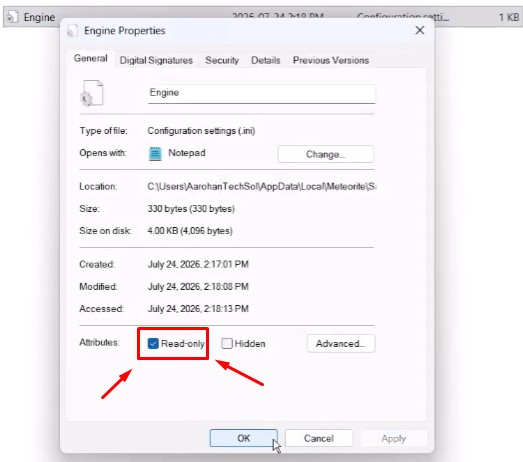
- Launch the game. The blurry graphics should now be fixed.
Tips & Troubleshooting
- Path accuracy is critical. The
engine.inifile must be placed in the exact...\Saved\Config\Windows\folder. Placing it in the wrong directory will do nothing. - The Read-only attribute is mandatory. Without it, the game will delete your custom
engine.inior overwrite the settings the next time you start it. - If the blur persists, double-check that the file is saved correctly and that the pasted settings contain no extra spaces or missing line breaks. A single typo can prevent the entire block from loading.
- What these settings do: They disable film grain and chromatic aberration entirely, and they cap the Lumen temporal accumulation at 12 frames. This prevents the engine from blending too many frames together, which is what causes the soft, smeary look. The result is a significantly sharper, cleaner image that respects the original art direction.
Related Posts:
- Halo: The Master Chief Collection CE Weapon Bug, Sniper Zoom Bug How to Fix
- Halo: The Master Chief Collection – How to Find Custom Forge Maps
- Halo: The Master Chief Collection – “Sign in error” Solutions
- Halo: The Master Chief Collection – How to Skip the Loading Intro Video Before the Main Menu
- Halo: The Master Chief Collection – All Levels