For F1 Manager 2023 players, this guide provides link to a list of all drivers and key staff present in the game with their starting ratings and contracts and a breakdown of all attributes
We recommend you check out the new list of F1 Manager 2024.
Link & Introduction
– I’ve rewritten the “general info on key staff” part with more info about their progression
https://docs.google.com/spreadsheets/d/1k1hVu7-gYYF3pxci2syw2dsm8zudhbQsVgfhg3UwWbg
This document contains ratings and contract details on all drivers and key staff that are currently on the game, I did the exact same thing last year for F1M22 and started to compile all the info I could gather as soon as I could for this year’s guide.
I could have just put the link and let you see the data but while doing it I also have made some observations I wanted to share, so I made a few parts detailing those observations, this is not a complete and definitive guide by any means but hopefully it is helpful enough.
Maybe I’ll update this guide if there are changes or if I have new discoveries to share, for reference last year Frontier released patches for F1M 22 until March and they never re-balanced or modified the starting ratings nor did they add any new driver or staff, meaning that as long as they are keeping the same philosophy (and as long as I didn’t do any typing mistake in the doc) the ratings and the lists themselves are “safe” and should not move (although they did modify the starting age of a couple key staff one time but this was mentioned in the patch notes).
Note: If you are just interested in driver ratings Frontier has got you covered, they have almost all the drivers’ ratings available on F1 Manager’s official website[www.f1manager.com]
General info on drivers
There are 86 drivers at the start of the game, that includes :
- The 20 F1 race drivers of the 2023 season, obviously
- 10 F1 reserve drivers (1 per team, including three fictional placeholders)
- 22 F2 drivers
- 30 F3 drivers
- 1 free agent
- 3 new-gens (also free-agents)
The same driver still cannot have more than one active contract and now F2 and F3 championships are simulated, meaning that instead of having fictional placeholders in F2 we now have them in the reserve seats. The following reserve seats are taken by fictional placeholders (IRL reserve driver in parenthesis):
- Alpine (Jack Doohan, who also drives for Virtuosi in F2)
- Alfa Romeo (Théo Pourchaire, who also drives for ART GP in F2)
- Williams (who actually have no contracted reserve driver of their own this year IRL, they share Mick Schumacher with Mercedes)
Finally we have one real-life free agent (McKenzy Cresswell, who was a substitute in F3 at Silverstone and Hungaroring) and three new-gens at the start of each save, as the new-gens are randomly generated
A number of drivers who were in F1M 22 are not in F1M 23 simply either because they are not involved anymore in either of the licensed championships or because of the aforementioned limitations of the game (1 reserve driver per team), however Frontier carried over the 22 database in this year’s game, meaning all the drivers that are in last year’s game are still buried in this year’s database with their 2022 ratings, and can be added into the game if you know how (but this is not the subject of this guide ;))
There are also a number of names that are hidden in the database for history purposes (either because they appear in previous years results as result history goes a few years back or because they hold a track record), I use the word “names” here because they usually have generic ratings.
Driver Ratings
There are two sheets for driver ratings:
- One simple sheet with just the overall ratings (OVR)
- A more detailed sheet with all attributes for every driver and other details
As a reminder, OVR is not an average of all attributes but that some attributes had more weight than others, I will detail the formula below but if you played F1M 22 just know that the OVR formula hasn’t changed from what I could see.
Drivers also have the same attributes as last year, here’s the breakdown of each attribute :
Most of the attributes are pretty self-explanatory, “Reactions” is basically the “Throttle” skill and “Adaptability” the “wet-weather” skill.
Those attributes can be separated into three categories:
Basically, the “Pace” attributes are what make your driver go fast, the “Consitency” are what make your driver stay on-track and stay consistent over race distance and the “Racecraft” attributes are more situational attributes related to wheel-to-wheel racing or wet weather.
All those attributes are not equal when it comes to calculate a driver’s OVR, some attributes have more weight than others, and the Cornering attribute is the one that has the most weight when calculating a driver’s OVR:
Knowing all that we can determine the following formula to calculate any driver’s OVR:
I also have added weighted ratings for pace, consistency and racecraft attributes in the “Detailed driver ratings”.
You should not read too much into the OVR, despite being weighted it is not necessarily representative of how a driver will perform on-track (eg. someone can theoretically have 75 OVR but 50 Braking, making them essentially useless).
Last year the community eventually realised that Braking was the most important stat to improve, before Cornering (despite the latter having more of an impact in OVR calculation), Accuracy and Control also being very important.
Frontier did announce on stream that drivers attributes would be re-balanced but didn’t elaborate on what and how they have been re-balanced, so I did a quick first test in Bahrain in qualy setting to see how much of an impact each pace attribute had on lap times and this is what I found:
Braking still seems to be the best pace stat with Cornering and Reactions being about the same but Cornering still slightly better than Reactions if you look at the average gap over each sample.
However I feel this needs more testing, first with more attributes (I want to at least test Accuracy, Control and Adaptability) and also in other tracks and in race conditions.
Driver progression
The driver progression system was changed for this year, last year drivers gained a development point every time they gained a certain amount of XP and you could allocate those points freely on the attribute(s) of your choice meaning players usually spammed all their points to Braking, now in F1M 23 you have to choose a Development Focus which will focus your development points into 4 attributes (apart from the balanced focus that has no focus).
Here are all the Development Focuses available and the attributes they improve:
Control
Overtaking
Defending
Reactions
Smoothness
Adaptability
Braking
Accuracy
Adaptability
Smoothness
Overtaking
Defending
Control
Smoothness
Adaptability
Control
Overtaking
Defending
Older drivers are also now supposed to regress if they perform poorly, but we’ll have to see in-game how that works exactly.
This new progression system is also used for key staff, each category of staff having their own focuses, more on that on their dedicated sections.
Development Rate and Aggression are secondary attributes that don’t contribute to a driver’s OVR, they affect respectively driver progression and a driver’s probability to attempt overtakes. Aggression seems to be unchanged from last year, Development Rate actually replaces Growth Potential but I feel this is just a name change.
Development Rate and Aggression are both shown on the menus as either “Low”, “Medium” or “High” but Aggression and Development Rate actually have numbers hidden under those labels:
Knowing the underlying is particulary crucial for development rate because this year almost all young drivers seem to have a “High” development rate, but a DR of 76 is not quite the same as a DR of 95.
Last year growth potential decreased by 2 each year, I don’t know if this is still the case with development rate, I actually have to finish a season to know that.
I’ll have to keep track of driver growth in my save but what I saw last year on a limited sample is that F2 drivers would gain 2x attribute points compared to young F1 drivers and F3 drivers would gain 3x the number of attribute points. Of course this depends of their DR and I’ll also have to see how the now simulated F2 and F3 races impact their growth.
Now, some interreting young prospects I noticed while putting the ratings:
- Nikola Tsolov (16 yo, F3, ART GP) is the driver with the highest DR, actually he has 100, but as I said this year a lot of drivers have really high potential at the start of the game, in fact, almost all F3 drivers have a DR>=80
- Gabriele Minì (17yo, F3, Hitech) is not the best F3 driver overall but has a really strong pace for someone his age, I would scout him to see how he grows
- Gabriel Bortoleto (18yo, F3, Trident) is actually the best overall and the 2nd best pace in that championship, like Minì I would scout him and let him « cook » a couple of years to see whether he is F1 ready
- Théo Pourchaire (19yo, F2, ART) is the best rated F2 driver in the game and has stronger pace ratings than some F1 drivers, he might be a strong candidate if you want to replace one of your drivers early in your save
Contracts
New for this year is the ability to sign drivers (and also key staff) for the following year, at last! You still have the choice to sign a driver or key staff immediately if you wish to do so though (for example if you want to make changes to your team immediately when starting a save).
In general, all contracts have two attributes :
- End of contract date
- Yearly salary
Driver contracts also have bonuses, which will be detailed in its own part
When signing a driver under contract you have to pay the cost of breaking the contract of the driver you are replacing (if applicable) and a buyout fee, which is simply the cost of breaking the contract of the driver you are trying to sign.
For example if you wanted to replace Nyck de Vries by Daniel Ricciardo at the start of your save you would need to pay $679,496 to break De Vries’ contract and also pay $1,855,987 to buy Ricciardo’s contract, which would amount to a total of $2,535,483 (plus the potential signing bonus you pay when signing a new driver).
The formula of the cost of breaking the contract of one of your drivers is roughly the following:
The formula above won’t give you the exact sum (it is a few $ off and you can see the exact sum for your drivers on the contract menu at any time anyway) but it gives the general idea.
Basically it means that it costs half the yearly salary per year of contract remaining, but the cost is recalculated every day meaning the less days remaining in the contract, the cheaper it gets to break it.
As the game starts on February, 20th and contracts all run to December, 31st (be it 2023 or later) it means it costs about the following to break a contract on the first day of the save:
contract on February, 20th
(% of yearly salary)
If you wait until March, 2nd (10 days after the game starts and the time you need to do a basic scouting of a driver) before immediately signing a driver or key staff you can save roughly 1% when breaking the contract.
The “Driver contracts” sheet tells you the contract situation of every F1 driver at the start of the game.
This is the position of the driver within your team, from what I can see so far it doesn’t seem there’s any difference between Car 1 and Car 2 (apart from the T-Cam colour in-game), so if you want to sign Hamilton or Verstappen to your team and the driver you are looking to replace the driver who is currently driving Car 2 they won’t mind.
Do note that if you promote your reserve driver it will always be at the expense of the race driver you are replacing, the replaced driver will be effectively fired, not demoted to reserve.
Not all drivers can sign in F1 at the start of the game, in real life there’s of course the superlicence which you can get by fulfilling a number of requirements including having good enough results across a period of 3 years to score enough points but in-game the system is much more simplified and there’s no points system due to the crude way F2 and F3 have been integrated into the game.
In the game, a driver needs to fulfill two conditions to be eligible to sign for your team (and that includes race and reserve drivers):
- Be 18 years of age or older
- Have raced two seasons in F3 or F2
If you cannot propose a contract to a young driver it will be for one of those two reasons.
Six F2 drivers and all but five F3 drivers are not eligible to race in F1 at the start of the game, you’ll have to wait 2024 or even 2025 to attempt to sign them to your team.
In addition of salary and duration you also can negotiate bonuses for drivers, there are two kind of bonuses:
- A signing bonus, that will be payed only once when signing the driver
- A race target bonus, which is accompanied by a position threshold, which will be payed every time the driver finishes a race in the position mentioned or better
Of course I would advise against giving bonuses if you can avoid it, especially race bonuses, and if you really have to only give the highest position and lowest bonus you can get away with.
General info on key staff
Each team has 4 key staff members:
- A Technical Chief (TC)
- A Head of Aerodynamics (HOA)
- Two Race Engineers (RE), one for each driver
- A Sporting Director (SD), which is new in F1M 23
For all key staff the OVR is the average value of all their attributes.
The roster of RE contains 72 RE in total: 20 being in F1, 22 in F2 and 30 in F3 (1 per car basically), there are no free agents RE at the start of the game.
TC and HOA have each 15 people in their roster at the start of the game:
- 10 in F1
- 3 free-agents that are the same in each save
- 2 free-agents that are new-gens (ie. randomly generated)
The three fixed free-agents TC are:
- Tariq Basara
- Diana Romano
- Mauro Ferrara
The three fixed free-agents HOA are:
- Martin Werner
- Gladys Carter
- Sari Koskinen
SD have 26 people in their roster at the start of the game, including 10 F1 SD, 10 F2 SD, 3 fixed free-agents and 2 new-gens free-agents
The three fixed free-agents SD are:
- Karl Wolf
- Anna Barnard
- Jonas Salo
In general F1 key staff are better than their F2/F3 or free-agents counterparts, with a few exceptions.
Key staff also have the new development focus system as drivers, the number of attributes improved by their dev focuses will vary as some staff don’t have as many attributes as drivers (eg. SD have 4 attributes and their dev focuses will improve 2 of those attributes).
Unlike drivers, key staff don’t have development rate which means their experience gain will rely almost exclusively on the level of your Team Hub facility, they also only gain weekly experience and have no race experience gain unlike drivers.
All staff will gain 100 XP per week. The Team Hub facility will give a bonus of 20 % base-XP gain for your staff, up to +100 % at level 5, on the top of that your staff’s morale can give an additional 10% (if they have high morale) or negative 10% (if they have low morale) to the base+facility bonus rate, meaning if you have a staff that has high morale and a level 2 Race Hub, they’ll earn 100 (base) + 40 (race hub) + 14 (high morale bonus) = 154 XP per week.
 In the screenshot above, Enrico Cardile having low morale means he’ll have a 10% reduction to his weekly XP gain.
Free agents gain no XP.
Race Engineer Ratings
Those are the Race Engineer attributes, do note that the Pit Crew Management attribute from F1M 22 has been replaced by Composure (as pit crew management is now under the scope of the new Sporting Director role), this new Composure attribute will affect driver confidence:
Each RE also has a driver affinity attribute depending on the time spent with the paired driver (in weeks) and his communication skill. At the start of the game, the drivers who just joined their team (eg. Alonso, Gasly) have 6 weeks paired with their RE and a low affinity, those who have spent a season with their team (eg. Albon, Bottas) have 52 weeks and a good affinity those who have been with their team two seasons or more have a great affinity. The only outlier is Kevin Magnussen who got a new Race Engineer in the middle of last year and this is reflected in the game.
The driver affinity is more important than ever in F1M 23 because this is what impacts the “shape” of driver confidence bar during race weekends: The higher the affinity, the larger the high and very high confidence bars and the smaller the low and very low confidence bars will be.
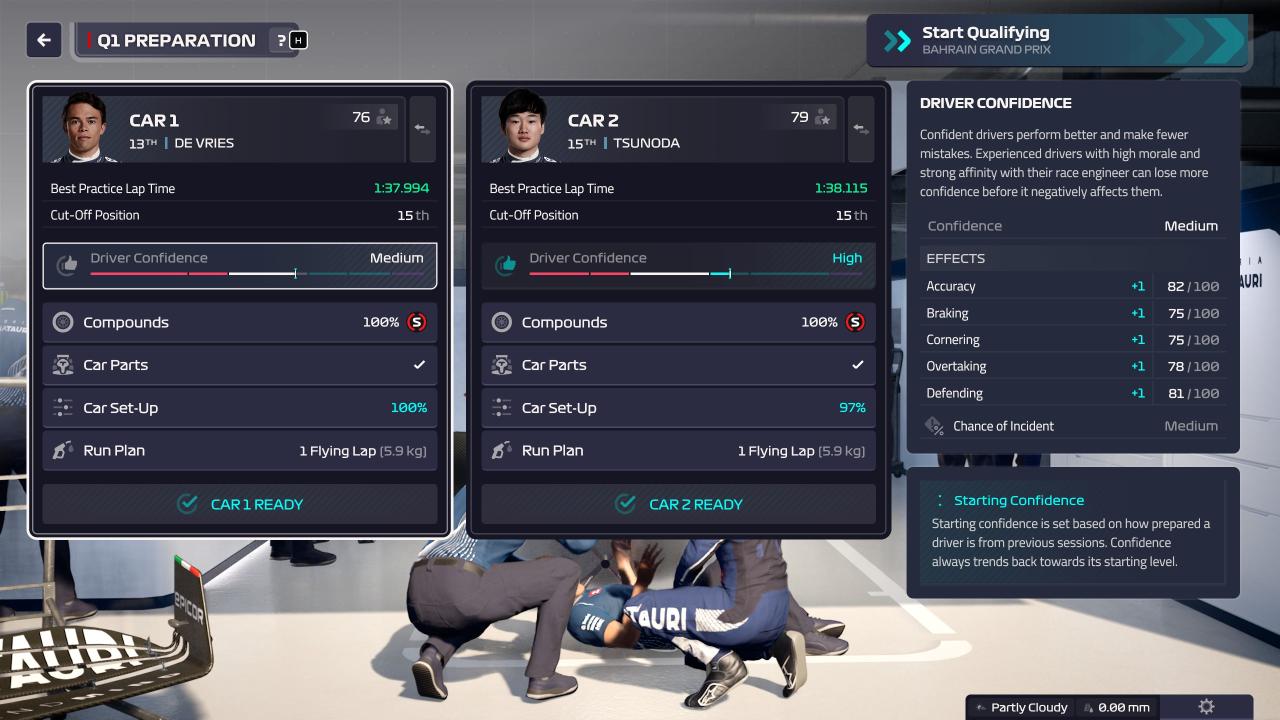 Here’s an example with De Vries (who just joined the team and therefore has a low affinity with his race engineer) and Tsunoda (who has been with the team for 2 years and enjoys a maxed-out affinity with his race engineer). They both have similar race preparation but De Vries has a lower confidence which gives him lower attribute bonuses for the rest of the race weekend.
Race Engineers have 4 development focuses (including Balanced):
Feedback
Composure
Composure
Technical Chief Ratings
Not much to say about Technical Chiefs’ ratings as they are pretty straightforward, each attributes corresponds to a car part, the better the attribute the better the TC is at Developing the corresponding car part:
- Chassis
- Front Wing
- Rear Wing
- Sidepods
- Underfloor
- Suspensions
I haven’t noticed any changes on how they work compared to last year’s game.
Tech Chiefs have 7 development focuses (including Balanced):
Front Wing
Rear Wing
Sidepods
Suspensions
Rear wing
Suspension
Sidepods
Underfloor
Sidepods
Underfloor
Underfloor
Suspension
Head of Aerodynamics Ratings
Same thing as Technical Chiefs, there’s not much to say, Head of Aerodynamics have an impact on car attributes, the difference being each car attribute are affected by different car parts:
- Cooling: Brake cooling (Front Wing and Suspensions) and Engine cooling (Chassis and Sidepods)
- DRS Delta (Rear Wing)
- High Speed Downforce (Front Wing, Rear Wing, Underfloor and Suspensions)
- Medium Speed Downforce (Front Wing, Rear Wing, Underfloor and Suspensions)
- Low Speed Downforce (Front Wing, Rear Wing, Underfloor and Suspensions)
- Drag Reduction (Chassis, Rear Wing, Sidepods, Underfloor and Suspensions)
- Airflow Management: Airflow Front (Front Wing, Sidepods and Suspensions) and Airflow Middle (Chassis and Sidepods)
- Airflow Sensitivity (Front Wing, Rear Wing and Underfloor)
I haven’t noticed any changes on how they work compared to last year’s game.
Head of Aerodynamics have 7 development focuses (including Balanced):
High Speed Downforce
Low Speed Downforce
Airflow Sensitivity
DRS Delta
Low Speed Downforce
Airflow Management
Medium Speed Downforce
Low Speed Downforce
Airflow Sensitivity
Medium Speed Downforce
Drag Reduction
Airflow Management
DRS Delta
Drag Reduction
Airflow Management
Medium Speed Downforce
Drag Reduction
Airflow Sensitivity
Sporting Director Ratings
A new role in F1M 23, the Sporting Director trains the pit crew, allowing it to do faster pit stops and to minimise pit stop mistakes.
Sporting Directors have 4 performance attributes:
The ability to help mechanics reach their full potential. A higher rating means a higher upper limit to the pit crew’s potential skill
The pit crew’s attributes can only improve up to the Sporting Director’s aptitude
The attributes names might not be straightforward but basically:
- Training=Skill and Skill attrition between seasons
- Aptitude=Max potential
- Leadership=Time lost during pit stop mistakes
- Processes=Fatigue
Sporting Directors have 5 development focuses (including Balanced):
Leadership
Leadership
Processes
Processes
From what I can gather with those descriptions, you’ll have to improve the Training attribute if your pit crew has not attained it’s potential, the Aptitude attribute if it has attained or is getting close to it’s potential and the Processes attribute if you are struggling with pit crew fatigue or cannot train it as much as you’d like. I feel that the Leadership attribute can be ignored because if you have pit stop mistakes it is better to minimise their occurrence rather than their consequences. Considering the available focuses, I would use Innovation and Industry standards depending of the situation and only use the two other if the Processes attribute is maxed out somehow.
Appendix: Driver Qualy Pace Test
This part details the test I performed to determine the effect of pace attributes on lap time in a qualifying setting.
- Team: Red Bull Racing, the cars are the same as at the start of the game
- Grand Prix: Bahrain
- Session: Q1
- Runs: 1 run per driver, Verstappen released at about 9 minutes remaining on the clock, Pérez released at about 8 minutes 55 remaining on the clock, this timing was the best to ensure that both drivers wouldn’t encounter traffic during their flying lap.
- Setups and prep: Both drivers had perfect (ie. 100%) setups and a Very High starting Driver Confidence
- Powertrain parts: Both drivers had a 92% engine, a 93% ERS and a 91% Gearbox
The test itself was about comparing the two drivers with different pace ratings to see what were the average lap time gap between them, Verstappen was the “control” driver and was set a rating of 100 for each attribute.
Pérez was the one who would have different rating through the different experiments:
- The first experiment was on Cornering: He was set a 46 rating in Cornering, which would amount to 50 after the bonus was applied (+4 when a driver has a very high confidence)
- The second experiment was on Braking: He was set a 46 rating in Braking, which would amount to 50 after the bonus was applied (+4 when a driver has a very high confidence)
- The third experiment was on Reactions: He was directly set a 50 rating in Reactions as there is no bonus for that attribute from driver confidence.
Ten runs would be performed for each driver, all outliers (eg. lost time due to traffic, which happened sometimes) were removed from the results.
0.444/50=0.00888s per reactions point