Link to a list of all drivers and key staff present in the game with their starting ratings and contracts and a breakdown of all attributes
Link & Introduction
– First version of the F1M24 guide
– The list is still worked on at the time of publishing this guide
https://docs.google.com/spreadsheets/d/1CTNAxzLlrmNgHbs7zvc-dzRiQAYzTAdg6G5r1-9Nyog/edit#gid=0
This document contains ratings and contract details on all drivers and key staff that are currently on the game, I did the exact same thing the previous years and started to compile all the info I could gather as soon as I could for this year’s guide.
I could have just put the link and let you see the data but while doing it I also have made some observations I wanted to share, so I made a few parts detailing those observations, this is not a complete and definitive guide by any means but hopefully it is helpful enough.
Most of the guide has been taken from last year’s guide, some parts have been slightly re-written, and new parts have been added about the new things in the game (mentality, affiliates, contracts).
Maybe I’ll update this guide if there are changes or if I have new discoveries to share, for reference last year Frontier never re-balanced or modified the starting ratings nor did they add any new driver or staff in previous games post-launch, meaning that as long as they are keeping the same philosophy (and as long as I didn’t do any typing mistake in the doc) the ratings and the lists themselves are “safe” and should not change.
General info on drivers
- The 20 F1 race drivers of the 2024 season
- 22 F2 drivers, including those that are affiliated to F1 teams
- 30 F3 drivers, including those that are affiliated to F1 teams
- 26 ‘Affiliates’ that are not racing in either F2 or F3
- 1 free agent
- 5 new-gens (who start as free-agents)
One of the new things of this year’s game are the Affiliate system that replaces the Reserve drivers that we used to have in the previous years:
- Affiliates can hold an affiliate contract AND race in one of the lower formulae at the same time (eg. Andrea Kimi Antonelli is a Mercedes affiliate AND races in F2)
- A team can have up to 10 affiliates at the same time
- A team can run any eligible affiliate in FP1 sessions
The new Affiliate system means that the driver list has expanded compared to previous years, that includes secondary reserve drivers that were not in previous games because of limitations (eg. Shwartzman, Vandoorne, Hirakawa) and also some juniors affiliated to an F1 team who are not racing in either F2 or F3, that includes some drivers racing in lower formulae such as Formula Regional or Formula 4 (eg. Ugochukwu, Nakamura-Berta, Lacorte) and also some (but not all) drivers from F1 Academy (e.g. Pulling, Bustamante, Weug). However some teams have incomplete affiliate line-ups and some drivers are missing (e.g. Pin and the Al Qubaisi sisters in F1 Academy and Mercedes and Red Bull juniors in lower formulae) because of what I assume is licencing limitations.
Finally we have one real-life free agent (James Hedley, who replaced another driver in F3 at Monaco) and five new-gens at the start of each save, new-gens are fictional drivers randomly generated by the game, therefore those 5 drivers should be different in each save.
A number of drivers who were in F1M 23 are not in F1M 24 because they are not involved anymore in either of the licensed championships, however Frontier carried over the previous years’ databases in this year’s game, meaning all the drivers that are in last year’s game are still buried in this year’s database with their previous ratings, and can be added into the game if you know how (but this is not the subject of this guide ;))
There are also a number of names that are hidden in the database for history purposes (either because they appear in previous years results as result history goes a few years back or because they hold a track record), I use the word “names” here because they usually have generic ratings.
Driver Base Ratings
- One simple sheet with just the overall ratings (OVR)
- A more detailed sheet with all attributes for every driver and other details
As a reminder, OVR is not an average of all attributes but that some attributes had more weight than others, I will detail the formula below but if you played one of the previous games just know that the OVR formula hasn’t changed from what I could see.
Drivers also have the same attributes as last year, here’s the breakdown of each attribute :
Most of the attributes are pretty self-explanatory, “Reactions” is basically the “Throttle” skill and “Adaptability” the “wet-weather” skill.
Those attributes can be separated into three categories:
Basically, the “Pace” attributes are what make your driver go fast, the “Consistency” are what make your driver stay on-track and stay consistent over race distance and the “Racecraft” attributes are more situational attributes related to wheel-to-wheel racing or wet weather.
All those attributes are not equal when it comes to calculate a driver’s OVR, some attributes have more weight than others, and the Cornering attribute is the one that has the most weight when calculating a driver’s OVR:
Knowing all that we can determine the following formula to calculate any driver’s OVR:
I also have added weighted ratings for pace, consistency and racecraft attributes in the “Detailed driver ratings”.
You should not read too much into the OVR, despite being weighted it is not necessarily representative of how a driver will perform on-track (eg. someone can theoretically have 75 OVR but 50 Braking, making them essentially useless) and the overall rating will be only indicative of the base attribute ratings without taking mentality into account, but more on that below.
I have to run tests to see what effect has each attribute.
Mentatity
I also need to calculate the exact effects of mentality on attributes, but it seems that it has a significant effect.
Do note that all attribute ratings shown in the detailed ratings table are base attributes, without mentality bonus/penalty applied. This is why the numbers you will see in the various drivers profiles in-game are not the ones you’ll see on my table. However overall ratings are always calculated from base attribute rating values and will never change according to mentality.
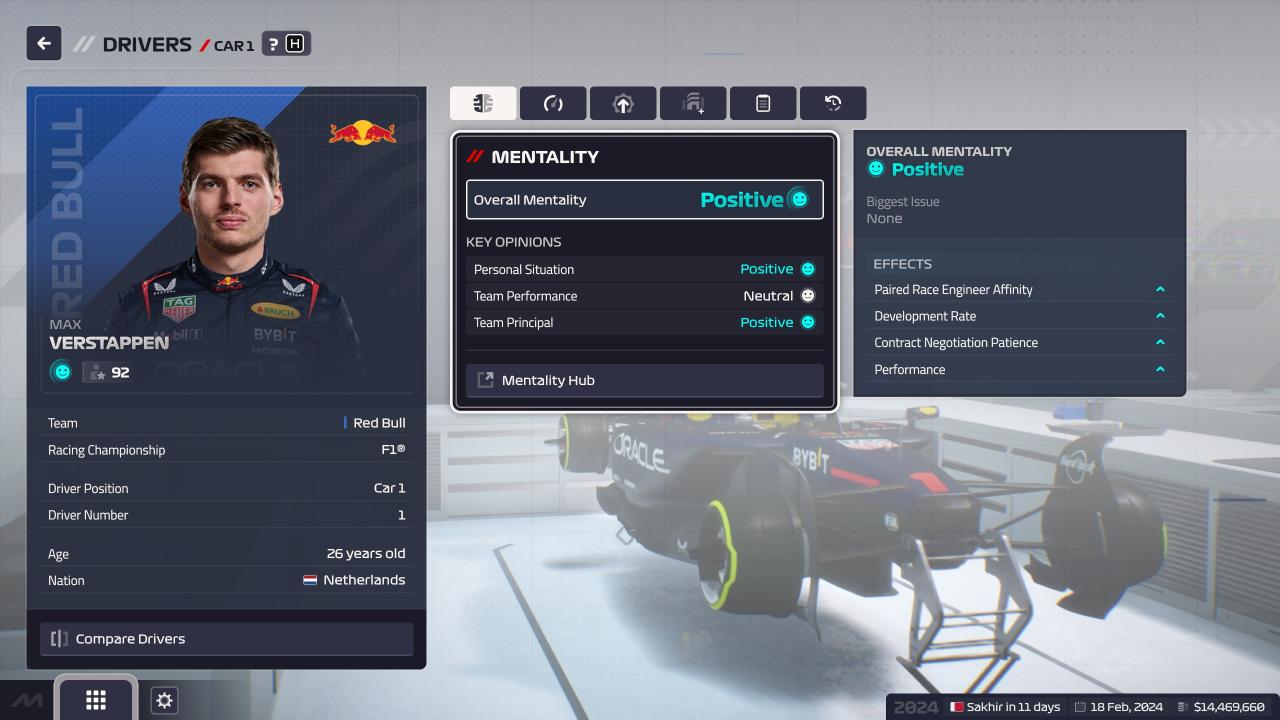
Here for example, Verstappen has a positive overall mentality at the start of the game.
His base stats are :
And here are his stats when his mentality factors in:
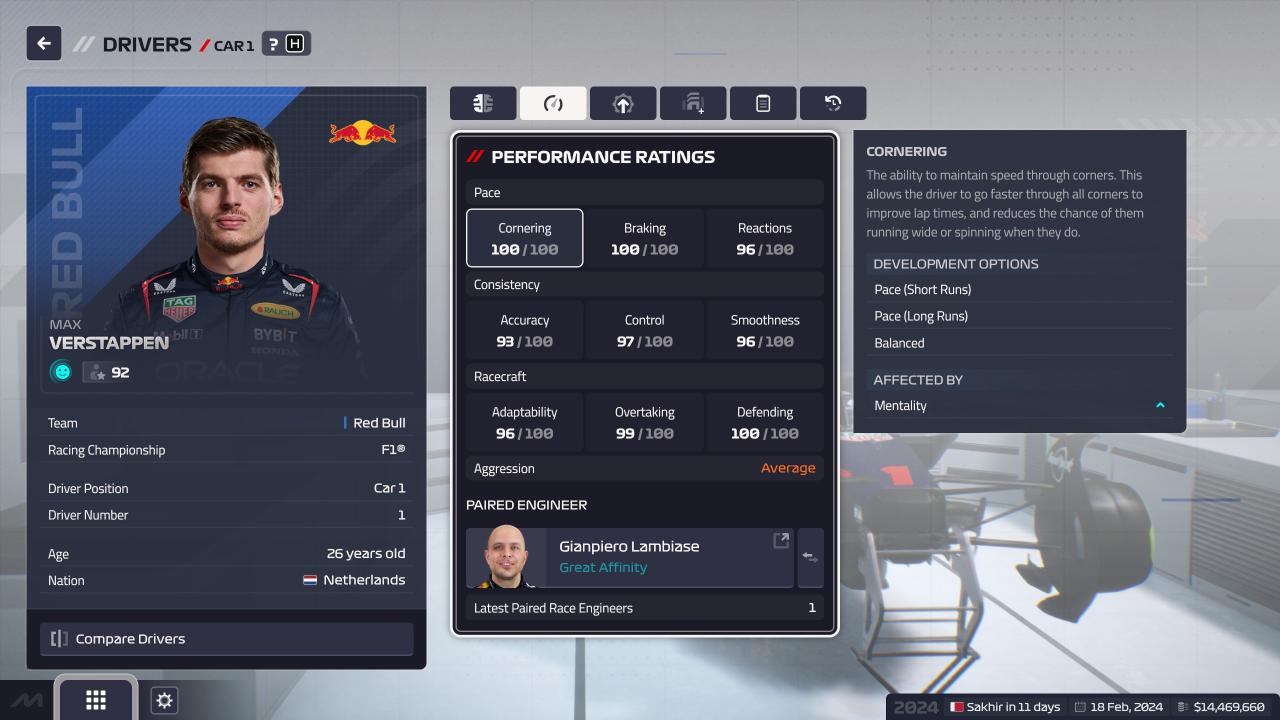
That’s +7 on all attribute ratings, which is huge.

Driver progression
Here are all the Development Focuses available and the attributes they improve:
Control
Overtaking
Defending
Reactions
Smoothness
Adaptability
Braking
Accuracy
Adaptability
Smoothness
Overtaking
Defending
Control
Smoothness
Adaptability
Control
Overtaking
Defending
Development Rate and Aggression are secondary attributes that don’t contribute to a driver’s OVR, they affect respectively driver progression and a driver’s probability to attempt overtakes. Both attributes seem unchanged from last year.
Development Rate and Aggression are both shown on the menus as either “Low”, “Medium”, “High” or even “Very High” now but Aggression and Development Rate actually have numbers hidden under those labels, Development Rate labels have been redone so I have to check what labels match what numbers.
Knowing the underlying is particularly crucial for development rate because this year almost all young drivers seem to have a “High” development rate, but a DR of 76 is not quite the same as a DR of 95.
Like the main attributes it seems that DR is impacted by mentality, meaning that a driver that has a high mentality will progress even faster.
I have to confirm how DR evolves over time. In F1M 23 all drivers lost 6 development rate every year.
Driver confidence
Driver confidence will have an effect on those 5 attributes: Cornering, Braking, Accuracy, Overtaking and Defending, in that order (meaning bonuses will first impact Cornering then Braking, etc.). Being at 0% driver confidence gives -4 to all aforementioned attributes and being at 100% driver confidence gives +8 to all aforementioned attributes.
Driver confidence will increase or decrease during qualies and races, usually because of either of one those 3 things
– Setting a personal best in any sector or lap
– Successfully overtake a driver/Failing to overtake a driver
– Successfully defending his position against another driver/Get overtaken by a driver
The race preparation that determines starting confidence will depend on three factors, all to be build up during the free practices sessions of the weekend:
– Track acclimatation account for 25%
– Car knowledge account for another 25%
– The remaining 50% comes from your car setup.
When you get maximum race preparation (ie. perfect track acclimation, car knowledge and setup) you’ll get 68% of the bar, so your driver will need to do actions on track to get his confidence higher, eventually reaching peak level if all goes well.
Driver confidence will take the form of a bar that has six sections:
– Very low (red)
– Low (red)
– Medium (white)
– High (blue)
– Very high (blue)
– Peak (purple)
While the “peak” section will always take the last 10% of the full bar other sections will depend of your driver morale and the driver’s affinity with his race engineer (I elaborate onto that in the RE section of the guide), both factors have the same effect on the bar, meaning a driver with a maxed out affinity but no morale will have the same bar as the driver who has absolutely no affinity but full morale.
A low combination of those two factors will mean bigger red sections and smaller blue ones, and the other way around if your drivers has max affinity and good morale, meaning a driver with good morale can have a starting confidence that is “Very high” instead of just “High”. So it is important to keep your drivers in good spirits.
A driver with max prep, max affinity but no morale at all will still get a High starting driver confidence which gives +3 Cor, Brk, Acc and +2 Ovt, Def, while having everything maxed out will give a Very high starting confidence and +4 to all five of the aforementioned attributes.
With the new mentality system, I feel like driver confidence might be not as important this year as a positive mentality can compensate a low driver confidence, however it can have a double-whammy effect where a driver with a positive mentality and peak confidence can simply become god-like even with modest base attribute ratings, the same is true the other way around where a top tier driver can become useless with a low mentality and confidence.
Contracts
In general, all contracts have two attributes :
- End of contract date
- Yearly salary
Driver contracts also have bonuses, which will be detailed in its own part.
The new things for this year are the ability for rival AI teams to poach your drivers or staff (they are supposed to be vulnerable to poaching if they have low mentality) and the ability for drivers and key staff to send counter-offers to your offers.
The UI will also now show a little gauge showing how good is your offer.
Breaking contracts and breakout clause
A new thing for this year’s game is that you can negotiate the breakout clause, meaning any other team that would try to poach your drivers would have to pay more to sign them theoretically, however offering a higher breakout clause will decrease the attractivity of your offer.
With the new breakout clause system the formula of the cost of breaking the contract of one of your drivers is now roughly the following:
The formula above won’t give you the exact sum (it is a few $ off and you can see the exact sum for your drivers on the contract menu at any time anyway) but it gives the general idea.
Specific info on Drivers Contracts
The “Driver contracts” sheet tells you the contract situation of every F1 driver at the start of the game.
This is the position of the driver within your team, from what I can see so far it doesn’t seem there’s any difference between Car 1 and Car 2 (apart from the T-Cam colour in-game), so if you want to sign Hamilton or Verstappen to your team and the driver you are looking to replace the driver who is currently driving Car 2 they won’t mind.
Do note that if you promote one of your affiliate driver it will always be at the expense of the race driver you are replacing, the replaced driver will be effectively fired and not demoted to affiliate.
Not all drivers can sign in F1 at the start of the game, in real life drivers need a Superlicence to race in F1 which has a number of conditions to fulfil, and the game has a crude reproduction of that system.
In the game, a driver needs to fulfil two conditions to be eligible to sign for your team as a race driver:
- Be 18 years of age or older
- Have competed in two seasons of either F3 or F2
If you cannot propose a contract to a young driver it will be for one of those two reasons.
You can sign anyone as an affiliate but they need to fulfil both conditions mentioned above to take part to a FP1 session.
Six F2 drivers and Twenty-six F3 drivers are not eligible to race in F1 at the start of the game, you’ll have to wait 2025 or even 2026 to attempt to sign them to your team. However a driver will be considered to have “competed” in a season if they took part to at least one round, meaning drivers in their second year in F2/F3 can become signable after the first round of the season.
Ineligible drivers cannot be chosen in the Create-A-Team mode, only eligible drivers are selectable for your custom team.
In addition of salary and duration you also can negotiate bonuses for drivers, there are two kind of bonuses:
- A signing bonus, that will be payed only once when signing the driver
- A race target bonus, which is accompanied by a position threshold, which will be payed every time the driver finishes a race in the position mentioned or better
Of course I would advise against giving bonuses if you can avoid it, especially race bonuses, and if you really have to only give the highest position and lowest bonus you can get away with.
General info on key staff
- A Technical Chief (TC)
- A Head of Aerodynamics (HOA)
- Two Race Engineers (RE), one for each driver
- A Sporting Director (SD)
For all key staff the OVR is the average value of all their attributes.
The roster of RE contains 72 RE in total: 20 being in F1, 22 in F2 and 30 in F3 (1 per car basically), there are no free agents RE at the start of the game.
TC and HOA have each 13 people in their roster at the start of the game:
- 10 in F1
- 3 free-agents that are new-gens (ie. randomly generated)
SD have 26 people in their roster at the start of the game, including:
- 10 F1 SD
- 11 F2 SD
- 5 free-agents that are new-gens (ie. randomly generated)
Key Staff progression
Key staff also have the new development focus system as drivers, the number of attributes improved by their dev focuses will vary as some staff don’t have as many attributes as drivers (eg. SD have 4 attributes and their dev focuses will improve 2 of those attributes).
Unlike drivers, key staff don’t have development rate which means their experience gain will rely almost exclusively on the level of your Team Hub facility and their mentality, they also only gain weekly experience and have no race experience gain unlike drivers.
All staff will gain 100 XP per week. The Team Hub facility will give a bonus of 20 % base-XP gain for your staff, up to +100 % at level 5, on the top of that your staff’s morale can give an additional XP-boost if they have high mentality, I have to check how much that bonus amounts, last year, a high-morale gave a 10% boost.
Free agents gain no XP.
I haven’t noticed changes on how key staff work compared to last year’s game in general, but like drivers I suspect they will be significantly affected by the new mentality system.
Race Engineer Ratings
Each RE also has a driver affinity attribute depending on the time spent with the paired driver (in weeks) and his communication skill. At the start of the game, the engineers who just joined their team (eg. Benisi/Zhou) have 6 weeks paired with their driver and a low affinity, those who have spent a season with their team (eg. Stallard/Piastri, Cronin/Alonso) have 58 weeks and a good affinity those who have been with their team two seasons or more have a maxed out affinity. Some outliers who changed race engineers mid-season might be in-between.
The driver affinity is important because this is one of the two factors (with mentality, both have the same impact from what I can see) that impacts the “shape” of driver confidence bar during race weekends: The higher the affinity, the larger the high and very high confidence bars and the smaller the low and very low confidence bars will be. The good news is that it grows faster than the starting affinities suggest and you should be able to max out the affinity of any driver/RE pair in less than a season even if your RE doesn’t have a great communication rating.
Race Engineers have 4 development focuses (including Balanced):
Feedback
Composure
Composure
Technical Chief Ratings
- Chassis
- Front Wing
- Rear Wing
- Sidepods
- Underfloor
- Suspensions
Tech Chiefs have 7 development focuses (including Balanced):
Front Wing
Rear Wing
Sidepods
Suspensions
Rear wing
Suspension
Sidepods
Underfloor
Sidepods
Underfloor
Underfloor
Suspension
Head of Aerodynamics Ratings
- Cooling: Tyre preservation (Front Wing and Suspensions) and Engine cooling (Chassis and Sidepods)
- DRS Delta (Chassis and Rear Wing)
- High Speed Downforce (Front Wing, Rear Wing, Underfloor and Suspensions)
- Medium Speed Downforce (Front Wing, Rear Wing, Underfloor and Suspensions)
- Low Speed Downforce (Front Wing, Rear Wing, Underfloor and Suspensions)
- Drag Reduction (Chassis, Rear Wing, Sidepods, Underfloor and Suspensions)
- Airflow Management: Airflow Front (Front Wing, Sidepods and Suspensions) and Airflow Middle (Chassis and Sidepods)
- Airflow Sensitivity (Front Wing, Rear Wing and Underfloor)
Head of Aerodynamics have 7 development focuses (including Balanced):
High Speed Downforce
Low Speed Downforce
Airflow Sensitivity
DRS Delta
Low Speed Downforce
Airflow Management
Medium Speed Downforce
Low Speed Downforce
Airflow Sensitivity
Medium Speed Downforce
Drag Reduction
Airflow Management
DRS Delta
Drag Reduction
Airflow Management
Medium Speed Downforce
Drag Reduction
Airflow Sensitivity
Sporting Director Ratings
Sporting Directors have 4 performance attributes:
The pit crew’s attributes can only improve up to the Sporting Director’s aptitude
The attributes names might not be straightforward but basically:
- Training: Skill and Skill attrition between seasons
- Aptitude: Max potential
- Leadership: Time lost during pit stop mistakes
- Processes: Fatigue
Sporting Directors have 5 development focuses (including Balanced):
Leadership
Leadership
Processes
Processes
Pit crew attributes
I made a pit crew attributes sheet on the doc, all the visible attributes seem to start between 50 and 60, which means they’re still quite far from their sporting director’s aptitude rating (which is the attribute that limit their potential).
Most attributes will have an effect on pit stop mistakes rather than pit stop time, pit stop time seems to depend on a hidden speed attribute. Each speed point seems to give about 0.028s on pit stop time at the level where all pit crews sit around at the start of the game but it seems to have diminishing returns as the lowest pit stop time that you can theoretically achieve is 1.799s with a maxed out speed attribute.
Lastly fatigue will have an effect on pit stop mistakes chances, a tired pit crew will give a small penalty on mistake chances (less than a percent usually, which might not even be noticeable), but from weary onward the penalty becomes much bigger (about 20%) and even bigger (about 45%) when the pit crew is exhausted. Pit crew fatigue also reduces the gains made from training.