
You’ve got 42 achievements to claim, and the game won’t hand you a single one for free. The path from your first shovel strike to that final 300,000th block is a mix of careful depth management, obsessive fossil hunting, and at least one session of staring at the screen while your drill does the work. This guide maps every unlock condition, every hidden trigger, and the most efficient way to burn through the grind so you don’t waste time digging in the wrong dirt.
Overview
Diggin’s achievement list splits into four natural categories: progression, collection, cumulative mining, and hidden actions. The progression set covers discovering every ore type and reaching every depth layer — 19 achievements that form the backbone of your playthrough. Collection achievements demand you find fossils and artifacts, which require specific equipment management and a sharp eye in the late game. The cumulative mining achievements ask for raw block counts, and the hidden ones require specific, often unintuitive actions. This guide treats each category in the order you’ll encounter them, with exact numbers and strategies for the grind.
Progression Achievements: Ore Discovery & Depth Layers (19 Achievements)
Ore discovery is straightforward but requires patience. You need to find ten standard ores and three interstellar ores. The standard ores appear in sequence as you dig deeper: Stone, Silver, Gold, Rock Candy, Aluminum, Platinum, Iridium, Ruby, Emerald, and Diamond. Each unlocks an achievement the first time you break a block containing it. The interstellar ores — Starcrust, Starstone, and Starmetal — only appear in the deepest layers, after you’ve reached Density 8 or below. You won’t miss them if you keep digging, but they don’t show up early, so don’t panic if your inventory is empty of them for hours.
Depth layer achievements track your descent through ten densities: Gravel, Stone, Slate, Greenslate, Coldrock, Shinestone, Magmite, Sulphurite, Stellstone, and Astrofer. Each layer has a distinct visual and texture, and you’ll know you’ve entered a new one when the background shifts and the blocks change color. These achievements pop automatically as you break through the boundary between layers. The key is to keep a steady downward path — don’t waste time digging horizontally unless you’re hunting for a specific ore. A straight vertical tunnel will hit all ten layers in about 45 minutes of focused play.
Collection Achievements (6 Achievements)
Fossils and artifacts are scattered throughout the dirt, and they don’t show up on any map. The Paleontologist achievements require finding 1, then 8, then all fossils. There are more than 8 fossil types, but the achievement triggers once you’ve discovered every unique one. The final fossil slot doesn’t unlock until late in the game, so don’t panic if you’ve been digging for hours and still haven’t seen it. Keep your equipment slots free — you’ll need to swap between a drill, a pickaxe, and a detector to spot fossils in the first place.
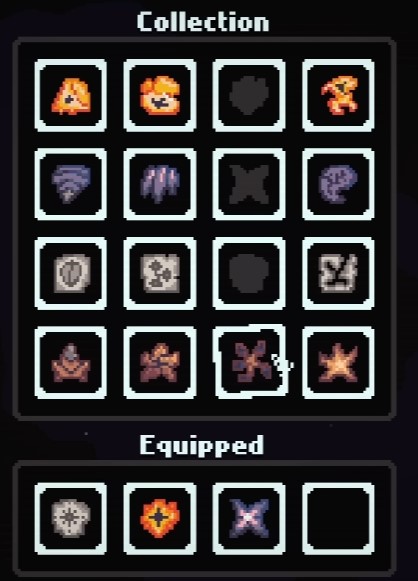
Artifacts are similar but trickier. The Archeologist achievements ask for 1, then 8, then all 9 artifacts. The late-game problem is visual clutter: as you dig deeper, the screen fills with particles, explosions, and fast-moving debris. Your character also speeds up, making it easy to zip past an artifact without noticing it. Enable half-speed mode in the settings and use collision detection — your character will bump into artifacts instead of passing through them. This turns artifact hunting from a frustrating pixel hunt into a reliable collision-based sweep.
Cumulative Mining Achievements (5 Achievements)
Mining Master requires 300,000 blocks. The original target was 1,000,000, but a patch cut it by more than two-thirds. By the time you finish the main game — all ores, all layers, all fossils and artifacts — you’ll have mined roughly 38,000 blocks. That leaves about 262,000 to go, and manual digging will take hours of repetitive work.
The efficient solution is the Explosion AFK method. Equip the best explosive drill you have, find a spot in Density 3 (Slate) or Density 4 (Greenslate), and start placing explosives in a grid pattern. Each explosion clears a radius of blocks, and the chain reactions can clear hundreds of blocks per minute. Set up a macro or simply hold down the action button while watching something else. Each session yields about 3,000 blocks, so you’ll need roughly 87 sessions to hit 300,000. That sounds like a lot, but it’s about 15 hours of passive farming — far better than the 100+ hours manual digging would take.
Special & Hidden Achievements (12 Achievements)
These are the achievements that won’t happen naturally. Overdrive Space Program (7.0% unlock rate) requires you to use the extremely low gravity and overdrive thrust in Stage 1. Launch yourself straight up — not at an angle — and you’ll break through the top of the map. It takes a few tries to get the timing right, but once you do, the achievement pops immediately.
LISAN AL-GAIB! is a Dune reference. You need to summon or encounter a super-powerful sandworm. This happens randomly in deep layers, but you can force it by staying in one spot and digging continuously. The worm appears after you’ve broken a certain number of blocks in a single area. It’s loud, it’s destructive, and it’s the only way to get the achievement.
Overkill demands extreme single-hit damage. Stack damage upgrades, use the strongest explosive, and hit a cluster of blocks. The exact threshold isn’t stated, but a full-power explosion in Density 1 or 2 will usually trigger it.
Diggin Rejected is the easiest hidden achievement. Consume 100% of your fuel or endurance without breaking a single block. Start a new game, stand still, and let the fuel drain. That’s it. You don’t even need to move.
KABOOOOOOOM triggers the first time you create a chain explosion. You’ll get this naturally while farming blocks, but if you haven’t, place two explosives close together and detonate one. The chain reaction will handle the rest.
The remaining hidden achievements — Meteor Larp, Starmetal Trophy, and a few others — have specific triggers that are easy to miss. Meteor Larp requires you to be hit by a falling meteor while mining. It’s rare, but standing still in the upper layers for a few minutes usually attracts one. Starmetal Trophy requires you to collect a piece of Starmetal ore without using a drill — you have to pick it up by hand after an explosion. It’s a one-frame window, so use half-speed mode and keep your eyes open.