Guide to get you started on understanding the game, also explaining the basics of the character Minogame, often regarded as the easiest character to play with at the beginning.
Introduction
I am not going to go over any in-depth scoring mechanics or specific strategies for stages and bosses, this is simply to get you started. More detailed info can be obtained from the manual (found in <Hellsinker folder>/instruction/guide_en.htm) or this thread[shmups.system11.org] (contains spoilers past a certain point, though it has a warning).
I also recommend this guide[hsmanual.web.fc2.com] (from which I was partly inspired by after translating it), which contains the same information that is here but it’s much more expanded and detailed (though it’s also quite long), still remaining a guide for beginners without going into too many technical details.
As sources I’ve used the sites mentioned above, plus the Japanese Hellsinker wiki[w.atwiki.jp], the game’s manual, and the game itself.
Basic Mechanics
Generally speaking, there are 4 main keys:
- Main shot / Confirm
- Subweapon / Back
- Discharge
- Slow
I might refer to them as A/B/C/D respectively for convenience’s sake.
Their functions will be introduced later since they can get rather complex and are dependent on a variety of factors.
You can configure key bindings through the “Pad assign” option in the game launcher.
There are 3 extra buttons, which are:
- Pause
- Retry
- Quit (return to menu)
Besides from Pause, you might not use the other 2 very much, though they do have their useful features.
Holding Retry for 1 second while having entered the game from SEGMENT LOCATION (explained in “Settings and Unlockables” section under “Main Menu unlockables”) restarts that Segment (or boss) from the beginning.
Holding Quit for 1 second while in-game ends your run. It’s also used in SEGMENT LOCATION.
Also, pressing Alt or F10 while in-game freezes the screen and keeps playing the music. Basically like pause but without the pause menu. Pressing it again resumes the game.
At the start, there’s 4 options in the main menu. There’s explanatory text at the bottom, but basically they are:
- FULL SEQUENCE ORDER: Start the game
- TUNING DIPSW: Settings
- ACHIEVEMENT OF EXECUTORS: Scores
- AWAY: Quit
I’ll explain FULL SEQUENCE ORDER (namely, the settings screen that comes up right after it) and TUNING DIPSW in detail later.
Pressing left/right in this menu (and a couple of other submenus as well) changes the selected character, their name displayed at the bottom in yellow.
Both Dead Liar and Kagura have parameters that can be cycled through by pressing the Pause button while having them selected. In Dead Liar’s case it changes his Mistletoe, while in Kagura’s case it changes its armament i.e. the actual character you’re going to use.
For more information see the respective characters’ manual pages.
Pressing B while having FULL SEQUENCE ORDER highlighted opens the replays screen corresponding to the character you currently have selected.

This piece of UI appears at the top of the left sidebar.
LIFE MAX indicates the number of maximum lives you can hold at any given time, NECESSARY indicates the number of Life Chips you need to get an extra life, and the hearts at the bottom show, obviously, your lives.
What are Life Chips you ask? They are these little items:
![]()
They’re dropped by enemies and from some other places, and like I said, when you get enough of them you get another life.
Each time you get a 1UP through this method the amount of NECESSARY Life Chips increases, so it’ll probably get harder to get each subsequent life.
There are some ways to reset NECESSARY to its base value or to decrease it, but I won’t go in detail here.
By the way,

this item is called Revive, and it gives you a whole life instantly. It’s generally dropped by some bosses under particular conditions.
As an additional note, let’s talk about Continues.
In Hellsinker, you can only use a single Continue, and this is not something you can change or disable. Using Continue will change the structure of your run, skipping some stages and, most notably, not letting you fight the final boss. There’s probably other minor changes as well, but these are the most important.


Hold right and press A to Continue
Also, after you’ve gone through the Shrine of Farewell (explained under “TERRA” in the next section), you can’t use Continue anymore, so if you run out of lives in any stage after it, you will get a game over regardless of whether you used Continue or not previously.

You can skip the game over screen by pressing Pause
Generally speaking, pressing A shoots normal bullets, pressing B activates the ship’s own unique subweapon(s), and pressing C activates Discharge aka bomb. These functions greatly differ per ship so you shouldn’t take them at face value, but they do tend to share their connections to the main gauges on the left sidebar.
SOL
![]()
This gauge generally goes from 1 to 5, and the higher it is, the more damage your main shot deals.
Additionally, if it gets to a certain level and starts flashing in orange (generally at level 3) you can use Discharge. Discharge is a powerful attack that generally makes you invincible for a few seconds, similar to bombs in most shmups.
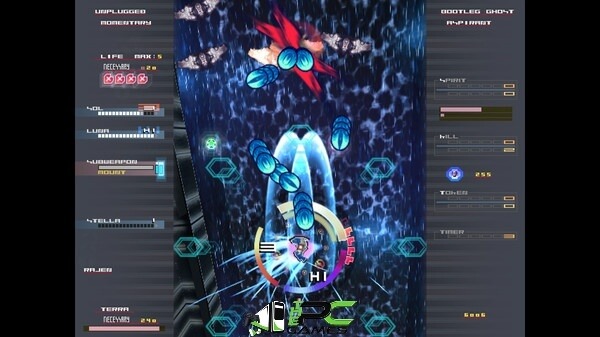
Your current SOL is shown as a big circle made up of smaller circles around your character if it’s at 3 or above.

The amount of bigger circles indicate the current level of SOL (4 in the picture).
LUNA

LUNA generally has LO/MI/HI levels, and the higher it is the higher your rate of fire will be. It generally decreases when you use the main shot, so you’re forced to keep a good balance between attacking and standing by or defending.
SUBWEAPON
This has 2 levels, indicated by the notches on the side and the colors of the bar. The second level is generally stronger than the first, many times being a completely different attack from the first. Needless to say, using subweapon consumes this gauge.

Lv. 0 (cannot use Subweapon)

Lv. 1

Lv. 2 (max)
Additional info
All these gauges recharge over time, unless you are doing an action that decreases them (something that depends on how each ship works).
There’s also items you can pick up to replenish your SOL and LUNA.
![]()

The SOL items are just those little S squares, but there’s a variety of LUNA items and in different sizes, though they’re all some kind of purple crystal.
Remember that SOL, LUNA, and SUBWEAPON don’t act or work in the same way for all characters; consider this section a generalization.
PS: You can visualize these gauges around your character without having to look at the sides by going into Info augmentation from the game’s launcher and setting the relevant options.


This is the Vortex + Variant Segmented combination, looks pretty cool.
Special Mechanics
If you’ve played a bit already you might’ve noticed the blueish circle that appears around your character. This is called Supression Radius and its main function is slowing down and (sometimes) destroying bullets that enter it.

The conditions by which it activates differ depending on the character and a particular setting (more on this in the Setup Menu section), but generally, it’s while you’re holding A and/or while you’re idle (doing nothing other than moving).
It’s very useful if you’re not that good at dodging, though sometimes it can make dodging more difficult by creating walls of bullets through which you can no longer get through, so use it carefully.


A bullet’s shape determines whether it can be slowed or destroyed with Supression. For more information, check the “Target bullets” section in the manual.
Bullets may also drop items when destroyed.
When approaching some enemies or enemy parts, a SEAL icon will appear on top.

It means this enemy/part won’t attack as long as the icon is on top of it. So instead of having to deal with enemy fire, you can make it so they don’t fire at all and save yourself some hassle (for example, you could be on top of the screen and SEAL enemies as they come down).
Not everything is SEALable, but a lot of things can, including bosses or boss parts.
STELLA is basically the equivalent of “rank” in other shmups, a stat that the higher it gets, the harder the game gets (and viceversa when it lowers), increasing the better you play the game and decreasing the more you die. Making the game harder means changing enemy/bullet patterns, though there are apparently situations in Hellsinker where having lower STELLA actually makes it harder.

STELLA gauge on the left sidebar
The main difference in Hellsinker is that it can be increased or decreased through specific STELLA items.
![]()
![]()
These two generally appear in pairs, one of each. The green one increases STELLA and the red one decreases it. Unless you’ve got some specific reason you should probably focus on getting the red ones.
![]()
These generally drop when you die, and increase STELLA.
At death, your STELLA decreases. These let you recover the STELLA that you lost when dying, so you can keep STELLA at a stable level and therefore stabilize enemy patterns.

This one is pretty convoluted, but basically, it decreases as you die or other bad things happen, and if it reaches 0, the stage next to the one you’re in right now will be the Shrine of Farewell, which is a special boss rush where you can’t die, and at the end you’re rewarded with certain items that increase depending on your performance in the stage and give you extra lives.
I’d recommend reading the manual for more information (and playing once and getting far enough to see the Shrine, it’s probably always going to appear, and soon enough if you die a lot).
Just adding this subsection as a disclaimer: I won’t be explaining the stuff on the right side. These are all related to scoring and such, and not only do I have no idea about this, but it’s also not important to simply being able to play. For more information you can refer to the manual or the strategy guide I linked earlier (the tutorials also have some explanations about these).
Minogame
This means that in total, there are 7 characters.
However, due to its ease of use, it is highly recommended that you use Minogame first, at least until you unlock KAGURA, since by that point you’ll have gotten more used to the game and you’ll also have a broader selection of characters to pick from that might fit your style or skills better.
Dead Liar and Fossil Maiden are much more complex than Minogame, which is why Minogame ends up being recommended initially.
Once you think you’re ready, feel free to try out other characters and study them.
Characters in Hellsinker generally have a relatively wide amount of different attacks at their disposal, much greater than the amount of buttons you use to activate these (A/B/C). These are achieved not only by pressing those buttons individually, but also by other factors such as how you press the button, whether you’re pressing another button at the same time, how long you press them, etc. Basically, you can think of it kind of as Smash Bros.
Going in blind to try out a character in-game might end up confusing you, but luckily, the manual has detailed descriptions for all of the attacks for each character. Here’s Minogame’s sheet as an example:

I recommend trying out characters in the training mode (PRACTICE CHAMBER > MEASURING INSTRUMENT starting from the main menu) before actually going in-game.
Minogame has around 8 different skills/attacks, but the most useful (or the ones you should focus on for now) are around half of that.
Nirvana
Input: Press B while holding A at Subweapon Lv. 2 (having 2 notches on the Subweapon gauge)
This is the attack that will help you the most by far.

It launches this circle in front of you which damages enemies that it touches, and when you’re inside it it makes you invincible, so you can spam it a lot to completely ignore hard patterns. Having this lets you progress through the first few stages without having to worry much about what you’re doing.

Invincible inside
It lasts around 2 seconds, and after it disappears it takes a similarly short time to recharge the Subweapon gauge to the max, meaning you can use it pretty frequently.
Forbidden Shell
Input: Hold A then release
While holding A, a bar charges on top of Minogame.

When you release A, Minogame starts spinning and dealing damage around it in the form of a purple aura.

The time this attack lasts depends on how long you held A for i.e. how full the bar was.
If you tap A repeatedly while Minogame is spinning, a stronger version of the attack is activated, reducing the attack has left but increasing damage and the size of the aura.

After tapping repeatedly
Discharge
Input: Press C at SOL 3 or more
This is basically like a normal bomb. It shoots a bunch of rays across the screen and makes you invincible while it’s active.
Its damage and the time it lasts increase according to the SOL you had when activating it, though your SOL is reset back to the minimum afterwards.
Reality Hedge
Input: Press B at Subweapon Lv. 1
Shoot some small purple guided missiles. The Lv. 2 version is basically a better version of this.
Naraka/Hell
Input: Press B at Subweapon Lv. 2
Shoots guided dark beams that stay inside enemies dealing damage. If they destroy an enemy, they jump outside and into another enemy, or stay off-screen until an enemy appears then jump inside it. Of course, they can only stay a limited time on the field.
Nimbus Cluster
Input: Press B while holding A at Subweapon Lv. 1
Shoots some purple clouds on a short range that stay for a few seconds while slowly advancing forwards.
Main shot
Input: Tap A
You shouldn’t use this since it decreases your Subweapon gauge (rendering you unable to use Nirvana instantly) and it also doesn’t let you use the A-Hold attack, though it probably has its uses past beginner level.
You might’ve guessed this by now, but the way you’re going to use Minogame is shooting Nirvana into enemies, then going inside the circle while approaching enemies and hitting them with Forbidden Shell. Rinse and repeat.
If you think you’re safe you can also throw some Naraka in there which is pretty powerful.
Another important thing is that you can create a combo to sustain invincibility for quite a long time by doing Nirvana->Discharge->Nirvana. Basically, you throw a Nirvana, and when it’s about to disappear, you activate Discharge. By the time Discharge is over you’ll be able to use Nirvana again, therefore being able to avoid attacks for a handful of seconds.
Setup Menu

You select an option on each section with up/down and confirm and go to the next section with A (Shot).

This lets you configure the behavior of the Slow function.
- AUTOMATIC: Slow while holding down A.
- MOMENTARY: Slow while holding down D.
- ALTERNATIVE: Alternate between Slow/Fast speeds each time you press D.
- TRIPHASE: Same as above but with an additional Middle speed.
I like to use ALTERNATIVE since it gets hard at times to manage so many buttons at once, and this lets you leave it on Slow when you have to dodge a lot.

This lets you set the maximum number of lives you can hold at a time, indicated by the yellow number at the left of each option.
I’m not sure what the advantages of setting a lower number are, though it’s probably somewhere in the manual.

This one gets a bit more complicated.
This option is related to both the “autobomb” function and to the behavior of your Supression Radius. I say autobomb but in truth the only thing it does is cancel a hit you receive, destroy some nearby bullets, and give you a bit of invincibility time. However, it does not activate Discharge, so don’t confuse it for more conventional autobombs.
This can be triggered only 3 times per stage.
The first two options, ASPIRANT and SOLIDSTATE, have regular Supression Radius, where it activates by being idle as well as holding A. ADEPT removes this capability, letting you only activate it by holding A. However, the time it takes to activate it with ADEPT is much shorter than with the other 2 options.
- ASPIRANT: Cancel hits only when your SOL is at the max level and when your lives are below their starting number (4).
- SOLIDSTATE: Cancel hits whenever your SOL is at Discharge level (i.e. 3 most of the time).
- ADEPT: Can’t cancel hits.
An additional note regarding ADEPT with two certain characters:
FOSSIL MAIDEN cannot normally activate Supression by idling or holding A, and this doesn’t seem to change by using ADEPT.
However, Chirijinmu/KAGURA1, who can’t normally use Supression while holding A (but can while idling), trades the idle Supression for A-hold Supression, which might make ADEPT a useful choice in this case, depending on your usage.
Settings and Unlockables
Entering this screen gives you 3 options, GENERAL, VIDEO, and SOUND (and exit). You can imagine what’s inside each of these.
Tip: pressing A in any of these submenus cycles to the next one.
This screen lets you configure both the Setup Menu and the way STELLA works.
CUSTOMIZE MENU METHOD changes the behavior of the Setup Menu based on its setting.
- SETUP MENU[ACTUAL]: Show the Setup Menu with set to its initial values every time.
- SETUP MENU[FORMAL]: Show the Setup Menu with its values set to the ones below.
- BASED ON DIPSW: Skip the Setup Menu and use the values set below.
Below it you have all 3 Setup Menu settings that you saw before, and you can change them when using FORMAL or BASED ON DIPSW.
Useful if you don’t plan on changing around these settings every time you play.
LEVEL lets you set how STELLA works.
- UNPLUGGED: Normal setting.
- LIMITED: Minimum of STELLA Lv.1 and maximum of Lv.6.
- COMPRESSED: Minimum of STELLA Lv.4 and maximum of Lv.A (basically Lv.10).
- DISTORTED: Minimum of STELLA Lv.7 and maximum of Lv.A.
Basically, it’s a difficulty setting. No problem with leaving it at UNPLUGGED.
CAPTION
Controls the dialogue text that shows up in game, mostly for Dead Liar who has a lot of dialogue; there’s very few occasions where other characters have this kind of dialogue.
- WITHOUT ALWAYS: Never show dialogue.
- AT REPLAYING: Show dialogue only on replays.
- WITH ALWAYS: Always show dialogue.
INTERMISSION MONOLOGUE
Controls the “novel” sections that appear sometimes in between stages (these are skippable by pressing C anyways).
- TALK: Show.
- SILENT: Don’t show.
CORE SIGN
Controls whether to show the player’s hitbox. Recommended to enable.
- SHOW: Show.
- HIDE: Don’t show.
BACKGROUND DISTINCTNESS
Controls the clarity of the in-game background. Goes through MIN, 25, 50, 75, up to MAX. MIN makes the background plain black, while the closer it is to MAX the clearer the background will appear.
INV VISUALIZER
Changes the colors of the entire screen when you’re invincible (a transparent purple overlay or something). Whether this is enabled or not, your character always turns white when it’s invincible. However, you might not notice your sprite all the time, so this is recommended to make it clearer when you’re invincible.
- WITH: Enabled.
- WITHOUT: Disabled.
COMMON HIT SPARK
Controls the visual effect that shows when your bullets hit enemies. There’s other effects independent of this setting, but this effect is the same on all enemies for all bullets (therefore “COMMON”, since it’s shared across everything).
- WITHOUT: Disabled.
- SMALL: Small effects appear where you hit an enemy.
- SMALL STRUGGLE: Small effects that also quickly appear in random positions near the hit position, to give it a more flashy feel.
- LARGE: Large effects.
- SMALL STRUGGLE: Same as SMALL STRUGGLE but with the larger version.
This is affected by the option in “Info augmentation” that says “Newer Hitmark” changing the effects by deeper bluer ones that are also bigger.

COMMON FIRE SPARK
Similar to the previous option, though this one controls a shared effect for when enemies fire bullets, showing in the place where the bullets were fired from.
- WITHOUT: Disabled.
- FIXED SIZE: Enable; always shows at the same size.
- VARIABLE SIZE: Enable; size depends on the initial speed of the bullet.
I’m not entirely sure how SPIRIT GAIN DISP and RESULT GRAPH work so I’m not explaining them, though you can probably find out what they do by the in-game subtitle explanation and from the manual.
These are pretty self-explanatory, but I’ll shortly describe them.
- VOLUME-MASTER: Master volume control.
- VOLUME-BACKGROUND: Music volume.
- VOLUME-SOUND EFFECT: SFX volume.
- SW CHARGED ANNOUNCE: Enable/disable SFXs that play when the Subweapon gauge is charged to each level.
- DC STANDBY ANNOUNCE: Enable/disable SFX that plays when your SOL reaches enough level to use Discharge.
- SPIRITS CYCLE ANNOUNCE: Enable/disable SFX that plays every 1 million SPIRIT you get.
- KILL CYCLE ANNOUNCE: Enable/disable SFX that plays every 100 KILL you get.
After clearing Segment 4 using no continues, you’ll unlock KAGURA along with the SEGMENT LOCATION option in the main menu. This option is the classic stage select option. Stages here generally become available to select after you’ve gotten to and beaten that stage using no Continue, though there seem to be some exceptions.
Pressing C while having the cursor on a stage takes you to that stage’s boss, so you can both practice the entire stage or just its boss.
Also, pressing B will take you to the replays screen for that Segment, and the Quit button (an extra button configurable from the launcher) will take you to the replays screen for that Segment’s boss.
After reaching Segment 8 (possibly no need to clear, nor any special continue conditions), you’ll unlock the SHORT MISSION option. This lets you play only 5 stages instead of all 8, and beating the final boss here unlocks the same things as beating it on FULL SEQUENCE ORDER. Additionally, this also unlocks stages on SEGMENT LOCATION if you beat them without using Continue.
There’s a number of other unlocks and changes, but I’ll leave those as a surprise and let you explore them by yourself.
Summary
- Practice with Minogame before using other characters until you get used to the game.
- Change character by pressing left/right on the main menu.
- Practice a character’s moves and the like by going into PRACTICE CHAMBER from the main menu then to MEASURING INSTRUMENT.
- If your character looks all white (or black with certain filters) then it’s invincible during that time.
- Ignore the right sidebar (SPIRIT, KILL and TOKEN gauges, etc.).
- Set the Setup Menu to: MOMENTARY/ALTERNATIVE, PRUDENTLY, and SOLIDSTATE.
- You can only use one Continue, or none if you’ve visited the Shrine of Farewell. Continue leaves you unable to fight the final boss, and skips certain stages.
- Try out other characters after unlocking KAGURA i.e. after beating Segment 4 using no Continue.
- Change Dead Liar’s Mistletoe and KAGURA variations by pressing Pause while having them selected.
- Read the character sections in the manual to know more about each character and all of their moves.
- You can beat the game by doing SHORT MISSION instead of FULL SEQUENCE ORDER (without using Continue).
- If there’s something you don’t understand or want to know that isn’t in this guide, read the manual (<Hellsinker folder>/instruction/guide_en.htm).
Keep your dignity.
Glossary
- SOL: Bomb gauge
- LUNA: Rate of fire
- STELLA: Rank
- DISCHARGE: Bomb
- SEGMENT: Stage
- SUPPRESSION RADIUS: Shield
- TARGET: Enemy
- EXECUTOR: Player character
- MISTELTOE/MISTLETOE: Option
Written by 730