Base Building tips
When building a base, there are a few things to consider before laying down some roots:
- Proximity to an analyzer
- How far away you are from spider dens
- Resource availability
Here’s a variety of resources you’ll likely be building to make a home:
- Wall: Four grass planks
- Windowed wall: One weed stem, and three grass planks
- Door: One weed step, three grass planks, one sprig, and two woven fiber.
- Sturdy door: Three weed stems, four wove fiber, and two sprigs
- Stem wall: Three weed stem
- Windowed stem wall: Two weed stem
- Scaffold: Two weed stem
- Triangle scaffold: One weed stem
- Roof: One weed stem, four clover leaves
- Roof corner: One weed stem, four clover leaves
- Roof Interior corner: One weed stem, four clover leaves
Tier 2 Tools
Grounded Tier 2 Hammer
The Level 2 Hammer, known as the Insect Hammer, allows you to break the mint from the ice-caps mint container. Make sure you have a workbench. To craft an Insect Hammer, you need the following items:
- Four Stinkbug Parts
- Four Berry Leather
- One Boiling Gland
Grounded Tier 2 Axe
One of the first weapons that you need to upgrade is your axe. A Level 2 Axe can be used to chop Weed Stem. A Weed Stem falls under Tier 2 material type and is an essential item that helps protect the base with stronger structures. To chop down a Weed Stem, you need to craft an Insect Axe. Make sure you have a workbench. To create this tool, you will need to collect the following items:
- One Ladybug Head
- Three Bombardier Parts
- Four Spider Silk
Smoothie Recipes
To make a smoothie station, you can analyze the resource Grub Goop by harvesting a Grub from the ground and taking it to a field station. You need three resources to craft a Smoothie station:
- One acorn top
- Four Sprigs
- Five Grub Goop
The smoothies you make in the game can be hit or miss. If a smoothie doesn’t work, it will only hurt your character. The ones that do work can be memorized, and you quickly craft them at your smoothie station, but you need to first learn them. It’s all about experimentation with any of the various resources you find in the game.
- Boost Juice: aphid, mushroom, and acorn bits
- Green Machine: sprig, cloverleaf, and plant fiber
- Fuzz on the Rocks: mite fuzz, quartzine, and a pebble
- Hedge lord: Berry chunks
- Liquid Gills: plant fiber, cloverleaf, eelgrass strands
- Liquid rage: ant mandible, spider fang, larvae spike
- Gastro goo: honey, gas sack, fungal growth
Floors
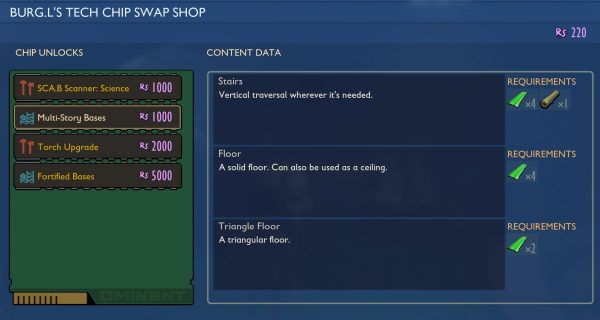
Once you complete the main story you’ll meet BURG.L the robot, who’ll sell you more base building items, such as stairs and floors. You’ll need to earn Raw Science Points to unlock these extra bits, which you can do by popping the floating pink bubbles around the lab and completing quests for BURG.L.
You’ll be able to find a chip in the room he’s in, so look out for it and give it to him when you find it to unlock the extra choices.

Bomb
You can acquire the crafting recipe after analyzing one of the resources it consumes to make it. Fungal growth from infected weevals are probably your best bet. You can find infected weevals by visiting the location near the bug spray canister at the southwest part of the map. Make sure you have a workbench. When you learn how to craft the bomb, here are all of the ingredients you need to craft it:
- Two fungal growths
- One ant egg
- Four dry grass chunks
Gas Mask
You can research the gas mask by analyzing a weevil nose or gnat fuzz. These are pretty easy resources to find within your first few hours of the game. When you obtain any of them, send them to a field station to learn about the gas mask and add it to your list of recipes to craft.
The gas mask does not provide the best armor to protect yourself. You primarily want to wear it when you know you need to withstand any type of gases that could prove harmful to your health, which happens later in the game. It requires four ingredients to make:
- One weevil nose
- Four gnat fuzz
- Two woven fiber
- One Stinkbug Part
Arachnophobia mode
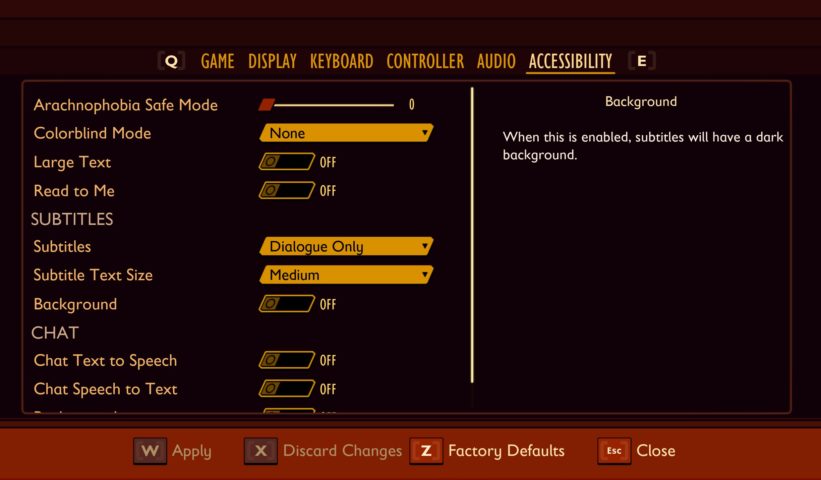
To use Arachnophobia mode, you will need to go into the Accessibility menu from the main screen. The very first option there is a slider. You can set it at 0 when spiders will appear normally, or you can set it any other point to reduce the detail of the spiders, making them less spider-like.

That’s all we are sharing today in Grounded Beginners Guide (Characters, Crafting, Unlocks, and More), if there are anything you want to add please feel free to leave a comment below and we’ll see you soon.
Credit to Jz
Related Posts:
- Grounded Combat Tips (Spiders, Sting Bugs, Bombardbugs, Larvae)
- Grounded Smoothie Recipes Guide (Health, Hunger, Increased Damage)
- Grounded Combat Guide (Enemies, Gear & Mechanics)
- Grounded Rotten Bee Armor Location Guide
- Grounded Interactive Map Guide
