For THE HOUSE OF THE DEAD: Remake players, this guide provides a walkthrough for using a Nintendo Joy Con’s gyro controls to serve as an impromptu light gun for The House of the Dead Remake on Steam.
It provides all of the information you need to install the necessary driver software (BetterJoy) and configure it to work with House of the Dead. This guide covers outputting gyro inputs from the Joy Con to mouse output and to joystick output. Steam controller configurations and BetterJoy configuration parameters are provided.
Requirements, Drivers, and Installation
The version of BetterJoy used in this guide is BetterJoy 7.1 available here: https://github.com/Davidobot/BetterJoy/releases/
Note: Davidobot is not involved with this, and I am using his freely available tool as-provided on his GitHub to accomplish this. Many thanks to him for putting in the time and effort to develop this tool so we can have nice things.
- Download the .zip file for the appropriate version of BetterJoy and extract the files. Pick a location where you will be able to find these again because you will run BetterJoy from or otherwise create a shortcut to this location in the future when you want to use it (you need to run it before starting the game).
- After extracting the files, navigate to the Drivers folder in the extracted files and install the appropriate ViGEmBusSetup driver using the one of the two setup utilities in this folder.
- The x64 utility should be used for a 64-bit system while the x86 utility is for a 32-bit system. If you are unsure, right click the Windows icon in the lower left corner of the desktop and select System. The system type field on the window that opens will tell you whether your system is a 32-bit or 64-bit system.
- Once the ViGEmBus driver is installed, it’s not a bad idea to restart your computer.
- After restarting, connect the right Joy Con to the PC as a standard bluetooth device. Open Settings > Devices and click “Add Bluetooth or other device.” At this point, press and hold the sync button on the inner side of the Joy Con that usually connects to the switch. The lights should start to flash, and Joy-Con (R) should populate the Add a Device menu. When it appears, click it, and it will pair. You will get some notifications telling you that it is setting up the device and when it is successfully set up.
Once these steps are complete, you’re ready to run BetterJoy.
Mapping Buttons in BetterJoy
Open BetterJoyforCemu.exe, and it should detect your JoyCon as shown in the image. (Note: Cemu is a Wii U emulator for which this driver was originally intended, hence the name. This version doesn’t require Cemu, and it will work fine for standard use on a PC too.)
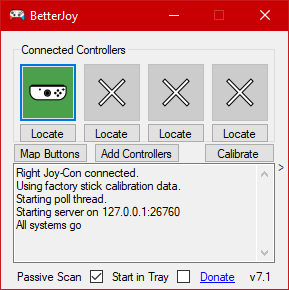
The Joy Con starts in horizontal mode, but we want it in vertical mode. Simply click the image, and it will rotate.
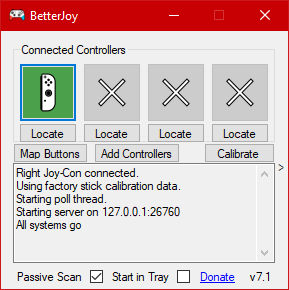
Once the Joy Con orientation is correct, click Map Buttons to open the configurator. This window allows you to map the special buttons on the Joy Con that the PC normally would not read. Since BetterJoy tells the PC that the Joy Con is an Xbox 360 controller, most buttons map 1:1, but an Xbox 360 controller doesn’t have gyro input, and it doesn’t have the extra shoulder buttons on the side, home button, capture button, etc.
In my testing, I mapped the following for keyboard/mouse:
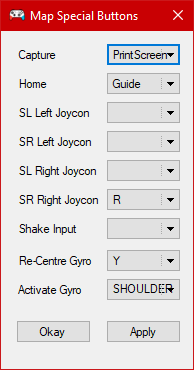
- SR on the Joy Con to be reload (R key if using keyboard/mouse; left click the drop down and type R to set this)
- Re-centre gyro to the Y button (which is the same as recentering the crosshair for joystick controls in House of the Dead although there is no equivalent to recenter the crosshair with mouse/keyboard)
- Activate Gyro to shoulder_1 (which is the R button – I picked this because it is mostly unused, although it will switch menu tabs if you are navigating menus. This can be avoided by just using a regular mouse to navigate menus or by mapping to a different button that is not used. This button is a toggle to turn gyro inputs on and off.)
It is of note that the mapper calls the right side of the controller “shoulder” and the left side “shoulder2,” and the bumper is _1 while the trigger is _2. For example: the right bumper (R on the Joy Con) is shoulder_1 and left trigger is shoulder2_2.
For joystick:
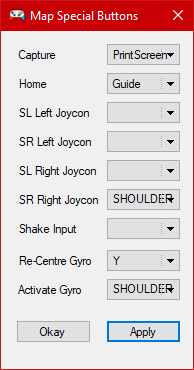
- Reload is left trigger (shoulder2_2)
- Re-centre gyro is still Y
- Activate Gyro is still shoulder_1
Note: in this configurator, the face buttons are as printed on the controller. For everything else (in-game, Steam configurator, etc.), they will map to the Xbox controller equivalents by location on the controller, i.e.: B = A, A = B, Y = X, X = Y.
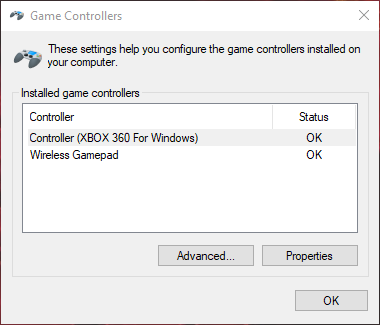
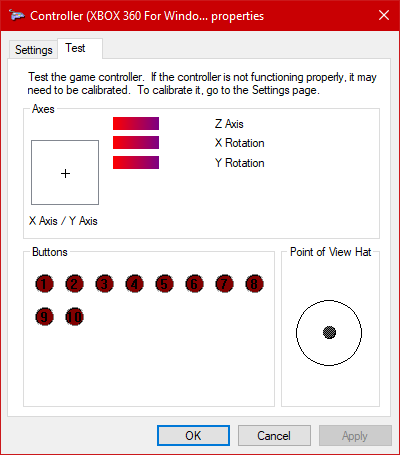
These configurations can be tested by searching for “game controllers” in Windows search to find the Windows controller testing utility. Once that is open, click “Controller (XBOX 360 For Windows)” and click properties. This window will show you which buttons and axes are firing when you press the corresponding buttons, allowing you to test your mappings, although it is more helpful if you have an Xbox controller to test in parallel since the utility calls all inputs by generic numbers and X, Y, Z axes.
Buttons that are not unique to the Joy Con will be handled by Steam’s built-in configurator (which recognizes the Joy Con as an Xbox 360 controller), and I have generated and play-tested Steam configurations that can be applied for either joystick input or mouse input. Additional configuration parameters for BetterJoy and accessing the Steam profiles will be addressed in the next sections.
BetterJoy Configuration
Note: Notepad++ is better than Notepad because it has syntactic highlighting and better formatting, making it easier to find and modify these parameters. However, it is not required, and these parameters can be modified in any text editor of your choosing.
The changed settings are as follows (all are changes, not additions, and default values provided by the developer of BetterJoy exist as comments in the configuration file):
<add key=”AllowCalibration” value=”true” />
-This allows you to calibrate the Joy Con gyro. Not sure if it’s helpful, but I prefer to do it before I start playing
<add key=”HomeLEDOn” value=”false”/>
-Turns off the blue LED on the home button…unless you want that on all the time
For mouse aiming:
<add key=”GyroToJoyOrMouse” value=”mouse”/>
For joystick aiming:
<add key=”GyroToJoyOrMouse” value=”joy_left”/>
-This is key for which configuration you use. In fact, it is only one of two lines different between configuring for mouse or joystick input. “mouse” will output gyro inputs as mouse data and “joy_left” will output gyro inputs as left joystick data (which House of the Dead reads for aiming if using a controller)
For mouse aiming:
<add key=”UseFilteredIMU” value=”false”/>
For joystick aiming:
<add key=”UseFilteredIMU” value=”true”/>
-This is the other key difference between the configurations. My experience is that FilteredIMU is “smoother” and requires more physical movement for gyro detection. This is problematic for mouse aiming (it takes too much movement for a response, set to false) but essential for joystick aiming (raw gyro is too jerky, set to true).
<add key=”GyroMouseSensitivityX” value=”120″/>
<add key=”GyroMouseSensitivityY” value=”80″/>
-These affect gyro sensitivity when read as mouse input (has no effect on joystick input). I find these numbers work best when using an in-game sensitivity of 3.0. They provide close to 1:1 movement with the Joy Con vs the crosshair sitting at normal viewing distance from a 15″ laptop screen. Your mileage may vary based on preferences, hardware setup, etc. Edit as you see fit.
<add key=”GyroStickSensitivityX” value=”120″/>
<add key=”GyroStickSensitivityY” value=”80″/>
-These affect gyro sensitivity when read as joystick input (has no effect on mouse input). These work well when using an in-game sensitivity of 3.0. Again, tested with the same playing conditions as above. Your mileage may vary. Edit as you see fit.
All other parameters are left at their default values. All are well-documented by the developer as comments in the configuration file, so refer to that documentation for any questions or further modifications.
Steam Controller Profiles
Joystick:
steam://controllerconfig/1694600/2805639914
Mouse:
steam://controllerconfig/1694600/2805662901
These should also be available as community configs for House of the Dead through the House of the Dead controller configuration menu in Big Picture.
The Joystick profile maps right stick to left stick to allow it to control the game. It also applies an anti-deadzone to the center of the joystick to make it more responsive to any movement instead of requiring you to move a certain threshold before any movement takes effect.
The mouse profile maps the buttons to appropriate keyboard keys. Enter is mapped to A to assist with navigating menus, but overall, it’s better to just use mouse and keyboard for navigation.
Any bindings can be easily changed with the Steam configurator as needed or perferred.
Some Last Steps Before Jumping In
To fix this, check the invert X axis option in the House of the Dead control settings:
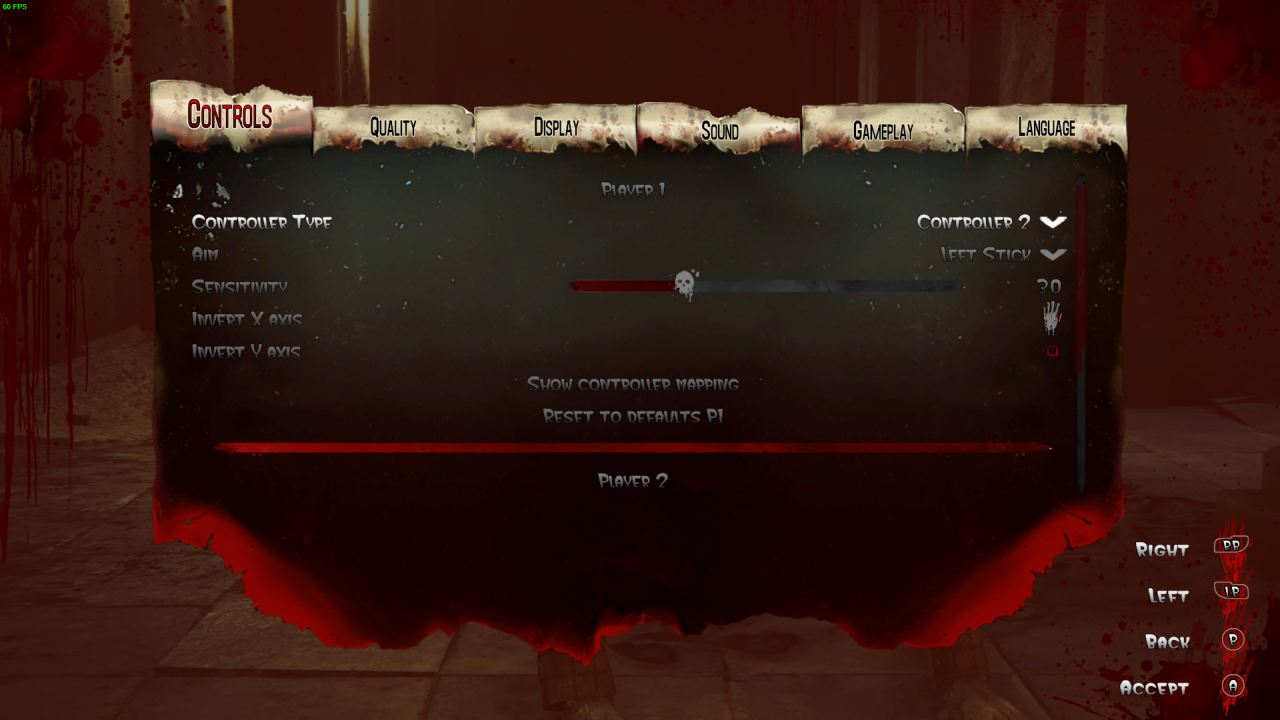
Be sure that you also select the right controller input. I think that the Joy Con itself is detected (Windows can recognize them by default after all, even if it can’t use the gyro inputs), and it comes up as Controller 1, so I need to select Controller 2. Luckily, House of the Dead tends to automatically set inputting controllers to Player 1 on that screen (I think to keep you from soft-locking yourself), so if you move the joystick on the Joy Con, it should automatically set the right controller (in my case Controller 2) to be player 1. It’s also worth mentioning that this can be really problematic when trying to set up additional controllers and/or keyboard mouse controls for another player through remote play together, so be careful.
Also, remember to toggle the gyro controls on by pressing R. They can make it difficult to navigate menus (especially with the joystick mapping), so I usually do it once I’ve started the game and reached the “shoot to start” screen before I…well shoot to start.
Final Remarks and Remote Play Together
I will be the first to admit that it’s not perfect, but I’ve found it to be really responsive both with mouse mapping and joystick mapping. Originally, I intended to try to get this to work so I could have a “good enough” option for multiplayer with my friend who was struggling to map his Steam Controller’s gyro inputs to joystick and make them accurate enough. In the end, it turned out to be a lot of fun and my preferred control scheme for the game.
Regarding multiplayer, I have not run into this issue, but the developer of BetterJoy notes that BetterJoy can cause clashes with additional XInput devices, and an additional HIDGuardian driver (that’s included with the BetterJoy files) needs to be installed to prevent this. I did not have any issues with this, so I have not installed HIDGuardian. It doesn’t seem to affect my Xbox One controller inputs, and it doesn’t affect Steam controller inputs from a remote play together client when I host, but that is the extent of my experience.
Regarding remote play together, configuration can be a little tricky, but I have gotten it to work with me hosting using the Joy Con mapped to joystick movements and the client using a Steam Controller with gyro controls mapped to keyboard/mouse. I just wanted to enumerate some pitfalls that we ran into so someone else doesn’t spend 3 hours on a Friday night trying to get it to work (assuming your friend will be using keyboard/mouse; thanks, Kevin for suffering with me):
- Make sure you enable keyboard and mouse inputs for the other player. These are off by default and can be enabled by clicking the images of the keyboard and mouse next to your friend’s name on the remote play together controller assignment window that comes up when you set it up.
- It seems to work better when keyboard/mouse is player one. In my case, I set player 1 to be keyboard/mouse and player 2 to be controller 2. After that, have player 1 start the game and make sure to keep gyro off! Touching anything seems likely to bump the Joy Con back to player 1 and remove the other player. Don’t touch anything until you get to the shoot to start screen – too many times we got there only to find that it automatically switched our two player game to a single player game because my Joy Con mysteriously bumped his controller entirely.
- YOU need to map YOUR FRIEND’S controller. Especially if your friend is using a Steam Controller and/or something different from the game’s default mappings (ie gyro controls), you need to configure their controller for them because it uses YOUR controller profiles for remote play together.
- Be patient and test carefully. There are lots of things that can potentially go wrong, and they are usually very minor with big implications, so don’t give up if it doesn’t work the first time.
Related Posts:
- THE HOUSE OF THE DEAD: Remake Reinforcements! Achievement Guide
- THE HOUSE OF THE DEAD: Remake Deratization Achievement Guide
- THE HOUSE OF THE DEAD: Remake All Route Map Guide
- THE HOUSE OF THE DEAD: Remake Cheat Codes
- THE HOUSE OF THE DEAD: Remake How to Fix Startup Crash Bug
