For Nexomon: Extinction players, this is a no story walkthrough, an overall guide of Nexomon: Extinction, with all of the areas being grouped, this should help you play the game, let’s check it out.
Introduction
Hello, I am trying to note everything down for the seperate Zones (found Items, Nexomon, Quests, and so on…).
For Zones with Nexomon I put a Fight Count in, right of the Nexomon you see a “x123”, the number after the x indicates how often I’ve had a fight against this particular Nexomon. You can now caclulate a chance by dividing the xNumber/Fight Count = xxx
For example I’ve fought Rubby 27 times out of 50 fights 27/50=0,54 or 54%. Please be aware that this kind of chances are not really representable unless there were thousands of Fights in a Zone. Anyway I wanted to give you some small indication, whereas your personal experience might differ a lot!
If you search for the next Healer/Storage Console press CTRL+F and search for “Healer” or “Storage Console”. For Vaults search for “Vault”. And if you search for a specific Nexomon same procedure but with the name of the Nexomon. Hopefully you’ll find what you search 🙂
I’ll mark the Nexomon with:
1/X (Whereas X is the max Evo. Some Nexomon can evolve 1 time, some 2 time and some can’t evolve at all.)
List of possible values:
- 1/1
- 1/2
- 1/3
- 2/2
- 2/3
- 3/3
Random Things + Important Note
Nexomon Levels Scale, as of now (2020-08-29) this leads to evolved Nexomon in some areas, so it might be impossible to catch all Evo 1 Nexomon if your team is high level. Hopefully there’ll be a fix, but it might also mess up with the list of Nexomon you might encounter in the areas… Please be aware of that.
Though in the forums some ppl say you can still find the pre-evo form alongside the evo form. I’ll try to check this out when I have a higher level.
- Shard Spots (black stones with minerals) give random Shards and respawn after some time.
- Tamers want a rematch after some time (repeatable/unlimited times?) with level scaling and sometimes even more Nexomon in their team than before
Quests
Quest Start: Tamers Guild
Reward:
- 500 Coins
- Perfect Berry
- Blazing Shard
- Ocean Shard
Solution:
- Meet Videll outside the Capital City.
- Go South until Frozen Lake from Outlands – West Entrance
- Go inside the Cave in Outlands – Frozen Lake
- Rescue Videll and report back to Guild
Quest Start: Tamers Guild
Reward:
- 500 Coins
- 1x Wind Nexotrap
- 1x Plant Nexotrap
Solution:
- Meet with Ross and Nora at the Orphanage.
- Head inside the Orphanage and rescue three hostages.
- Defeat all Bandits & meet Outside
Quest Start: Outlands – West Entrance
Reward:
- 400x Coins
- 1x Super Elixir
- 1x Destruction Core (I)
Solution:
???
Quest Start: Forest – Intersection
Reward: Pickaxe
Solution:
Give him following Items
- 200 Coins
- 1x Potion
- 1x Elixir
Quest Start: Drake Isles – West of Intersection
Reward: Vault Key
Solution:
Give him following Items
- 1x Namasi (Evolution Dinja-Lv15->Dichala-Lv32->Namansi)
Quest Start: Tamers Guild
Reward:
- 200 Coins
- Experience Core (II)
Solution:
Deliver Supplies to outpost in the Outlands – Medical Tent.
Quest Start: Parum City
Reward:
- 1x Vault Key
Solution:
Search in Parum for garbage (after accepting the quest they shine like items) and return it to the old Lady. You need 12 Garbage.
I found 9 in Parum City Center, 2 in Parum West and 1 in Parum East.
Quest Start: Forest – Northeast
Reward: Vault Key
Solution:
Remember her maze pattern and follow it
Quest Start: Drake Isles – Northeast of Intersection
Reward:
- 350x Coins
- 1x Destruction Core (I)
- 1x Flan
- 1x Glazed Cake
Solution:
Do the Trade with him. He even gives you a Golden Nexotrap on top of the rewards.
- 1x Fire Nexotrap
- 1x Water Nexotrap
- 1x Wind Nexotrap
- 1x Plant Nexotrap
Quest Start: Parum – City Northwest (Secondary Research Center)
Reward: Experimental Lure
Solution:
Give him money x1000 Coins.
Crafting
Core Crafting
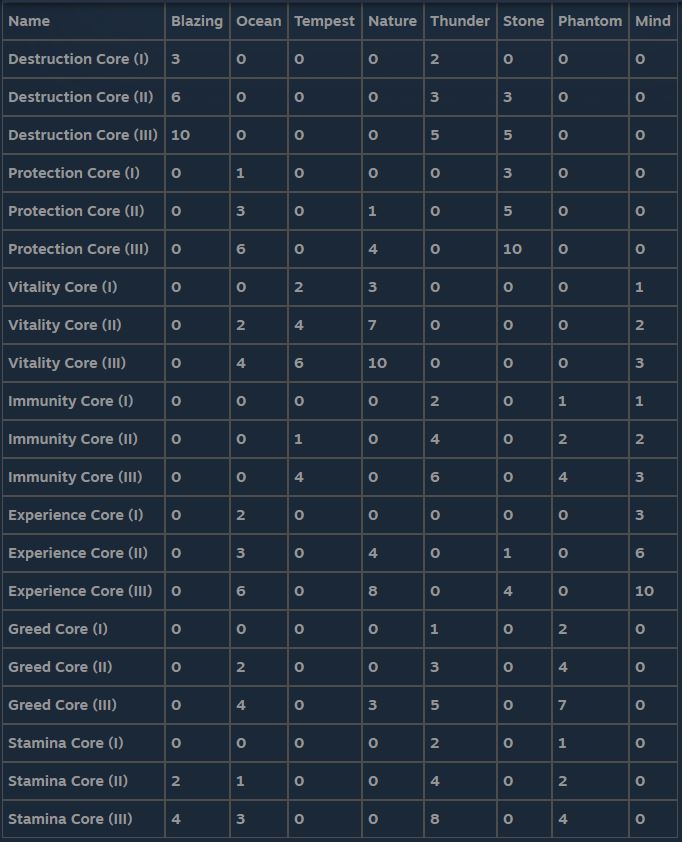
In Progress…
Orphanage
")
Items:
- 1x Apple
- 1x 20 Coins
- 1x 50 Coins
Main Hall
")
Items:
- 1x Elixir (after you return with your own Nexomon)
- 1x Anti Poison (NPC, after #02)
")
Items:
- 1x Potion
- 1x Elixir
- 1x Ether
- 1x Elixir (after #02)
- 1x Ghost Nexotrap (after #02)
- 1x Psychic Nexotrap (after #02)
- 50x Coins (after #02)
")
Items:
- 1x Nexotrap
- 1x Vitality Core (II) (NPC, after #02)
")
Items:
- 1x 25 Coins
- 1x Anti Paralyze
")
Items:
- 1x Revive (NPC, after #02)
")
")
Specials:
- Warpstone (After #01 – The Frozen Lake)
- Traveling Merchant (only until you’ve your Bronze Badge)
Items:
- 1x Revive (outside the East Wing)
- 1x 15 Coins
- 1x Ether (Pickaxe required)
Forest
")
Quest:
- #504 – Pretty Rocks (after you’ve your first own Nexomon)
Items:
- 1x Shard Spot (Pickaxe required)
")
Here you chose your first Nexomon out of 9. (one for each element)
")
Specials:
- Healer (only after Capture Tutorial, 3rd topic) (is gone after you return to Orphanage)
Items:
- 1x Nexotrap
- 1x 25 Coins
- 1x Potion
- 1x Super Potion
- 3x Lemon Pies (after Capture Tutorial, speaking 2nd topic)
- 1x Shard Spot (Pickaxe required)
")
Nexomon:
- Fight Count: 52
- #001 – Cloddy (Uncommon) (1/3) x6
- #032 – Stinger (Common) (1/3) x8
- #075 – Rubby (Common) (1/2) x29
- #135 – Fanling (Uncommon) (1/3) x2
- #145 – Calfter (Rare) (1/3) x3
- #199 – Woozy (Rare) (1/2) x2
- #207 – Skunqute (Common) (1/3) x1
- #325 – Dinja (Ultra Rare) (1/3) x1
Items:
- 10x Nexotraps (Story, not missable)
- 1x 25 Coins
")
Nexomon:
- Fight Count: 52
- #038 – Shromporo (Common) (1/3) x15
- #075 – Rubby (Common) (1/2) x20
- #135 – Fanling (Uncommon) (1/3) x10
- #145 – Calfter (Rare) (1/3) x4
- #187 – Cruff (Rare) (1/3) x2
- #325 – Dinja (Ultra Rare) (1/3) x1
Items:
- 1x Flan
- 2x Grapes
- 1x Revive
- 1x Shard Spot (Pickaxe required)
- 1x Chest not reachable yet…
")
Nexomon:
- Fight Count: 51
- #001 – Cloddy (Uncommon) (1/3) x5
- #038 – Shromporo (Common) (1/3) x21
- #122 – Poyal (Common) (1/3) x6
- #190 – Singletti (Uncommon) (1/3) x5
- #199 – Woozy (Rare) (1/2) x10
- #325 – Dinja (Ultra Rare) (1/3) x4
Items:
- 1x 20 Coins
- 1x Potion
- 1x Shard Spot (Pickaxe required)
")
Quest:
- #511 – Playing With Salem
Nexomon:
- Fight Count: 51
- #001 – Cloddy (Uncommon) (1/3) x4
- #038 – Shromporo (Common) (1/3) x10
- #122 – Poyal (Common) (1/3) x27
- #135 – Fanling (Uncommon) (1/3) x2
- #145 – Calfter (Rare) (1/3) x1
- #187 – Cruff (Rare) (1/3) x7
")
Items:
- 1x Peach
- 1x Perfect Berry
- 1x Masquiti Companion
- 2x Shard Spot (Pickaxe required)
")
Nexomon:
- Fight Count: 54
- #001 – Cloddy (Uncommon) (1/3) x3
- #032 – Stinger (Common) (1/3) x21
- #075 – Rubby (Common) (1/2) x6
- #187 – Cruff (Rare) (1/3) x14
- #190 – Singletti (Uncommon) (1/3) x5
- #325 – Dinja (Ultra Rare) (1/3) x5
Tamer:
- Money Stealing Girl (Misc types)
Items:
- 1x 50 Coins (accessible from Forest – East Path)
- 1x Green Pear (accessible from Forest – East Path)
- 1x Nexotrap
- 1x 20 Coins
")
Nexomon:
- Fight Count: 50
- #001 – Cloddy (Uncommon) (1/3) x5
- #032 – Stinger (Common) (1/3) x11
- #038 – Shromporo (Common) (1/3) x8
- #122 – Poyal (Common) (1/3) x13
- #135 – Fanling (Uncommon) (1/3) x2
- #145 – Calfter (Rare) (1/3) x1
- #187 – Cruff (Rare) (1/3) x1
- #190 – Singletti (Uncommon) (1/3) x4
- #199 – Woozy (Rare) (1/2) x3
- #325 – Dinja (Ultra Rare) (1/3) x2
Tamer:
- Green Headband Guy
- Boy with blue Basecap
Items:
- 1x Watermelon
- 1x Potion
Trader:
Gives
- 2x Ghost Nexotrap
- 2x Psychic Nexotrap
for
- 1x Nexotrap
- 1x Revive
- 100 Coins
Camp (West of Orphanage)
")
Specials:
- Healer
Items:
- 1x Nexotrap
- 1x Blazing Shard (Pickaxe required)
Trader:
Gives
- 250 Coins
for
- 1x Rubby (Lv. 1)
Bridge (East of Orphanage)
")
Items:
- 1x Peach
")
Items:
- 1x Plant Nexotrap
Trader:
Gives
- 1x Golden Nexotrap
for
- 1x Cruff (Lv. 1)
")
Nexomon:
- Fight Count: 51
- #028 – Griff (Common) (1/3) x8
- #063 – Onin (Rare) (1/2) x2
- #088 – Scaratic (Common) (1/2) x22
- #159 – Leechy (Uncommon) (1/2) x9
- #161 – Chirrent (Uncommon) (1/2) x8
- #184 – Ribombo (Rare) (1/3) x2
- #340 – Mearn (Ultra Rare) (1/3) x0 (*Comment add, no encounter myself)
Items:
- 1x Banana
")
Items:
- 1x Ether
- 3x Nexotraps
Parum City
")
Nexomon:
- Fight Count: 50
- #028 – Griff (Common) (1/3) x18
- #063 – Onin (Rare) (1/2) x3
- #088 – Scaratic (Common) (1/2) x16
- #102 – Porklet (Uncommon) (1/3) x3
- #159 – Leechy (Uncommon) (1/2) x5
- #168 – Goateeze (Rare) (1/2) x3
- #340 – Mearn (Ultra Rare) (1/3) x2
Tamer:
- Pink Hair Girl
")
Be aware I went to the Tamers Guild first, so I am not sure what of the things in the City might need a Bronze Badge to trigger.
Specials:
- Warpstone (After #01 – The Frozen Lake)
Quest:
- #510 – Beautiful Parum (Bronze Badge required)
Trader:
- GIVES
- 1x Wind Whistle
- 1x Secret Sauce
- FOR
- 500x Coins
- GIVES
- 1x EXP Booster
- FOR
- 1x Mind Shard
- 1x Stone Shard
- 2x Potion
- 2x Ether
- GIVES
- 1x Max Potion
- 1x Max Ether
- 1x Max Elixir
- FOR
- 250x Coins
Healing Center:
") Specials:
Specials:
- Healer
- Storage Console
General Store:
") Trader:
Trader:
Wares vary depending on your rank.
Shard Buyer
He tries to buy your precious Elemental Shards. -.-”
Can only be accessed with at least Bronze Badge. It’s in Northeast of Parum City Center.
") For now nothing to do except Talk with NPCs.
For now nothing to do except Talk with NPCs.
House in Northwest of Parum City Center
")
") Items:
Items:
- 1x Nexotrap
- 1x Fire Nexotrap
Houses in Southeast of Parum City Center
")
A1
Can’t enter for now…
A2
Can’t enter for now…
A3 (Bronze Badge required?)
") Items:
Items:
- 1x Ether
A3 – Upstairs:
") Items:
Items:
- 1x Discount Voucher
A4
Can’t enter for now…
A5 (Bronze Badge required?)
")
A6
Locked.
")
Items:
- 1x Nexotrap
West House
")
Items:
- 35x Coins
East House
Locked.
")
Trader:
- GIVES
- 1x Psychic Whistle
- 1x Dragon Whistle
- 1x Golden Nexotrap
- 400x Coins
- FOR
- 5x Blazing Shard
- 5x Thunder Shard
- 5x Nature Shard
- 5x Phantom Shard
")
Synth Shards to Cores
Here you can craft Cores.
Trader:
- GIVES
- 1x Mineral Whistle
- 300x Coins
- FOR
- 2x Ocean Shard
- 2x Mind Shard
- 2x Stone Shard
Items:
- 1x Donut
")
Quest:
- #537 – The Extinction Project (Bronze Badge required)
")
Items:
- 1x Electric Whistle
- 1x Potion
")
Nothing yet. Supposed way to Khan Forest, but without an Access Card we can’t progress here. Info will be added later on.
")
A1
") Items:
Items:
- 1x Onigiri
A2
Locked…
A3
") Items:
Items:
- 1x Peach
A3 – Upstairs
") Items:
Items:
- 1x Revive
")
Left
Someone in front of door.
Middle
") Right
Right
Locked…
")
Items:
- 35x Coins
House right of the canal
") Items:
Items:
- 1x Elixir
- 1x Woozy Companion
")
Trader:
- GIVES
- 1x Airship Ticket
- FOR
- 200x Coins
- GIVES
- 1x Dragon Whistle
- FOR
- 350x Coins
- 1x Blazing Shard
- 1x Nature Shard
")
Items:
- 20x Coins
")
A1
")
A2
") Special:
Special:
- Storage Console
A3
") Items:
Items:
- 1x Potion
A4
") Items:
Items:
- 20x Coins
- 1x Sandillo Companion
Parum City – Tamer Guild (City North)
")
Items:
- 1x Elixir
- 75x Coins (From the Fisher Girl, after obtaining Bronze Badge)
Hall except for accepting Main Story Quests, and Side Quests nothing else yet.
")
Quest:
- #01 – The Frozen Lake (Story)
- #02 – Orphanage in Peril (Story)
- ???
- #509 – A Little Help (Bronze Badge required)
The Meeting room. Here you get instructions for the Tamers Guid Quests.
")
Outlands
")
Specials:
- Warpstone (After #01 – The Frozen Lake)
- Healer
Quest:
- #503 – The Missing Kid
Nexomon:
- Fight Count: 70
- #028 – Griff (Common) (1/3) x24
- #044 – Larkito (Common) (1/3) x7
- #063 – Onin (Rare) (1/2) x2
- #088 – Scaratic (Common) (1/2) x14
- #102 – Porklet (Uncommon) (1/3) x5
- #159 – Leechy (Uncommon) (1/2) x5
- #161 – Chirrent (Uncommon) (1/2) x4
- #168 – Goateeze (Rare) (1/2) x4
- #184 – Ribombo (Rare) (1/3) x2
- #340 – Mearn (Ultra Rare) (1/3) x3
Tamer:
- Boy at Camp
- Girl with blue Cap East
- Girl below Podest close to south exit
Items:
- 1x Potion
- 50x Coins
- 1x Nexotrap
- 20x Coins
- 1x Super Revive
- 1x Orange
- 4x Shard Spots (Pickaxe required)
Trader:
- GIVES
- 1x Water Whistle
- FOR
- 300x Coins
- GIVES
- 5x Anti Freeze
- FOR
- 150x Coins
- GIVES
- 250x Coins
- 1x Protection Core (I)
- FOR
- 3x Nexotrap
") Special:
Special:
- Storage Console
Quest:
- Deliver Supplies from #509 – A Little Help
Items:
- 1x Pincho
- 1x Glazed Cake
- 20x Coins
")
Nexomon:
- Fight Count: 54
- #010 – Spikus (Uncommon) (1/3) x3
- #019 – Zumble (Common) (1/3) x15
- #111 – Hinazuru (Uncommon) (1/3) x7
- #122 – Poyal (Common) (1/3) x13
- #130 – Snush (Common) (1/3) x4
- #187 – Cruff (Rare) (1/3) x8
- #343 – Gekoko (Ultra Rare) (1/3) x4
Tamer:
- Lumberjack
Items:
- 1x Nexotrap
- 1x Shard Spot (Pickaxe required)
")
Nexomon:
- Fight Count: 60
- #044 – Larkito (Common) (1/3) x25
- #063 – Onin (Rare) (1/2) x5
- #088 – Scaratic (Common) (1/2) x15
- #159 – Leechy (Uncommon) (1/2) x5
- #161 – Chirrent (Uncommon) (1/2) x6
- #168 – Goateeze (Rare) (1/2) x1
- #292 – Florozard (Mega Rare) (1/1) x1
- #340 – Mearn (Ultra Rare) (1/3) x2
Tamer:
- Girl in Cyan
- Boy with Headphones
Items:
- Experience Core (I)
- 50x Coins
- 2x Cream Puffs
- 2x Blazing Shards
- 1x Potion
- 3x Shard Spot (Pickaxe required)
Frozen Lake (Entrance Cave)
")
Specials:
- Warpstone (After #01 – The Frozen Lake)
- Traveling Merchant
Nexomon:
- Fight Count: 51
- #028 – Griff (Common) (1/3) x11
- #044 – Larkito (Common) (1/3) x8
- #088 – Scaratic (Common) (1/2) x15
- #102 – Porklet (Uncommon) (1/3) x5
- #159 – Leechy (Uncommon) (1/2) x6
- #184 – Ribombo (Rare) (1/3) x6
Tamer:
- Tamer west of cave
Items:
- 1x Anti Bind
- 1x Anti Burn
- 1x Ocean Shard
- 2x Shard Spots (Pickaxe required)
- 1x Elemental Shard (from NPC after #01 – The Frozen Lake)
Outlands East Cave
")
Nexomon:
- Fight Count: 57
- #007 – Bloopish (Common) (1/3) x19
- #133 – Durtacles (Uncommon) (1/2) x7
- #143 – Prankrow (Common) (1/2) x19
- #275 – Mermella (Rare) (1/2) x9
- #346 – Masquiti (Ultra Rare) (1/3) x3
Items:
- 35x Coins
- 6x Shard Spot (Pickaxe required)
")
Nexomon:
- Fight Count: 54
- #007 – Bloopish (Common) (1/3) x23
- #013 – Pebglem (Common) (1/3) x23
- #212 – Mallish (Uncommon) (1/3) x5
- #275 – Mermella (Rare) (1/2) x2
- #346 – Masquiti (Ultra Rare) (1/3) x1
Items:
- 1x Revive
- 8x Shard Spot (Pickaxe required)
")
Nexomon:
- Fight Count: 50
- #007 – Bloopish (Common) (1/3) x16
- #133 – Durtacles (Uncommon) (1/2) x6
- #143 – Prankrow (Common) (1/2) x21
- #275 – Mermella (Rare) (1/2) x4
- #346 – Masquiti (Ultra Rare) (1/3) x3
Items:
- 1x Ether
- 5x Shard Spot (Pickaxe required)
")
Special:
- Vault #8
Nexomon:
- Fight Count: 51
- #013 – Pebglem (Common) (1/3) x14
- #143 – Prankrow (Common) (1/2) x17
- #175 – PotPot (Rare) (1/3) x6
- #212 – Mallish (Uncommon) (1/3) x10
- #346 – Masquiti (Ultra Rare) (1/3) x5
Items:
- 1x Elixir
- 6x Shard Spot (Pickaxe required)
")
Items:
- 150x Coins
- 100x Coins
- 150x Coins
- 100x Coins
- 1x Golden Nexotrap
- 1x Raksuma Companion
- 1x Tribute of Nature
")
Nexomon:
- Fight Count: 51
- #007 – Bloopish (Common) (1/3) x16
- #013 – Pebglem (Common) (1/3) x15
- #133 – Durtacles (Uncommon) (1/2) x9
- #175 – PotPot (Rare) (1/3) x8
- #346 – Masquiti (Ultra Rare) (1/3) x3
Items:
- 5x Shard Spot (Pickaxe required)
Frozen Lake Cave
")
Nexomon:
- Fight Count: 56
- #007 – Bloopish (Common) (1/3) x19
- #035 – Faucefant (Common) (1/3) x21
- #111 – Hinazuru (Uncommon) (1/3) x4
- #138 – Scooptor (Uncommon) (1/3) x4
- #151 – Blublub (Uncommon) (1/2) x1
- #168 – Goateeze (Rare) (1/2) x2
- #250 – Coral (Rare) (1/3) x3
- #331 – Noki (Ultra Rare) (1/3) x2
Items:
- 1x Perfect Berry
- 1x Shard Spots (Pickaxe required)
")
Nexomon:
- Fight Count: 50
- #007 – Bloopish (Common) (1/3) x21
- #035 – Faucefant (Common) (1/3) x4
- #086 – Sounse (Common) (1/2) x9
- #111 – Hinazuru (Uncommon) (1/3) x3
- #138 – Scooptor (Uncommon) (1/3) x4
- #151 – Blublub (Uncommon) (1/2) x2
- #168 – Goateeze (Rare) (1/2) x4
- #250 – Coral (Rare) (1/3) x2
- #331 – Noki (Ultra Rare) (1/3) x1
Items:
- 1x Water Whistle
- 1x Shard Spots (Pickaxe required)
")
Solution below
") From the start go:
From the start go:
Down, Right, Up, Left, Down, Left, Up, Right, Down, Right, Up, Right. Welcome to your target destination. 🙂
")
Nexomon:
- Fight Count: 51
- #007 – Bloopish (Common) (1/3) x17
- #086 – Sounse (Common) (1/2) x18
- #138 – Scooptor (Uncommon) (1/3) x3
- #151 – Blublub (Uncommon) (1/2) x6
- #222 – Tesling (Rare) (1/3) x6
- #331 – Noki (Ultra Rare) (1/3) x1
Items:
- 2x Shard Spots (Pickaxe required)
")
Nexomon:
- Fight Count: 53
- #035 – Faucefant (Common) (1/3) x9
- #086 – Sounse (Common) (1/2) x21
- #111 – Hinazuru (Uncommon) (1/3) x3
- #138 – Scooptor (Uncommon) (1/3) x6
- #151 – Blublub (Uncommon) (1/2) x4
- #168 – Goateeze (Rare) (1/2) x3
- #250 – Coral (Rare) (1/3) x7
Items:
- 1x Nexotrap
- 1x Strawberry Cake
- 3x Shard Spots (Pickaxe required)
")
Special:
- Boss Fight
Nexomon:
- Fight Count: 51
- #007 – Bloopish (Common) (1/3) x7
- #035 – Faucefant (Common) (1/3) x10
- #086 – Sounse (Common) (1/2) x13
- #111 – Hinazuru (Uncommon) (1/3) x5
- #138 – Scooptor (Uncommon) (1/3) x5
- #151 – Blublub (Uncommon) (1/2) x1
- #168 – Goateeze (Rare) (1/2) x2
- #222 – Tesling (Rare) (1/3) x3
- #250 – Coral (Rare) (1/3) x3
- #331 – Noki (Ultra Rare) (1/3) x2
Haunted Woods
")
Nexomon:
- Fight Count: 0
Tamer:
- Scared Girl
Items:
- 1x Shard Spot (Pickaxe required)
Drake Isles
")
Specials:
- Merchant
- Healer
Nexomon:
- Fight Count: 52
- #016 – Heliwurm (Common) (1/3) x23
- #153 – Stalkee (Uncommon) (1/3) x15
- #307 – Briar (Mega Rare) (1/3) x1
- #313 – Flotter (Mega Rare) (1/3) x8
- #325 – Dinja (Ultra Rare) (1/3) x5
Trader:
- GIVES
- 2x Flan
- 2x Strawberry Cake
- 2x Shrimpgiri
- 2x Orange
- FOR
- 250x Coins
")
Tamer:
- Musician
Items:
- 1x Elixir
West House near Area Entrance
") Items:
Items:
- 1x Anti Sleep (NPC)
East House
")
")
Nexomon:
- Fight Count: 50
- #016 – Heliwurm (Common) (1/3) x26
- #153 – Stalkee (Uncommon) (1/3) x13
- #298 – Basil (Mega Rare) (1/3) x2
- #301 – Drare (Mega Rare) (1/3) x4
- #310 – Oren (Mega Rare) (1/3) x1
- #322 – Deyam (Mega Rare) (1/3) x1
- #325 – Dinja (Ultra Rare) (1/3) x3
Items: (not reachable yet)
- Item Spot
- Chest
- 2x Shard Spot (Pickaxe required)
House at Intersection
Can’t enter / thrown out (maybe higher Badge required?)
")
Quest:
- #508 – Catching a Namansi (Bronze Badge required)
Nexomon:
- Fight Count: 51
- #016 – Heliwurm (Common) (1/3) x23
- #153 – Stalkee (Uncommon) (1/3) x15
- #298 – Basil (Mega Rare) (1/3) x1
- #307 – Briar (Mega Rare) (1/3) x3
- #316 – Volt (Mega Rare) (1/3) x2
- #319 – Wadgon (Mega Rare) (1/3) x4
- #325 – Dinja (Ultra Rare) (1/3) x3
Tamer:
- Ghost
Items:
- 1x Flan
- 1x Orange
- 1x Shard Spot (Pickaxe required)
")
Nexomon:
- Fight Count: 50
- #016 – Heliwurm (Common) (1/3) x21
- #153 – Stalkee (Uncommon) (1/3) x13
- #298 – Basil (Mega Rare) (1/3) x2
- #307 – Briar (Mega Rare) (1/3) x4
- #310 – Oren (Mega Rare) (1/3) x2
- #319 – Wadgon (Mega Rare) (1/3) x2
- #322 – Deyam (Mega Rare) (1/3) x3
- #325 – Dinja (Ultra Rare) (1/3) x4
Tamer:
- Exlorer Girl
Items:
- 2x Shard Spot (Pickaxe required)
")
Nexomon:
- Fight Count: 50
- #016 – Heliwurm (Common) (1/3) x11
- #153 – Stalkee (Uncommon) (1/3) x20
- #301 – Drare (Mega Rare) (1/3) x9
- #313 – Flotter (Mega Rare) (1/3) x2
- #316 – Volt (Mega Rare) (1/3) x6
- #325 – Dinja (Ultra Rare) (1/3) x2
Items:
- 1x Orange
- 1x Shard Spot (Pickaxe required)
Trader:
- GIVES
- 1x Experience Core (II)
- 1x Immunity Core (II)
- FOR
- 3x Super Potion
- 3x Super Ether
- 2x Super Revive
House East
") Items:
Items:
- 2x Green Cake (NPC)
")
Nexomon:
- Fight Count: 51
- #001 – Cloddy (Uncommon) (1/3) x12
- #044 – Larkito (Common) (1/3) x27
- #294 – Hyphoon (Mega Rare) (1/1) x1
- #304 – Cryzzard (Mega Rare) (1/3) x3
- #307 – Briar (Mega Rare) (1/3) x5
- #313 – Flotter (Mega Rare) (1/3) x3
Items:
- 1x Revive
- 1x Glidlee Companion
")
Quest:
- #519 – The Middleman (Bronze Badge required) – see Quests for Solution and Trade details.
Nexomon:
- Fight Count: 51
- #016 – Heliwurm (Common) (1/3) x34
- #153 – Stalkee (Uncommon) (1/3) x15
- #307 – Briar (Mega Rare) (1/3) x2
- #319 – Wadgon (Mega Rare) (1/3) x1
Items:
- 1x Apple (Treestump to the right, no shiny item spot thing)
- 2x Shard Spot (Pickaxe required)
")
Nexomon:
- Fight Count: 50
- #016 – Heliwurm (Common) (1/3) x26
- #153 – Stalkee (Uncommon) (1/3) x8
- #294 – Hyphoon (Mega Rare) (1/1) x1
- #313 – Flotter (Mega Rare) (1/3) x7
- #316 – Volt (Mega Rare) (1/3) x3
- #325 – Dinja (Ultra Rare) (1/3) x5
Tamer:
- Red Haired Woman
House East
") Items:
Items:
- 1x Onigiri
- 1x Zumble Companion
")
Nexomon:
- Fight Count: 50
- #001 – Cloddy (Uncommon) (1/3) x14
- #044 – Larkito (Common) (1/3) x19
- #304 – Cryzzard (Mega Rare) (1/3) x7
- #313 – Flotter (Mega Rare) (1/3) x9
- #340 – Mearn (Ultra Rare) (1/3) x1
Lydias Village (Silver Badge required?)
")
Special:
- Warpstone (After #01 – The Frozen Lake)
In Progress… Can’t Progress since not enough reputation, since Silver was recommended at Airport I guess we need Silver Badge first.
Related Posts:
- Nexomon: Extinction Element Effectiveness Chart
- Nexomon Extinction How to Get the Running Shoes
- Nexomon: Extinction All Tyrant Locations
- Nexomon: Extinction Wild Encounters + Vaults
- Nexomon: Extinction All Status Effects Explained