
FINAL FANTASY VIII – REMASTERED is a remaster of FINAL FANTASY VIII, featuring multiple enhancements including additional options to customise your gameplay experience and difficulty.A lot of achievements from the original Steam release were removed from this version. This includes “Contrived Finish – Finish the game with Squall’s initial level”, “10000 kills – Kill 10000 enemies” and “Collector – Collect all cards”, among many others.
This guide is only limited to the achievements for this version.
 Magic Miner
Draw magic 100 times from draw points
Simply keep drawing all the draw points you see through the game. Some are hidden and will require special skills to see them.
 Magician
Draw (Stock) magic from enemies 100 times
Just like the previous one, but this takes place in battles. Make sure to draw to “Stock” for it to count.
 100 Kills
Kill 100 enemies
 1000 Kills
Kill 1000 enemies
Both should come naturally towards the end. If you’re still missing kills by the end of the game, head to the forest next to Dollet and keep killing enemies in that area. They’re weak enough and always show up in groups of three.
Game boosters hotkeys are the following:
- F1: Battle assist options (HP, ATB gauge, and Limit Break boosts)
- F2: No random encounters
- F3: Game speed boost (x3)
We highly recommend not touching these, unless you already played this game before and only want the achievements the easy way, or if you want to reduce your grind time.
Also, activating “Cheats” such as ‘Obtain all items, abilities, max G.F. levels, max currency, max spells, etc, will DISABLE achievements PERMANENTLY for that playthrough.
Disc 1
Quezacotl and Shiva GFs (Desk) – Not Missable, forced later when you talk to Quistis at the front gate.
- After the opening cutscene, you’ll end up with Quistis walking to class. After the brief meeting in class, you’ll be tasked with talking to Quistis. Instead, interact with the desk that you were already sitting at to bring up a menu. Select ‘Turn on the power and…’ and then when the main page loads, select ‘Tutorials’ and you’ll automatically receive both, Quezacotl and Shiva.

 Quezacotl
Unlock Guardian Force Quezacotl
 Shiva
ShivaUnlock Guardian Force Shiva
Ifrit GF
- Battle Reward for beating Ifrit
 Ifrit
IfritUnlock Guardian Force Ifrit
Once you’re back at Balamb Garden, head to your room to get changed and progress with the story.
Make sure to junction ‘Draw’ to someone before fighting the boss.
Elvoret Boss draw: Siren GF
- Battle begins with just Biggs, then Wedge joins after a period of time. After you deal enough damage to Biggs and Wedge, Elvoret will blow them away. Immediately draw Siren from Elvoret. The ??? is Double.


Unlock Guardian Force Siren
Timber Maniacs – Hotel or Train Station (doesn’t matter which one you grab)
- After the SeeD exam in Dollet, you’ll ride the Vessel back to Balamb. Go south and you’ll be at the spiral with a hotel in the middle. Enter it and take the stairs to the left to enter the bedroom. Examine the desk to the right of the save point.

- After graduation, talk to Cid to receive the Battle Meter. This is not related to any achievement but still good to have.
 First Salary
Get your first salary from SeeD
This will come naturally after the training center incident and while walking back to your bedroom.
Magical Lamp (Given by Cid – starts diabolos GF fight)
- Your first SeeD mission is given by Cid just south of the directory, south two screens. Talk to him again to receive this item.

Use it from inventory (save beforehand) and defeat Diablos to unlock the GF.
 Diablos
Unlock Guardian Force Diablos
Note: You can do this at any point of the game, as long as you have the Magical Lamp in your inventory.
Timber Maniacs (Newsroom)
- Backroom of Timber Maniacs building

Timber Maniacs (Hotel – stay a night)

- Note: Don’t worry if you didn’t visit it before taking the train, this location can be revisited shortly after.
Location: Follow the train passed East Academy, then follow the road to the cliffside coast.

Timber Maniacs – Guest Room (Inn – Stay a night)

Timber Maniacs (Pub, second floor)

- Location: Northeast of Deling City

Brothers GF (automatically granted after completing this dungeon)
- You need to essentially visit each cardinal direction of the map except for South as that is the exit. On the eastern end, you fight a pre-battle with Sacred. On the northern end, you can flood the dungeon by letting water through. There’s a draw point here. On the western end, you mess with the gears on the left to presumably lower the draw bridge.
- Once you’ve done all three parts, exit through the south, then enter again and head straight to the middle for the boss fight.
- HINT: To go from south to east to north to west to south again, simply take the right route every single time it’s a 4 way crossroad.

 Brothers
Unlock Guardian Force Brothers
Timber Maniacs (Hotel – stay a night)

Carbuncle GF (Draw it from Iguion Boss)

 Carbuncle
Unlock Guardian Force Carbuncle
Disc 2
CC Group Quest
- This sidequest has the prerequisite of winning 15 triple triad games in the Balamb Garden, but Cafeteria, Library or Classroom 2F matches won’t count, so try to play them all in the main hall area.
- Once you’ve done the previous step, you can finally start playing against the members of CC group. Defeat them in the order specified below.
The following achievement will come naturally while doing the sidequest:
 Card Player
Play Triple Triad
This other might come naturally as well, but if it doesn’t, I highly recommend getting it out of your way as soon as possible:
 Loser
LoserLose a rare card in a Triple Triad game
Jack (Main Hall)
- This is the first of the CC Group opponents.

Card Magician Joker
- Head to the Training Center, take the right path and go past the docks. Save at this point.
- Go back to the docks and look for the Joker. If he isn’t there, go left and right until he spawns.

Card Knight Club
- Save at your dormitory, then head one screen down. Knight can come from the left or right side. If he doesn’t spawn, simply keep reentering the scene until you can find him.

Card Princess Diamond
- Diamond is actually two girls, better known as the Diamond Duo. They can be found just under the Garden directory. Closest save is the dormitory.

- Once you’re done with all the CC group members, head to the elevator to continue with the story.
Norg Boss
- This boss has Leviathan, a missable GF.
- In order to extract the GF, you first have to damage NORG’s pod quite a bit o reveal its body.
- Once the body is visible, just draw it with any character to get the GF.

 Leviathan
Unlock Guardian Force Leviathan
Card Prince Spade
- After defeating NORG, you will regain access to the 2F. Save and head there.
- You’ll find two guys sitting at the halfway. Challenge the rightmost one to find out that he’s ‘Spade’.

And that concludes the first part of the CC group quest.
Timber Maniacs
- Inn – Second Floor

Timber Maniacs
- Follow the rails all the way north until reaching a dead end. On the right side there’s a house, go inside.
- The magazine is on the floor.

Card Queen Heart (Garden’s bridge)
- Once the Garden is fixed, head to the bridge and challenge Xu to a card game.
- Defeat her.

Card Master King
- It’s time to hunt the last member of the CC Group.
- Head to the infirmary and attempt to challenge Dr. Kadowaki to a card game. She’ll give you some information regarding the Card Master King and how she lost her position 4 years ago.
- Go to your dormitory and save your game there.
- Examine your bed. If you’re in a party, choose ‘Leave me alone….’, then interact with the bed again and rest.
- The true King will be revealed that night, defeat her to finish the sidequest and unlock the achievement.

Note: She can be rematched at the Bridge, in case of losing or drawing.
 Cards Club Master
Defeat every member of the CC group
Location: Found on the northernmost continent.

Timber Maniacs
- Go all the way north and take the elevator to access the village.
- Now, head two screens to the left to find a pond with a frog. Enter the right house here.

Location: Found on the southern continent.

- Warning: This is a timed dungeon, you can either disable the timer completely by defeating the boss at the end, or keep re-entering the ruins to reset it.
Brief walkthrough to the optional boss
- Take stairs twice until you reach the ruins. Go inside, take the elevator block up.
- Use the left ladder, go in and examine the control panel.
- Go out and all the way down. Examine the blue orb on the altar at the bottom of the ladder. Take the newly appeared stairs to the right.
- Take the ladder immediately at the top of the stairs. Examine statue and take the left eye.
- Go down the ladder and up stairs on the right. Climb up the ladder to the left and examine statue. Put in the left eye, statue gives code. Remember the code, it’s randomized for each playthrough.

- Take both eyes, go back to the first statue and put both in.
- Statue wants a code, put in yours, from top to bottom. Hit cancel to CONFIRM.
- Door opens under, boss fight inside. Reward is the Odin card and the pseudo GF Odin, as well as disabling the timer completely for the rest of the dungeon.
Tonberry GF
- Defeat between 16 and 22 tonberries to make the Tonberry King show up.
- Tonberry GF will be obtained as a battle reward.

 Tonberry
Unlock Guardian Force Tonberry
During Fujin and Raijin boss fight
- Pandemona can be drawn from Fujin

 Pandemona
Unlock Guardian Force Pandemona
-
- Location: Northernmost continent, right next to Shumi Village.

- Go in, speak to the kid and buy a ChocoWhis for 1,000 Gil.
- Use whistle to find a spot where only one Chicobo shows up, should be around top left corner.
- Interact with the Chicobo to make Mama Chocobo to show up.
- Choose to ride her.
 Chocobo
Capture a Chocobo
Location: Northernmost continent.

Timber Maniacs (Graveyard, right from entrance)

Disc 2 (Cont)
Location: Centra Continent, southern region.

Cerberus GF
- Pretty hard to miss since you have to go through that room in order to progress with the story, but still can be missed if you don’t interact with it. The GF is rewarded upon winning the battle.
- Note: There’s a save point at the bottom right corner.

 Cerberus
Unlock Guardian Force Cerberus
Alexander GF
- During the fight against Seifer and Edea in the auditorium, defeat Seifer first, then draw Alexander from Edea.

 Alexander
Unlock Guardian Force Alexander
Disc 3
Location: Southernmost continent, near the starting point of disc 3

Timber Maniacs
- Upon entering the doorway, it sits on the ground to your right.

Location: Southern continent, in the middle of the sea surrounded by mountains

Timber Maniacs
- After entering the ship, head over to the right and you’ll have a cutscene.
- Once you regain control, take the stairs to your left. The magazine is on the floor.

- This SHOULD be your final Timber Maniacs magazine thus unlocking the achievement.
 Timber Maniacs
Collect all Timber Maniacs magazines
 Ragnarok
Find Ragnarok
- Creatures have to be killed in pairs to avoid them getting revived. Eg: Kill a red then another red, a yellow then another yellow and so on.
- Located in Easther continent – Cactuar Island. See the screenshot for exact location.
It will show up as a Jumbo Cactuar in the world map. Just interact with it to start the battle.

 Cactuar
Unlock Guardian Force Cactuar
You’ll need to find the following ingredients to build this GF.
Solomon Ring
- Located at the foot of the large statue in Tears’ Point.


It’s right where my character is standing, but I already picked it up during my playthrough.
6x Remedy+
- Buy 60 remedies from any shop, then use Med Lv Up ability from Alexander GF to upgrade them to Remedy+. You need to learn Med Data ability to unlock Med Lv Up.
- Note: Refer to ‘Power Leveling Characters and GFs’ section if you’re lacking Med Lv Up or Med Data abilities.
6x Steel Pipe
- Can either mug them from Wendigo monsters (forest near Dollet) or Card Mod an Elastoid card for 1 Steel Pipe each.

- Note: Refer to ‘Power Leveling Characters and GFs’ section if you’re lacking Mug ability.
6x Malboro Tentacle
- Malboros are found on the Island Closest to Hell. You can either mug or get them as a battle reward. Alternatively, you can ‘Card Mod’ 4 Malboro cards into 1 Malboro tentacle (24 would be needed for the 6 tentacles).
- Island Closest to Hell is the leftmost island. All enemies here have 50k+ health.
- Use Degenerator blue-magic of Quistis to quickly defeat them.

- Note: Refer to ‘Power Leveling Characters and GFs’ section for more information.
Once you’ve collected all the required items: Open your menu, then items and use the Solomon Ring.

 Doomtrain
Unlock Guardian Force Doomtrain
The next dungeon is quite hard, so I highly recommend making the best weapon for Squall before proceeding.
What materials do you need to build the ‘Lion Heart’?
- 1x Adamantine: Card mod the Minotaur Card or Mug it from Adamantoises.
- 4x Dragon Fang: Almost all dragons drop this. Head to the Island Closest to Hell if you need some.
- 12x Pulse Ammo: Made by various rare items using Ifrit’s Ammo-RF ability.
- 2,000 Gil
Once you have all, head to any weapon shop and simply ‘Remodel’ your weapon.

I’m sure that you already upgraded a few weapons, but if you haven’t yet, the following achievement will unlock:
 Handyman
Upgrade your weapon
Warning: This dungeon is hard, be aware.
Location: Southwestern corner of the map.

Bahamut Boss and GF
- Approach slowly to the core, but DO NOT move when it is active.
- Options we must choose:
- It’s not our will to fight
- Never
- Bottom option (It’s invisible).

You will receive Bahamut GF upon winning the battle.
 Bahamut
Unlock Guardian Force Bahamut
At this point, you should have enough levels (30) to reach the max Seed Rank. Refer to the Seed Ranks section for all correct answers.
- Leave and re-enter the location. A save point and a path to go deeper will be now available.
- Put Zell in your party and go through the hole on the floor.
- You start with 20 units of RSP. Use 4 on the very first room.
- On the second panel, use 2 units. Should have 14 units left.
- Now, choose 1 units for the three next levels. You should have 11 left after taking the elevator.
- At the bottom floor, let Zell manipulate the machinery to avoid spending any units.
- Go through the door after the scene.
- If everything was done correctly, you’ll get a whole set of unavoidable battles every few steps. Not even the No-Encounters booster can save you from this. If you messed up at some point, head back to the beginning but start from the second panel. The 4 units you used on the first panel cannot be recovered.
- You will reach a second save point in the ruins. Save and continue further.
- Make your way to the very bottom.
- Don’t interact with the machinery yet. If you have Move-Find ability unlocked, I highly recommend equipping it on any of your characters and using the save point next to the machinery. If you don’t, may god have mercy upon your soul.
- Interact with the machinery to start one one of the hardest battles in the game.
Ultima Weapon
- Make sure to draw Eden before defeating the superboss.

- Note: Like I mentioned previously, you can skip this section if you’re having too much troubles to continue. Eden is obtainable again at the last dungeon of the game.
However, if you actually managed to get to this point and draw Eden from Ultima Weapon, the following achievement will pop:
 Eden
EdenUnlock Guardian Force Eden
Obel Lake Quest
- There is a chance that you’ve already started this side-quest, but as this is the first mention of it in this guide, it’ll be explained in full.
- Another note is, THIS CANNOT BE DONE ON DISC 4.
Step 1: Finding the Shadow
- Head to Obel Lake. On the continent near East Academy stop and between there and Timber, you’ll find a small lake with a rather sizable peninsula. This is Obel Lake.

- Stand on the peninsula and interact around there until you get an option to ‘Try humming’ and ‘Throw a rock’.
- Pick ‘Try humming’ to summon the shadow. After that, you’ll get another option, pick ‘Try humming again’ and you’ll finally encounter your shadow.
- Try humming again and you’ll be prompted. Choose ‘What is it?’
- Your next step is to find Mr. Monkey
Step 2: Finding Mr. Monkey
- Head to Dollet, then go to the closest forest. Use the action key until you encounter Mr. Monkey giving the option to ‘Throw a Rock’.

Throw a rock and return to Obel Lake. - Once back at the peninsula, summon the shadow by picking ‘Try Humming’ and you will share the whereabouts of Mr. Monkey.
- After the dialogues, pick ‘Throw a rock’ until it says ‘the rock skipped many many times’.

- Then after that, continue talking to the shadow for hints that will lead you to the four clues. Simply keep talking to the shadow until he repeats himself.
Step 3: The Four Clues
- Clue #1: Head back to the forest where you found Mr. Monkey and throw rocks at him until he throws one back. It’ll be a man-made stone with carvings on it: U R H A E O

- Clue #2: Head to the rails that are connected to Fisherman’s Horizon, then head west. You will see a peninsula just north of where the rails connect to the mainland.

Examine that peninsula for the man-made rock: R E A I D R - Clue #3: In between Galbadia Garden and the D-District Prison, there should be a railway that runs near some cliffs and over a river that has a waterfall coming out of the cliff. Land the Ragnarok on top of the cliff with the waterfall (you can check menu to see that you’re in a place called ‘Monterosa Plateau’. Use the action key to get a notice about a bird warming up some eggs to trigger a scripted battle.

Finish the battle to retrieve another clue: E A S N P D - Clue #4: Head over to Balamb and run around on the beach using the action command.

Keep finding rocks until you find one similar to the one thrown by Mr. Monkey: S T S L R M
Step 4: Three Stars
- Head to Esthar, then head north. You’ll pass some plateaus. Then above that, you’ll find some dirt plains before running into a set of mountains. Run around the plain examining and you’ll find some interactions: blue rock, white rock, black rock, and red rock.

- The blue rock provides no actual hints aside from the fact that every other rock is lying as they are the ‘Liar Rocks’
- The white rock says whatever it wants.
- The black rock repeats the last line.
- The red rock helps you find the ‘Three Stars’ that you’re looking for by lying. It will tell you a cardinal direction, but the treasure is in the opposite
- In turn, simply point your map to the north. Examine rocks until you find a red one. If the red says the treasure is to the east, go west. If it says west, go east. If north, go south. If south, go north. Ignore all other rocks.

Step 5: The Final Clue
- Return to Obel Lake and talk to the shadow. The shadow gives you a hint that you should take some ‘time off’ at Eldbeak Peninsula. Head there.
- Eldbeak Peninsula is located on the southwest corner of the Trabia Continent. (It’s northeast of Obel Lake.) Examine the very tip of the peninsula for the clue: “TRETIMEASUREATMINOFFDEISLE”

- Combine that with the hint that the shadow gave you, simply remove the words “time” and “off from the clue to give you: “TREASUREATMINDEISLE” or ‘Treasure at Minde Isle’
Step 6: The Treasure
- Now for the finale, head to Minde Isle. It’s a small island south-southwest of Esthar and northeast of the Centra continent where both continents meet. You can check your menu to see if you’re in the right area.
- Now, you don’t get any hints as to which part of the island it’s on, but it’s tiny so spam the action key. The only hint you do get is, it is NOT on the edges of the island. So park your Ragnarok on the edges so it’s not in your way.

- You’ll get a dialogue when you’ve found the reward as well as the achievement: Luck-J
 Obel Lake Secret
Complete the Obel Lake side quest
PuPu’s Quest
- This questline has two purposes: the PuPu card and the UFO achievement
- Do this as soon as you get the airship, Ragnarok.
- UFO encounters are battle encounters; however, they ignore the fact that you use ENC-NONE or the No-Encounters booster. So feel free to use them while hunting for these encounters.
UFO #1: Mandy Beach

UFO #2: Kashkabald Desert

UFO #3: Winhill Bluffs

UFO #4: Heath Peninsula

UFO #5: Chocobo Sanctuary

- This is a pre-warning before you head to the next area automatically. HAVE AT LEAST 5 ELIXIR WITH YOU AND ‘Item’ JUNCTIONED TO A CHARACTER.
PuPu: Balamb Garden (Original)
- After the aftermath of the fifth UFO, it crashes somewhere. This place is Balamb Garden. DO NOT GO THERE UNLESS YOU HAVE 5 ELIXIR.
- Elixirs can be bought via Call Shop -> The Esthar Shop!!!
- Make sure someone has ‘Item’ junctioned.
- Once you’ve got at least 5 elixir and the item action junctioned, head to the original location of Balamb Garden.

- Give the injured PuPu 5 elixirs to complete the quest.
 UFO
UFOComplete the PuPu side quest
Disc 4
Bosses
- Sphinxaur: Upon defeating the first boss, release “Draw” seal.
- Tri-Point: Has Siren GF.
- Art Gallery puzzle solution is:
VIVIDARIUM
INTERVIGILIUM
VIATOR
- Trauma: Has Leviathan GF.
- Red Giant: Has Pandemona GF.
- Krysta: Has Carbuncle GF.
- Gargantua: Has Cerberus GF.
- Catoblepas: Has Alexander GF.
Boss is unlocked by having all 4 coffins opened at the same time. - Tiamat: Has Eden. This is your last chance to draw it if you missed the opportunity during 3rd disc.

- As Omega Weapon is an optional boss, I’ll put this here. After going through the castle and defeated all of Ultimecia’s guardians, the last being Tiamat, you should be ready for Omega Weapon.
- Tips: He has 1,200,000 health points.
- You can Card Mod the Gilgamesh Card into 10x Holy War to make your party invincible.
- You can Card Mod the Laguna Card into 100x Hero to make a single character invincible.
- You can Tool Mod Power Wrists bought from the Esthar Pet Shop into Aura Stones, so you won’t need Aura magic to spam limit breaks
- You can cast Meltdown or Doomtrain in order to inflict Vit 0 on Omega Weapon.
- Godspeed.
- Place your chosen battle team near the fountain and switch to the second team.
- Head with the second team to the room just before the art gallery.

- Interact with the bell cord in there. A short timer will be activated.
- Switch to the first team and run into the chapel to find the superboss.

If you are still alive after your confrontation with Omega, congratulations! you’re the greatest SeeD that this planet has ever seen:
 Omega Destroyed
Beat the Omega Weapon
I won’t spoil anything about the last boss or the ending, but if you did manage to defeat Omega Weapon, then this should be a piece a of cake.
 End of Game
Finish the game
Power Leveling Characters and GFs
The place is called ‘Island Closest to Hell’. Here all enemies have 50k+ HP and are extremely aggressive. It might sound like a crazy idea to go farm levels and APs in this location, but it’s actually quite an easy task if you abuse of Quistis’ blue-magic ‘Degenerator’.
More info about this ability can be found at the community wiki: https://finalfantasy.fandom.com/wiki/Blue_Magic_(Final_Fantasy_VIII)
Degenerator blue-magic is unlocked by using a ‘Black Hole’ item on Quistis. You can get this item as a drop/mug from Gesper, or by Card Modding a Gesper or Diablos cards.
Gesper shows up at the same location.
Diablos card is a reward for defeating Diablos GF.
See the screenshow below for the exact location:
This is one if not the best spot to power level-up all your characters and GFs.
Each battle takes about 20 seconds if Degenerator is used, and awards ~10 AP.
Also, this island is filled with draw points, so draw away if you haven’t unlocked ‘Magic Miner’ achievement by now.
Side note: For the record, I went from level ~20 to 100 in about 30 minutes with 3x speed boost.
Seed Ranks
All correct answers will be listed below:
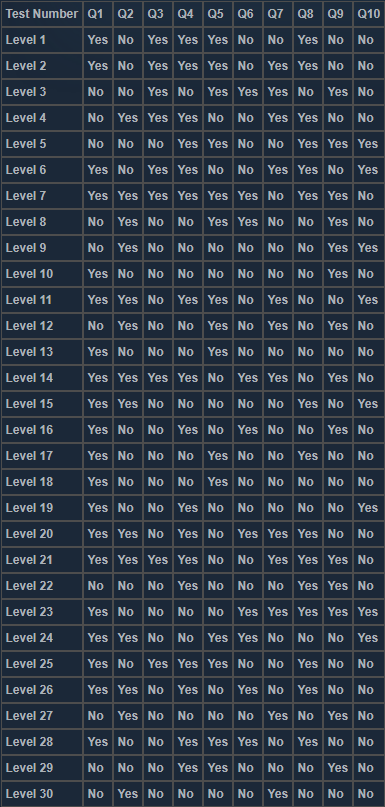
Reach SeeD rank A
Achievement Cleanup
 Maximum HP
Reach maximum HP
Pretty easy if you max out a character level and use HP+% abilities. Brothers and Diablos GFs have ‘HP+80%’ passive skill that can be also stacked with others of the same kind, eg: HP+40% to reach +120% total.
1000 KillsKill 1000 enemies
If you’re still missing kills after getting every other achievement, take the first portal on the chain area before Ultimecia’s Castle and head to this location:

All battles in the forest portion of this area are against a group of three enemies. Battle assist (F1) and Game speed (F3) boosters are recommended.
I’m on disc 4 and can’t seem to complete the CC quest. Only member that is available is joker. Your guide makes no mention to doing the quest in disc 4.