This guide is meant to give players the tools and knowledge necessary to survive the Nightmare and all of its terrors.
Introduction
In this guide I will go into specifics about the following:
The HUD
The Objective
Maps
Your Opposition
The Killers
The World and You
Scrap
Classmates
Combat
Classes
Class – Assault
Class – Medic
Class – Scout
Class – Technician
Spells
Spells cont.
Closing Notes
The HUD
The Objective
Retrieval
This kind of objective will involve you moving towards a designated item, and bringing it to a location where it’s needed.
Gym Retrieval:
Retrieve gas cans and bring them to generators. Occurs twice and both require two cans.
Library Retrieval:
Retrieve floppy disks and bring them to the server. Occurs once and requires three disks.
Belltower Retrieval:
Retrieve blowtorches and bring them to the sewer door. Occurs once and requires two torches.
Retrieve clock gears and bring them to the gates. Occurs once and requires two gears.
Interaction
This objective type involves you moving to a designated location to complete a certain task. This task will require you to stand in place to continue with the plan. Every map will have at least one Interaction.
Gym Interaction
Interact with the valve in the basement to open the grate blocking the fuel. Requires about 30 seconds of total interaction.
Interact with the valve in the rafters to open the exit gate. Requires about 8 seconds of total interaction.
Library Interaction:
Interaction with computers to unlock the secret library. Occurs once and requires three computers, each requiring about 5 seconds of interaction.
Interact with the valve in the secret library to open the exit gate. Requires 8 seconds of total interaction.
Belltower Interaction:
Interact with the lever to open the belltower area’s exterior doors. Interaction is instantaneous.
Interact with the valve at the top of the tower to open the exit gate. Requires 8 seconds of total interaction.
IMPORTANT TIPS TO KNOW:
Interaction objectives, such as the exit gates, can be done to partial completion. This allows you to leave valves at 99% to go take care of other things if necessary.
Maps
- The Gymnasium
- The Library
- The Belltower
The Gymnasium
This map takes place in the main section of the high school. It features many hallways and choke points that the killer can use. The Gym itself is a wide open space allowing you some freedom of movement, when the time comes.
The Library
This map contains a fair balance of inside and outside gameplay. There many corners that killers can use to ambush you. Do be careful to stick together, as I don’t think the killers are here to check out books.
The Belltower
This map has a lot of outside gameplay. You’ll have to be careful when ascending the belltower, as you can very easily fall to your death.
Your Opposition
Physical and Predator Mode
Killers can enter two different modes during the game. In Physical mode, killers are tangible can damage you. Killers can enter Predator mode while they are out of sight from survivors, and can move very fast. They can also trap scrap locations, place snares on the ground, and enter instakill spots all around the map. In order to enter Physical mode, they need to be out of sight from survivors again.
Executions
Once a survivor is downed, killers can execute them. During this execution, killers cannot be harmed and the survivor cannot be helped. The killer can choose to enter Predator mode or stay in Physical Mode while the execution is happening.
The Killers
The Slasher:
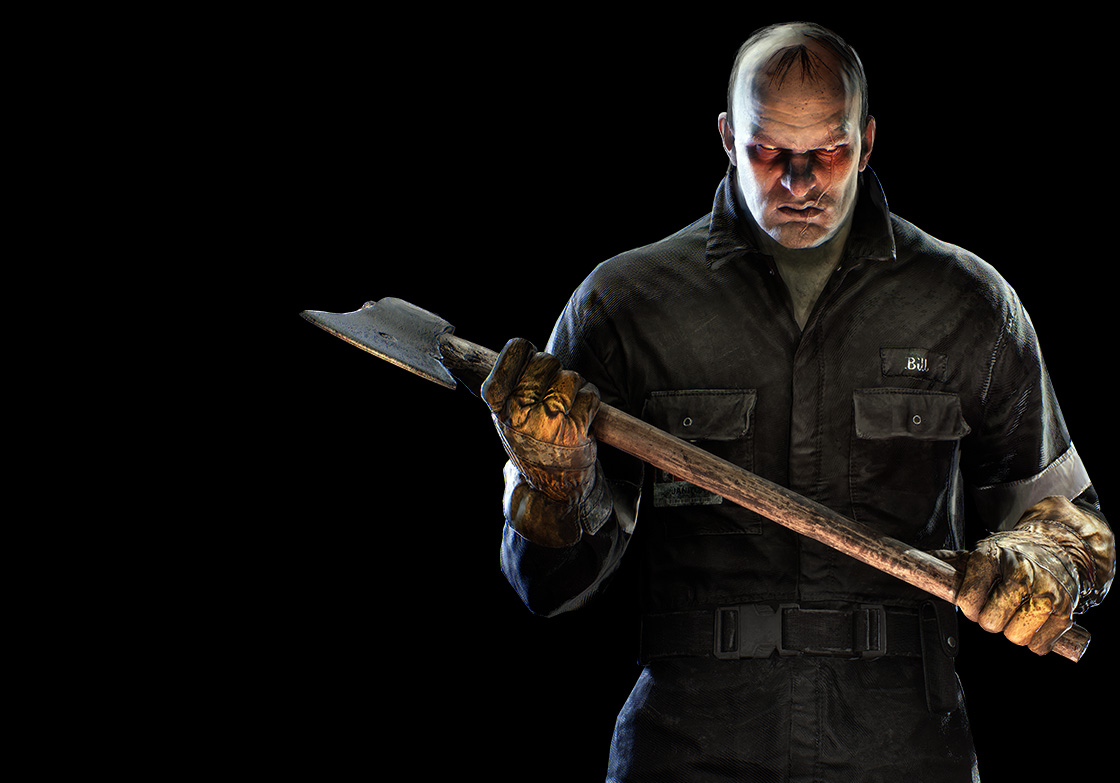 The Slasher is a well rounded killer. Able to move keep up with survivors, and deal a lot of damage. He doesn’t have any secondary abilities, but he’s still a very efficient killer. He uses skylights as his kill spot.
Cutting Down the Slasher:
When it comes to fighting the Slasher, you need to make sure that you have your team ready to do so. Careless efforts and lack of teamwork or planning will allow him to shred through the team easily.
The Slasher can damage classmates very quickly, so we’ll try to imagine the fight between your team and the Slasher as a race. As soon as the starting pistol goes off, you both are aiming to cross the finish line first, which in this analogy will be killing the opposition.
You can trip up the Slasher in the race to get ahead of him by putting things in his direct path to slow down his pace. What this means for you is that you need some way to negate his damage, while allowing you to deal damage at the same time. Assaults can craft helmets, that need to be broken before you can sustain damage, and Medics can craft Shockers to immobilize the Slasher for the rest of the team to kill him. Technicians can place down turrets to cause the killer to step away to break them, buying you and your team a quick second to make distance or attack him. Scouts can make Smoke Bombs to incapacitate the Slasher, so ranged weapons can get their damage in as well.
The Strangler:
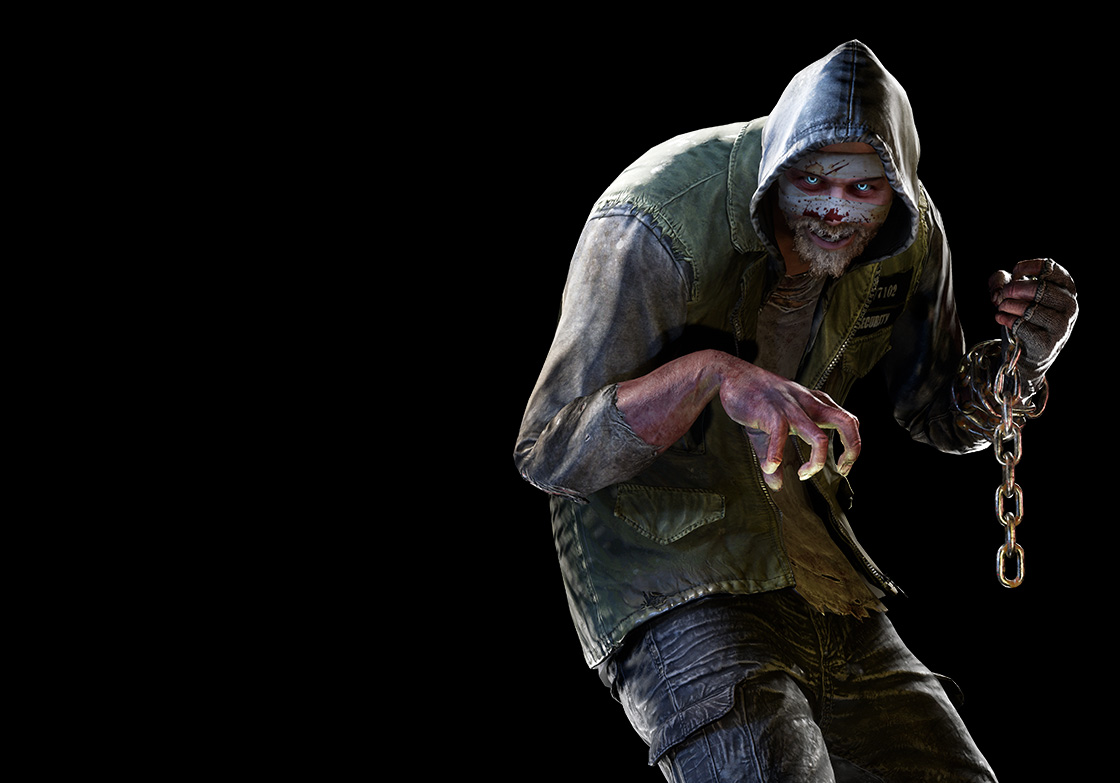 The Strangler is a killer that excels in picking off isolated targets. He uses his chain to pull survivors away from the group to create separation and discourse. He does find difficulty in fighting groups, but his 1v1 game is unmatched. He uses open grates as his kill spot.
Strangling the Strangler:
The Strangler’s greatest strength is the ability to win 1v1 encounters with the upmost ease. Once you take that away from him, he doesn’t have much left. Sticking together as soon as you hear his insane snickering, will greatly increase your chances of survival. If he decides to show his face when the group’s assembled, rush him down. Swarm him and don’t let him get away. If all of you are around him, hitting him with everything you got, he’ll be the one gasping for air.
The Giant:
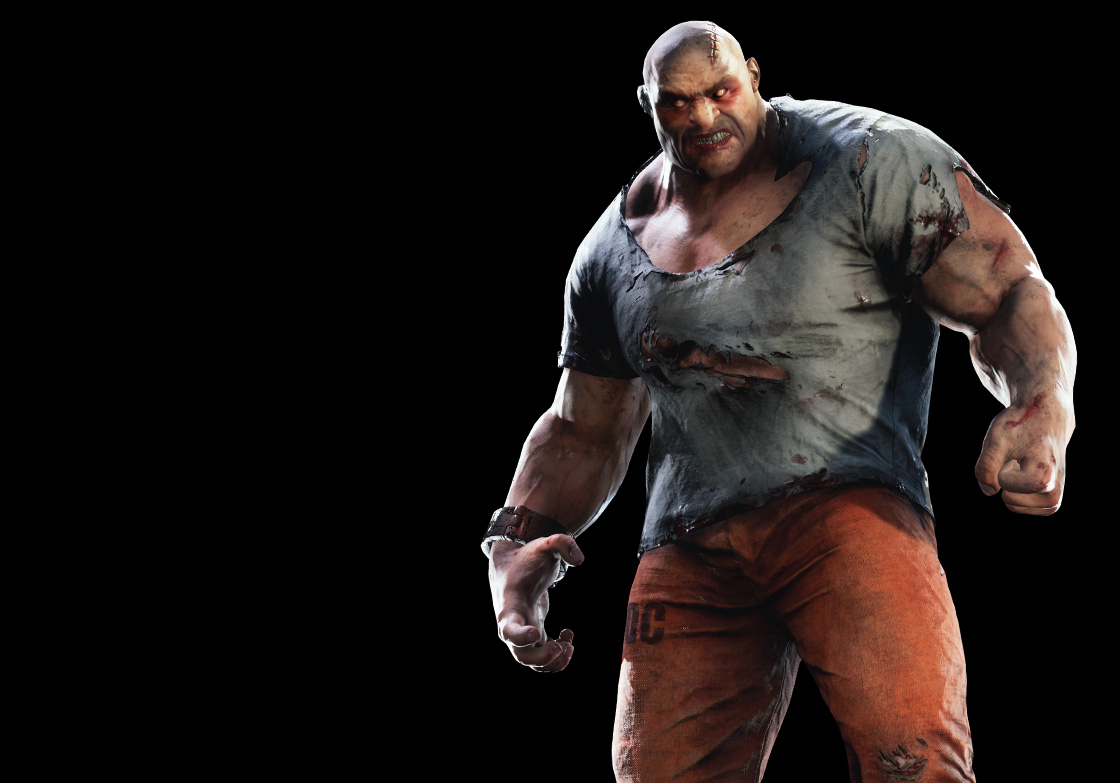 The Giant is a hulking wall of muscle, capable of fighting groups of survivors at one time. He can pickup survivors and throw them long distances and even into other survivors. He has a lot of health, so fighting crowds is his specialty. Bare walls are his kill spot.
Crushing the Giant:
The Giant follows a similar strategy to the Slasher, in that you need to outdamage him before he does you. The main difference is that the Giant has a much better time with crowd suppression. His large health pool, high damage output, and ability to grab and throw survivors, make him a very dangerous threat up close. When fighting the Giant, Assaults need to time their attacks to make sure they aren’t grabbed. The use of equipment is very important when tackling the Giant as a team. Specifically equipment that deals damage over time is very useful, such as the Assault’s Molotov and the Technicians turrets and Flamethrower. If you can keep your eyes on the Giant, while damage over time does it’s thing, he’ll quickly be cut down to size.
The Spider:
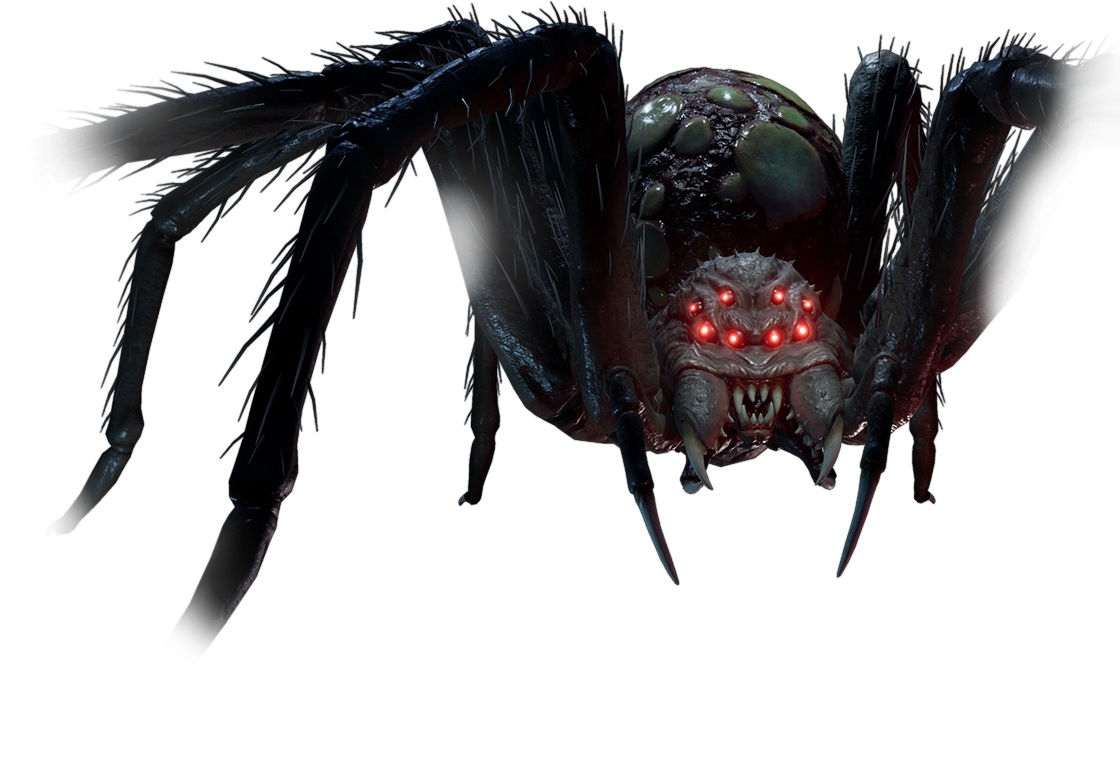 The Spider is a large arachnid specializing in crowd control. She can spit acid onto the survivors to cause damage over time. When she dies, she explodes in a splatter of acid which helps with locking down objectives for a few seconds. The Spider erupts from certain spots on the ground for her kill spot.
Squashing the Spider:
The Spider is a fast attacker, with the ability to lockdown certain areas with acid for a few seconds. She can rush down survivors with damage over time and quick swipes with her fangs. What you have to look for when fighting the Spider, is the acid spit. As soon as she uses it, she can be easily overpowered. Make sure that as soon as the spit’s out the team rushes her down. After the Spider goes down, make sure to get out of her acid explosion’s range. That’s all there is to it, no bug spray necessary (not that it would help).
The World and You
Doors
These are pretty self-explanatory. They’re doors. They close, they open, they creak, they squeak. These babies can do it all.
Floor Hatches
Floor Hatches can be in two states: untrapped and trapped. If a hatch is trapped, it will open when you step on it. Be careful and watch you step around them, as the killer can use them to isolate you from your team. Scouts can use their trackers to tell if a hatch is trapped.
Snares
Killers can place up to five snares on the ground to trap you and your classmates. If you step on one, you’ll be immoblized. While trapped, other survivors can free you from your trap. Traps will not go off if you crouch over them, and they can be disabled by interacting with them.
Air Ducts
Survivors can use these to travel from one part of the map to the other very quickly. You can use these if you need a quick escape, or if you need to get to somewhere or someone fast.
Scrap Stashes
These containers hold from 1-5 scrap for you to collect. Killers can hide toxic gas in these to incapacitate survivors who open them. Survivors can identify trapped stashes with a Scout’s tracker.
Open Grates
The Strangler can hide in these grates to kill you instantly by dragging you into the darkness beyond. Try to keep out of the grate’s range when you suspect a Strangler is waiting to kill you. Scouts can highlight the kill zone, so you can avoid it.
Skylights
The Slasher can drop down from these to kill you instantly by cleaving your head in two. Try to keep out of the skylight’s range when you suspect a Slasher is waiting to kill you. Scouts can highlight the kill zone, so you can avoid it.
Bare Walls
The Giant can burst through these walls to kill you instantly by smashing your skull with his fists. Try to keep out of the wall’s range when you suspect a Giant is waiting to kill you. Scouts can highlight the kill zone, so you can avoid it.
Giant Burrows
The Spider can erupt from the floor to kill you instantly by dragging you into her burrow. Try to keep out of the burrow’s range when you suspect a Spider is waiting to kill you. Scouts can highlight the kill zone, so you can avoid it.
Cryptid Dens
These little glowing holes in the ground allow spiderlings to spawn into the map to attack you and your team. You can break these to stop spiderlings from spawning and get a small amount of scrap as a bonus.
Scrap
Classmates
Chad Taylor
“Quarterback, Prom King, D Student”
 Chad is the quintessential popular kid, a jock whose good looks and success on the football field excuse his academic delinquency. Though he might seem like the type, he is far from a bully, always sure to stand up for his team and lend his considerable strength to the cause-of kicking ♥♥♥. Loud, confident and occasionally overbearing, Chad doesn’t know what it feels like to lose. For him, the Nightmare is just another challenge.
Amber Davis
“Overachiever, Prom Queen, Mean Girl”
 Amber is East Side High’s breakout star and she knows it. Her grades are as winning as her million-dollar smile and her social engineering skills and acerbic wit have kept her at the top of the food chain since freshman year. She’s smart, savvy, and can move from bubbly to cutting in a flash. Amber is not about to let a few serial murderers get in the way of her college applications, so when she enters the Nightmare, it’s with a ferocity and a drive that is a surprise to the group-and perhaps to her.
Nick Howard
“Nerd, Scientist, Renaissance Man”
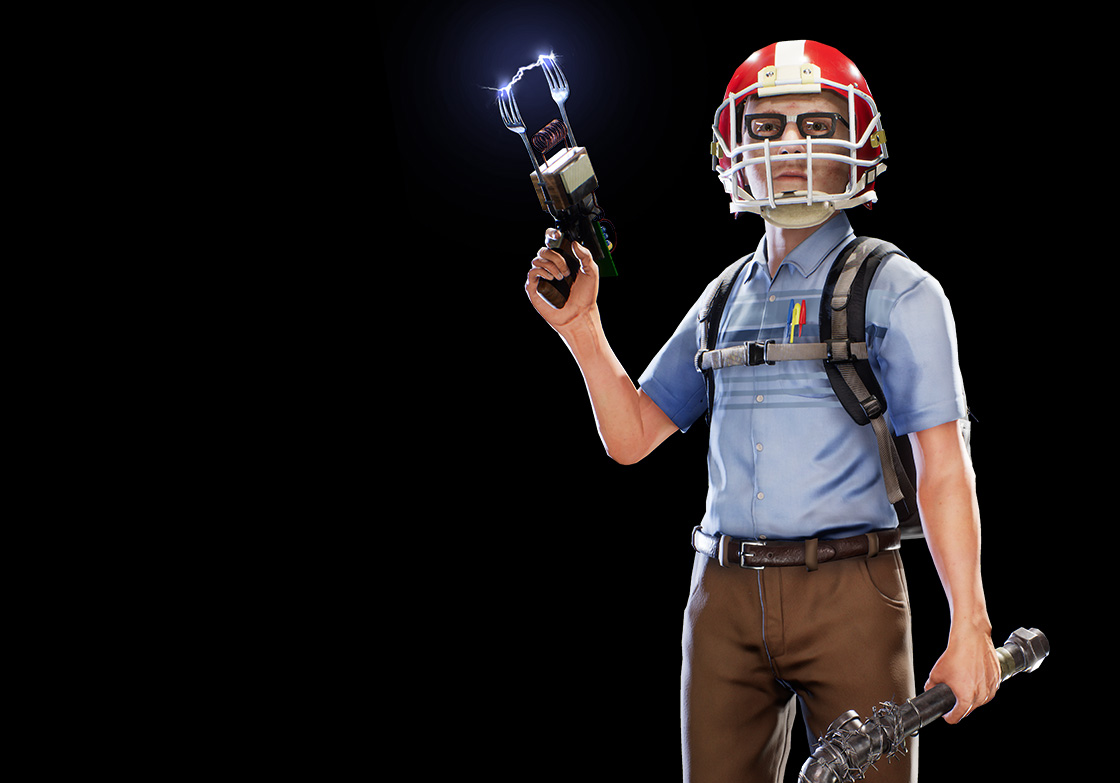 Nick is a proud nerd, entirely comfortable with himself and his archetype. Though fashion-impaired and frequently the target of school bullies, Nick sees everything as “classic” high school, and manages to carry himself with confidence and an innate charm. Nick realizes that the Nightmare might be supernatural, but there’s a certain logic to it, a fascinating temporal loop that must surely possess some underlying science. This is his chance to “boldly go”, and as terrifying as the killers might be, he’s going to take it.
Samantha Bennett
“Outcast, Geek, Invisible”
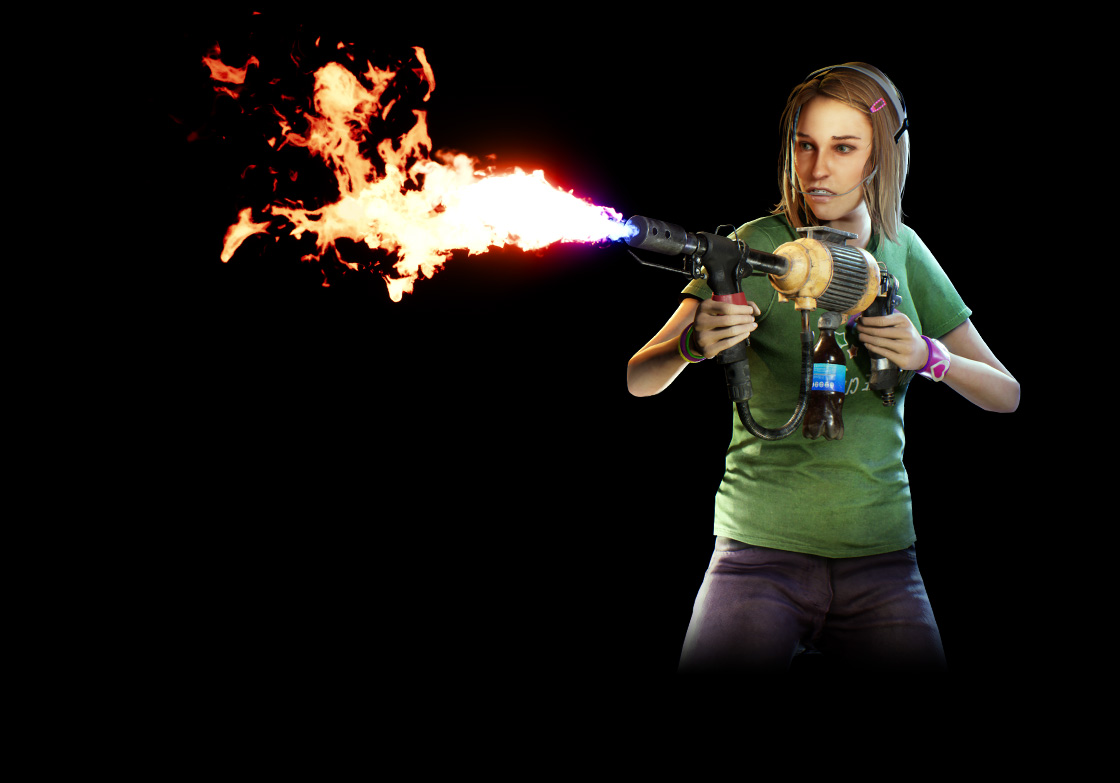 Sam can’t seem to catch a break. A meek and mild-mannered girl, her efforts to be cool (or even noticed) are constantly undone, and the reason she never gets bullied is the bullies don’t seem to know she exists. Sam strives to break free of her loserdom and become a cool kid at last…but for now it’s mostly online penpals, orthopedic shoes and her pet bunny, Sprinkles. Sam’s arrival in the Nightmare feels like an inevitability: of course she’s going to be chased by crazed killers in an alternate dimension, just like she’ll be the one who gets caught in a lawn sprinkler on picture day.
Troy Coleman
“Cool Kid, Strategist, Genre-Savvy”
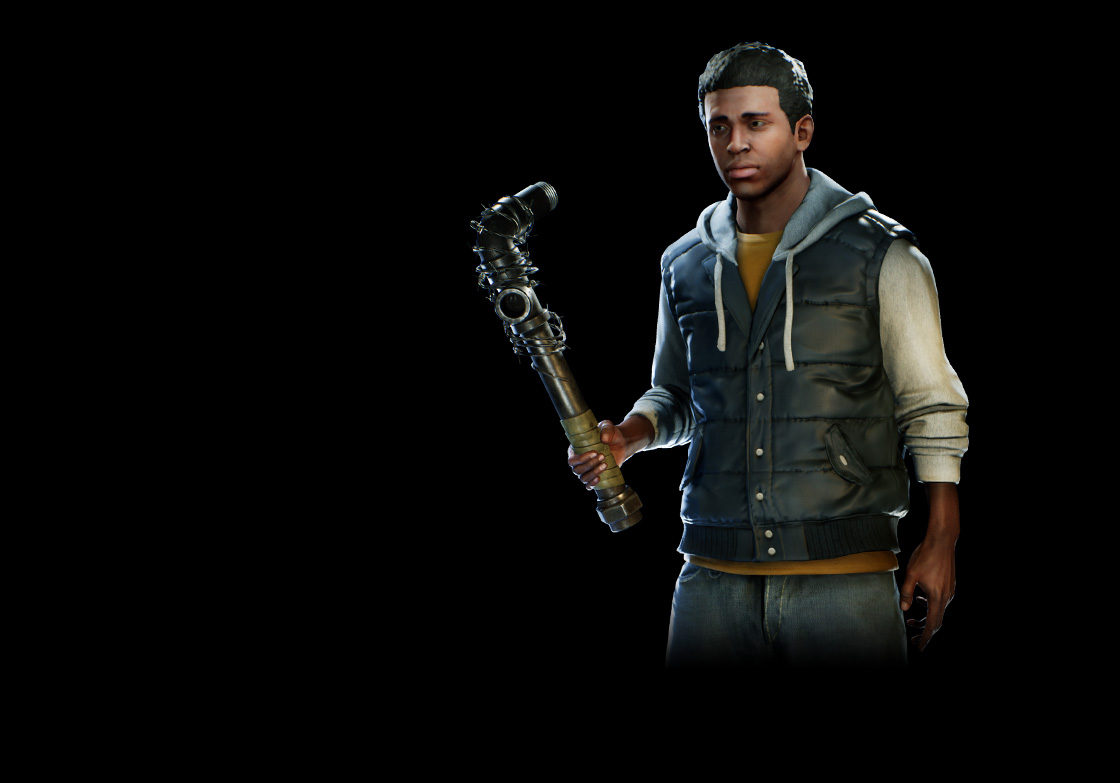 Troy’s family moved from New York City to Forest Hills when he was four years old. While he has little memory of his former home, he’s happy to take the cred it affords him in the sleepy suburbs. Charismatic and trustworthy, Troy’s used to having people look up to him, but being the sharpest guy in the room can mean more responsibility than he’s happy to take on. Troy’s seen a lot of horror movies, so when he arrives in the Nightmare, he doesn’t love his odds. But in the midst of the terror, it’s up to him to lead the team, devise escape strategies, and get everyone out alive.
Raj Singh
“Team Player, Hype Man, Natural Leader”

Combat
Basic Combat
Everyone has the ability to deal some amount of damage, no matter the class they choose. Using your RMB you can throw punches. They only deal 5 damage, but can be great for dealing with spiderlings. If you’ve got nothing left and your back’s against the wall. Then make sure you go out swinging.
5v1
It’s very important to understand that you hold the numbers advantage on the killer. If all of you fight the killer at once, there’s a good chance they’ll die. Be sure to coordinate with your team on how you wish to go about this, as you can easily get wiped if you all aren’t working together.
Dangerous to Go Alone
Fighting solo is a guaranteed death sentence. Success is possible, but it requires a lot of counterplay and thinking. Make sure that if you need to fight the killer alone, that it’s only option left, or that you are prepared to do so.
Time-Out!
Whenever the killer is executing a classmate, they will be invincible during the animation. You can tell by the green glow that appears on them when they would normally take damage. Whenever the killer enters an execution animation, use that to buy you some time to make some distance.
Classes
- Assault
- Medic
- Scout
- Technician
In the next section we’ll discuss the four classes and their roles in your teams.
Assault
Class Tool Specifics: Lead Pipe
- 15 damage/swing
- 1 hit spiderlings (punching takes 2)
- 2 hit cryptid dens (punching takes 3)
The Assault is capable of crafting the following equipment:
Molotov Cocktail
Cost: 14
This item works the way it normally does in other games. Once thrown the area covered by the impact is coated in flames, burning anyone in the area. Killers that are set alight by the flames will suffer from damage over time. The molotov can also damage your teammates so be wary of when you choose to throw it.
Killers that are currently on fire will be unable to enter Predator Mode, so use that as an opportunity to beat them down while the fire works its magic.
Football Helmet
Cost: 16
Another self-explanatory item, the helmet serves an extra health bar of sorts. Once the helmet receives 50 points of damage, it will break. If you have a helmet on your head and you make another one, it will drop on the ground. This will allow your teammates to wear them too.
If you are wearing a helmet and the Strangler tries to grab you, he will take the helmet instead of your neck.
Baseball Bat
Cost: 18
Yet again, another simple item for the Assault class. The Bat is capable dealing large amounts of damage per swing, but it will break after four swings.
IMPORTANT TIPS TO KNOW:
Seeing as you are the main threat towards the killer, you may be targeted first in a fight. Make sure that you always initiate combat with a Medic at your side or with a helmet on your head. If you don’t, the killer will easily overpower you.
Try to think of yourself as less of a warrior and more of a guardian. Playing defensively as an bodyguard can extend your life and the lives of those around you. This is especially true for those dummies who love to run off on their own.
Medic
Class Tool Specifics: Medical Bag
- 8 charges
- 10 health/charge
- 10 secs recharge/charge
The Medic has access to the following equipment:
Pipe Bomb
Cost: 14
This piece of artillery is a thrown explosive that can deal massive damage if thrown correctly. You can cook the grenade in your hand by holding the LMB, before releasing. These grenades can also deal damage to your team, so be VERY careful with where you throw it.
Belt Flashlight
Cost: 5
A very simple item to understand. It’s a flashlight that attaches to your belt. That’s it.
Shocker
Cost: 20
A very useful piece of equipment for the Medic, the Shocker will shoot out an arc of electricity that will stun the killer on contact. The killer will immobilized for about 3 seconds, giving your teammates time to deal some damage or escape.
IMPORTANT TIPS TO KNOW:
As a Medic, you are a high priority target for the killer. Make sure that you have a game plan of keeping the killer away from you while the others beat the stuffing out of them.
As a Medic, you have to make the calls on who you heal and when you heal them. Sometimes it is better to heal the Assault, even though he has a helmet, while the Technician crafts some pills for the Scout. Being able to have this kind of game sense comes with time and experience, but once you have it, you’ll be a force to be reckoned with.
Scout
Class Tool Specifics: Tracker
2 sec blind
20 recharge time
The Scout is capable of crafting the following equipment:
Smoke Bomb
Cost: 12
This grenade erupts in a cloud of smoke that incapacitates killers and classmates alike. Those who stand in the smoke will move slowly and be unable to do anything but move. Survivors can bypass the effect by crouching.
Adrenaline Shot
Cost: 8
The Adrenaline Shot will heal you for 25 health points while also giving you unlimited stamina for about 25 seconds. Use this to move to where you need to be quickly and to outrun killers. if there’s no Technician or Medic around, this item can definitely help you in a pinch.
Shotgun
Cost: 22
The Shotgun is a high powered firearm with two shells. Point the gun at the bad man and shoot. Sounds simple enough.
IMPORTANT TIPS TO KNOW:
Scouts don’t have a lot in the way of defense. Scouts have a blinding flash, but it can be avoided by looking away form it. Their only damaging weapon is the Shotgun, but it’s very expensive to make and only has two shots. If you’re going to play Scout, make sure you balance your lack of offense with your abundance of callouts and ability to rush the objective.
Technician
Class Tool Specifics: Toolkit
- 5 damage/shot
- 20 second cooldown
- 10 sec added back if you destroy the turret
- 3 barricades at one time
The Technician can create the following pieces of equipment:
Proximity Mine
Cost: 14
The Proximity Mine is an explosive that will detonate whenever the killer or a spiderling enters its effective range.
Painkillers
Cost: 8
This bottle of pills will gradually heal those who ingest them. These can help take some of the pressure off of your Medic, when he needs to heal everyone.
Flamethrower
Cost: 25
This weapon is pretty self-explanatory. It’s a flamethrower. A gun that spews flames. You can do the math.
IMPORTANT TIPS TO KNOW:
Technicians can serve as an all rounder class. They can fight killers solo pretty well, and have an option to heal themselves. They have a line of defense against killers with their barricades and they can easily waste the killer’s time with the proper kiting.
Spells
Here’s some things to know about Spells in general:
- Spells come in three tiers, with each spell tier being more powerful than the last.
- Once a spell is bought, you only pay for refills of that spell at a much lower cost.
- You can only equip two at a time.
- Once a Spell is equipped and you enter a game, it can be used as many times as possible until the match ends.
Now that you’re aware of the basics, lets start to run down the list of what Spells we’ve found so far.
Tier 1 Spells
Nimble Feet
Effect – Instantly get out of a trap when activated.
Duration: N/A
This Spell is a simple one. Use it to escape traps when you step into them. Works as a great endgame perk, and if you’re either blind or accident prone (you know who you are).
Faster Crafting
Effect – Significantly increases crafting speed.
Duration: 15 seconds
Another simple Spell. Reduces crafting time from 5 seconds to 1. Useful when you need to craft in a pinch. Works well when you’re the last one and need a quick craft, but the killer keeps interrupting you.
Power Walker
Effect – Increases movement speed.
Duration: 15 seconds
A simple Spell. This perk is great for carrying objectives that require you to walk, so you can get them done that much faster.
Respite
Effect – Significantly increases sprinting speed, but decreases crafting speed.
Duration: 10 seconds
Allows you to run much faster, but doubles your crafting time from 5 seconds to 10. Great for long distance saves, or trying to keep up with the crowd during the endgame.
Travel Light
Effect – Significantly increases stamina, but reduces max scrap capacity.
Duration: 10 seconds
Gives you much more stamina to work with, but you can only hold 10 scrap for the duration. Any scrap you have above that number, gets deleted. Gotta empty your pockets to travel light, right?
Moonwalker
Effect: Front and back speed are the same.
Duration: 30 seconds
Not a very useful Spell, but it can definitely help to keep a constant speed, when under the effects of a speed boost.
Feather Fall
Take no fall damage.
Duration: 10 seconds
This Spell can very easily save your life when playing on maps such as The Gymnasium or the Belltower. Being able to hit the ground running has never been more accessible!
Helping Hand
Effect: Helping a downed classmate with give them extra HP.
Duration: 30 seconds
This Spell should give you a hand in making sure that your teammates can make a good escape after you help them up by giving them an extra 50 HP. Having this perk Spell help to sustain the Medic’s healing charges. Make sure you let your team know you have this Spell, so you can save your team some time.
Healing Hands
Effect: Heal others and yourself more efficiently.
Duration: 30 seconds
Medics will make the most use of this Spell. Use it whenever you have a lot of damage to fix, but not enough charges to make substantial recoveries.
Human Tank
Effect: Reduces received damage, but reduces all movement speeds.
Duration: 15 seconds
All damage taken will be reduced by 20%. Use this when you need to buy a bit more time for a couple more swings as an Assault.
Resilient
Effect: Adds HP after recovering from being incapacitated.
Duration: 10 seconds
You will receive an extra 20 HP when you get back to your feet. Pop this Spell, and you should have a better chance at delaying the killer from tunneling you and executing you.
Tier 2 Spells
Tread Lightly
Effect: Moving on traps will not activate them.
Duration: 10 seconds
The Spell can help you to stop Strangler and Giant setups by allowing you to run through their traps. This Spell can help a lot during the endgame when traps are most always present.
Last Man Standing
Effect: Significantly increases max health when you are the last Classmate.
Duration: 15 seconds
Your HP is raised to 200 when you are the last one left. Use the opportunity to kill the killer, or to buy you some time to make some moves. Assaults with helmets can put a decent amount of damage in with this Spell.
Lone Wolf
Effect: Significantly increases stamina when alone, and see Classmate’s locations.
Duration: 20 seconds
Scouts can make this Spell work for them, while the team distracts the killer. They can push objectives, make saves, or use it to return to the group with ease.
Thrifty
Effect: Decreases the cost of crafting items.
Duration: 10 seconds
This Spell will reduce all crafting costs by 25%. Use this to craft two of something that is a bit over 15 scrap when you’re full. Two helmets or shockers in a snap can really help the team.
Speedy Recovery
Effect: Instantly recover from the incapacitated state when activated.
Duration: 5 seconds
Use this Spell to get you out of a quick execution. This timing of this Spell matters, as killers can kill you before you can proc it.
Blood Lust
Effect: Increases max health after killing the Fiend.
Duration: 5 seconds
Killing the killer while this Spell is activated, will add 50 HP to your max health. You can keep raising your max HP until you die, so try your best to stick to the team and steal the last hit to slowly increase your HP.
Bloody Gash
Effect: Melee weapons do bleeding damage on hit.
Duration: 10 seconds
Assaults can use this Spell to increase their damage output. Anyone also holding a melee weapon can use the Spell as well, so you can an Assault and a Scout with a Bat, quickly draining health in a matter of seconds.
Take That!
Effect: Third successful consecutive melee weapon hit does extra damage.
Duration: 10 seconds
This Spell is great for prolonged combat. If you can fight for a long time, by having a helmet and having a Medic on you, you can really deal some damage.
Stealthy
Effect: Cryptids cannot detect you.
Duration: 15 seconds
This Spell is good for the objectives where a lot of cryptids spawn. Use this Spell to focus your attention on the objectives, while your team cleans them up. by the time they’re done your Spell will wear off and you’ll be unscathed.
Scavenger
Effect: Receive an extra scrap from each scavenging spot.
Duration: 10 seconds
Pop this Spell when there are many scrap stashes around you. The scrap can easily build up, allowing you to make a lot of stuff really fast.
I Am Rubber
Effect: Reflect a portion of damage done to you back on your attacker.
Duration: 15 seconds
This Spell has a distinct visual effect. Use the Spell to deter killers from fighting you in the group. This should allow you to deal damage uncontested from in the crowd.
Leech
Effect: Receive a portion of damage dealt to the Fiend as HP.
Duration: 15 seconds
Using this Spell, while a turret is shooting the killer can give you a decent amount of health back. Especially when the killer is busy with the others.
Pent-Up Rage
Effect: Increases the amount of damage of the next weapon hit on the Fiend after each successful Cryptid hit.
Duration: 20 seconds
Use this Spell to gather up strength to deal a good chunk of damage. Works well during objectives where many Cryptids spawn.
Hightail
Effect: Increases movement speed after a successful melee weapon hit.
Duration: 10 seconds
This Spell can help reinforce the hit-and-run strategy for Assaults. It also has a good use for making a quick escape in exchange for a bit of health.
Spells cont.
Huddle Up
Effect: While carrying an objective, grants a health boost to nearby Classmates.
Duration: 20 seconds
Those affected by the Spell have an extra 50 HP. Use this Spell to buff your teammates while they protect you on your way to the objective site. Those with helmets will be super useful during this time, as they essentially have 200 HP for the duration.
Acid Effect
Effect: Adds acid damage to successful weapon hits.
Duration: 15 seconds
Like Bloody Gash, the Spell can help increase your damage output. That’s about it. If I can get the damage numbers, I can determine if this is any different than the other effects.
Fire Effect
Effect: Adds fire damage to successful weapon hits.
Duration: 15 seconds
Melee weapon attacks gain the attributes of a molotov. Use this to make sure the killer can’t despawn should he manage to get away from you.
Shock Effect
Effect: Shocks the Fiend on weapon hit, reducing its stamina.
Duration: 15 seconds
Use this Spell to make it harder for Giants, Stranglers, and Slashers to chase you. Great for kiting killers.
Vigorous
Effect: Gain back HP over time.
Duration: 10 seconds
Pretty self explanatory Spell. You get 5 HP back every second the Spell is active.
Carpet Bomb
Effect: On impact, throwables will spawn multiple smaller throwables of the same kind.
Duration: 20 seconds
Use this Spell with Pipe Bombs to decimate the killer. Even Giants will have a bit of a rough time trying to deal with the resulting damage. Just make sure your throw isn’t off.
