I want to start by saying that Neverwinter Nights was a huge part of childhood and is still one of my all time favorite games to this day! It is for this reason that once achievements were being put into the development stage, I decided that I wanted to dedicate myself to making a thorough, complete guide for you all so that you won’t have to hunt and search anywhere else! It is a personal dream of mine to help you all completely with a game that I adore. I’m sorry it took so long but I have finally finished this guide for you.
I’m sure there might be alternate ways to get some achievements, but if you have any troubles or find new ways to unlock them, feel free to comment or share! I will do my best to update this if anything changes once the achievements leave development and go public!
Main Campaign- Chapter 1
The adventure begins for our fearless hero.
Story Progression. Finish your training and aid Lady Aribeth with the attack on the Academy.
Fair Weather Henchmen
You’ve built the foundations for six beautiful friendships with the power of bribery.
Each of the henchmen available to you will have a quest for you. You must complete six of these for this achievement. In order to initiate the quest, hire the henchman and talk to them while they are in your party. All of their quests run through three stages and the stages are tied to your level vs a sequence of events. Stage 1 you can meet right away. Stage 2 talk to them again when you are level 5+. Stage 3 talk to them a final time when you are level 6+ and they will finish their story and tell you what it is that they are searching for. You will have to retrieve this item and return it to them in order to complete their personal quest, but they don’t need to be in your party when you are searching for the items.
You can find these items at any time, without the final stage prompt, so if you are thorough you won’t have to backtrack, but you will need the final stage prompt in order to give the item to the henchman. Just make sure not to drop or sell their item! Your henchman can always rejoin you if you don’t sell their item you get when you first hire them, verifying their services to you. If you do, you can rehire them- for a price. When you give them their quest related item they will give you a special reward. Make sure to keep and not sell these for later chapters- you will need for another achievement.
Boddyknock Glinckle (in order by name, not place to go to first. places where items are are in bold so you can get them depending on where you go since you can go in any order)
Location: Inside the Trade of Blades (Straight out of the Halls of Justice, down the ramp, next to the Docks Gate)
CH 1 Quest: He is looking for a recipe for Leaven Bread. You can find the recipe for it on Siril’s body in a barricaded home in the Beggar’s Nest.
Reward: Lantanese Ring +1 (CHA +1, Regeneration +1, while equipped). The regeneration effect is 1 point per round and it will stack with other regeneration effects for faster healing.
Daelan Red-Tiger
Location: Trade of Blades

CH 1 Quest: He needs to find his mother’s brooch to complete his vision quest. You can find it in the unlocked chest on the Bloodsailor ship in the Docks District.
Reward: Amulet of the Red Tiger Tribe +1 (STR +1, Immunity: Fear)
Grimgnaw (my personal favorite!)
Location: Trade of Blades

CH 1 Quest: He needs to retrieve a silver ring to prove that another initiate is dead. You can find it in a desk in the house at the end of an alley in No-Man’s Land (This is there area you enter when you go through the Blacklake District Gate from the City Core).
Reward: Amulet of the Long Death +1 (CON +1, Spell Resistance: 10)
Linu La’neral
Location: Trade of Blades (noticing a pattern yet?)

CH 1 Quest: She needs to retrieve the Silver Chalice that was stolen from her temple. You can find the chalice from Melanden’s estate in the Blacklake District. If you speak to the old lady named Milly, who can be found walking around the guarded estates, and she will give you a key to her home (between Melanden’s estate and the zoo) which has a secret entrance in! Or you can just kill the guard at the gate and take his key to get in. The chalice will be in a cabinet in the room with a red symbol on the floor downstairs (you will need to be in this room for story progression in your search for the Waterdavien Creatures, so you shouldn’t miss it).

Reward: Pendant of the Elf (DEX +1).
Sharwyn
Initial Location: Trade of Blades

CH 1 Quest: She needs to find the Celestial Elixir to cure her mother. You can find it in the Alchemy desk in the Tanglebrook estate (there is a key to get in under the welcome mat) in the Peninsula District next to the prison.
Reward: Belt of the Performer +1 (CHA +1, Perform +1, Persuade +1)
Tomi Undergallows
Location: inside the Halls of Justice by the exit (where you speak to Lady Aribeth)
CH 1 Quest: He needs to find some forged documents that will “prove” he was in Neverwinter at the time of an assassination. You can find them in a bookcase where you find Hector in the Beggar’s Nest.
Reward: Ring of the Rogue +1 (DEX +1, Disable Trap +1, Open Lock +1).
Burn Baby
You’ve stayed healthy in Neverwinter by eating well, washing your hands and setting things on fire.
You need to set fire to all corpse piles (pyres) in the Peninsula District (Prison area). They aren’t hard to find if you wander the map a bit. You will need a torch equipped to set fire to them!
Note: You might only need to set fire to four, so any four in any area should suffice, but the PD is a good area to go to first anyway. Also note that becoming diseased before you light these may prevent the achievement from popping, so avoid that if possible. It is easy to become diseased in the Beggar’s Nest, so if you go to the Peninsula District first you should be fine.
Neverwinter Crypt Raider
Your journey has taken you into the sleeping territory of the dead. You’ve raided three tombs of Lord Never and returned the artifacts found there to Oleff or Giles.
Oleff can be found in the Halls of Justice, whereas Giles can be found at the Moonstone Mask. If you do decide to give them to Oleff, you will also need to get 1 item from Giles that he took. Due to difficulty, and other achievements, I recommend going in this order:
Peninsula District- Next to the Mizzenmast Mercantile there is a House with a single guard inside. Go downstairs and show Briley your Letter from Oleff and he will unlock a chest for you. Inside are the first items you will need.
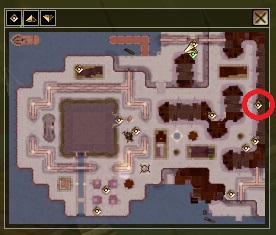
Beggar’s Nest- When you get to the Great Cemetery there is a building with a chest in front of it. Open the chest to find the torn scroll there that says, “A wall at arms length”. Place the ceremonial shield (from the Peninsula District) in the chest and the door to the tomb will open. Defeat the mummy inside, open the sarcophagus, and you’ll get the Ancient Chronicles of Halueth Never.
Blacklake District- There is a house with a girl named Punkin outside of it. You can persuade her, or her mother inside, to get the password to the bookcase in the house in order to get to the tomb of Halueth Never. You will find a chest outside of a door with a riddle “a splinter delivered in flight”. Put the Ceremonial arrow (from the Peninsula District) inside and the door will open. Go down the stairs, fight off four swords of Never (there is another achievement if you fight and defeat them while level 8 or less), and the open the socophagus to get Halueth Never’s Rusted Armor.
Main Campaign- Chapter 1 Continued
These Swords are Poorly Balanced
While level 8 or less, you rallied your might to defeat four flying swords in Never’s tomb
See Neverwinter Crypt Raider -> Blacklake District for details. As stated in Achievement description, you must be level 8 or less for this achievement to pop. Avoid using the Stone of Recall while fighting them if you want to avoid a potential bug!
Deal or No Deal
There is a demon in Helm’s Hold. Do you release it or restore the guardian spirit to its rightful place?
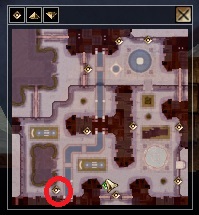
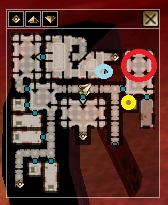
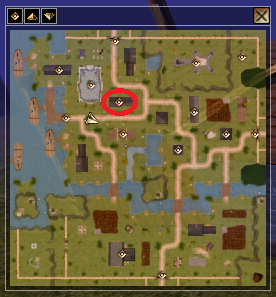
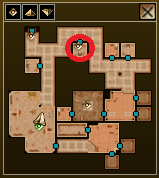
While in pursuit of Desther, you may enter Helm’s Hold. In a room (red circle) on the ground floor there is a demon trapped over a red drawing on the ground. You can choose to release Chaohinon of the Void by completing the ritual the false Helmit’s didn’t finish, or you can banish it with the Black Grimoir found in the connecting room in a bookshelf (yellow circle). If you complete the ritual you can get a Cloak of Movement that grants Freedom, a Double Axe (1d8 crit x3), or short lasting buffs. If you banish him you will have the option to resurrect the Guardian Spirit of Helm who can give you a glimpse into the future, a ring for +15 elemental resistance, an elven court bow (1d8 crit x3 attack +3 mighty +3), or the same short lasting buffs as the demon. You can find the book to summon him, at the same altar, in the trapped bookcase by the stairs going up (blue circle).
Silence the Wailing
You succeeded in curing the Wailing Death!
Story progression. Take Desther back to Lord Nasher, promting a final cut-scene for chapter 1 and giving you this achievement.
Main Campaign- Chapter 2
Nothing says loyalty like giving your employees more presents.
Using Fair Weather Henchman as a reference from chapter one, continue their new quests in Chapter 2 as well. TLDR? Talk to henchmen at various levels, find out what they need, collect items at any time, give item to henchman after theyve told you what they need while they are in your party. They will upgrade their quest reward items they gave you earlier- hopefully you kept and didn’t sell them!
Boddyknock Glinckle
CH 2 Quest: Boddyknock is in search for a rare seed called the Prism Blossom seed. The seed can be found in a crate at the entrance of the Creator Caves, through the third level of the Troll Caves. It will be before you pass through the fence where the first Seal Guardian Golem is.
CH 2 Reward: Boddyknock will upgrade his reward from CH 1 Quest to Lantanese Ring +3 (CHA +3, Regen +1).
Daelan Redtiger
CH 2 Quest: Daelan wants to find the axe that killed his mother. When you enter Mutamin’s Challenge at the Green Griffon Inn on the North Road you will eventually meet up with a dwarf called Gorkan down at Level 3, right before the final riddle room. He will attack you there and after you defeat him you can loot the axe you need from his corpse.
CH 2 Reward: Daelan will upgrade his reward item from CH 1 to the Amulet of the Red Tiger Tribe +3 (STR +3, Immunity: Fear).
Grimgnaw
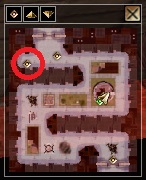
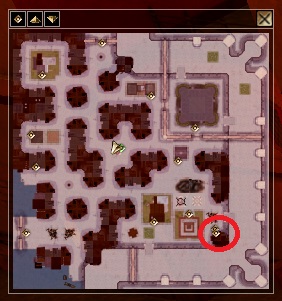
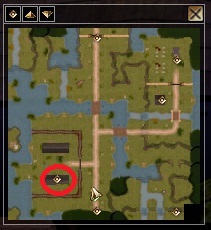
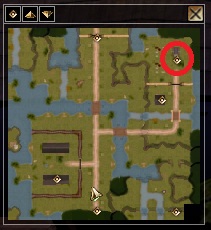
CH 2 Quest: Grimgnaw will need a corpse’s hand. When you reach the Graveyard on the North Road, you will need to enter the Arcane Brotherhood’s Tomb (red). You can get in if you talk to the gravekeeper in his shack nearby. Once inside, go straight out from the entrance. Next to the fence/gate there will be a chest (yellow) with the Corpse Hand inside.
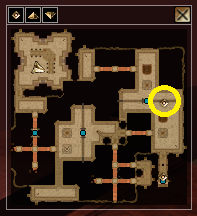
CH 2 Reward: Grimgnaw will upgrade your CH 1 reward item to the Amulet of the Long Death +3 (CON +3, Spell Resitance: 10).
Linu La’Nera
CH 2 Quest: Linu is in search for her Husband’s Journal. You will come upon a Journal of Synth La’neral at the Troll Caves, on the East Road, on a corpse on the first level. There are a number of ways to get into the troll caves, however I would recommend starting by going into the one furthest north, near the Archeologist Barracks.
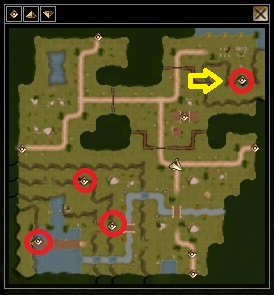
CH 2 Reward: Linu will upgrade your CH 1 reward item to the Pendant of the Elf +3 (DEX +3, Darkvision).
Sharwyn
CH 2 Quest: Sharwyn is in search for a lock of Nymph’s Hair. You will find a lock of hair in the Nymph’s House in the Neverwinter Wood. It will be in an armoire in one of the bedrooms.
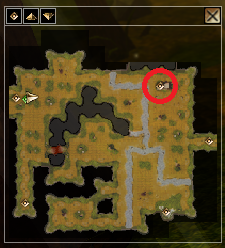
CH 2 Reward: Sharwyn will upgrade her CH 1 reward item to the Belt of the Performer +3 (CHA +3, Perform +2, Persuade +2).
Tomi Undergallows
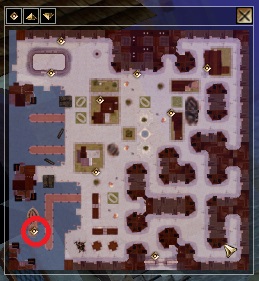
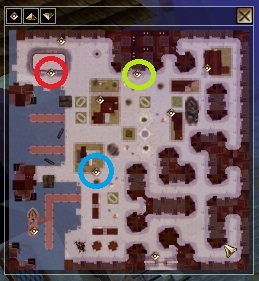
CH 2 Quest: The item that Tomi is looking for is the Star of Calimshan. The gem is located in Wanev’s Tower (red circle), on the South Road. In order to get to Wanev’s Tower you will first have to get past Lerk the Troll (blue circle.) Then, since the gate to the tower needs a specific key to unlock, go to the cave (green circle). There is a locked door, get through it, go down the hallway, and you will find a door that takes you inside of Wanev’s Tower. It will be in one of the Bugbear’s chests (locked) on the main floor.
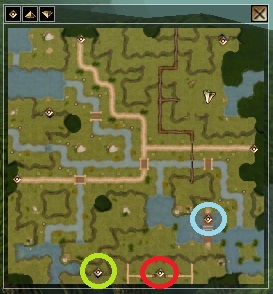
CH 2 Reward: Tomi will upgrade your CH 1 reward item into the Ring of the Rogue +3 (DEX +3, Disable Trap +2, Open Lock +2).
Hoard Mode
In your journey to Luskan you have completed the quests that had you collect gems for a serpent, crystal sculptures, magical tomes, and… ears.
This is referring a few quests you will have to do:
Collect gems for a serpent…Quest “Port Last: The Serpent’s Gems”: Speak to Elaith in the Alliance Arms Inn and ask to help him with his problems.
He will tell you about 3 gems that he needs you to recover for him:
Zamithra’s Gem: Go to the Green Griffon Inn and speak to Zamithra. If you are a man you can lure her up to her room upstairs and persuade (or kill) her to get her gem. If you are a woman you will hear her, not so subtly, tell a companion of hers to join her in her bedchambers upstairs. Follow them and, sneakily, take the gem from the chest in her room. If she notices you she will call you a thief and attack you.

Setara’s Ruby: Go to the Neverwinter Woods. First go to the Nymph’s home to find a mirror in a chest in the room where you find the Nymph. Bring the mirror to Setara in her home further into the Neverwinter Woods and she will reward you with her ruby.

Wanev’s Gem: Go to Wanev’s Tower. Use Tomi’s CH 2 Henchman achievement for details on how to get in. Once you find Wanev you can ask him about his problems. He will tell you about a portal he needs closed and will send you to a different area- the summoning chambers. In this area there is a chest on the northern part of the map with the gem inside.
Crystal Sculptures…Quest “North Road: Mutamin’s Challenge”: Enter the Green Griffon Inn and speak to Kasma. He will tell you about a maze below the inn. Then, speak to Mutamin, the owner and inquire about the competition.

Enter and go through each level of the maze. You will need to collect:
A Crystal Egg: You will need this for a riddle at the end to leave, but as long as you had it its okay to use it, you will still get the achievement. You can find it in the room in the top right corner of the map in a chest on Level 3.
A Crystal Skull: level 1 inside a chest in a SW room.
A Crystal Insect: you can loot it from one of the minotaurs in the middle hallways on Level 2.
A Crystal Frog: The Yuan-Ti from Level 1 will give it to you if you solve her riddles. The answer for the first riddle is 15. The answer for the second riddle is 12 trinkets and 5 girls.
Magical tomes…Quest “Port Last: Five Tomes of Imaskar”: Speak to Eltoora in Port Last. She will, if asked, ask you to return 5 important tomes (if you take the portal behind her you could also craft them with the right ingredients).
You will need the:
Tome of Life: you can find it in the Tomb of the Arcane Brotherhood in a glowing bookcase.

Tome of Fire: Refer to Tower Frozen in time achievement for details on how to get this one.
Tome of Ice: In Wanev’s Tower in a glowing bookcase. Reference Tomi’s CH 2 henchmen achievement for details on how to get in!
Tome of Death: Refer to Tower Frozen in time achievement for details on how to get this one.
Tome of Resonance: This tome is in a glowing bookcase in Setara’s home in the Neverwinter Woods.

Main Campaign- Chapter 2 Continued

Convict 1: Zor, a burly minotaur, can be found in the Green Griffon Inn (which is after the North Road), second floor, last door on the right. If you choose to listen to his story when he surrenders, tell him there is honor in what he has done and will spare him, you will not get his ear! You have to either kill him outright or say “I’ll let you go if you can help me find the others.” When he attacks you again finish him off to collect his ear.

Convict 2: Stirge, an egomaniacal gnome, is hiding out near a hollow tree stump in the Farmlands (after the South Road toward Charwoodd) in the upper left hand corner of the map. You can play his game or kill him to get his ear.
Convict 3: Wyvern, an elven ranger with a taste for trickery, is hiding around in the Neverwinter Woods. He will approach you when you get near him and ask you to help him. Follow him and he will ambush you. After weakening him he will surrender. You can talk to him, but he will attack you again anyway. Finish him and collect his ear.
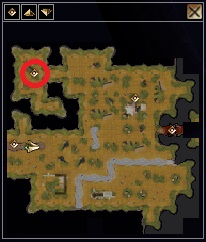
Convict 4: Delilah, a halfling assassin, is hiding in the Archeologist Barracks on the second floor. Go along the East Road to find the Barracks.
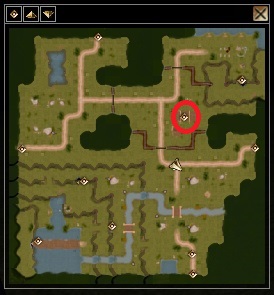
Convict 5: Yesgar, the group’s ring-leader and mastermind, is only accessible once you have collected the other 4 convicts’ ears. Go back to Kendrack in Port Last and he will tell you that his daughter has been kidnapped by him and he is taking refuge in Port Last Mines. He will give you a key. Go to the North Road midway up the east side of the map. Fight through the Orcs in the mines until you find and finally kill Yesgar. Once he is defeated, free Kendrack’s daughter and return to Kendrack. He will then have his 5th ear of the convicts (and his daughter) and you will have your achievement. Huzzah!
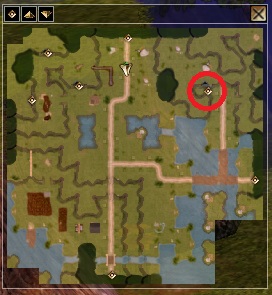
No Teen Wolves Here
Through battle or compassion, you dealt with the werewolf curse plaguing Port Llast and the surrounding area.
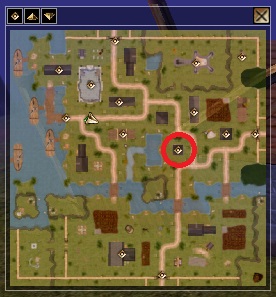
This is in reference to the quest Port Last: The Werewolf Hunter. There is a portal in Port Last that takes you to the Temple of Tyr (yellow circle). Speak to Neurik there, and he will tell you about Sir Karathis Ironheart, a travelling werewolf hunter, who enlisted four boys from the town to help him hunt “the Black Wolf”. It was a trap since he was the Black Wolf himself, and cursed the boys Bran, Urthm and Geth with lycanthrope. Neurik gives you silver charms to cure the boys of their curse before it fully takes hold of them. The fourth boy, Ander (found at the Alliance Arms Inn [red circle]), the only one to escape, may know where they are hiding.
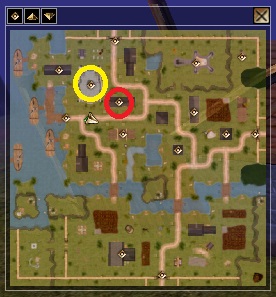
Urth: At the “outlying farm” go upstairs in his famiy’s home. His father will try to turn you away but the mother admits he is there. Go upstairs and you will be attacked by Urth, in werewolf form. Weaken him and he will surrender. You can then persuade him to take the charm and, if successful, will turn back into a man- cured.
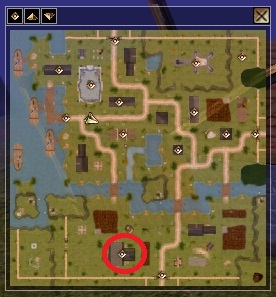
Bran: Go along the south road to Charwood. There is a cave to the north. Once inside, fight through the wolves until you get to the last “room” and you will find Bran, in werewolf form. Fight him down until he surrenders, then persuade him to wear the silver charm. This will cure him and he will transform back into his human self.
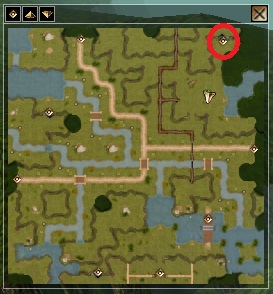
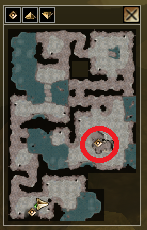
Genth: Go to the southern area of the East Road. There will be a burning carriage and some wreckage, and Genth in his werewolf form. Fight him, wear him down until he surrenders, and persuade him to put on the silver charm. He will then turn into a human again.
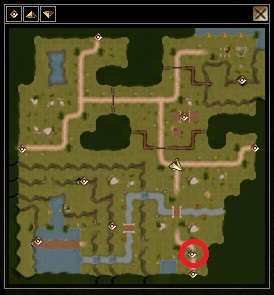
Sir Karathis: It is said that he was last seen in the Cave of the Black Wolf, in the hills east of the Green Griffon Inn. Enter the cave and you will find him in the Werewolf Lair area of the map, in his werewolf form. Beat him down until he surrenders, and persuade him to use the silver charm. He will transform back into his human form and give you a journal. Return to Neurik at the Temple and it will be revealed that Alhelor is really the Black Wolf!
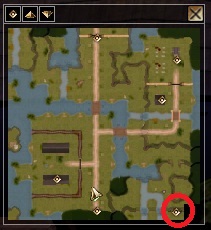
Alhelor: Return to the Alliance Arms Inn and speak to Anders. He will tell you that Alhelor went home to get some rest. His house is just slightly south-east of the Inn. Enter, confront him, and he will transform into a werewolf. Kill him and take his tooth to take back to Neurik at the Temple. Once you give him the tooth the quest will complete and the achievement will pop.
No Cult Stone Left Unkilled
You found more than enough evidence of cult activities to give to Aribeth.
Story Progression (There are probably a couple of ways to do this, but this is how I did it). You will first need the Letter to Solomon. Solomon will approach you and give you a ring- keep it. After some time he will approach you and tell you to stop looking into the cult. After a while longer he will appear again and attack you. Kill him, and take the Letter from his body. After Solomon is killed, some time will pass and another assassin will attack you. Take the Letter to Vardoc from his body next. Take these to Aribeth and then go to the Alliance Arms Inn. You will be approached and asked to save a sister, which is actually the last assassin waiting in a trap to attack you! Take the Letter to Neva from her body. Lastly, you will need Relmar’s journal. You can find, and kill, him in the spirit world of the Neverwinter Wood. Return all of these items to Lady Aribeth and the achievement will pop.
Tower Frozen in Time
You were diligent in investigating the crimes of the brothers Jhareg. You possessed all of the facts before you passed judgement.
You will need to go to Charwood. Upon entering, Quint will talk to you and a new quest will begin. Next, speak to the Mayor in his home (yellow) and you will be able to go through the gate to enter Castle Jhareg (red).
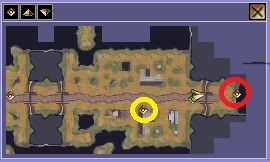
When you enter there will be a riddle chest and three paths: right, left, and straight. The right path contains legions of undead, the left path fire creatures, and the straight path has treasure. I recommend going straight and pick up the next key. Head straight down again through the next door and you’ll be greeted by an Air Elemental which will further your mission…to get the oaths of Quint and Karlat Jhareg!
Main Campaign- Chapter 2 Continued Still
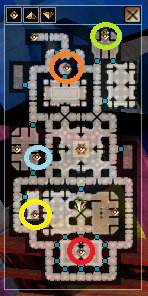
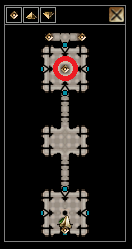
Now head over to Karlat’s Chambers, the brother of fire. You will need to fight past a lot of fire monsters so be ready. You will need a number of things from this area that you will need. There is Karlat’s Protection Wand (orange), Karlat’s Burning Wand (blue), and the Journal of Karlat Jhareg (purple). Remember to also collect the Imaskarran Tome of Fire (yellow, you will need this for the Hoard Mode achievement) from Karlat’s Chambers while you are here. Now, head for the summoning chamber for Belial (green) first. Before you summon him, cast Protection From Evil upon yourself using Karlat’s Protection wand or he will fight you. Put a Fire Beetle belly in the brazier (you can get one of these from various crates or from their corpses if you fought some) and then use Karlat’s Burning Wand to cast Burning Hands on the brazier. Belial will appear, and once he sees you are protected he will talk to you. You have to say you come as the judge and only demand answers, only then will he tell you the tale of the brothers Jhareg and give you the Oath of Belial which you will also need for this achievement. Now you can finally confront Karlat (red)! Talking to Karlat and hearing his story will give you the Oath of Karlat Jhareg.
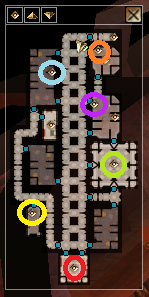
You can finally head back to the Air Elemental in the first room to pronounce judgment on the Jharegs. Make sure you have collected everything stated above by this point! You will be asked a simple question: who is guilty?
Karlat Jhareg is Guilty: This will destroy the Phylactery of Karlat and Belial will be unable to rise again. Charwood will be saved and the Mayor will be waiting to congratulate you with some treasure.
Quint Jhareg is Guilty: This will give Karlat back the Phylactery and allow him to summon Belial. Now Charwood will forever be tormented by the flames of Belial. Good job.
Neither One Guilty (The “Correct” Option): You will need your Oath of Belial to choose this as proof of your decision, in which case Belial will be summoned to be judged. Now you must choose the fate of the Phylactery, which is what summons Belial. If you choose to have it guarded, Charwood will forever be lost to the weave of time. Should you take it, Belial will be free but Charwood will be saved, ending with Mayor Mobley thanking you, like above.
Once your decision is made, the achievement will pop.
New Servant of Evil
You navigated the Host Tower and uncovered a terrible plot.
Story Progression. Once you get to the Host Tower, navigate through the levels until you reach the pinnacle and “uncover a terrible plot”. Since you don’t need to obtain anything specific I will briefly go through the story-related items on each level if you want to better understand what is happening and why.
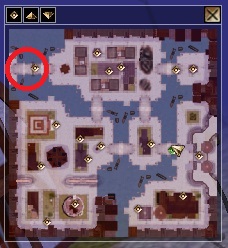
Level 1 is the ambassador’s quarters and you will find Aribeth’s room. After Fighting the Golem inside, you can get her journal and the Tower Entry Key from her desk.
Level 2 has a 4th floor portal stone.
Level 3 has a note on a corpse, a Blood war research journal in the library, and Host Tower Lab Notes in a bookpile.
Level 4 has Arteno Genth’s journal on a corpse, the 7th Floor Portal Stone, and Rimardo Domine who you can speak to if you beat him down enough.
Level 5 has 6th, 7th, and 8th floor portal stones, and Nymphithys whom you can talk to.
Level 6 has the Pinnacle portal stone and Valindra Shadowmantle, whom will only attack you and not talk.
Level 7 has the Warden Erjack who will drop a Pinnacle Portal Stone and prison key, and a prisoner named Deltagar Zhelhund whom you can talk to.
Level 8 has a 4th floor portal stone.
Level 9 has Arklem, whom you can talk to. Free him by bashing all of the blazers (they will summon enemies with each one you break: a skeleton devourer, a greater fire elemental, a bone golem, and a death slaad). Once freed he will open the locked door that has beyond it a portal to the Pinnacle.
NOTE: YOU CAN ALSO GET THE “You Can’t Just Keep A Baby” ACHIEVEMENT AT THIS POINT!
Earlier there was a woman named Yvette upstairs in the Wink and Tickle. If you agreed to help her get her baby back, and returned it to her safely, the baby will appear again at this point. There will be a corpse with a note that the body was a spy of Aarin Grend, and near the corpse, the baby. Pick up the baby and when you complete Chapter 2 shortly after, you will get this achievement as well. You will still want to follow the “You Can’t Just Keep a Baby” achievement for shadows of the undrentide in order to get the follow up achievement that it was intended for, so if you didn’t help Yvette don’t worry, you can still get the achievement later.
The Pinnacle– The corpse of Aarin’s spy (and possible baby nearby as noted above), Maugrim’s Lair which has Maugrim’s Journal, and a ritual beyond a locked gate where Aribeth, Maugrim, and Morag are. Once the ritual finishes fight off the enemies and use the stone of recall to tell Aarin of this terrible plot! A final cut-scene will commence and you with have your achievement!
Main Campaign- Chapter 3
You’ve built the foundations for six beautiful friendships with the power of bribery.
Using Fair Weather Henchman as a reference from chapter one, continue their new quests in Chapter 3 as well. TLDR? Talk to henchmen at various levels, find out what they need, collect items at any time, give item to henchman after theyve told you what they need while they are in your party. They will upgrade their quest reward items they gave you earlier- hopefully you kept and didn’t sell them!
Boddyknock Glinckle
CH 3 Quest: Boddyknock needs a Dragon Scale. You can find it in a pile of rubble, behind a sleeping? dragon in a cave in the Moonwood forest.
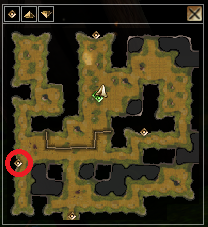
CH 3 Reward: He will upgrade his CH 2 reward to Prophyro’s Ring +4.
Daelan Redtiger
CH 3 Quest: Daelan will tell you he needs the Uthgardt Ceremonial Spear. You can get it from Zokan Thunderer, the leader of the Elk Tribe, at the Elk Tribe Keep near the Fort Ilkard Homesteads. You will have to peacefully talk to him to find out that Commander Damas has given the Tribe plague-ridden blankets, making them all sick. Agree to get the cure from Damas and bring it back to Zokan and you will get the Spear as a reward.
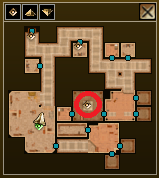
CH 3 Reward: Daelan will upgrade his CH 2 reward item to the Amulet of the Uthgardt +4.
Grimgnaw
CH 3 Quest: Grimgnaw will tell you a grim tale about how he needs a special dagger. In the forest of Coldwood you will come upon a small Orc Camp led by an orc named Vaath. You will find the dagger in a chest near his bedroll.
CH 3 Reward: Grimgnaw will upgrade his CH 2 reward item to the Amulet of the Silent Lord +4.
Linu La’Nera
CH 3 Quest: Linu will need a rare seed called Volcanic Oak Seed. You can find it near some standing stones over at the Fort Ilkard Ruins.
CH 3 Reward: Linu will upgrade her CH 2 reward item to the Pendant of the Elf +4.
Sharwyn
CH 3 Quest: Sharwyn is searching for the Lost Song of Love. When you reach the Creator Race Ruins you will find an item called Tamorlyn’s Song in a Sarcophagus. This is actually the Lost Song of Love that she needs.
CH 3 Reward: Sharwwyn will upgrade her CH 2 rewward item to the Belt of the Performer +5.
Tomi Undergallows
CH 3 Quest: Tomi is in search for some ashes of a Great Hero. When you arrive to the Elk Tribe Keep you will find the Ashes of the Running Wolf.
CH 3 Reward: The Ring of Rogue +4
Law and Rolgan
You were persuasive in your arguments. The jury was unanimous!
Neurik in the Temple of Tyr needs someone to defend Rolgan whom has been accused for murdering one of the soldiers of the Lords’ Alliance called Griff. If you accept to help, Neurik will give you the Defense Council Journal that contains details about the trial, the jurors and the witnesses. In order to get the achievement you will need to get all 5 jurors to raise their torches for you!
You can start in the Temple of Tyr. Talk to Edegar and whatever you do, do NOT attempt to bribe him!! If you do he will never raise his torch for you. I figured this out through much trial (literally) and error so save yourself the backtracking. Ask him about his thoughts until the End Diologue. Next, speak to Rolgan and ask him what happened. The rest of the people you need to speak to are:
Jurors
Averik: At the Drinking House (Can be bribed, but if you follow this guide you don’t need to)
Palla: At the Uthgardt Settlement. Don’t bother trying to bribe her. She won’t break like Edegar but she won’t give in to the idea.
Jevon: At the Mercenary Enclave (Can be bribed, but if you follow this guide you don’t need to)
Dalcia: Found just outside the Uthgardt Settlement. Speak to her about her thoughts on the case.
Witnesses
Lodar: At the Drinking House. He will be reluctant to talk to you so offer him some drinks. Come back and offer him another drink and you can persuade him to tell you the truth about the “victim”.
Zeb: At the Mercenary Enclave. He will be reluctant to talk to you and complains about his leg. Heal him (if you don’t have anything to heal him with, there is a chest in the same room with a healing kit inside you can use) and then talk to him again in order to get the truth out.
Vanda: At the Uthgardt Settlement. Ask her about what happened.
At this point you’ve spoken to everyone and can head back to the Temple of Tyr. I highly recommend saving, just in case, at this point. This way if you click the wrong dialogue on accident, or missed someone you needed to talk to, you can still fix it. Number 1 rule of RPG’s- save, and save often!
Talk to Neurik when you are ready to start the trial. Once the trial begins if you hit escape at any time the trial will immediately end and Rolgan will be guilty for the murder of Griff by default. The jury will have burning torches to show that they believe that Rolgan is innocent, or swords if they believe he is innocent. If they are on the fence/unsure they will have their arms at their sides. Some of the jurors are against being accused of racism, and despise the use of alcohol, so if you follow the conversation exactly as below (and didn’t try to bribe Edegar) you should be able to get all five torches needed for the achievement.
When Lodar is up ask him:
Did you see who actually started the fight?
Can you tell me how Griff felt toward the Uthgardt?
Isn’t it true that Griff spiked Rolgan’s drink earlier that evening?
Then, I have no more questions for this witness.
When Zed is up ask him:
You never actually witnessed the start of the fight, did you?
Griff had spiked Rolgan’s drink that night, right Zed?
Then, I have no more questions for this witness.
When Vanda is up ask her:
Tell me why you sent your husband to see Griff.
Then, I have no more questions for Vanda.
Next you will need to say “I would like to question Rolgan”
When Rolgan is up ask him:
Tell us what happened that night, Rolgan.
Then, I have no more questions for this witness.
In your closing statement say:
We know Griff was a violent man who hated the Uthgardt. He probably started the fight himself.
Griff spiked Rolgan’s drink, making Rolgan more prone to act irrationally.
Then, The defense rests its case.
If followed exactly as described you should have all five torches raised ending in a unanimous vote setting Rolgan free! Speak to Neurik to receive your reward and complete the quest, earning you your achievement.
No Jewelry for Me!
You defeated the powerful Winter Fang without weakening it!
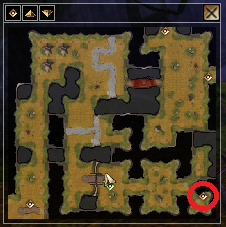
While in the snowglobe you will enter a cave with the Guardian White Dragon (Winter Fang) inside. Hard Save and pick a fight with it right away before exploring. This will not be an easy fight but once you have killed the dragon you will get this achievement.
Main Campaign- Chapter 3 Continued
You reforged a powerful Amulet of Ages with the aid of two warring factions, and used it to weaken a powerful dragon.
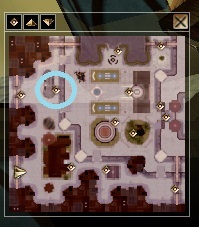
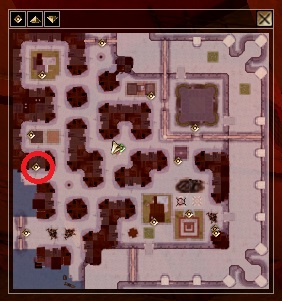
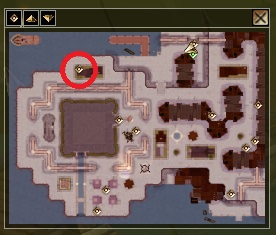
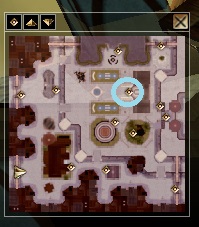
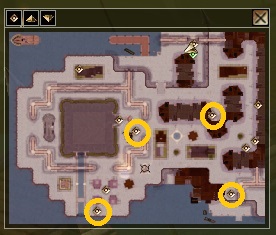
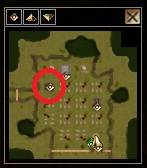
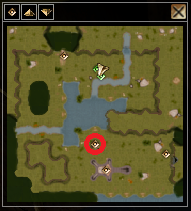
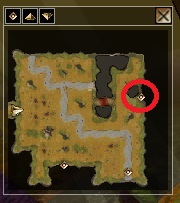
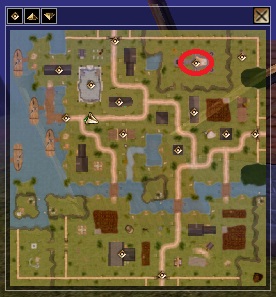
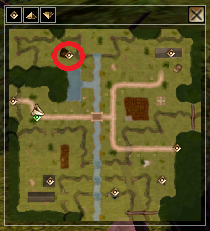
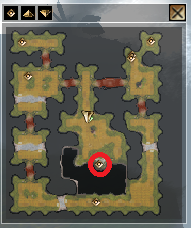
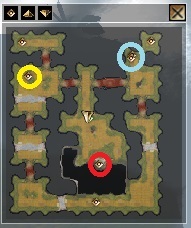
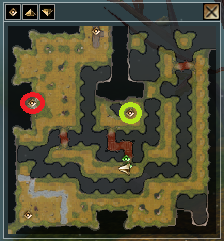
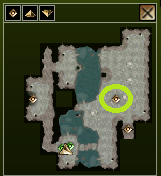
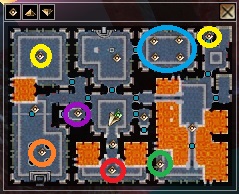
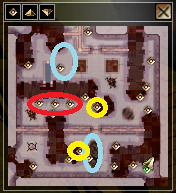
Reload your Hard Save from the No Jewelry for Me! Achievement and look inside the chest near the entrance to the cave (red circle, image 2). You will find the Amulet of Ages, but it is broken. Talk to Hodd, the head dwarf, to fix it (yellow circle, image 1). Then speak to Arwyl, the head dryad, to restore magic to it (blue circle, image 1). You will need to rotate the globe accordingly to make the parties you need to speak to not hostile to you. Once the Amulet of Ages is fixed and magic restored, equip it and go back to the cave. When you start fighting the dragon this time the achievement will pop right away without even having to fully kill it.
Dragons are Friends Not Fodder
You completed quests for a green and gold dragon.
Green Dragon-
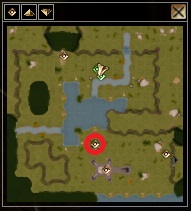
In a cave behind a waterfall in the Moonwood Forest is Akulatraxas the Green Dragon (green circle). Talk to him and you will learn that the Hill Giants are raiding his Lair in search for Dragon eggs. Stay civil, don’t threaten him, and offer your help. Akulatraxas will require from you to bring back the head of the Hill Giant Chief as proof. After storming the Hill giant Lair (red) and taking the head of the Chief, return back to Dragon Lair and give Akulatraxas the head. You will then be rewarded with 1000 gold pieces and 750 experiences points.
Gold Dragon-
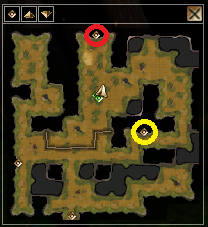
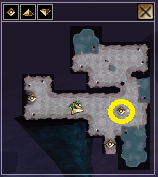
In a cave in the Spine of the World is Gorgotha the Gold Dragon (yellow). Talk with her and you will find out that a red dragon named Klauth (red) has recruited the Fire Giants to help him take Dragon Eggs. Gorgotha will also tell you that Klauth might have one of the Words of Power, which he does. Offer your help to put an end to Klauth. After killing him and taking his head (Word of Power is in chest in room behind him so grab that too), return to Gorgotha and she will reward you with 750 experience points and the Uthgardt Ceremonial Belt. You can also persuade her to give you a Ring of Protection +4.

Words Have Power
You gathered three of the four words of power and defeated a great enemy.
You can find the Words of Power in these areas:
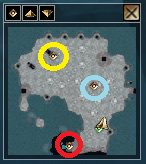
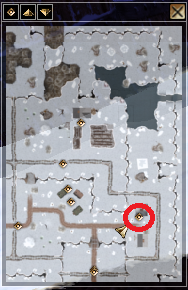
Inside the snowglobe, in the Guardian White Dragon’s Cave, in a chest (yellow circle, will open once the dragon [blue] is killed). You can use the No Jewelery for Me! and the It’s Not an Ocarina achievements for reference in defeating the dragon here.

Inside the Creator Ruins, in the altar (red circle), but you’ll need to do a bit to get there. You will first need to go to the garden (purple), talk to Sapphira there, and get Ultarg seeds and the Time Crystal from her. Then, use the Time Crystal on the sundials (yellow), to go to the past and tell 3 different slaves to give the golemns a weakness so you can detroy them in the present. While in the past you may as well go to the garden again and plant the seeds in the dirt and weed spot next to Morag, though this will not ruin your ability to get achievement if you miss it. Then, in the present, after destroying the three golemns you can go into each of their areas with their keys.
Smoke Ritual (green): Pick up the powders from the apparacatus and then in the brazier: place 1 red and 1 yellow inside first, then 1 blue and 1 red, and then last 1 blue and 1 yellow.
Ritual of Sound (blue): You will need to bang the four gongs in this order: Bottom Right, Top Right, Bottom Left, Top Left, Bottom Left, Top Right, Top Left, Bottom Right.
Ritual of Light (orange): You will get different colored gems from the pool in the middle. There are a couple of ways to solve this riddle, but the way I did it to make it simple is: 1 primary pool gets 1 yellow gem, 1 primary pool gets 1 blue gem, and each of the secondary pools get 1 green gem.
Once all three of these Rituals are complete the gate to the altar (red) will open, but be ready for a fight before you can get the Word of Power from it!
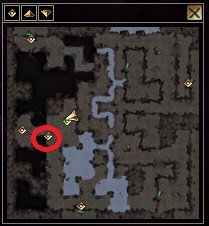
The Word of Power will be in a chest, inside a cave/dungeon in the Moonwood where you fight Klauth for the “Dragons are Friends not Fodder” Achievement.

Main Campaign- Chapter 4
Neverwinter is Under Siege! Repel the invaders.
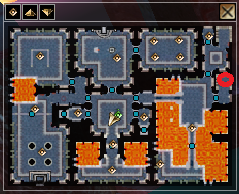
This is in reference to the Quest “Neverwinter Under Siege.” You will have to go to the Trade of Blades (where you find the henchmen in Ch. 1) and speak to Trancar. Offer to help him and he will tell you about the quest he needs done in the War Zone. You will have to destroy 3 catapults (red)and 2 wizards that control the Siege Golems (blue). You can find the wizards in the glowing homes (yellow), but be ready for a fight. They are each guarded by a Balor Lord. After defeating the wizard that controls the golem in their area, go back outside and finish off the Golem if they aren’t already dead. WARNING: It is difficult, but possible to kill the Golems without first having to kill the wizards that control them, but if you do this in this order it can break the quest leaving this half of it forever “unfinished”, so make sure to kill the wizards first!!
A Paladin’s Penance
The scales of justice will be balanced with peaceful sacrifice.
When you confront Lady Aribeth, talk her down instead of fighting her. Save before this to get the next achievement in one-go.
A Paladin Perishes
You’ve brought bloody balance to a disgraced devotee.
When you confront Lady Aribeth, fight her instead of talking her down. When she yeilds, fight her again to finish her off. Save before this to get the previous achievement in one-go.
Hardcore Morag
You defeated Morag while suffering under the difficulty of Hardcore rules or harder!
In your game settings make sure you are on Hardcore difficulty or higher before going in to fight Morag. This will be a hard fight, but destroy the statue asap. Morag will be invulnerable to all of the types that the lizard priests represent, but they are weak to the invulnerability they represent, so kill them however you wish in order to make Morag vulnerable to that attack type (ie. Invulnerable to Fire Priest is vulnerable to fire, and once killed Morag will take damage from fire attacks.)
Morag is No More
You defeated an ultimate evil and completed your adventure!
After killing Morag, go through the portal and speak to Haedraline. After talking go through the next portal in this area and a cut-scene will play, giving you this achievement. Congrats!
Shadows of the Undrentide
While your journey has exposed you to many valuable treasures, you probably should have returned the baby.
Tynan is a baby you will encounter during an East Hilltop quest. Nora Blake (circle) will approach you as you come near and tell you that kobolds are in her home and that her husband went inside to get their baby. Go inside, and upstairs, and get the baby back safely. Now, you have the option of being a monster by keeping the child and killing their mother when she becomes frantic and attacks you. I recommend saving before going outside since keeping the baby and murdering the mother will cause an evil alignment shift because, as stated, you are a monster and would only do this for the achievement…right? You’ll want to hold onto him for another achievement later in Hordes of the Underdark…or export the character with the baby in inventory, and then go back to previous save and give the baby back.
NOTE: YOU CAN ALSO GET THIS ACHIEVEMENT IN THE ORIGINAL CAMPAIGN IN CHAPTER 2!
There is a woman named Yvette upstairs in the Wink and Tickle. If you agree to help her get her baby back, and return it to her safely, the baby will appear again at the end of chapter two at the Pinnacle of the Host Tower. There will be a corpse with a note that the body was a spy of Aarin Grend, and near the corpse, the baby. Pick up the baby and when you complete Chapter 2 shortly after, you will get this achievement as well. You will still want to get Tynan in SoU to get the follow up achievement that it was intended for.
Hardcore Heurodis
You defeated Heurodis while suffering under the difficulty of Hardcore rules or harder
You will need to make sure you are on Hardcore or higher difficulty when you go into the Third Floor to fight Heurodis. Be ready for a hard fight and any potions/spells to protect you from paralysis. You will have to bash all the mythallar in the big circle before you can damage Heurodis. Try to deal as much damage as possible to take her out quickly otherwise she casts a bigby’s hand spell on you which will hurt. Repeat until she is defeated.
Undrentide Under Rubble
You defeated Heurodis and saved Faerun from a shadowy fate.
After defeating Heurodis and your final cut-scene starts this achievement will pop.
Hoards of the Underdark
What are you doing with that baby?
Refer back to the “you cant just keep a baby”. Tynan, if he remains in your inventory upon exporting the character (or if you’re not a monster and just exported character from when you took him, then loaded character at start of CH 2) can be used when you find a beholder bridge control panel east of Lith My’athar. The control panel will include a choice to “Insert Tynan”; upon doing so, two options (described as pictures) will appear. One picture is a spider and the other is a small humanoid. Choosing either option will remove Tynan and give you this achievement.
Hardcore Mephistopheles
You decided the fate of Mephistopheles after a grueling battle while the difficulty was set to Hardcore Rules or harder.
When you get back to Waterdeep make sure you are on Hardcore or higher difficulty from your Game Options Menu. Before the fight there will be some back and fourth of your henchmen either fighting for, or against, you. High persuasion will help you here most, but True Names work too. After this you will get a chance to banish Mephistopheles if you bought his True Name from the Knower of Names. If you didn’t, you’ll get to finally fight Mephistopheles. He will disappear a couple of times, turning the ground to ice or fire and elementals will be summoned based on the ground type. Use the demon hand to take higher ground and kill the elementals in order to make Mephistopheles come back. Beat him down until he surrenders and you’ll have the opportunity to finish him off or banish him. Either choice will give you this achievement.
Mephisto-Fallen
You saved the land from a most dangerous devil!
After defeating Mephistopheles and your final cut-scene starts this achievement will pop.
Skill Related Achievements
You have reached level 10!
Self explanatory; can easily unlock right away if you create a new character for the Hoards of the Underdark. Once in game, skip cut scenes and you will automatically get enough XP to level up to 15.
Level 20
You have reached level 20!
Reach Level 20. This does not need to be in a single base or prestige count, but combined number.
Level 40
You have reached level 40! You are unstoppable.
Reach Level 40, the max level your character can be. This does not need to be in a single base or prestige count, but combined number.
Multifaceted Hero
You trained yourself in multiple fields of battle. Beware the potential experience penalty!
Have a level put into at least 3 different base classes. These include: Barbarian, Bard, Cleric, Druid, Fighter, Monk, Paladin, Ranger, Rogue, Sorcerer, and Wizard. See Level 10 for an easy way to get.
How Prestigious
Gain your first prestige class.
Put a level into any Prestige class. See Level 10 Achievement for easy way to get.
How Prestigious x5
You are five times more prestigious.
Put 5 levels into any Prestige class. See Level 10 Achievement for easy way to get.
Extra Prestigious
You unlocked a prestige class from Shadows of Undrentide.
Put a level into any Shadows of Undrentide prestige class. These are: Arcane Archer, Assassin, Blackguard, Harper Scout, and Shadowdancer (my personal favorite). See Level 10 Achievement for easy way to get.
Even More Prestigious
You unlocked a prestige class from Hordes of the Underdark.
Put a level into any Hordes of the Underdark prestige classes. These are: Champion of Torm, Dwarven Defender, Pale Master, Red Dragon Disciple, Shifter, and Weapon Master. See Level 10 Achievement for easy way to get.
Top of Your Class
Your prowess in your current class has reached unimaginable heights.
This is the only one I’m slightly less sure on. I got this once I unlocked an Epic Spell on a Sorcerer (22), Pale Master (5) character. Will update once I pinpoint why the achievement unlocked *exactly*. May need level 9 spells unlocked, a prestige class, *and* epic spell/skill feat unlocked. Any feedback in the comments to pinpoint this one is encouraged and appreciated!
Don’t Believe His Lies
You are a master manipulator, a breathtaking bluffer. Are you lying or sincere? No one knows.
Have 10 points put into your Bluff Skill. Easy way to get is with the Level 10 achievement hint. Note that it has to be the bluff skill! Persuade, Intimidate, etc. will not work.
Bigby’s Thesaurus Hand
How many hands can Bigby possibly have?
You need to get each of the Bigby (no not the Fables one) spells. You will need to be a sorcerer or a wizard in order to do this. There are: Bigby’s interposing hand (lvl 5), Bigby’s forceful hand (lvl 6), Bigby’s grasping hand (lvl 7), Bigby’s clenched fist (lvl 8), and Bigby’s crushing hand (lvl 9). You must try to use at least one of these as well for the achievement to pop. You should be level 20 in order to get the level 9 spell slots.
Dunk the Monk
You duck, you weave, you tumble away from danger as if you were a ghost. Your tumbling skill is so high you might as well be in the circus.
Have 10 points put into your tumble skill. See Level 10 achievement for an easy way to get this.
Arcana: Epic Edition
You mastered a truly epic spell.
You must get an epic spell from feats list to be able to use. There are: Mummy Dust (Spellcraft level 15), Dragon knight (SPC LVL 22), Greater Ruin (SPC LVL 25), Epic Mage Armor (SPC LVL 26), Hellball (SPC LVL 32), and Epic Warding (SPC LVL 34). Note that you will need to be a sorcerer or a wizard to get.
Misc. Achievements
You were defeated in battle. Gather your willpower and try again!
Die in the game. Just…don’t heal. Make sure to save often however.
There Are Too Many People In This Hallway
You’ve amassed a battle party of four or more companions.
You can get this as a mage or sorcerer. You will need to have a party with your familiar, a summoned creature, a henchman, and yourself. This is easy to get if you follow the Level 10 achievement note, and then continue into the inn to get Deekin as a henchman.
Jingle, Jangle, Sell Another Bangle
One hundred thousand pennies in your pocket.
Have 100,000 GP on your character at once.
No Workers Comp
You might need to aim more carefully around your henchmen in the future.
You will need to deal the damage on a henchman that kills them. In order to hurt your own henchmen you will need to be on Hardcore or harder difficulty. Then just…cast area effect damage spells like acid fog, etc. until they die.
Related Posts:
- Neverwinter Nights: Enhanced Edition – All Votes for Kingmaker
- Neverwinter Nights: Enhanced Edition – Cleric Guide

Oh my gosh this is my guide!!! This is so neat!! Thank you for crediting me too- even if you took out my author’s note I’m so glad my hard work was recognized! I feel immortalized; this is so cool! Thank you for sharing!
Great guide. I can’t get a couple of the achievements to work (I’m on beta) – No Workers Comp and There are Too Many People. I’ve done both multiple times (killed hench, summoned for party of 4 ) and neither will trigger no matter what. Maybe it’s a henchman mod interfering? Dunno…
How do I get the Bigby’s Thesaurus Hand achievment? I am level 21 sorcerer and I only have Bigby’s interposing hand lvl 5, the other ones dont show up to learn when I level up. Thanks.
Hey there. Fantastic guide! I just wanted to bring one thing up. About the Hoard Mode guide, I’m not sure you need to get all of the crystal items. I my playthrough, I left the dungeon having only gotten a frog and the egg. I am playing on Xbox mind you so it’s possible steam is different.
Hoard mode achievement followed and it did not trigger? I have read something about having to put all the crystal items in the chest, is that confirmed or just speculation?