

I’ll be upfront: this is the strategy that flipped the whole game for me. Instead of babysitting scattered citizens across an entire city and hoping my defenses hold, you flip the script and make the zombies come to a dense, horrible little can of people you control. It works on every map, it’s easy to replicate, and it is flexible enough to survive when things go sideways. If you’ve been losing runs to one random breach undoing an hour of careful defense, this is the approach I’d point you toward.
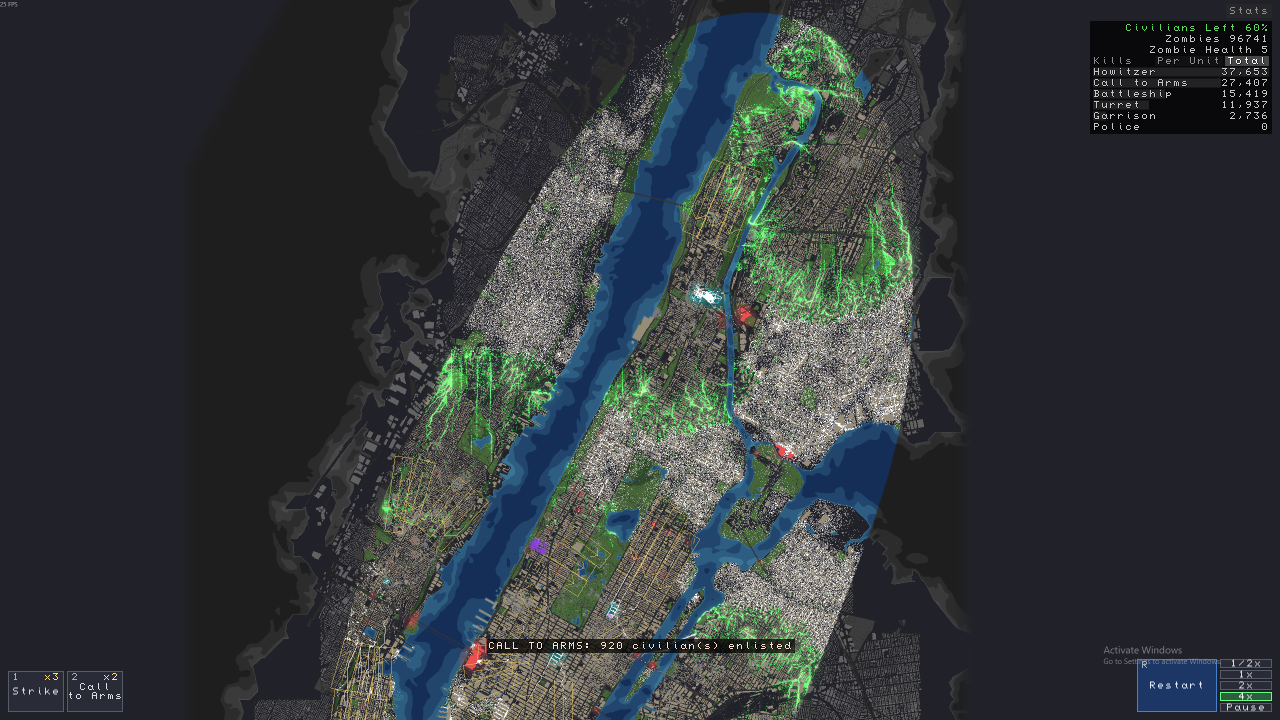
Below is what it looks like in New York after a short while in game — honestly the worst map for this strategy given its sheer size and lack of safe zones. There are roughly 25000 officers running around the city clearing it out.
Why the Sardines Approach Works
People management is about as important as anything else in this game. Anyone caught by a zombie becomes a threat to everyone else, and you have to handle them before the game ends. The natural instinct is to build a district-sized safe zone — but that costs a fortune, demands a lot of defenses, and leaves weaknesses in your coverage. Instead of fielding expensive units like artillery, you end up running multiple garrisons just to sustain a huge zone, all while praying a single zombie doesn’t bite through your wall in an uncovered spot.
This strategy turns the entire game upside-down. Zombies come to you — no, actually, you go to the zombies, and you drag the population into one cramped little circle while you’re at it.
The Fishing Trawler: Broadcast Buildings
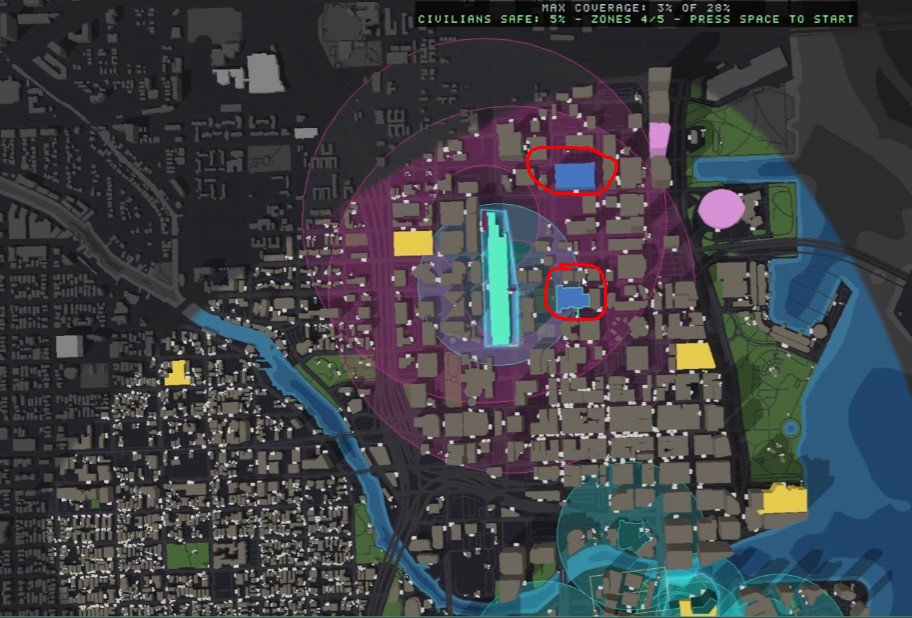
The blue buildings on the map — the Civic class — carry several bonuses worth knowing. The Police spawns armed units every so often. The Militia lets you panic-convert a portion of the people inside the safe zone into officers who hunt zombies when the wall is breached. The Radio Tower extends the range of units stationed in nearby buildings.
What I care about here is the fourth option: the Broadcast. This ability sends calm citizens within a huge radius running toward the safe zone gate, then into the broadcasting building. That’s my net for catching people and denying zombies the chance to wipe out big chunks of the population. You can also use the Corridor option to funnel people across the city toward a radio station — if they enter the radius, they’ll head into the safe zone.
The Can: Unethical Housing
According to statistics I completely made up, a person needs around 0.25m² of space to stand in a crowd. The game has no such limitation. You can pack as many people as you like into a conveniently sized 150m diameter circle around your radio station.
Include a few buildings inside your safe zone — ammunition is the reason. A garrison outside a safe zone has a limited amount of ammo it can fire. A single breach “deletes” the safe zone, scattering everyone and switching off the infinite ammo for all your units inside. So the priority is locking the zone down against any number of infected heading toward it. 5–6 garrisons usually hold everything, with a little artillery support for extra dense crowds.
Always include gates, or citizens simply won’t go to the safe zone. There’s also an AI quirk where people leaving can get stuck on walls instead of walking the opposite way to find a gate. I usually run two gates, though four facing all directions could be better.
Use buildings as walls. For a unit to get infinite ammo, the building needs to be at least 50% inside the safe zone. Zoom in close and trace the building’s outer edge when you create the zone to minimize how much wall you need. You can build as many corners as you like. Walls can be breached — buildings cannot. There’s also a wall length limit, though this strategy won’t come close to it.
The radio station needs to be 100% within the safe zone — a single pixel outside and it won’t activate. In some cases I’ve had to wall off the entire building, at least along one or two sides, just to make it count.
The Fishing Fleet: Extra Safe Zones
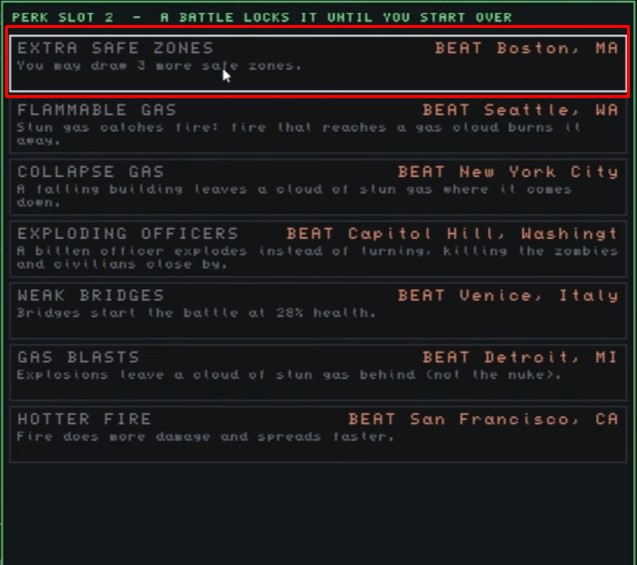
Take the extra safe zones perk to unlock three more. Find civic buildings on the map and turn each location into a safe zone. Don’t overlap the broadcast zones — the goal is getting as many civilians as possible running toward you so you can cram them into the smallest space available. Do this right and you’ll have several safe zones bristling with garrisons, plenty of money, and that lovely in-game warning telling you “Are you sure you want to start your game? You have 0% of citizens in the safe zone, you need to save at least 4%”.
The Conscription: Call to Arms
Here’s the main payoff of stacking everyone on top of one another. Call to Arms had its cost reduced to one from two, and it turns a small portion of people within a 150m radius into officers who run out and hunt zombies. I use it to save around 70% of a city while still having something to do. Put all your points into Call to Arms — more recruitment options are always better.
Pause at the start of the level. Look where outbreaks happen and check your safe zones and broadcast towers relative to them. At least one zone will often sit near an outbreak, and unfortunately those are worthless to us — zombies will overwhelm citizens walking toward the safe zone before they can cram in, so you never get to recruit them later.
Run the game at 4x for a short while, then pause again once some citizens have reached your safe zones. Recruit from the zones surrounding an outbreak. Your officers will pour out and laser down every zombie they see. Depending on how long you let citizens group up, you can recruit between 300 and 1000 people per action. They funnel onto each other into a blue dot of doom that sweeps out into the city and erases green in a blink. Say what you want about meat wave tactics — against a zombie horde, they work.
What to Do With All That Money
As a terrible landlord, you’ll be swimming in cash. I route it into a few things to maximize my death squads and save more people from certain doom.
First, more safe zones on broadcast towers. Early on you might only manage one zone when four are available — saving more people is always better, so set up more zones whenever it makes sense and they don’t overlap.
Second, artillery. A single battleship is a powerhouse that can outright destroy a horde, and five of them is just plain fun. Howitzers are great too. Find spots with a couple of overlapping yellow buildings — setting the power to the one that discounts units lets you cover a slightly-larger-than-a-sardine-can firebase full of them with enough garrisons to survive. Remember, if zombies breach your artillery base, it falls silent — even after the zombies are gone.
Third, corridors. Similar to adding broadcast towers. Some maps have poor blue building placement, so you funnel people into your radio towers instead. It saves more people but it’s costly, and it creates a conga line that takes a single zombie to turn an entire crowd into brain enthusiasts. Use the scroll wheel to widen the corridor and maximize the area.
Fourth, turrets. I love these because they fire incredibly fast and can solo a horde as long as they have ammo. They run dry quickly, so upgrade them for more ammo. They can’t be restocked even inside a safe zone — so I don’t bother keeping them in one and spread them across the whole city instead. I put turrets in strategic spots and along my corridors. Secure bridges with them, place them where the line of people runs past. If a zombie reaches them, the turret snuffs out the lit fuse and saves at least a portion of the population — at minimum it delays the horde and buys time to recruit officers or for existing ones to run the horde down.
What Can Go Wrong
No strategy is foolproof. I tend to save at least 40% of people each run, but there are issues to know about. The main one is citizens panicking and running away from the zombies your officers are chasing. Zombies keep eating everything ahead of them while the officers can’t move fast enough to catch the pack out front. That’s why recruiting from all safe zones around an outbreak matters rather than from one spot — officers clump naturally, but if they come from five directions the horde gets eliminated instead of chased endlessly while it devours the city.
The opposite is exactly what you want: citizens running at your officers with zombies trailing behind them. That’s when your thousand-strong army erases the green horde in no time and no new infected get created, which stops the loop entirely.
Breaches are the other unpredictable element. You can reasonably fit a safe zone for extra artillery, but then you risk losing it to the zombies. Artillery is more efficient at killing large numbers, but the garrison is what keeps your safe zone from adding 20000 more green dots. I lean heavy on garrisons rather than getting greedy with artillery — I’d rather a radio station survive than be breached and lose a huge percentage of a population, even if it never had an artillery firebase inside.
The Short Version
Find a blue building, set it to broadcast, build a tiny safe zone around it with garrisons so they get infinite ammo, and put two gates on it. Use Call to Arms to arm a huge officer killsquad from that tiny zone — the ability covers the entire thing and recruits 300–1000 people depending on how late it is in the game. Recruit strategically around the horde so it stays managed, since officers tend to become a single deathstack dot rather than a spread-out army. Spend your money on expensive units and turrets to secure your evacuation corridors.
Experiment a Little
Don’t treat the exact build as sacred — the abilities are worth playing with. You don’t need 35 uses of Call to Arms, and sometimes a single airstrike on a bridge is worth more than two squads that would never arrive in time. Helicopters are great for chasing hordes and often become my get-out-of-jail-free card when zombies push citizens away from my squads.