Definition and Introduction to the Dive Officer role
The Dive Officer is in charge of all the surfacing/diving operations on the u-boat.
You will be in charge of the following:
– Diving/Surfacing the boat,
– Maintaining a certain depth,
– Preparing the boat for diving.
We will discuss all of these duties, in depth, later in the guide.
The current guide applies to Wolfpack game version 0.26Q.
Abbreviations/Symbols
– DO = Dive Officer,
– MBT = Main Ballast Tank,
– PRT = Port (left),
– FRNT = Front,
– STB = Starboard (right),
– CR = Control Room (Central hub of the u-boat. Between officer’s quarters and the galley),
– DS = Dive Station (CR – STB FRNT side),
– M/m = meters,
– KG/kg = kilogram,
– CM/cm = centimeter,
– Keel = Bottom part of a ship’s hull,
– DUK/duk = Depth under keel,
– DOK/dok = Depth over keel,
– A^B = A “to the power of” B,
– FWD = Forward,
– RPM = Revolutions per minute,
– CD = Crash dive,
– PD = Periscope depth,
– OP = Observation Periscope,
– AP = Attack periscope.
Useful Terms
Buoyancy = (Wikipedia) Buoyancy or upthrust, is an upward force exerted by a fluid that opposes the weight) of a partially or fully immersed object. Positive buoyancy means the object will rise/float and negative buoyancy means the object will sink.
Pre-game Settings that affect the DO
Before we even jump in the game, here are the 2 main pre-game settings that affect you directly as a DO:
- Location: The depth of the ocean changes from an area to another.
- Wind Speed: Higher wind speeds mean more work for all of the 3 basic dive officer duties, that will be discussed later.
DO Tools
Showcase of all of the DO’s tools/instruments and their functions:
– Forward MBT vent(CR – PRT FRNT side):
1. Status display(Black=Closed, White=Open).
2. Forward Main Ballast Tank vent toggle.
When open it allows water to flood the aft ballast tank.
– DS(CR – STB FRNT side):
From left to right:
- Dive controls:The dive planes allow us to control our depth while maneuvering underwater.This station allows us to control the dive planes.
1. Dive plane controls:
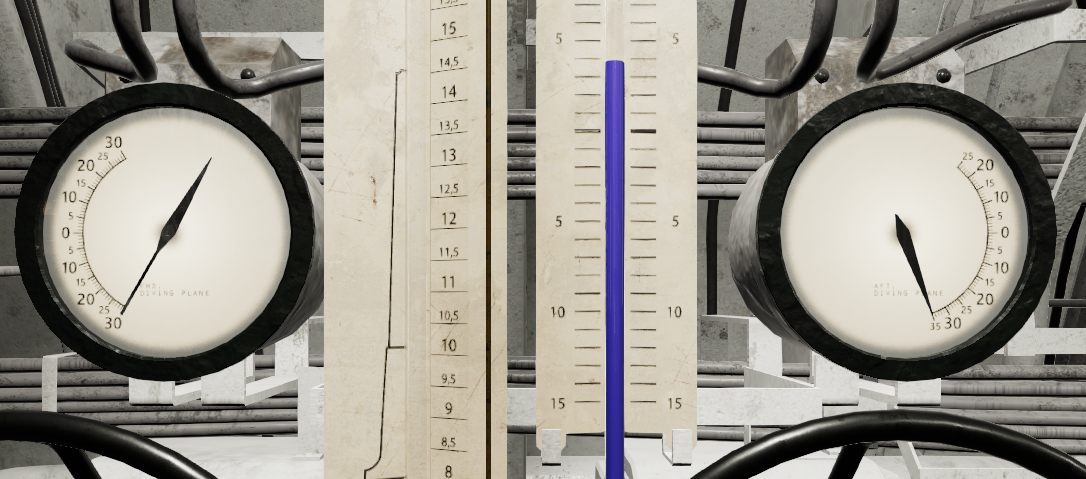
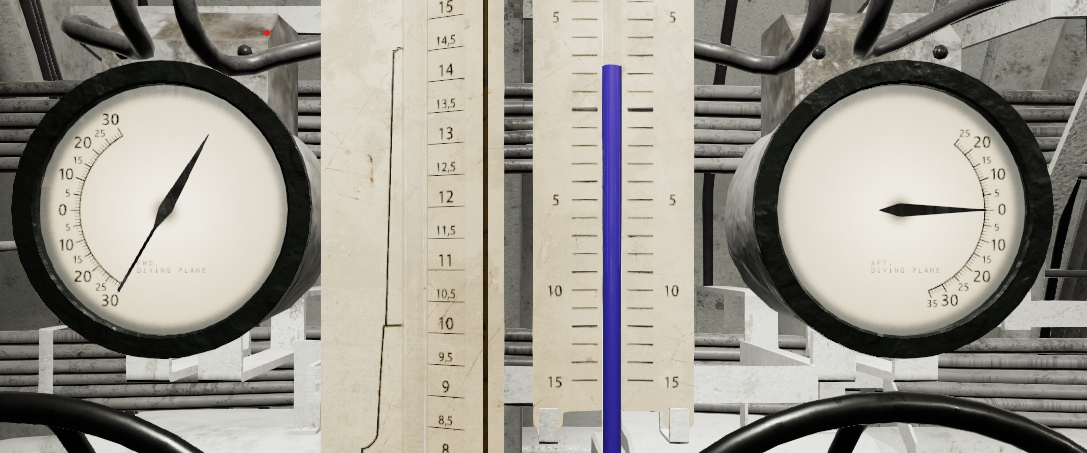
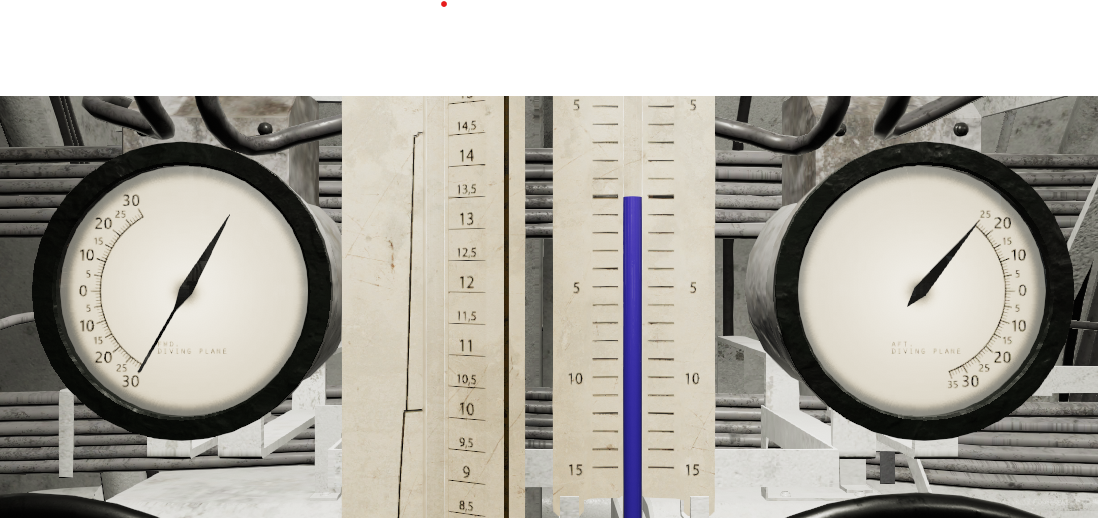
– FWD dive plane control: Controls the forward dive plane(A: Lower, Z: Center, D: Raise).
– Aft dive plane control: Controls the aft dive plane(<-: Lower, ^: Center, ->: Raise).
2. FWD dive plane gauge: Shows the forward dive plane’s angle. Range is [-30, 30] (inclusive).
3. Aft dive plane gauge: Shows the aft dive plane’s angle. Range is [-35, 25] (inclusive).
4. Shallow DOK gauge: Shows the depth of the boat, when in shallow waters. Range is [0, 25]m (inclusive).
5. Deep DOK gauge: Shows the depth of the boat, when in deeper waters. Range is [0, 200]m (inclusive).
6. PRT RPM gauge: Shows the port engine’s current RPMs. Black zone is forward movement RPMs. Red zone is backwards movement RPMs. Range is [0, 600]RPM (inclusive).
7. STB RPM gauge: Shows the starboard engine’s current RPMs. Black zone is forward movement RPMs. Red zone is backwards movement RPMs. Range is [0, 600]RPM (inclusive).
8. Small deep DOK gauge: Shows the depth of the boat, when in deeper waters. Range is [0, 200]m (inclusive).
9. Shallow Pappenburg’s depth gauge: Useful to monitor the depth of the boat in periscope depth. Also shows different features of the U-boat and the depth at which they re not visible from above the water surface.
10. Tilt gauge: Shows the angle/tilt of the boat in degrees. 0 means no tilt. A value above 0 means downwards tilt, while a value below 0 means upwards tilt. Range is [-15, 25] (inclusive). - MBTs controls:This station allows us to control the main ballast tanks.
1. FWD ballast tank gauge(bottom left gauge): Shows the amount of water in the forward ballast tank (measured in cubic meters). Range is [0, 50]m)^3 (inclusive).
2. AFT ballast tank gauge(bottom right gauge): Shows the amount of water in the aft ballast tank (measured in cubic meters). Range is [0, 50]m^3 (inclusive).
3. FWD ballast tank pressure gauge(top left gauge): Shows the pressure of the forward ballast tank (measured in kg/cm^2). Range is [0, 25]kg/cm^2 (inclusive).
4. AFT ballast tank pressure gauge(top right gauge): Shows the pressure of the aft ballast tank (measured in kg/cm^2). Range is [0, 25]kg/cm^2 (inclusive).
5. Compressed air gauge(bottom middle gauge): Shows the remaining amount of compressed air (measured in kg/cm^2). Range is [0, 205]kg/cm^2 (inclusive).
6. Blow valve(bottom valve): Allows us to progressively empty the ballast tanks (it controls both tanks at once). Empty rate depends on the pressure/depth. Requirements to empty the tanks:
– Enough compressed air (depends on depth/pressure and initial amount of water in the tanks).
– Closed MBT) vents. (if open, uses exponentially more air, to achieve the same result). - Trim tank controls:This station allows us to control the trim tank.
1. Flood valve: Allows us to flood the trim tank. (Open=Leftwards, Close=Rightwards).
2. Blow Valve: Allows us to empty the trim tank. (Open=Leftwards, Close=Rightwards). (NOTE! Even though there is no compressed air gauge, the blow valve does indeed use compressed air!) Requirements to blow the trim tank:
– Flood vent closed,
– Enough compressed air(depends on initial amount of water in the tank, as well as the pressure).
3. Accurate rotary depth gauge: Shows the current last digit of the DOK. 1 full rotation clockwise means +10m of depth, and 1 full rotation counter-clockwise means -10m of depth.
4. 2. Depth gauge: Shows the current DOK). Range is [0, 200]m) (inclusive).Measured in meters.
5. Trim tank gauge: Shows the amount of water (measured in cubic meters) in the trim tank. Range is [0, 15]m^3 (inclusive). - Negative tank controls:This station allows us to control the negative tank.
1. Negative tank gauge: Shows the amount of water in the negative tank. Measured in cubic meters(m^3). Range is [0, 4.5] (inclusive) m^3.
2. Compressed air gauge: Shows the amount of available compressed air. Measured in kg/cm^2. Range is [0, 205] (inclusive) kg/cm^2.
3. Flood valve: Allows us to open(Open=Rightwards, Close=Leftwards) the vent to flood the negative tank.
4. Blow valve: Allows us to blow air in the negative tank, in order to empty it(Open=Leftwards, Close=Rightwards). Requirements to empty the negative:
– Flood vent closed,
– Enough compressed air(depends on depth/pressure and initial amount of water in the tank).
– BIlge pump(CR – STB AFT side):
When operating at high depths (100m+), the boat accumulates water because of leaks caused by the high pressure levels, which leads to a decreasing buoyancy. Using the bilge pump we can remove that water.
1. Bilge level (top left gauge): Shows the current amount of accumulated water in cubic meters (m^3). Although the needle goes from 0 to 10, the actual amount of bilge water can surpass 10.
2. Compressed air level (top right gauge): Shows the current amount of available compressed air (measured in kg/cm^2). Range is [0, 205]kg/cm^2 (inclusive).
– The pump uses compressed air to push the bilge water out, so if you don’t have any the pump will not work.
– The pump should ideally be used while surfaced, as it is the loudest instrument on the u-boat, and greatly increases detection range underwater by enemy hydrophones.
3. Bilge pump turn on & off toggle.
– Aft MBT vent(CR – PRT AFT side):
1. Status display(Black=Closed, White=Open).
2. Aft Main Ballast Tank vent toggle.
When open it allows water to flood the aft ballast tank.
– Echo ranger(CR – PRT AFT side):
The echo ranger allows us to get the DUK:
1. Measure button(top left dot-button):
– Measures DUK and displays the result in the inner/outer ring depending on our mode selection.
2. Mode selection(bottom right switch):
– 0-100(Used when the switch’s needle looks up/down): Result will be within the range of [0, 100]m (inclusive). Uses the inner ring to display the result.
– 0-1000(Used when the switch’s needle looks left/right): Result will be within the range of [0, 1000]m (inclusive). Uses the outer ring to display the result.
– Navigator’s table depth gauge(CR – PRT FRNT side):
Displays the DOK (in meters) within the range of [0, 200]m.
– Compressed air reserve(Electric Engines Room – STB Aft side):
The compressed air tank controls allow us to replenish our compressed air reserves, while surfaced:
1. Compressed air reserve amount. Measured in kg/cm^2. Range is [0, 205]kg/cm^2.
2. Compressor toggle: Toggles the compressor on or off.
The 3 tasks of the DO
1. Going to a certain depth ( routine dive/going to a certain depth )
2. Maintaining a certain depth
3. Preparing for the next dive
Routine Dive/Surface
Upon receiving the order to dive from the captain:
1. Communication is key: repeat/confirm the order,
2. Make sure the bridge is clear (all personnel are inside the boat) and the hatch is closed (to avoid accumulating unnecessary bilge water),
3. Flood both of the main ballast tanks (by yourself or by asking other crew members to help and speed up the process),
4. Using the correct dive plane configurations for your speed, go to designated depth,
4. At 10m (depending on your familiarity level, it can be before or after 10m) blow the negative tank (if using simple preflood),
5. When at designated depth, make sure to call it out. (e.g.: Captain, we are at periscope depth!).After the dive procedure is completed, and you have some free time, you can close the main ballast tanks vents
so that other dive procedures can be executed faster (surfacing/maintaining depth with air/etc.).Surface:
Upon receiving the order to surface the boat:
1. Repeat the order,
2. If at a relatively low depth (<30-50m), we can simple blow the main ballast tanks empty to surface the boat. Otherwise
we will first need to lower our depth using the dive planes (or small increments of air) until we reach the threshold (30-50m)
from where depending on the compressed air level we can just blow the ballast tanks empty.
3. When the boat is surfaced, update the captain, and make sure to mention to the helmsman that
diesel intakes are clear (so he can swap to diesel engines if needed).
Crash Dive
- Crash diving is a safety procedure, where we dive to a deep depth to minimize detection levels (detection occurs by enemy hydro/pings),
- It is similar to routine dive procedure, but instead of blowing the negative at 10m we usually empty
it around 80-90m (also depends on our compressed air level) – that way we have negative buoyancy which will in turn accelerate our diving speed, - We also usually are at full speed (to increase our diving speed) so the dive planes in that case should be curved downwards,
- Unless otherwise ordered, we should dive to 185m (at which depth you cannot be pinged on the hull – but can still be heard – so the captain should still
be aware of the boat’s speed) (also remember to casually check echo ranger for available depth!).
Going to a certain depth
When we have speed/momentum we use the dive planes to adjust our depth(using the simple/advanced dive plane configurations).
2. Negative/Positive buoyancy:
When we don’t have speed or when we want to further accelerate our diving/surfacing speed (outside of dive planes), we can then manipulate our boat’s buoyancy to help with that process.
- In case we need to dive faster: We flood the negative tank (Avoid using the trim tank). This creates negative buoyancy that will accelerate diving speed.
- In case we need to ascend faster: We blow air in the ballast tanks. Depending on how fast we want to ascend, we can blow from 0.5-1 all the way up to 5 or 10 cubic meters of air in the tanks. There is no hardcoded number for this, as it depends on depth, compressed air level, and again, how fast we need to ascend. Doing this makes our boat positively buoyant, which will accelerate ascension speed.
Remeber to casually check the echo ranger, especially in shallow maps, so as to not scrape the bottom. If you are busy with something else, the navigator (whose station is right next to the echo ranger) can do it for you, as long as you remind him.
Simple Dive Plane Configurations
1. Forward movement:
- To increase depth:
- Full/Great speed:
- Half speed:
- Slow/Dead slow speed:
- Full/Great speed:
- To decrease depth:
- Full/Great speed:
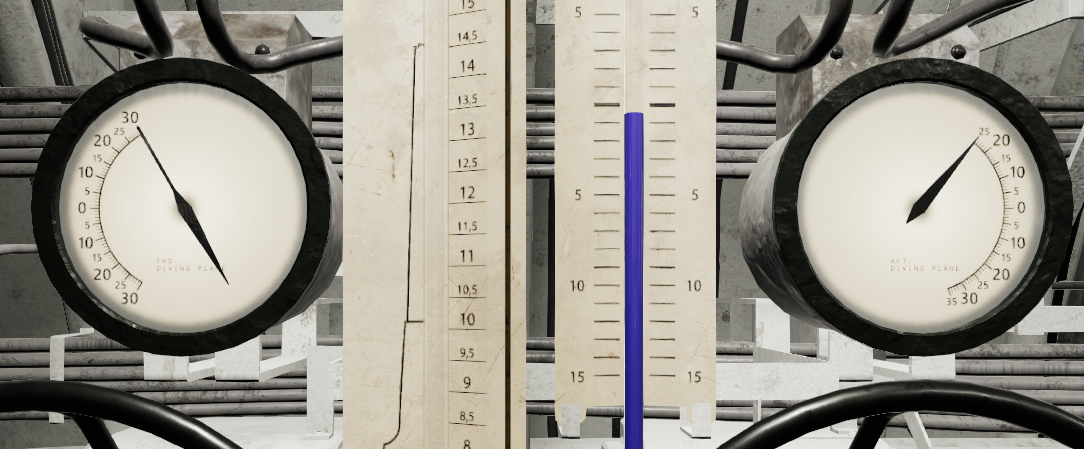
- Half speed:
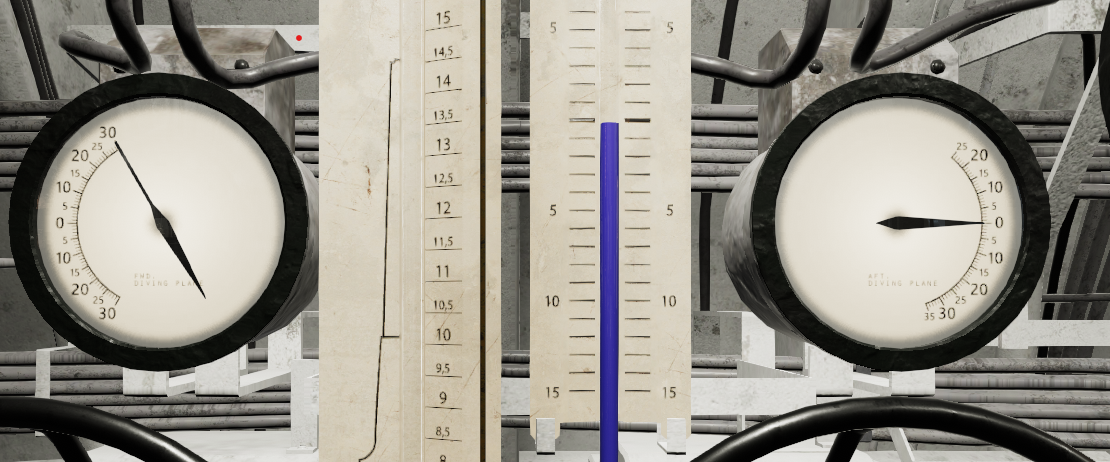
- Slow/Dead slow speed:
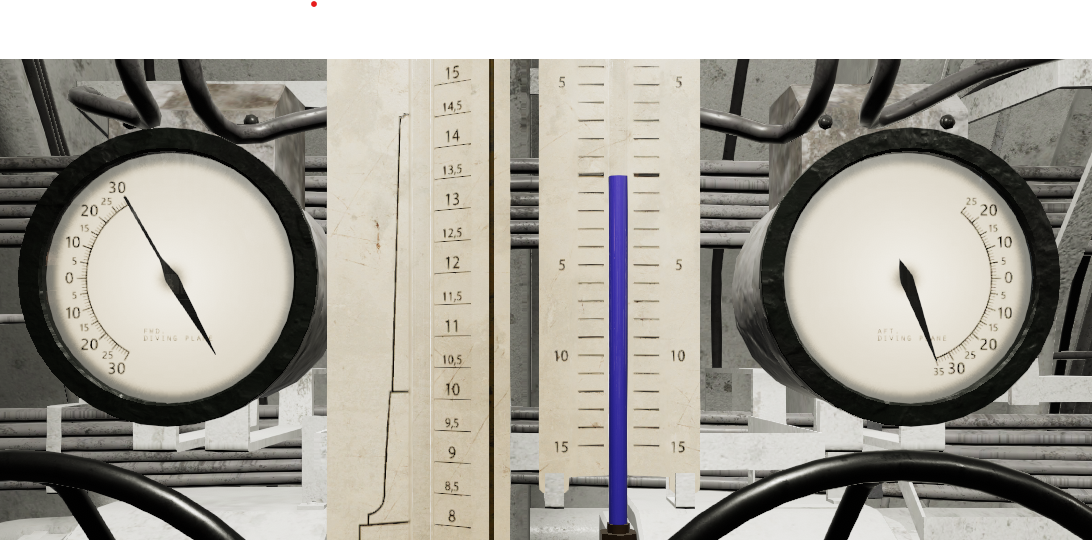
- Full/Great speed:
2. Backward movement:
- To increase depth:
- Full/Great speed:

- Half speed:

- Slow/Dead slow:

- Full/Great speed:
- To decrease depth:
- Full/Great speed:

- Half speed:

- Slow/Dead slow:

- Full/Great speed:
Advanced Dive Plane Configurations
TODO
Maintaining depth
1. Using the dive planes:
The first and most common way is using the dive planes. Using the simple dive plane configurations do increments of 1 towards the target forward and aft angle, and stop if u see that the boat is maintaining depth. Otherwise adjust accordingly.For example: Lets assume we are running at dead slow speed. The simple dive plane configuration for this speed if the boat tends to sink (because of bilge for example) is +30,-35 for the forward and aft angle accordingly (because we need to ascend to counter the sinking tendency). We move the front dive plane to 1 and the aft at -1. If we see that the boat is maintaining depth we stop. Otherwise we keep increasing to 2,-2, etc. Keep in mind that we have to do regular checks at the depth gauge (preferably the rotary one – as it is the most accurate) to check that we are maintaining depth.2. Using ballast tanks/compressed air:
If we have no momentum or if the dive planes are not enough for the uboat to maintain depth, then we will need to adjust the boat’s buoyancy by blowing air in the ballast tanks (We avoid wasting our trim, if possible). There are 2 possible scenarios:
- We are not using the dive planes to maintain depth(no speed for example): We will then need to remove as much cubic meters of water from the ballast tanks as there is in the bilge tank. (Keep in mind, as noted in bilge tank explanation, that the gauge goes from 0 to 10, though the actual capacity is higher than that.)
- We are using the dive planes already to try and maintain depth: Then we can blow water out of the ballasts at an increment of 1 cubic meter(in total-.5 on each tank=1 line), and monitor whether we are maintaining depth or not, otherwise we adjust accordingly.
Important note: Always remember the effect that blowing air in the tanks in going to have on the boat’s buoyancy and how it will effect your normal procedures!
Preparing for the next dive
1. Preflood
2. Empty bilge tank(Run the bilge pump).
3. Replenish compressed air reserve – As always communication is key: make sure to announce to the captain that you re gonna go away to turn on the compressor.
Preflood
preflooding the boat means preemptively flooding some of the boat’s tanks so that the diving speed is faster.
There are 2 types of preflood:
1. Normal Preflood(slower): Empty ballast tanks, full negative tank.
2. Heavy Preflood(faster): Empty negative tank, 18 cubic meters of water in the ballast tanks, in 3 configurations(Sorted from low to high by routine dive time):
- 9m^3 in front MBT, 9 in the aft,
- 18m^3 in the aft MBT,
- 18m^3 in front MBT.
Keep in mind when heavily preflooding we do want the negative initially flooded in order to accelerate the process.
Heavy Preflood
– Surfaced:
- As always, wolfpack is all about communication. Call out “DO preflooding the boat”,
- Flood the negative tank
- Open aft ballast vent,
- Monitor the aft ballast tank water gauge,
- Close the aft ballast vent, when the water gauge shows 15 cubic meters,
- Use the MBT blow valve to reduce ballast water amount to 18 cubic meters. Also blow the negative,
- Replenish compressed air. Make sure to call out “DO going to compressor”!
– Submerged:
- If you are dived, you can preflood the boat without any extra work, when surfacing.
- When captain orders surface the boat, confirm the order,
- Blow the ballast tanks until both ballast water gauges show 9 cubic meters.
- Continue with the preparing for next dive routine
Trimming the boat
‘Trimming the boat’ means balancing the weight of the boat to the state of ‘Neutral Buoyancy’. At that state, the U-boat will stay at a specified depth without the need of adjusting the planes(assuming no bilge water).
Requirements to trim the boat:
– Empty negative tank,
– Empty bilge tank (&& depth < 100m – otherwise you start acquiring bilge water),
– Centered dive planes,
– Boat tilt == 0,
– Boat is dived (ideally, but not required, at 20m) depth – if you re above ~15m, the waves will affect the accuracy of the rotary gauge).
To trim the boat, we’ll have to move over to the trim tank controls). The goal is to set the right ratio of water and air in the tank. The result will be, assuming the above requirements are met, that the rotary depth needle will not move at all/make barely noticeable movements(or the average will stay the same, if affected by waves).
To adjust the ratio we use:
– Valve 1: to let water in the tank.
– Valve 2: to push water out of the tank.
The actual result(presented in trim tank gauge 5) is always random. You will have to fill or blow the tank, monitor it over a period of time (e.g.: 30 seconds), and adjust again.
– If the needle goes clockwise, then the boat is too heavy – you need to push some water out.
– Otherwise, if the needle is going counter-clockwise, then the boat is too light – you need to let some water in the tank.
Riding the bubble
# ‘Riding the bubble’
Sometimes only the dive planes may not be enough to surface the boat/go to PD from greater depths. One example of this is high bilge level after
a crash dive, and since we want to minimize detection we can only use dead slow speed. In that case the boat is heavy enough for the speed to not
be enough to lower the depth. In that case we need to counter the extra weight, by blowing air in the ballast tanks (along with the dive planes).
This procedure we call ‘riding the bubble’ since by blowing air in the ballast tanks, we create an air bubble that will start increasing in size
as we decrease our depth (along with the water in the tank). The latter happens because of decreasing pressure.
Surface:
Because of our great depth, we cannot afford to blow the mbts empty. This is the case because of our depth, the pressure is high, so we need
a lot more air to empty the tanks. In this case we do small increments every 20m for example (e.g.: 2.5 cubic meters in each tank) along with the dive
planes. When we are at a relatively low depth (e.g.: 30-50m) and depending on our compressed air level, we can blow the mbts empty.
PD:
Sometimes, after a crash dive, we dont want to surface but instead go to PD and check the surroundings (to make sure we are safe to surface).
In that case we have to a follow a different procedure:
– Use the correct dive plane configuration for your speed.
– Blow {bilge level} + 2.5 lines of air in each tank. This will counter the bilge completely and the extra 2.5 cubic meters in each tank will
accelerate the process even more. (If you want to further accelerate without changing speed you can add small increments of air every 20-30m of depth).
– Like we mentioned previously we dont want to surface but at the same time the bubble in the tank is increasing, so we if dont arrest the ascend
fast enough, we risk surfacing the boat, and getting sunk/detected. Because of that we need to reflood the mbts at a relatively low depth, but high
enough to not ruin the procedure. The number changes from one scenario to another but if the bilge is not too high it should be around 30m.
At that point we flood the tanks, and use the dive planes to adjust depth. If the ascend is slow we can again blow air in the mbts.
IMPORTANT Riding the bubble is not a set of rules set in stone. Its the most complex procedure of the dive officer and one needs to experience
it t
Useful constants
– Max AP depth = 17m,
– Max Radio depth = 12.5m,
– Max crush depth = 254.5m,
– PD depth (usually refers to the depth where op, ap and radio are still operational) = ~11m (depends on wind speed),
– CD depth = 185m(escorts cannot ping you at that depth/but they can still hear you through the hydrophone),
– Heavy preflood = 18 cubic meters (in ballast tanks + negative tank combined – assuming trimmed/default trim),
– Good default trim value (set until you can trim) = 7.5m^3,
– Max depth before speed penalty = 5.5m over keel.
That’s all we are sharing today in Wolfpack – Dive Officer Guide, if you have anything to add, please feel free to leave a comment below, you can also read the original article here, all the credits goes to the original author Georg Lassen and Budyneczek(him1990)
