For Victoria 3 players, this guide will explain how to mod in, or make, a new country. It will tell you how to make a country at the start of the game, with owned land, cultures, pops, a ruler and a flag. Eventually it will cover formables, too.
Introduction
Important starting notes:
- It’s recommended to do text editing with a better editor than plain Notepad. My recommendations are Notepad++ (which is what this guide will use), VisualStudioCode and Sublime.
- All .txt files in the game must have the encoding UTF8-BOM. They may not work properly if they don’t have that. If you don’t know how to set the encoding, just copy an existing file and change its contents.
- Everything after a # in a text file is “commented out”, meaning the game ignores what’s written after the #.
- If you get some errors or something went wrong, it’s more likely that you made a mistake or didn’t follow this guide exactly. Almost nothing here is useless, so pay close attention!
Defining the country
- A human meaning of “deciding where the country will be and what it will look like
- A code meaning of telling the game information about our country so that it knows what the country is
So first of all, think about what country you want, and especially where it will be located.
My country will be called Cyrenacia and will be located here in Tripolitania’s land. (Edit: I realize now that the region is called Cyrenaica, so I ask you to overlook that mistake 😉 )
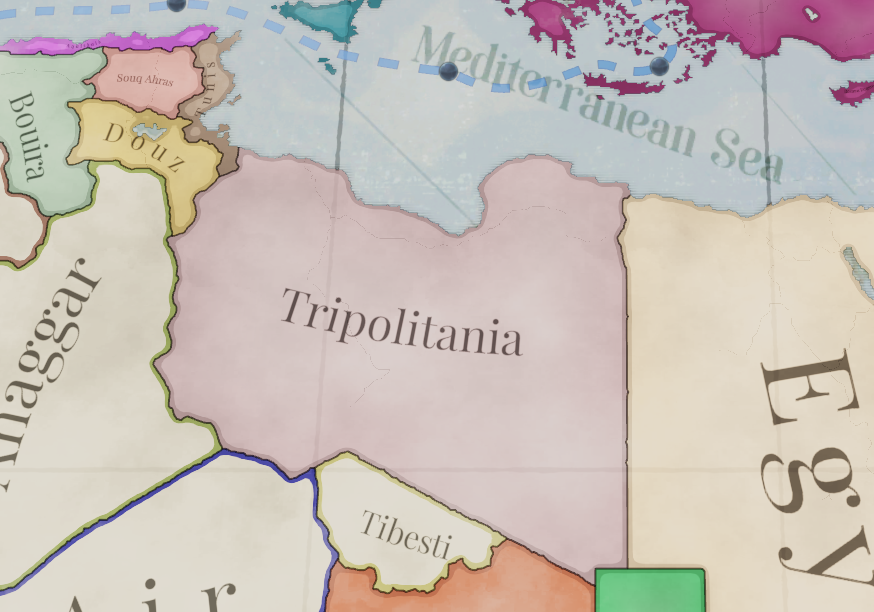
I think that I want to have it own the whole of the Libyan Desert state.
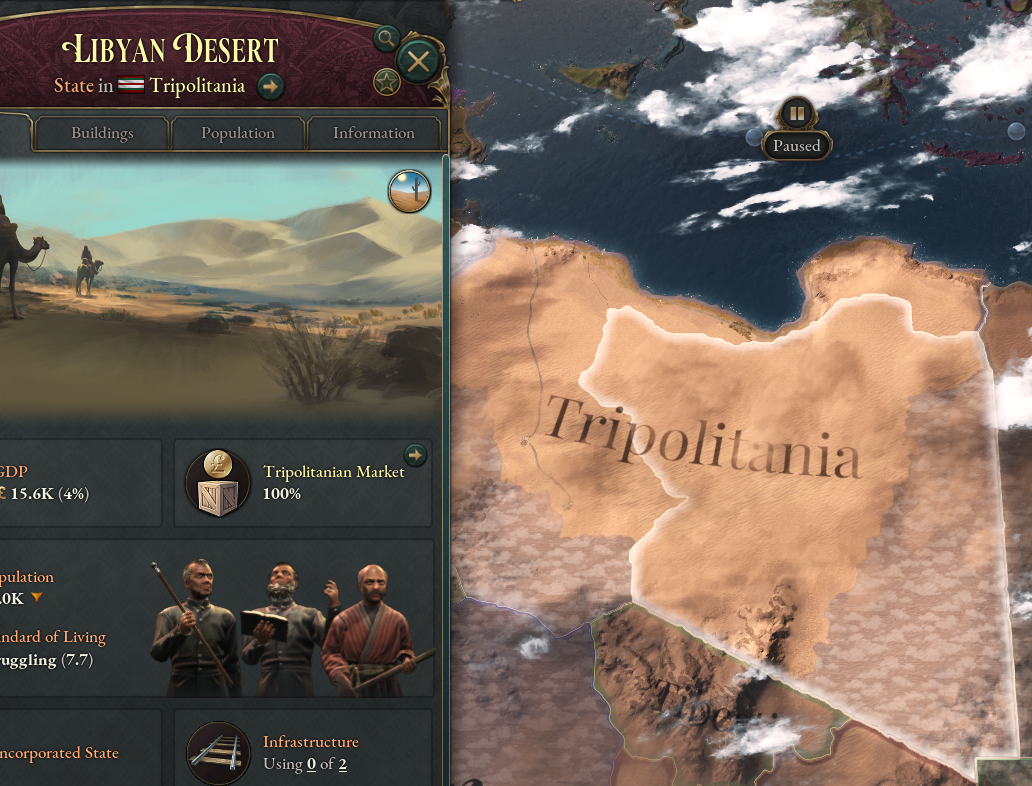
Now that I’ve decided those things and thought about some others, I need to decide on a tag (a three-character short code name for the country). I think CYR makes sense as a tag.
Let’s make sure that CYR isn’t already used in the base game by using Notepad++’s Find in Files function to see whether CYR shows up in the base game country definition files anywhere.
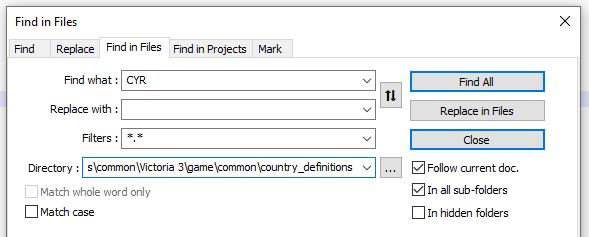 And it doesn’t, great! Now I’ll go to my mod’s country definition folder.
![]()
And I’ll add a definition for it.

As you may be able to see, there are some important parts to a country definition.
It starts with the tag, then you add a colour (this can be in either HSV360 format or RGB). Use some online RGB color picking tool, or image editing software to find the colour you want.
After that you decide what type of country it will be:
- recognized – Mostly used for “western” countries
- unrecognized – Used for “non-western” countries, akin to Vic2’s “uncivilized”
- decentralized – For countries without a central system of government, usually used for indigenous people
- colonial – For countries that are colonies of recognized countries
Then state its tier, which is essentially the size of the country:
- city_state
- principality
- grand_principality
- kingdom
- empire
- hegemony – At release in the basegame, only the country of India is a hegemony. Think of it as a megaempire
After that you’ll put the cultures in. The in-game spellings are usually the same as the code spellings, but not always. You can always double check in the base game’s common/cultures folder.
And finally say what state the capital is in. As above, this is normally the same as what’s written in game, except that spaces are always underscores, which is why my state capital is STATE_LIBYAN_DESERT instead of Libyan Desert. So your state will always be something like STATE_(NAME). If you’re not sure, check in map_data/state_regions or common/history/states.
Make sure you’ve got a closing bracket, too. Most fancier word processors like Notepad++, VisualStudioCode and Sublime have some way of doing this. Proper bracketing is very important!
Making the country show up (ft. the history folder)
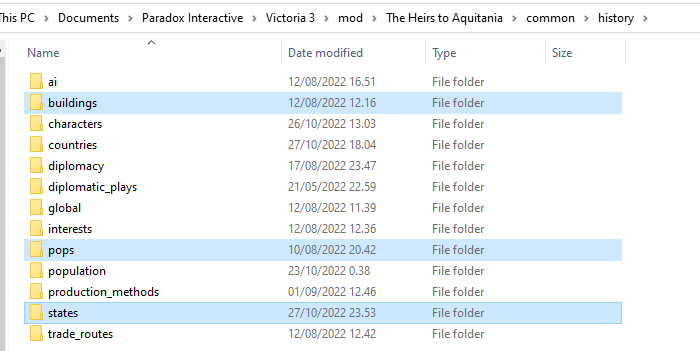
Let’s start at the bottom with states. The file(s) in this folder tell the game who owns what states (or what provinces in the state) at the start of the game, as well as information about what cultures consider the state to be their homeland. Let’s navigate to STATE_LIBYAN_DESERT:
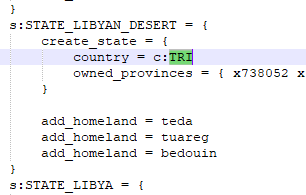
As we can see from the highlighted section, TRI (Tripolitania) currently controls the state. Let’s just change that:
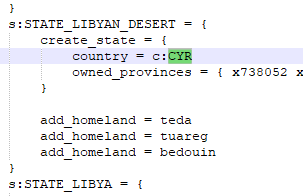
If you launch the game now, you will see that CYR controls the state, but it’s missing information about population and buildings, so it’s kind of useless.
So head over to the pops folder, and once again find STATE_LIBYAN_DESERT, and there, too, change TRI to CYR:
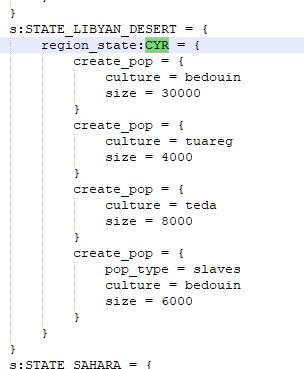
And do the same in the buildings folder:

Here we can see that there are no buildings in the state. That makes sense, considering it’s mostly desert and has a very small population.
And with that, the history folder entries are done for now.
Country history file
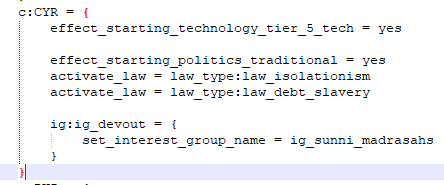
About technology:
In the game at the moment there are 7 “tiers” of technology, which you can view in common/scripted_triggers/00_starting_inventions.
- effect_starting_technology_tier_1_tech – For the strongest of western countries (UK, USA, Belgium, France, etc.
- effect_starting_technology_tier_2_tech – For strong western countries
- effect_starting_technology_tier_3_tech – Average European tech level
- effect_starting_technology_tier_4_tech – Basic, for most unrecognized countries and very “backwards” European countries like the Ottomans
- effect_starting_technology_tier_5_tech – Pretty basic, for “very backwards” countries
- effect_starting_technology_tier_6_tech – Very basic techs, for “extremely backwards” countries
- effect_starting_technology_tier_7_tech – Literally 0 techs, only for decentralized countries
In this file, as you can see, you can set what laws it has. If you don’t set any for a particular category, it will default to the top-most law listed for that category. You may get errors when choosing laws here (they’re listed in common/laws), so pay attention to your error log (at the time of writing, you have to open it manually from Documents/Paradox Interactive/Victoria 3/log) and see what it suggests for laws there.
This file is also used to rename interest groups for flavour. See other history files for other examples.
Finishing touches – Localization and population info
Localization is the way that you translate code into human languages like English. Let’s navigate to our mod’s localization folder.

You may see that I have a custom file name. The game supports that kind of thing, but some things are quite important. The file must:
- be .yml format
- have _l_english at the end of the file name (if your localization is English)
- start with l_english: in the contents of the file
I suggest just copying localization file from another mod or the base game and emptying it (except for the l_english: part).
The localization is pretty simple, as shown here:

Just replace TAG with your own TAG, i.e. CYR in my case.
An quite optional file to do: Population information. The population folder in the history folder gives information about the people who live in the country, specifically their wealth and their literacy. You can create a new file for your country and the two following things can be added:
Wealth: (defined in common/scripted_effects/00_starting_pop_wealth.txt)
- effect_starting_pop_wealth_low
- effect_starting_pop_wealth_medium
- effect_starting_pop_wealth_high
- effect_starting_pop_wealth_very_high
Literacy (defined in common/scripted_effects/00_starting_pop_literacy.txt)
- effect_starting_pop_literacy_baseline
- effect_starting_pop_literacy_very_low
- effect_starting_pop_literacy_low
- effect_starting_pop_literacy_middling
- effect_starting_pop_literacy_high
- effect_starting_pop_literacy_very_high
I’ve decided to go with the following:

This is a good idea for helping with the initial balance of the country, and will have important effects on the country over time.
Finished! Or are we?
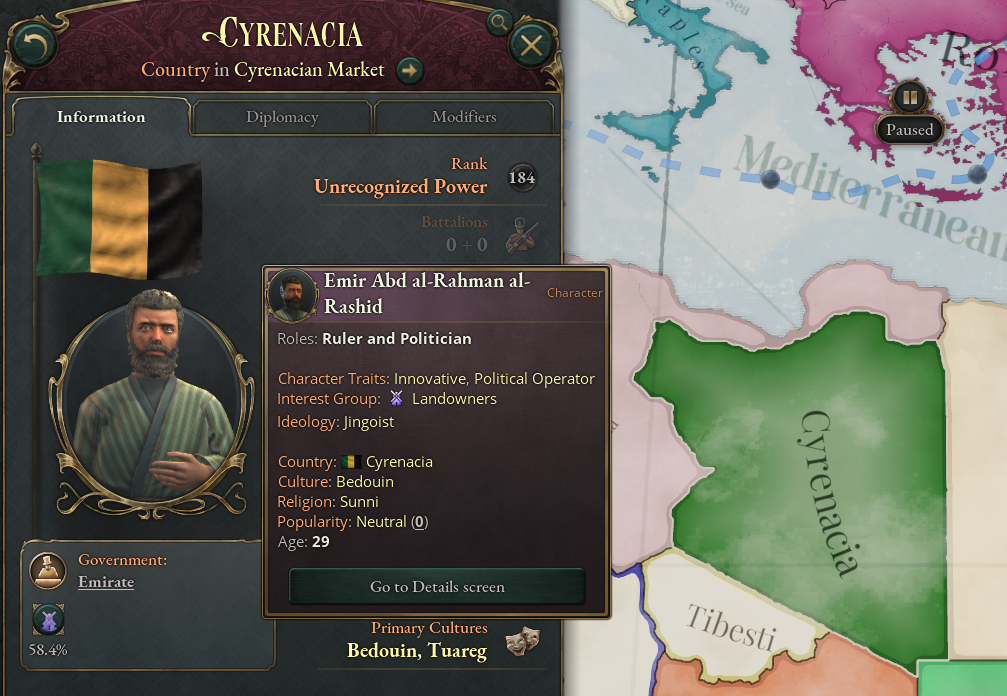
But are we REALLY finished? This is enough to get going if you don’t care too much about the flag or ruler. But let’s talk about those next.
Characters
If you want a specific character to be your country’s ruler, you’ll need to make an entry for your country in a file in the character history folder (common/history/characters). Again, I recommend going through the base game and/or your favourite mod and copying stuff from there. Possible settings for characters can be found in the base game’s common folder, look for folders mentioning character.
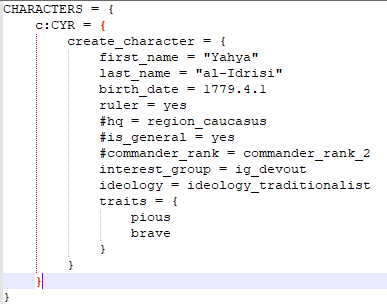
Here’s what I did. I chose a first name and a family name. Very important note: If your names are not already localized because they exist as character or culture names, you must add separate localization for them. In my case, both names were already localized by something, great! If you need to localize them, you can put them in any file (generally speaking, localization is only organized so it’s easier for people to find where things are. You can put your localization wherever you want, but I recommend organizing it by category)
If you need to localize the name, it’s pretty much the same as we had with the country localization:
So if I had needed to localize the family name, my localization would have looked like this:
You might look at that and say “But Savs, that’s exactly the same thing.” Yes, yes it is. Welcome to the wonderful world of localization. If the game doesn’t detect localization for a name, it won’t use the name you’ve supplied, so even if it’s silly that you have to localize it like that, do it.
Anyways, moving on, we’ve got the birthdate. Our character is supposed to be the country’s ruler, so we write ruler = yes. There are other roles, such as heir. See other character files in the base game or your favourite mod to find out more. The UK has lots of characters! You can see that it’s possible to set the ruler to be a general at the game start, but I don’t want that. I’ve commented it out so that the game ignores it, but you can see what it looks like.
Then you need to mention what Interest Group the character belongs to or represents. I’ve decided to follow in the footsteps of the Senussi by making him a member of the ‘Ulama, the Muslim devout interest group (whose name we set to be the ‘Ulama with the country history file).
Next is an ideology. These are found in common/ideologies/00_leader_ideologies. Since my country is not very urbanized and primarily survives on subsistence, I think this fits best.
Finally a couple of traits, which are in the character_traits folder in the common folder.
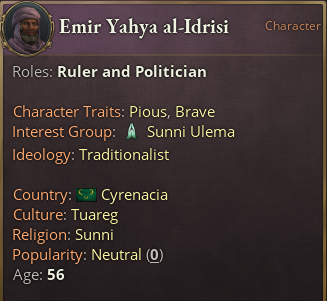
Here’s what I’ve got!
Flags
To make a basic flag in Vic3 all you need is an entry for it in a file in common/coat_of_arms/coat_of_arms. Flags can put in as plain images, but that’s boring in case you want to change things around, and it also takes up a bit more space than writing them in code like most flags are done in the game. Here’s the code I’ve cooked up:
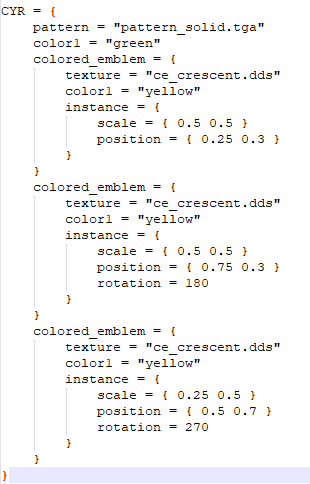
A brief explanation: All flags need a basic pattern to be based on. These are located in gfx/coat_of_arms/patterns. It’s important that for all flag components you wish to use, you must put them in quotes and include the file extension (.tga, .dds) for them to work.
Then you’ll see I’ve got color1, which refers to the first colour that can be used in the flag item. In my case, “pattern_solid.tga” only has one colour, so that’s all I need. I can add more colours if I want to refer to them later with my upcoming items (so instead of having color1 = “yellow” in all three of the crescents, I could have written color1 = color2 and have color2 = “yellow” underneath my pattern’s color1. This would be a fast way to change the colours of all three crescents without needing to change “yellow” to a different colour three times.
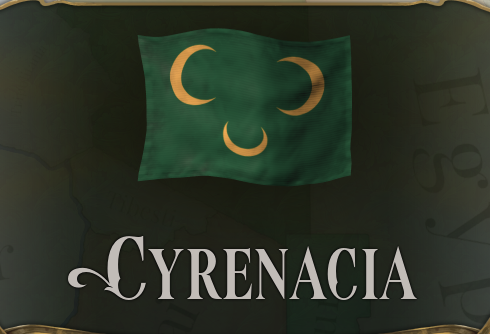
Anyways, then I’ve got my three crescents. I chose them from the files in gfx/coat_of_arms/colored_emblems, and they’re all the same emblem, as you see. You need to set a coloured emblem’s colour, as mentioned above, but also if you don’t want it to be the default size and in the center of the flag, you need to tell the game that “this instance should be of this size and the center of the emblem should be located here”, which is why my instances are doing. The scale refers to the x and y axis distortion, so if you want it to look normal, just put the same number for both. I’ve shrunk both axes by half, so these crescents are a quarter of their default size. I’ve also placed my first crescent at { 0.25 0.3 }, which means that 0.25 is a quarter of the way from the left side to the right side (0 is at the left edge of the flag), and that 0.3 is 30% of the way from the top of the flag to the bottom of the flag (0 is at the top). I’ve also set rotation for the two later crescents to make sure they don’t face the same direction as the first one.
Another important note: To make your life easier when making flags, I suggest opening the game’s command line (right click the game in your library and look at Preferences, and there on the bottom) you should write -filewatcher -debug_mode. The first will update some files in real time as they’re saved, so you don’t have to restart the game to see flag adjustments you make, and the second makes it easier to hunt down bugs and find information in the game.
All done with the flag!
Related Posts:
- Victoria 3 How to Make a New State
- Victoria 3 How to Move Provinces Between States in Large Amounts Quickly
- Victoria 3 How to Move Settlements in the Map Editor
- Victoria 3 Quick Independent Luxembourg Guide
