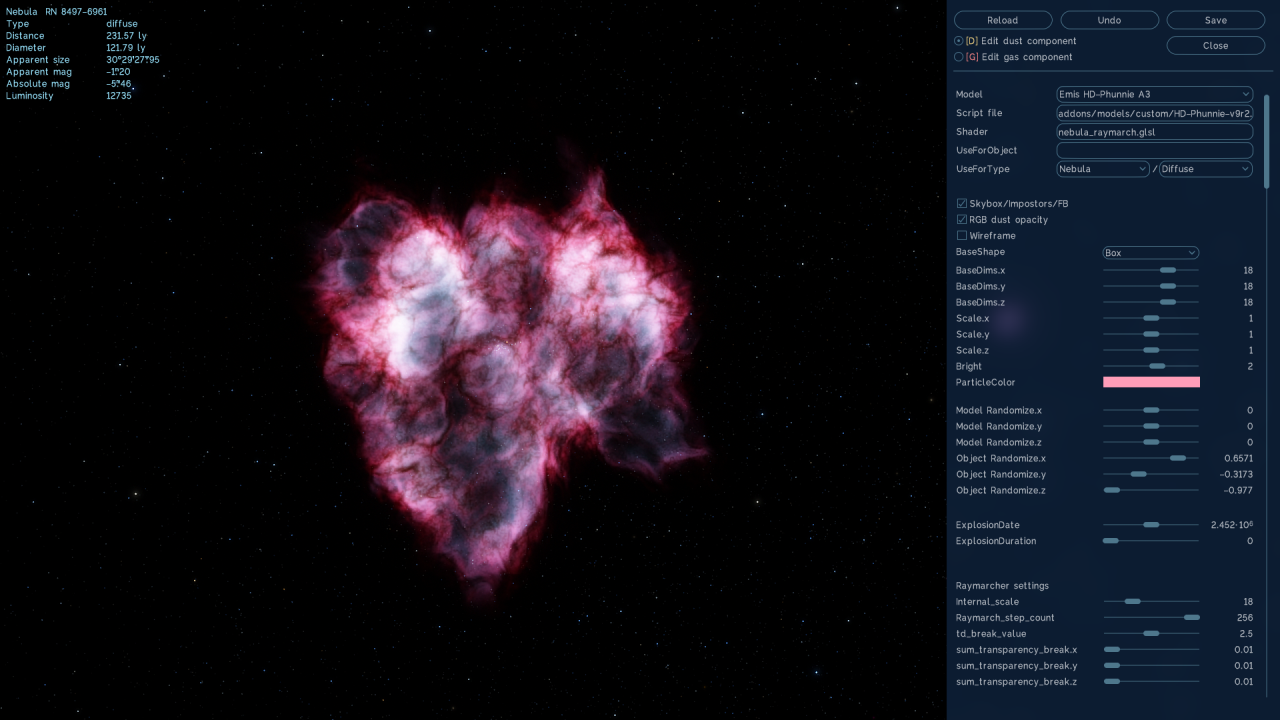
An in-depth guide on making nebula models with editor and Notepad used for procedural and catalog nebulae.
Using the Editor

This is only what I know so far so feel free to suggest a more detailed explanation of parameters and I’ll add them here. Also this will tackle only the most important parameters and will skip a bunch of stuff.
At the top of the UI, there are 4 buttons labeled Reload, Undo, Save and Close.
Reload: Reloads the model to the latest saved model, so if you saved in-game, Reload will reload that model.
Undo: Undoes ALL of the actions you have done since you have opened the Editor. That includes reverting back to before a save (though it will not overwrite it, you can still use Reload to revert back to that save.
Save: Saves the current model in a new file if it’s editing a default nebula, or replaces it if it’s a custom cfg. Once you save and close the editor, there is no going back.
Moving down:
Model: Clicking the drop down menu will display a list of all the models installed so far. Very useful for selecting and editing a nebula without having to find it in-game.
Script File: This indicates where the nebula model is stored. Don’t modify this in-game.
Shader: Points to the shader file DO NOT CHANGE.
UseForObject: Object that will use this model.
UseForType: Type of procedurally generated nebula that will use this model. Diffuse, SNR or Planetary.
Skybox/Impostors/FB: Works the same way as sprites. Disabling them will increase quality at the expense of performance.
Wireframe: Toggles the wireframe of the model. Useful to view the cutoff edges.
BaseShape: Chooses the shape of the nebula. Can be Box (recommended), Cylinder or Sphere.
BaseDims.[x,y or z]: Changes the dimensions of the nebula on the axis. NOTE: It does not expand the wireframe so edges will be cut if the nebula expands beyond it.
Scale.[x,y or z]: Changes the scale of the nebula on the axis. I.e. stretches or compresses it. Also does not expand the wireframe.
ParticleColor: Sets the sprite color you see from afar.
Bright: Nebula brightness Must be set to 2
Raymarcher settings
Internal_scale: Changes the whole scale of the nebula internally. I.e. the same as scale but in all axes.
Raymarch_step_count: Essentially changes the level of detail, however it should not be changed as it can severely impact performance.
Star render
I will skip this section because the parameters do not create real stars and is also very buggy. They are still functional though and you can create decent looking fake star illumination.
Dust
The two important dust parameters are: Dust_volume_height and Dust_volume_density_factor. The 3 other parameters have been tweaked to have realistic dust absorption, scattering and albedo values of 0.4, 0.6 and 0.6 (assuming you’re editing a default model).
Dust_volume_height and Dust_volume_density_factor work together to control the height, or in most cases, the fuzziness of the dust, and the volume of the dust.
Gas emission
This section is quite large so I will briefly explain what it’s for.
With Gas_emission_enabled on, you can then turn on 3 different glowing gas layers on which you can apply color. You can use the Emission_gas_direction[x,y or z] and the Emission_gas_coef_[1,2 or 3] to modify where on the nebula the specific emission gas will glow.
Emission_intensitivity_coef: Changes the glow intensity of all the gases enabled.
Position
NebulaCentPos.[x,y or z]: Changes the position of the nebula on the axis.
Scale
NebScale: Changes the render scale of the nebula. Unlike the other options of scale, changing this will change the amount of detail rendered in the nebula.
NebScaleCoef.x: Changes the scale of the dust only.
NebScaleCoef.y: Changes the scale of the gas only.
Before getting into the shapes, I need to mention that the final result produced can vary greatly with just a few different parameters. Every shape parameter will play off other parameters and create mixes. So explaining what every combination does in every situation would be impossible. This area is for you to experiment and find out what works and what doesn’t. This includes Spiral noise 2D
For all the shapes,
NebulaForm[shape]sign.x: Depends on the shape and other parameters active, but you can consider it as the weight of the shape on dust only.
NebulaForm[shape]sign.y: Depends on the shape and other parameters active, but you can consider it as the weight of the shape on gas only.
The other parameters tweak specific details of that shape. For example, NebulaFormSphRad tweaks the radius of the Sphere shape.
Noise
Noise functions in a similar way to the Shapes.
Sign.x controls dust and Sign.y controls gas.
The other parameters control intensity, frequency, etc.
Twist
NebulaMapTwistCoef[1,2]: Twists the nebula in opposite directions.
Thickness control
NebulaMapThickCoef.x Changes the thickness of dust only.
NebulaMapThickCoef.y Changes the thickness of nebula only.
Tips for Making a Nebula
Here are a few tips to get started:
-Find a nebula you already like and edit that one.
-Editing the shapes will cause change without completely breaking the nebula (sometimes, read the tips below).
-Play with emission gas direction and coefficient to get nice gradients.
-Playing with dust thickness, dust volume and dust height can drastically change the overall look of the nebula.
-Use the noise parameter to more fine detail.
-Use Spiral noise 2D parameters to change the wispiness of the nebula.
Here are a few tips to look out for:
-Keeping the BaseShape as a “Box” is by far the best option performance wise.
-Keeping Scale[x,y or z] below 1 will prevent weird clipping.
-If a nebula is too large and clips out, increase internal_scale to make the model smaller without losing detail.
-Keep the values of NebulaForm[Shape1]Sign.x and NebulaForm[Shape1]Sign.y of each individual shape equal or close. Example: If NebulaFormPlaneSign.x is set to 2, then onlyNebulaFormPlaneSign.y should also be set to 2, or at least very close. This will prevent or at least lessen glitching and artifacting.
-Be careful when tweaking values. Some can change the nebula completely or break with just a small change.
If you have anymore suggestions, feel free to let me know. I will gladly expand this list of helpful tips.
Using the Nebula
If you want to use the model for a nebula, then you need to first create a nebula catalog script. Name it anything you want, and add a .sc extension. Ex: MyNebula.sc.
Copy this template catalog into your .sc and replace the values with your own:
————————————————————————————————————————————-
Nebula “MyNebula” \\Name of the nebula
{
Galaxy “M 82” \\Parent galaxy
Type “Diffuse” \\Nebula type
RA 00 00 00.00 \\Right Ascension
Dec 00.0000 \\Declination
Dist 1000 \\Distance from the Sun
Radius 1 \\Radius of the Nebula in pc
AbsMagn -6 \\Absolute Magnitude
Quat ( 0.0000000 0.0000000 0.0000000 0.0000000 ) \\Quaternions
}
————————————————————————————————————————————–
Then save the file and place it in addons/catalogs/nebulae.
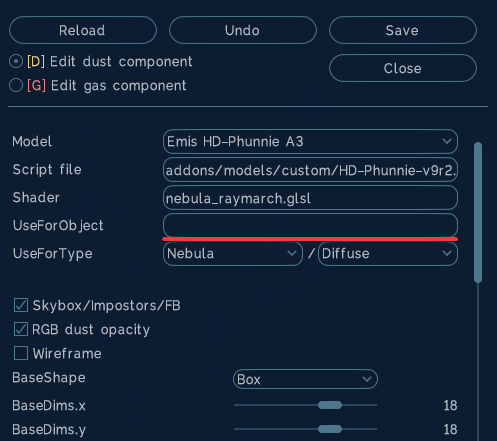
To apply the model to your newly placed nebula, you need to set a UseForObject “[NebulaName]” tag. You can do that in-game with the editor:

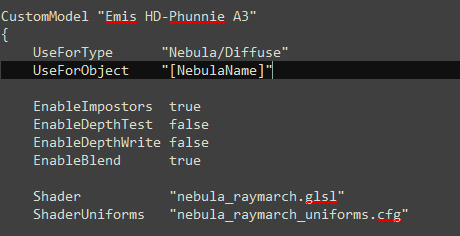
Alternatively, you can also open the cfg file of you nebula model and add it manually.

Rename [NebulaName] to whatever you used in your .sc file.
Save and that’s it! You should now see your new model used on your catalog nebula.
