Introduction
The bots are geared towards deathmatch-only capabilities, with some limited co-op capabilities.
The game features a built-in waypoint editor which lets you easily create and modify the waypoints of a level.
The bots will work in coop, but in limited capacity. They will engage enemies and pickup weapons, ammo, etc.. and generally try to follow the player or even venture on their own.
Unfortunately lack of features in the waypoint and navigation system means that the bots aren’t able to complete most singleplayer maps by themselves. The biggest issue they have is being unable to deal with key locked doors. They do not appear to have any concept of this and will just merely try to walk through the door.
PS: This could potentially be mitigated by forcing the bots to always pass through the key location but this would be way too much work and quite messy. Not to mention every time they would respawn, they would need to walk that whole distance again.
Navigation Editor
- Open the console
- Change the map to the one you wish to waypoint:
map <mapname>
- Enable cheats:
sv_cheats 1
- Enable the editor:
nav_edit 1
You should now be greeted with the navigation editor: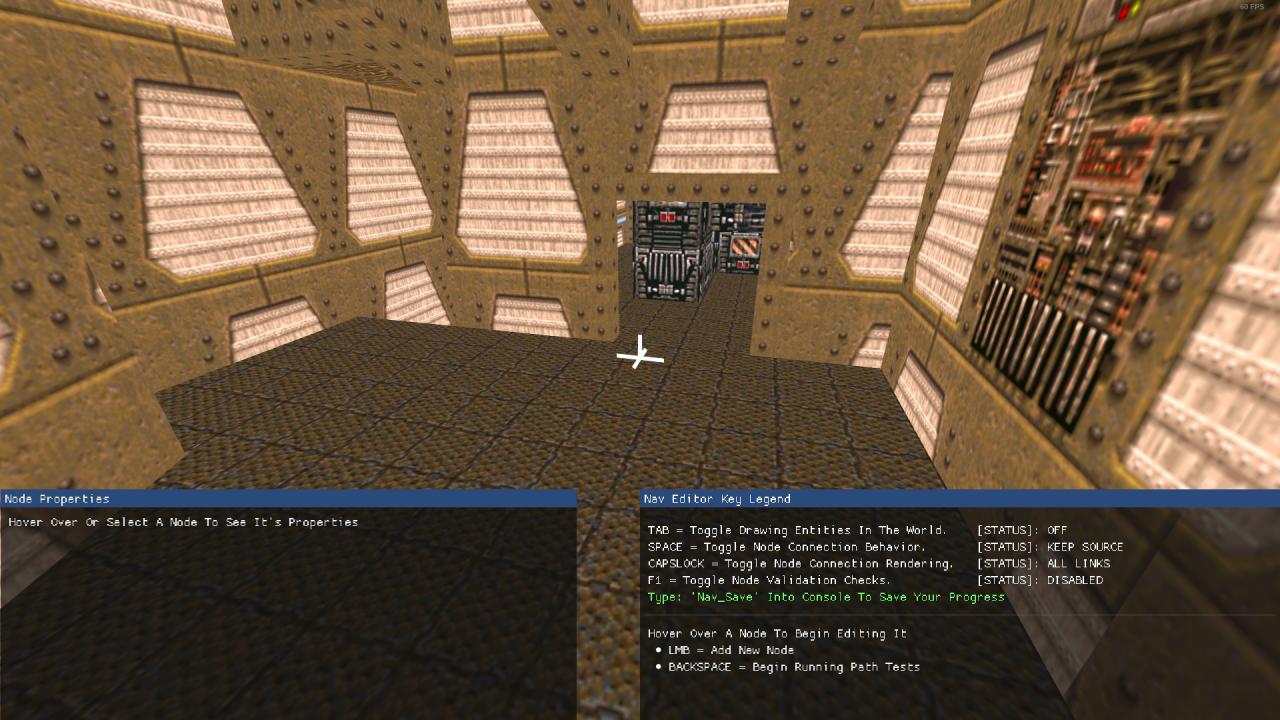
- Open the console
- Disable the editor:
nav_edit 0
To save, type
in the console.
WARNING: If you close the nav_editor without saving, you will lose all your changes.
- You will be granted notarget, god (Godmode) and noclip.
- When leaving the editor, you will spawn at the current location and your notarget, god, noclip will be removed.
- Remember to press ‘TAB’ to view all entities, so don’t be scared if suddenly everything looks a bit empty.
- If you enable the editor after aggro-ing some monster or bot, they’ll keep attacking you.
- Remember to save before closing the editor.
Working with the navigation editor
Luckily for us, the whole editor is very well documented and always displaying the keys + what they do.
Tip #1: Always look at the legend in the bottom right, and read.
Tip #2: It’s quite easy to get lost in the menus so make sure you look at the legend to know what mode you’re on.
Tip #3: I’d recommend disabling error checking by pressing F1 while in the editor. It can be annoying because you’re unable to save your progress.
NOTE: Currently there appears to be a bug (at least on my pc) where the last line of the help is cut off and unreadable.
You now have noclip which means you fly and can go through walls. Use WASD + Mouse look (or whatever keys you have bound to movement) to navigate.
Nodes (Waypoints)
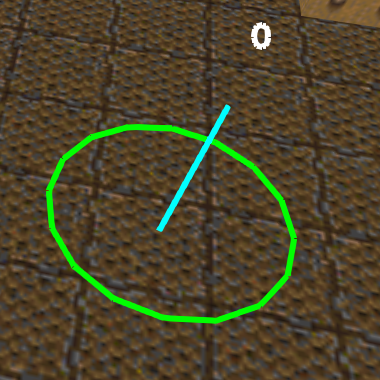
In this picture, the blue line represents the ‘center’ point.
The green circle is the ‘radius’. It indicates that any point inside this circle is floor and can be walked upon and that any properties the node contains, also affect this area.
The number above the blue line indicates the Node ID and will sequentially increase as you add more nodes.
Make sure you don’t have any node currently selected, and just press LMB (Left Mouse Button). If your crosshair was red then it’ll mean that it’s not possible to place down a waypoint at that location.
- Select the node you wish to delete
- Press ‘DELETE’
If you placed the node incorrectly or you wish to make it hover (for example, underwater), use the Move tool.
- Select the node you wish to move
- Press ‘SHIFT’
- Move / Place the node by moving the mouse.
- Raise / Lower it by using the scroll wheel.
- RMB (Right mouse button) to ‘drop it to the floor’
Nodes can have types. These usually indicate a special function.
Teleporter: It indicates that when you move here, you’ll be teleported. Automatically set if placed inside a trigger_teleport.
Pusher: Unknown. Probably related to wind tunnels.
Elevator Top: Indicates the highest level of an elevator plus how the bot should leave the lift.
Elevator Bottom: Indicates the lowest level of an elevator.
UnderWater: Liquids. Automatically set if placed inside a liquid.
Hazard: Not confirmed but should indicate that the bot will be hurt here and will try to avoid it.
Generally specially you don’t need to cover all items with a node, as the bots are smart enough to walk and fetch items that are close to the node radius.
I personally prefer to fill the radius as much as possible to fit within the room, although for the most part, official nodes appear to be using the default radius.
Links
In general, here’s how to identify them in the editor:
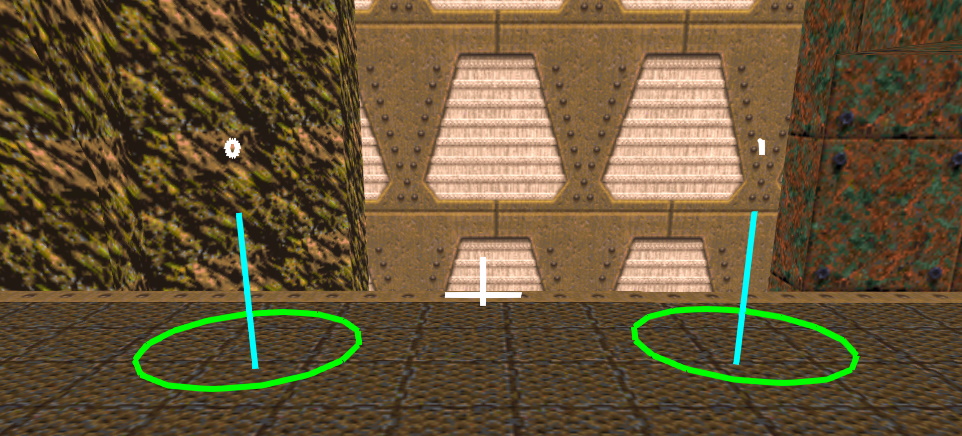
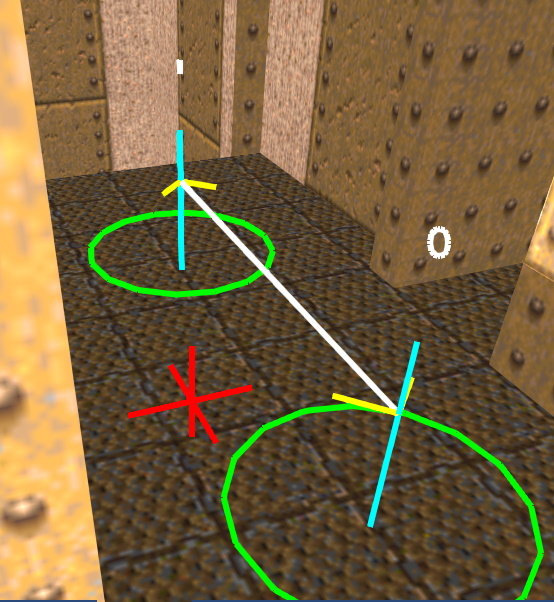
These waypoints are not linked, thus they cannot be walked from and to each other.
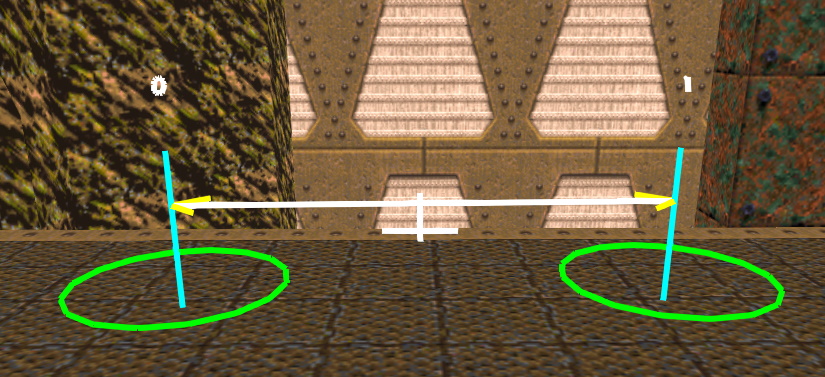
Note the white line + yellow arrows at the ends.
These waypoints are linked both ways. You can walk from 0 to 1, and 1 to 0.
There are 2 individual connections (one going each way)
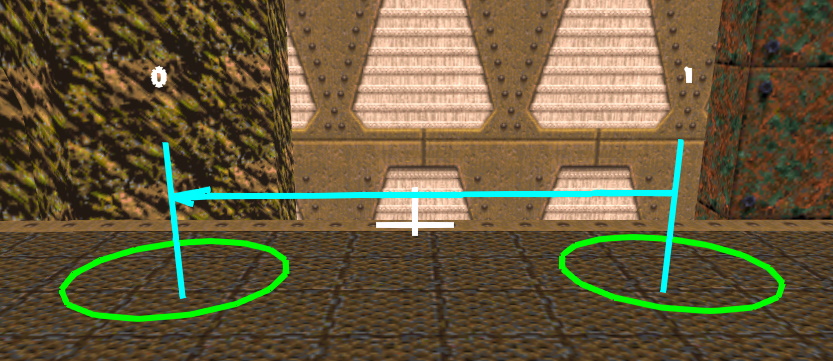
Note the blue line + blue arrow at the end.
These waypoints are linked one way. You can only walk from 1 to 0.
- Select the starting node
- Select the ending node (without deselecting the first one)
This will create a link. Two-way if possible, one-way if it thinks it’s a ledge.
If you mouse over the nodes, you’ll be able to see the connections listed in the bottom-left window.

To select an individual link, it’s a bit more complicated. Keep in mind that a two-way connection is effectively 2 links.
- Select the starting node
- Press ‘CTRL’ to enter link selection mode
Now you are in link selection mode:
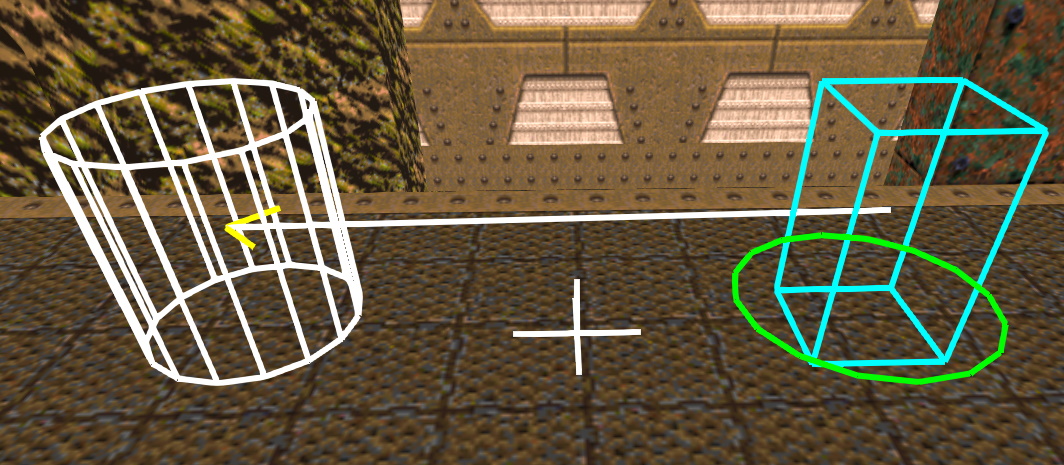
Each cylinder represents an end node of a connection that starts at the selected node. Select the cylinder to select the connection from the start node to that node.
Here’s a list of the settings each link can be:
Walk: Default. It means you can walk…
Long Jump: There’s a chasm of some kind that the bot needs to perform a long jump. Depending on the situation, bots might fall down.
Teleport: This link indicates that it’ll teleport you to another node instantly.
Walk Off Ledge: Drop from a ledge.
Pusher: Unknown. Suspect it’s related to wind tunnels.
Barrier Jump: There’s a small obstacle in the way that can be traversed by jumping.
Elevator: This is a special link. Should only be used between Elevator Bottom and Top nodes.
Train: Moving platforms
Manual Jump: The bot should jump no matter what.
Unknown: Unknown type. You will encounter this when linking nodes that can’t be seen from each other.
Edicts are level entities which have some relation to this link. They’re usually meant to indicate buttons, lifts and doors. You can see their use in the Scenarios section.
But just know that to set an edict, press CTRL while having a link selected, and then select the target entity which will be highlighted with a yellow box.
Two of the editor toggle options affect links.
Pressing CAPSLOCK toggles between being able to see ‘All Links’ or only ‘One Way Links’.
Pressing SPACE toggles between ‘Chain Connections’ and ‘Keep Source’.
Chain Connections: When linking a node to another, the end done with will become the newly selected node.
Keep Source: Opposite of ‘Chain Connections’, in which the starting node remains selected.
Handling some scenarios
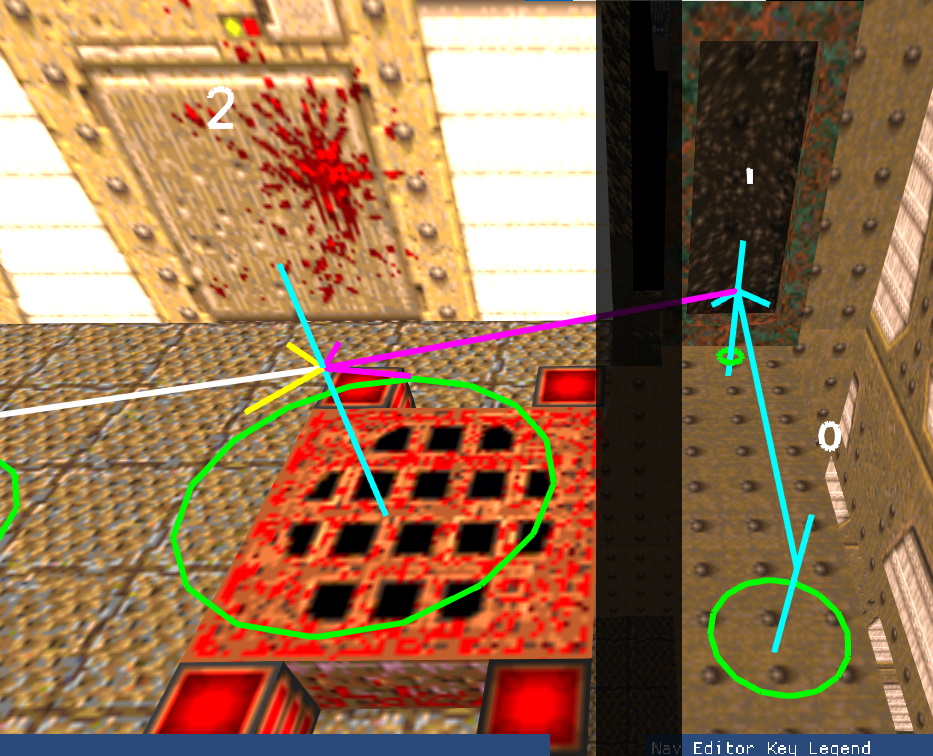
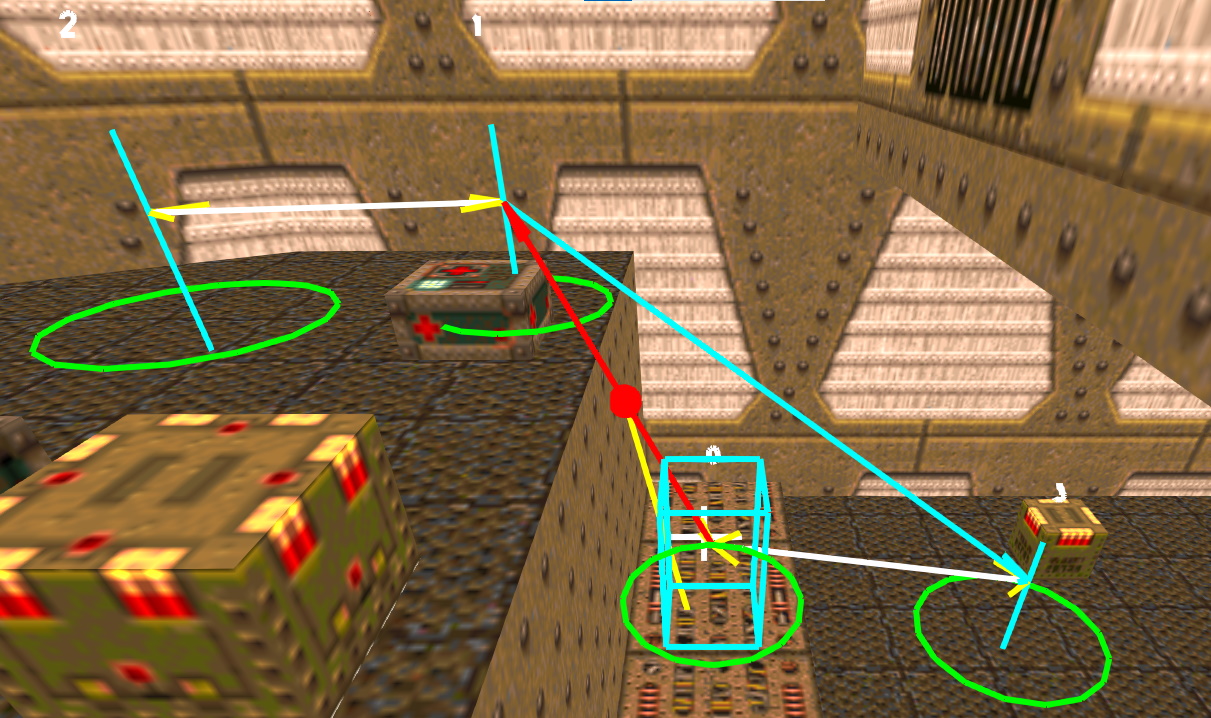
- Place a node at the teleport destination (node 2 in the picture)
- Place a node at the teleport. It should look a bit different with a tiny circle (node 1 in the picture)
- Link the teleport node to the destination node. It will automatically be set one-way and with teleport tag, represented by a purple line.
- Connect the entry node to the teleport (node 0 in the picture)
Part 1:
- Place a node on each side of the door
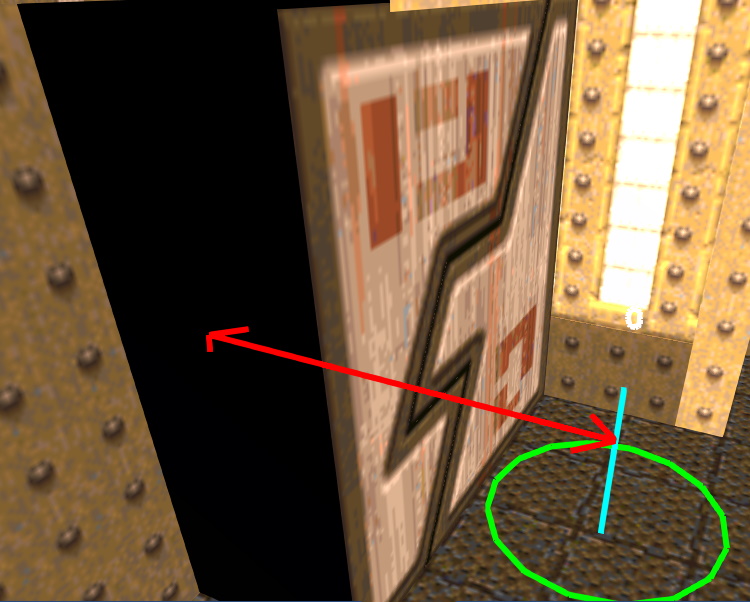
- Link both nodes in both ways (if applicable). NOTE that if the door obstructs the view, the link will be red and only one-way. So make sure you link it both ways (picture below)
Part2:
- If the links were red, manually edit the links and set their type to ‘Walk’.
- If the door triggers with a button, edit the links and set their Edict (CTRL key) to the button that triggers them.
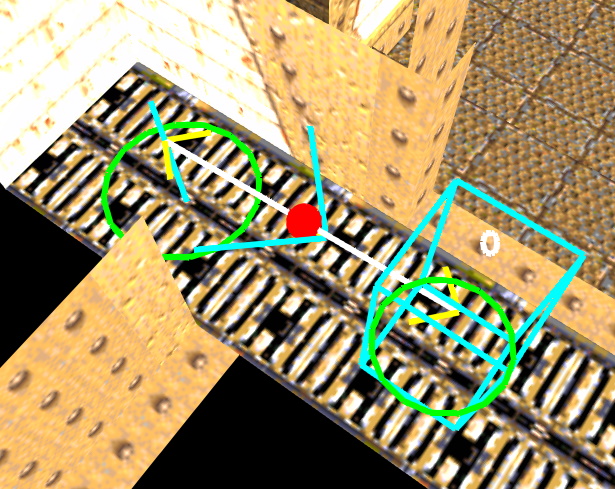
They’re probably the most complicated setup you’ll do. This is for a lift that starts at the bottom and raises when you step on it.
- Place a node in the middle of the lift at the bottom.
- Set the node type to ‘Elevator Bottom’
- Place a node at the top of lift, on the side where you’ll leave the lift.
- Set the node type to ‘Elevator Top’
- Create a link from the ‘Elevator Bottom’ node to the ‘Elevator Top’ node.
- Edit the link and set the Edict (CTRL key) to be the lift itself.
- (Optional) Finish off by adding a Fall Off Edge link if appropriate.
NOTE: If the lift bottom and top are too far away, you might not be able to select the top node since it disappears.
Bots do not automatically shoot secret doors. But it’s just an extra step from the ‘Door’ scenario.
- Do the same as the ‘Door’ scenario
- Set the link edicts as the door itself. It indicates to the bot that it should shoot it in order to pass.
Going for a test ride
- If you’re already inside the map, save your waypoints and type
disconnect
to go back to the main menu
- Type
maxplayers 8
- Type
map <mapname>
to go back to your level
- Now you can add bots via
addbot
Some things to keep in mind:
- If you open the navigation editor, bots will stop triggering things. That includes lifts, door triggers, teleporters… Once that happens, you need to restart the level to restore them.
- Bots will shoot you on sight if you’re in deathmatch mode. Enable ‘god’ and ‘notarget’ manually.
- Editing nodes while bots are roaming around will not update them. However once you save your nodes, the bots will start using your changes.
There’s a bunch of helpful commands to help debug the bot behavior.
bot_showPaths 1: Shows the current paths of each bot
bot_showBots 1: Shows where all bots are, even through walls.
bot_drawNavNodes 1: Draw all the navigation nodes even if outside the editor.
bot_navNodeGoal <Node ID>: Will make all bots beeline directly to that node. They will ignore monsters and each other (usually). Set to -1 to disable.
There are a bunch of other commands, but I didn’t personally find them useful.
Pressing BACKSPACE in the navigation editor (without any node selected), will put you in Path Test mode. You can easily test path connectivity between two nodes.
Save files
If you include these .nav files with your mod (zip or pak), it will automatically import the nav files in-game.
