Hello Patch Quest players, this guide will cover all the mechanics in Patch Quest that are worth discussing. This entry will talk about Patch Pins and how to utilise them for overworld exploring, perks and pets!
Intro
Index:
– The Pin Press
– Capturing
– Farming
– Pets
Part 1 – The Pin Press
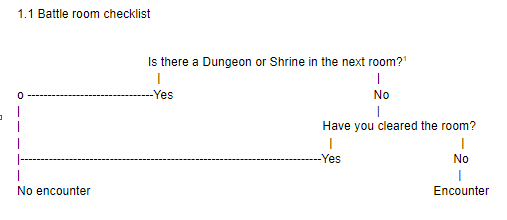
The Pin Press can only have one charge at once, it is therefore recommended any self-respecting explorer uses their charge on a Patch Pin before the next encounter. You can recognise which rooms are enemy encounters by looking on the map, where Elite battles will have a symbol on the map. Ambushes are, as the name suggests, not detectable on the map, however, you can try to spot one by standing on the edge of the corridor, go down this (mental) checklist to know if the room is an encounter or not.

Part 2 – Capturing
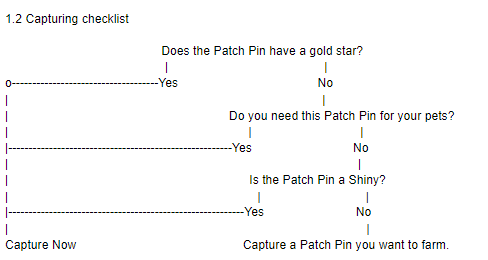
Shiny Patch Pins have a moving reflection that goes over them every few seconds, the ‘star’ I’m referencing can be found when selecting the Patch Pin, it will either be gold or silver. Gold stars are new Patch Pins and silver old ones. Patch Pins that your pets can use have priority because you want your pets to get to 5 gold stars as soon as possible. Farming gets unlocked after you beat your first Dungeon and will be explained after this.
Since you have obviously saved the previous graph somewhere or learned it by heart, we can now assume you always have a set amount of Patch Pins to work with before you need to capture something, remember that this is just a suggestion and you are free to decide where your priorities lie. The order goes somewhat like this:

Do note that this is the optimal way to play (in terms of Pin Press usage), if you want to play more relaxed, just pick a certain thing you want to do (like getting new Patch Pins) and only use Pin Press charge when you encounter that scenario (in this case, when you get a gold star on your Patch Pin).
Part 3 – Farming
Depending on if there is a Dungeon or Shrine in the room (in which case the encounter won’t happen), you first need to defeat a horde of enemies before you can plant anything. After you’ve done so there will be a pop-up which will give you the option to plant any of the Patch Pins you’ve gathered so far.
Once you come across one of your planted Patch Pins, it will give you its farming bonus for 3 rooms, or 5 if you planted a shiny Patch Pin.
There are many tiny things to consider with farming, but here are some general rules:
- Turrets generally are much more useful than Patch Pins that give specific monster species a buff.
- Only plant Patch Pins that give bonuses to specific monster species if that species naturally spawns in the area, doing this for your pets is not recommended, as they aren’t permanent/always available.
- If a Patch Pin gives allies, don’t plant them, they are not strong enough to make enough of a difference.
- If a Patch Pin gives you a wall/shield, don’t plant it, they’re only likely to get in your way.
- Only plant Fruit Bushes if you like the Ammo Type.
- Patch Pins that give you a buff are very strong and almost overpowered even, plant them if you can. Also note that monsters can’t use these, making them even stronger.
Each Patch Pin also gives you a power-up for planting it (you can find what Patch Pin gives what power-up in the records tab). This power-up is given every time you come across the patch, just like the special buff, so these are basically just free power-ups.
If a Patch Pin does anything else, you can decide if you want to plant it on your own without my help. If you want to know what Patch Pin gives what farming bonus, select them in the records tab, and it will show you a ‘detailed’ description of each effect.
Part 4 – Pets
Every Patch Pin is tied to a zone, plant 5 Patch Pins of a certain Zone in one of your home base’s patches to make a themed patch. Every monster likes a different zone, and using these themed patches to your advantage is a must, as they give you one full heart for having them.
Each Patch Pin also has 1-3 attributes, each corresponding attribute will give you 1/4th of a heart. Shinies gives an additional 1/4th of a heart for each corresponding attribute as well. So a shiny with one matching attribute would give half of a heart and that same Patch Pin but without the Shiny effect would give 1/4th of a heart. You can find out what attributes a pet likes in the records tab or by standing close to them.
You can also pet your monster for 1 additional heart, this needs to be done before every run.
For now, just know that each full heart a pet gets gives it a stronger bonus when you summon it as an ally.
Outro
See Also
More from The Survivalist Handbook (these are all still WIP’s, so no link):
- The Survivalist Handbook – Mounts
- The Survivalist Handbook – Shrines and Charms
- The Survivalist Handbook – Dungeons
- The Survivalist Handbook – Subhabitats
- The Survivalist Handbook – Bosses
