For Meet Your Maker players, this guide for beginners should contain all the info needed to understand Meet Your Maker, let’s check it out.
About this guide
THIS GUIDE IS A WORK IN PROGRESS. I AM WORKING ON IT
This guide should contain all the information required to understand how the game works.
The tutorials already do a good job, but I felt like some things were missing or confusing.
This guide is mostly made from knowledge learnt during the beta. Therefore, some things could be inaccurate and will be fixed later.
This guide will not contain information about Meet Your Maker’s lore.
If you want to know more about the story and events, I recommend you check the codex in your settings menu.
Do not hesitate to leave a comment if you spot a mistake or if you have a question.
What is Meet Your Maker
Meet Your Maker is an asynchronous, player versus player, first-person shooter.
You play as both a builder, designing deadly outposts, and a raider, invading other players’ outposts.
The term “asynchronous” means you will never fight another player directly, and players cannot do anything more to defend their outpost but making them as deadly as possible.
The difficulty of the game depends entirely on players’ ingenuity, but you don’t really lose anything for trying again and again.
Not all outposts can be cleared with the default gears.
You will need to upgrade them or unlock new gears to change your loadout according to your playstyle or the outpost you’re raiding.
Meet Your Maker supports cross-content, meaning you can raid outposts made by players from any platform.
What about co-op
Both players will be rewarded similarly for raiding outposts, however, only the host will be rewarded for outposts built in co-op since he is the outpost’s owner.The only difference between playing solo and with a friend, is the ability to revive a dead player by interacting with the skull icon that should be located near the spot he was killed.
Just like dying over and over, there is no real downside to reviving a player again and again.
However, it should be noted that each player’s death will reward the outpost’s owner.
Meet Your Maker does not support cross-play nor cross-progression (yet?).
Glossary
Here is a list of words explained, just in case.
- Chimera : The strange creature floating in red liquid.
- Custodian : Each player is playing as a Chimera’s Custodian. They are warrior clones.
- Sanctuary : Your base of operation where the Chimera is located.
- Advisors : The five human clones sitting in the Sanctuary.
- Outpost : Bases outside the Sanctuaries built by Custodians.
- Burial Site : Location used to build an Outpost.
- GenMat : Short for Genetic Material. More on that later.
- Cells / Parts / Synthite : Currencies obtained in-game. More on that later.
- Hardware : Consummables that are destroyed upon use (like grenade).
- Guards : Clone units placed in Outposts to hunt down and kill Custodians.
- Harvester : The little guy who makes trips between the Shipping Station at the entranceof an Outpost and the GenMat Extractor deep inside said Outpost.
GenMat
The main goal in Meet Your Maker is to evolve the Chimera, and to do that, you need to process GenMat through the five advisors.
GenMat is split into 5 categories, one for each advisor :

- Suits
- Traps
- Guards
- Hardware
- Weapons
GenMat is used to level up advisors, which will in turn evolve the Chimera.
There are 2 ways to obtain GenMat :
Raiding another player’s outpost will reward you with GenMat depending on the outpost’s difficulty rating.
Building an outpost and activating it will slowly and passively grant you GenMat (even if you are offline). On top of that, each death of a player attempting to raid your outpost will grant you GenMat.
When you obtain GenMat of a kind, it will fill up the square around an advisor’s icon (as seen on the picture above).
When a square is filled, that means the corresponding advisor is ready for processing.
The GenMat obtained also goes toward your Tribute.
Advisors
They serve 3 purposes :
- They process the GenMat you collect in order to evolve the chimera.
- They allow you to unlock/upgrade/purchase gears, hardwares, traps and guards.
- They can grant you a time limited buff.
Once one or more advisors are ready for processing, you can press the big button next to the Chimera to start the “processing procedure”.
This procedure will level up each advisor who received enough GenMat, and grant one experience point toward the Chimera Evolution per advisor.
It takes more and more experience for the Chimera to evolve.
(As seen on this screenshot, it takes 5 experience point for the Chimera to evolve from level 13 to 14)
 You can check how much GenMat is required to level up an advisor by interacting with them and checking the right side of the screen on the Boost tab.
(Look at the top of the screen for the tabs)
Each new level requires 400 more GenMat than the previous level, and it caps at 5 000 GenMat around level 12.
Each advisor is responsible for unlocking and upgrading parts of your arsenal.
- Prosarmogi is the Suit Advisor. He will allow you to unlock suits and upgrade “Biolinks” which are upgrades to the suits’ abilities.
- Prota is the Traps Advisor. She will allow you to unlock traps, and mods that can be applied to traps in order to modify their abilities and behaviour.
- Metamorph is the Guards Advisor. He will allow you to unlock guards, and augments that can be used on guards to modify their abilities and behaviour.
- Elpida is the Hardware Advisor. She will allow you to unlock new hardwares, and then craft more supplies of said hardwares.
- Chrona is the Weapon Advisor. She will allow you to unlock new weapons and upgrade unlocked weapons.
Each Advisor can grant you a limited duration boost in exchange for currencies.
Each boost has 3 levels of effect, and the boost’s duration scales with the advisor’s level (3 minutes per level).
- Prosarmogi will give you info about the outposts you’re raiding such as length and trap numbers.
- Prota increases the drop rate of Synthite while raiding & building.
- Metamorph increases the prestige earned by your outposts.
- Elpida increases the amount of GenMat earned while raiding.
- Chrona increases the drop rate of Parts while raiding & building.
Currencies
Here is a summary table explaining how to obtain each currency :
(According to the in-game info, you get rewards at the end of a campaign according to your rank when it ends. I cannot provide info about this because it has never happened before.)
Here’s another summary table explaining what currencies are used for :
As you can see, all unlockable require Cells, and it is the hardest currency to obtain.
Which is why you should be very careful as to how you spend them.
Raiding
(Here you will only find info about raids in general. I will be making a full guide on raiding with tips and explanations)
The first way to obtain GenMat, is to raid another Custodian’s outpost.
By interacting with your sanctuary’s Command Center, you get access to the Raid map.
On the left, you can see this :
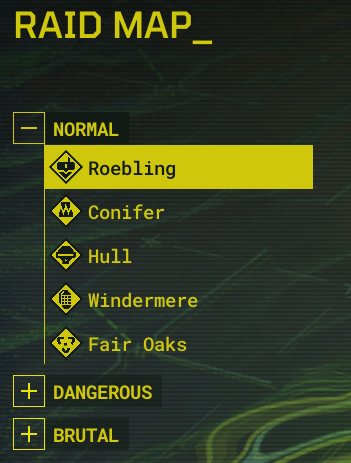
Here you can see 3 difficulties, normal / dangerous / brutal.
For each difficulty, you have access to 5 outposts, one for each type of GenMat.
Of course, brutal outposts grant more GenMat than dangerous outposts, which grant more GenMat than normal outposts.
Selecting an outpost will display some details about it on the right side of the screen :
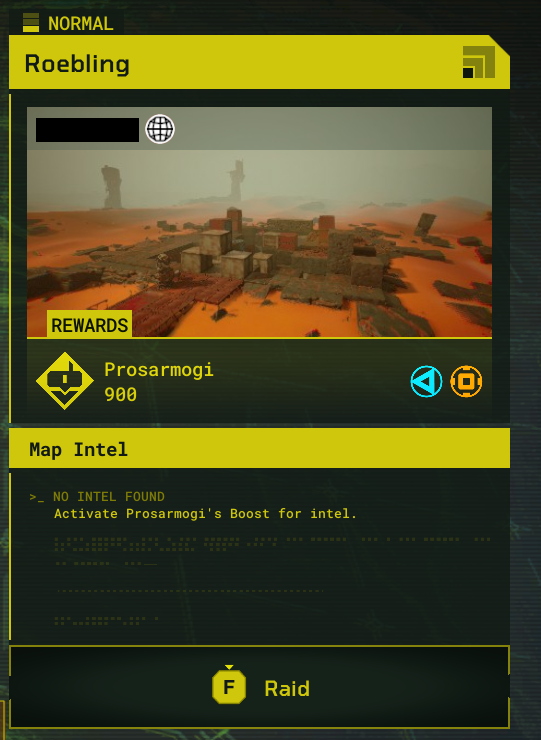
Here you can see :
- The difficulty rating : NORMAL
- The name : Roebling
- The size : Small (top right icon)
- The Custodian’s name : Censored in black
- The type of GenMat rewarded and the corresponding advisor : Suits GenMat for Prosarmogi
- The amount of GenMat : 900
- Other rewards : Parts and Synthite
- Map Intel : This is where info about the outpost’s path’s length and most used traps will be displayed if you activate Prosarmogi’s boost
Outposts owned by the Devious Team are Outposts made by the developers.
Raiding outposts will fill the bar at the bottom of the map toward unlocking Champion Outposts (the higher the difficulty, the faster it will fill up) :

Each time the progress bar reaches one of the thresholds, you get to raid a Champion outpost in the difficulty of your choice.
These outposts always reward GenMat of all 5 types at once :
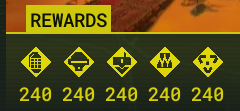
Once you have completed 3 Champion Outposts, you get a bonus reward of Parts and Synthite, and you can start the whole process again.
Something important to keep in mind is difficulty rating does not mean the outpost has killed a lot of raiders.
It means there are more traps and guards close to the harvester’s path.
That can lead to harder outposts, but not necessarily
By pressing R in the Raid Map, you can access the Social Raids.
This interface allows you to look for a specific player or specific outpost by name, and start a social raid.
You will not gain anything from social raids, and you can only access outposts that are set on “Social”.
Building
(Here you will only find general information about building. Going into details would require an entire guide)
The second way to obtain GenMat, is by building outposts.
Everything related to your outposts can be found in the Build tab of the Command Center (top of the screen).
From the Build tab, you can press R to claim a new Burial Site. This is where you’re going to build your outpost.
You will be offered 8 Burial Sites to choose from, with varying stats and price.
You can have up to 200 Burial Sites, as displayed on the top left, and claiming one requires Synthite.
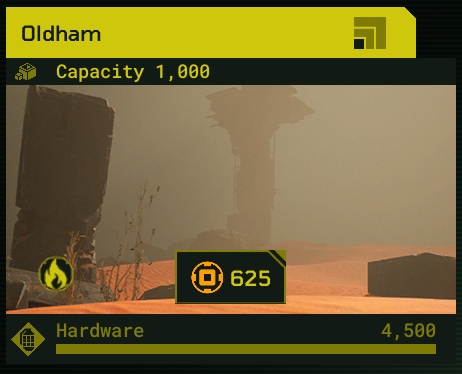
On each Burial Site, you have the following information :
- The name
- The size : the square displayed on the top right indicate a small Burial Site on this screenshot
- The capacity : limits the amount of blocks, traps and guards (and corresponding mods and augments)
- The environment : the flame represents the environment, there is currently only one available
- The amount of Synthite required to claim that Burial Site
- The type of GenMat generated
- The total amount of GenMat contained
Once claimed, you can enter the Burial Site and start building your deadly Outpost.
Once you’re done building your Outpost, you need to activate it so it can start generating some GenMat.
This can only be done if :
- The Harvester’s path between the Shipping Station and the GenMat Extractor is ok
- The Outpost’s GenMat pool isn’t empty
- You have set enough defenses (traps and guards)
- You have an activation slot available (you can only have 5 outposts activated at the same time)
Here’s the activation menu :
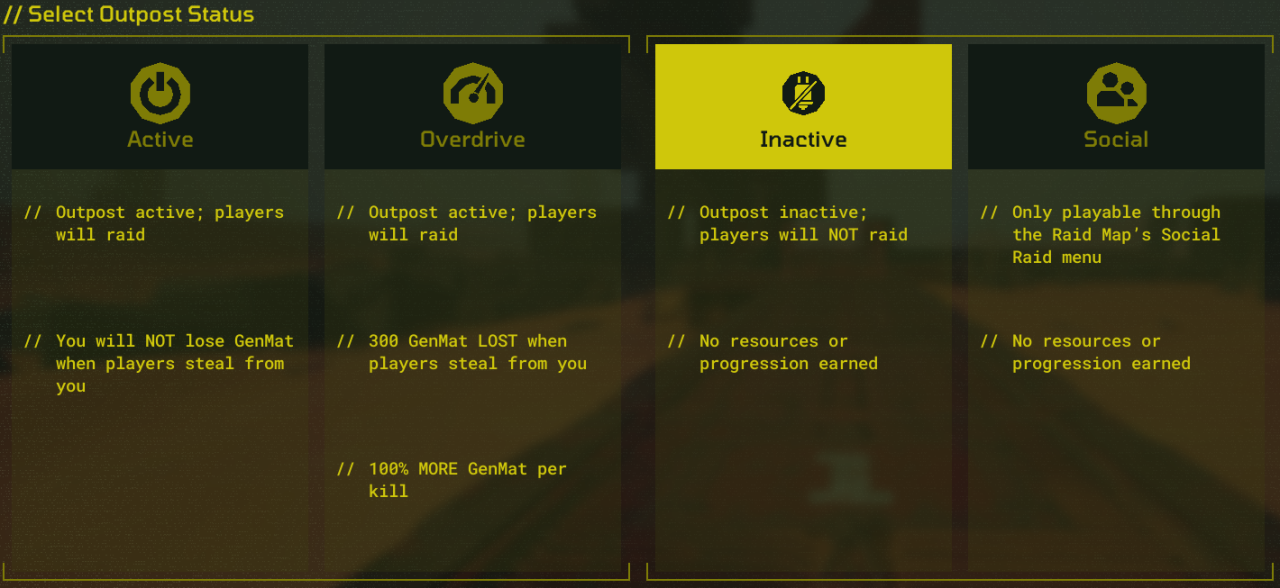
Inactive means players cannot raid your outpost and it won’t produce any GenMat.
Active means the outpost will be raided by players, and it will produce GenMat.
Overdrive is the same as Active except you get more GenMat from raiders’ deaths but if they manage to steal the GenMat, they will reduce the amount of GenMat from the Outpost’s pool. (You won’t lose anything, only the Outpost does).
Social means the outpost can only be raided by players who have your name or the outpost’s name. The outpost doesn’t produce GenMat, you won’t earn anything for killing raiders, and raiders won’t get anything either.
An outpost will only remains active for a limited time.
From the build tab of your Command Center, you can select an outpost and have a summary of it on the right side.
Related Posts:
- Meet Your Maker Outpost Obtaining, Cleaning, and Planning for Beginner
- Meet Your Maker Beginner Guide (Everything You Need to Know to Start)
- Meet Your Maker Outpost Building Guide
