This Guide for Users and Modders explains how to Skin Selector works and can be implemented. Moreover, it also explains to Modders all the Randomization (RNG) options the Skin Selector comes with, since it is also the most powerful RNG engine up to date.
[General Information]
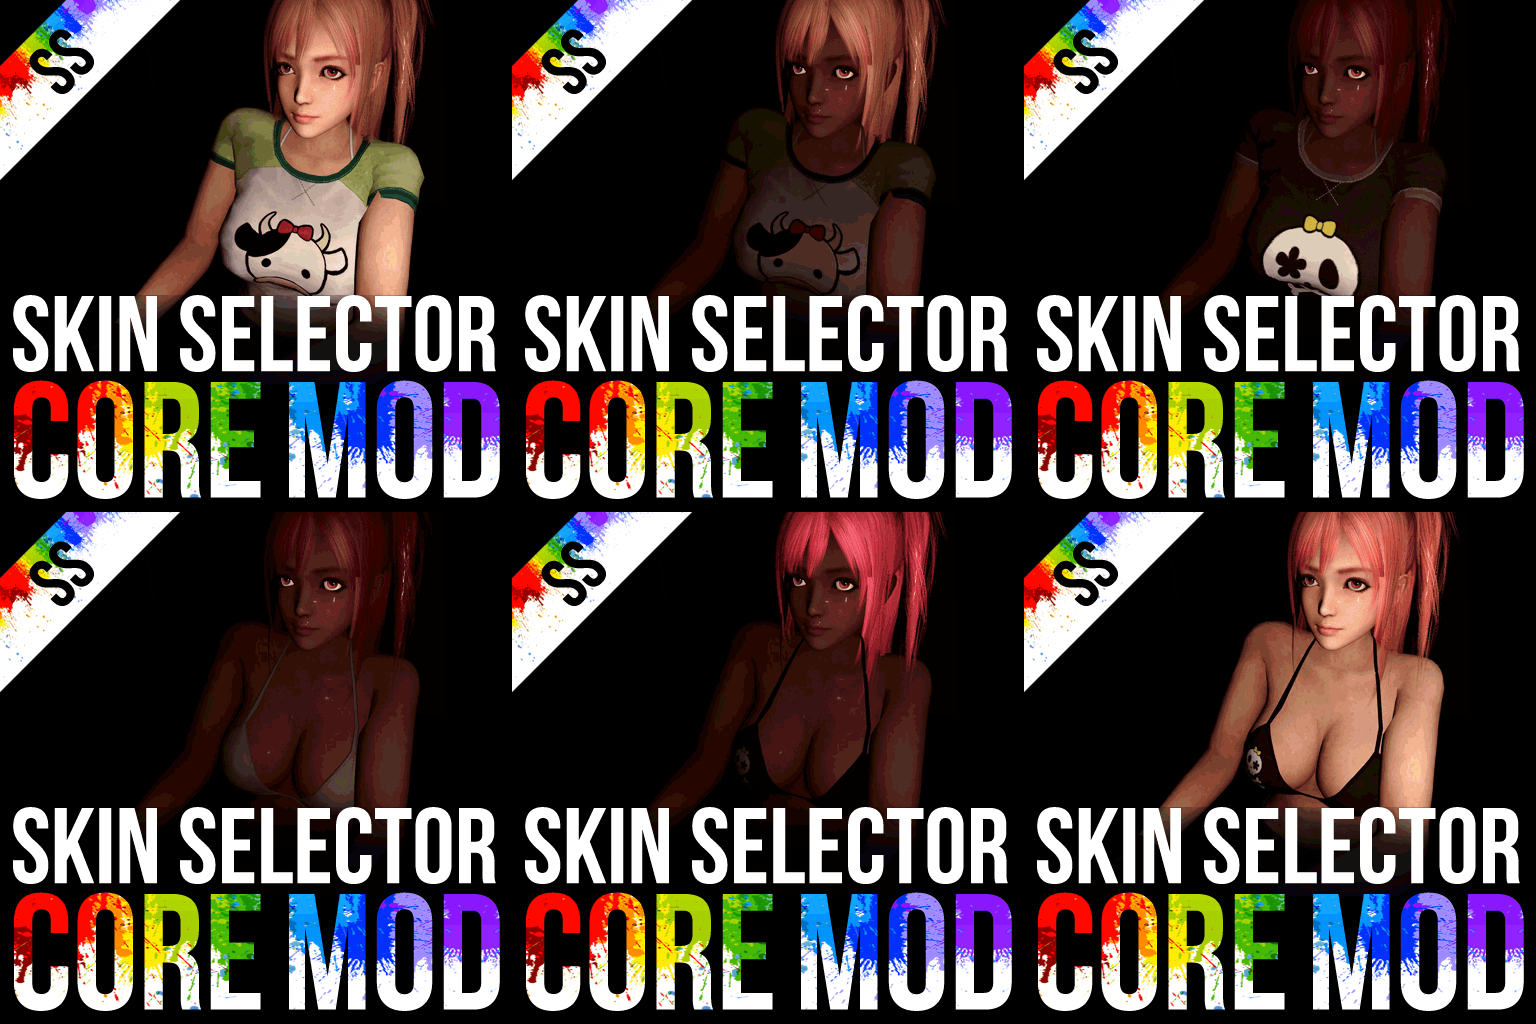
❗ IMPORTANT : Despite its name, the Skin Selector is not only a Skin Selector. It can do everything that RNG codes are able to do. You do not need to choose between traditional randomization (RNG) codes and this, you can have both at the same time ! In other words, it is the next stem after the traditional RNG.
Short description : With the Skin Selector, the end user can change the skin of a compatible target using keyboard shortcuts. The Skin Selector can also randomize the skins, and includes all RNG codes in one easy new CORE MOD that does everything.
Needed skills to implement in a character or item mod :
- Knowing how to make a multiple frames VTF
- Knowing how to edit a VMT
- Having multiple textures for the user to select or to randomize (RNG)
What is Skin Selector ?
What is it ?
The Skin Selector (or simply SS) is a script-like thing that allows users to change skins while in a game, for characters, items, guns etc., on any server that allows mods. Moreover, it is also a RNG Engine that does (almost) everything RNG can do.
- For the end user, it comes in the form of key binds that makes it possible to change the skins of a compatible mod.
- For the modder, it comes in the form of a code to copy and paste in VMTs to activate everything, with a few variables to set depending on how many skins the user have etc.
In very short, it works this way for the end user:
- The user press on a key to enter Grab Mode
- When the user approach a compatible target in Grab Mode, the target will become green
- The user can then press another key to Grab the target.
- While a target is grabbed, the user can use the left and right keys to change the skins ($frames), the up and down keys to go between the compatible parts (VMT) of the target to change their skins too, and can show or hide certain parts that can be hidden using.
- Once the user has made its choice, he can press the Release key to save the new skin
The user also has two other special keys to achieve a Grab in first person mode, one to grab items from first person, and one to grab the character itself from first person. And last but not least, the user also has a key to grab the world and change the global RNG to its likings.
Questions and Answers (Q&A)
Q : On what does it work ?
Q : Does it work online ?
Q : Does it include RNG ?
Q : How hard is it to implement ?
Q : Can each part of the model change skin independently ?
Q : Can different parts of the model change skin together ?
Q : Is there a skin limit ?
Q : Can it also hide parts of the model (VMT hide) ?
Q : Can it swap parts of the model (VMT swap) ?
Q : Does the skin change between maps ?
Q : Is there any glitches ?
Provided that you already have all the VTF files ready (textures with multiple skins), it takes a few minutes to add this. It is almost as easy to implement as RNG. Like the Realistic Blood damage, it uses a CORE MOD that allows modders to benefit from code improvements and hotfixes directly into their already released mods.
USER GUIDE
This whole section of this Guide is dedicated to users of the Skin Selector. It is divided in two sub-sections, one about the installation of the Skin Selector, and one about the usage of the Skin Selector on compatible mods.
How to install
There are different methods to install the skin selector. If one does not work, you can try the next one.
Download this mod (you need it anyway for the technology to work)
STEP 2
Deactivate all the (radial) Vocalizer Mods you have active. Also deactivate any other mods that allow key binds (keyboard shortcuts).
STEP 3
Launch L4D2 and go to Options > Keyboard/Mouse > Edit Keys/Button.
STEP 4
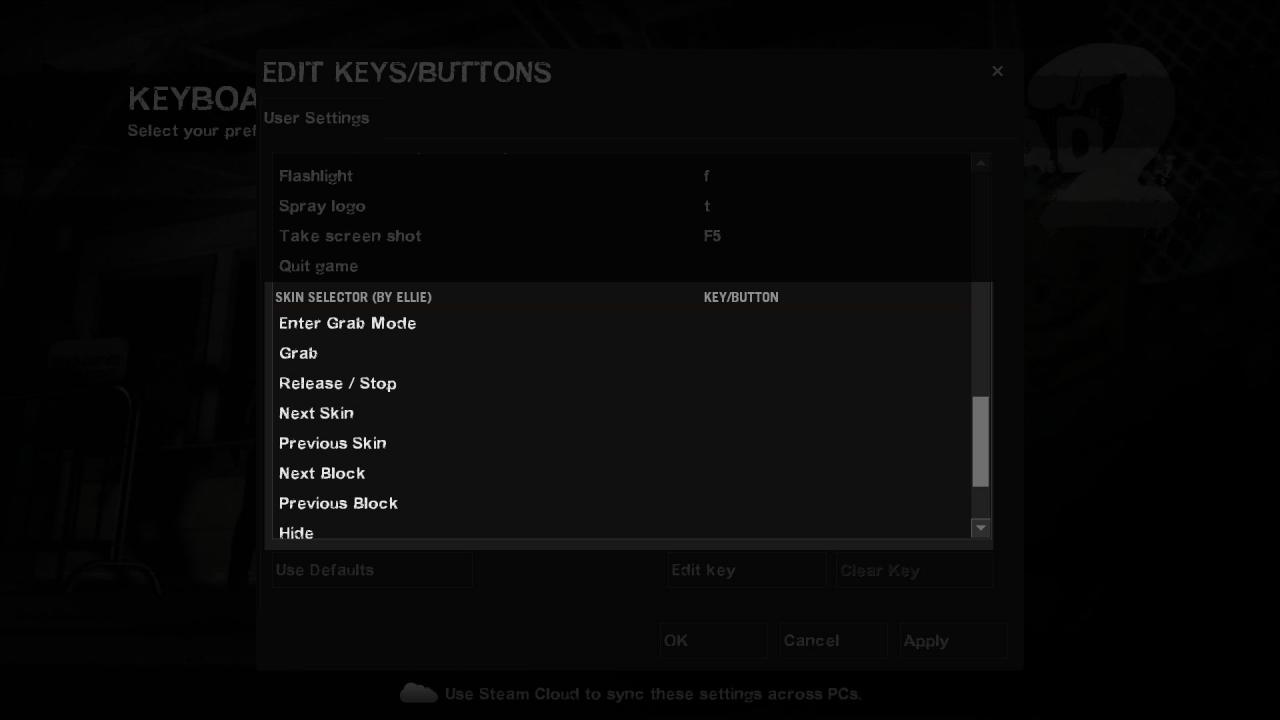
If you did everything correctly, you should now see a section called SKIN SELECTOR (BY ELLIE) at the very bottom of the Edit Keys/Button dropdown menu. You can then choose to assign the controls to your preferred keys. Explanations about the controls are in the How to use part.
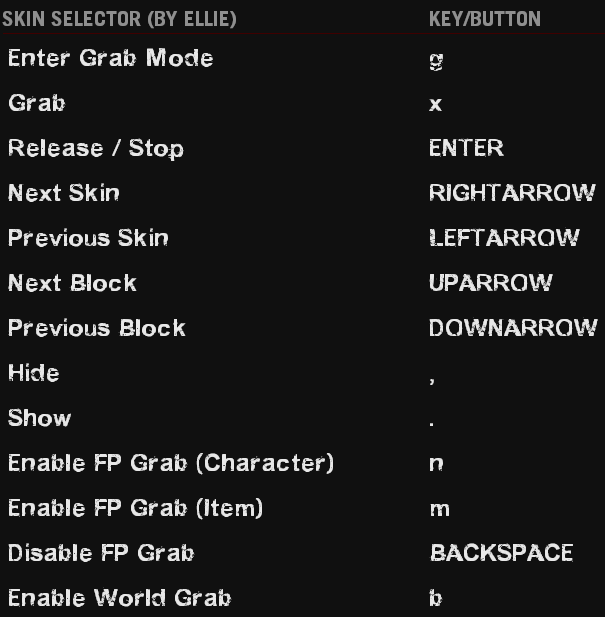
Below are the recommended key binds. The Guide will later use these to explain how to use the mod.
STEP 1
On your hard drive, go to Steam\SteamLibrary\steamapps\common\Left 4 Dead 2\left4dead2\scripts and open the kb_act.lst file with Notepad or another text editor.
STEP 2
Add this at the very end of the kb_act.lst file and save it.
“blank” “SKIN SELECTOR (BY ELLIE)”
“blank” “==========================”
“cl_chatfilters 24;cl_timeout 30;cl_detail_avoid_radius 64” “Enter Grab Mode”
“cl_chatfilters 25;cl_buy_favorite_nowarn 500;cl_buy_favorite_nowarn 500;” “Grab”
“cl_chatfilters 23;cl_detail_avoid_radius 64;cl_resend 6” “Release / Stop”
“incrementvar cl_buy_favorite_nowarn 0 1000 -1” “Next Skin”
“incrementvar cl_buy_favorite_nowarn 0 1000 1” “Previous Skin”
“incrementvar cl_buy_favorite_quiet 1 1000 1;cl_timeout 30” “Next Block”
“incrementvar cl_buy_favorite_quiet 1 1000 -1;cl_timeout 30” “Previous Block”
“cl_timeout 31” “Hide”
“cl_timeout 30” “Show”
“cl_chatfilters 24;cl_timeout 30;cl_detail_avoid_radius 66;” “Enable FP Grab (Character)”
“cl_chatfilters 24;cl_timeout 30;cl_detail_avoid_radius 65;” “Enable FP Grab (Item)”
“cl_chatfilters 24;cl_timeout 30;cl_resend 7;” “Enable World Grab”
STEP 3
Launch L4D2 and go to Options > Keyboard/Mouse > Edit Keys/Button.
STEP 4
If you did everything correctly, you should now see a section called SKIN SELECTOR (BY ELLIE) at the very bottom of the Edit Keys/Button dropdown menu. You can then choose to assign the controls to your preferred keys. Explanations about the controls are in the How to use part.

Below are the recommended key binds. The Guide will later use these to explain how to use the mod.

STEP 1
Only if you do not know how to open the developer console, download this mod.
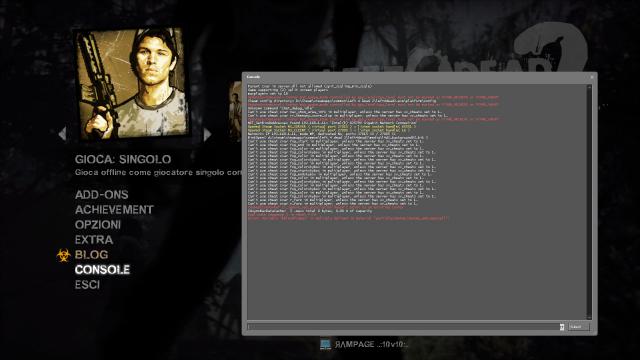
Click on the CONSOLE button in the menu or just open the developer console.STEP 3
One by one, copy each of these lines in the console and press on ENTER.
bind x “cl_chatfilters 25; cl_buy_favorite_nowarn 500;cl_buy_favorite_nowarn 500;” // Grab
bind ENTER “cl_chatfilters 23;cl_detail_avoid_radius 64” // Release / Exit
bind RIGHTARROW “incrementvar cl_buy_favorite_nowarn 0 1000 -1” // Next Skin
bind LEFTARROW “incrementvar cl_buy_favorite_nowarn 0 1000 1” // Previous Skin
bind UPARROW “incrementvar cl_buy_favorite_quiet 1 1000 1” // Next Part
bind DOWNARROW “incrementvar cl_buy_favorite_quiet 1 1000 -1” // Previous Part
bind , “cl_timeout 31” // Hide
bind . “cl_timeout 30” // Show
bind n “cl_chatfilters 24;cl_timeout 30;cl_detail_avoid_radius 66;” // FP Character Grab
bind m “cl_chatfilters 24;cl_timeout 30;cl_detail_avoid_radius 65;” // FP Item Grab
bind b “cl_chatfilters 24;cl_timeout 30;cl_resend 7;” // “Enable World Grab”

Note that there will be no confirmation message at all.
These lines assign the controls to keys G / X / ENTER / the ARROW KEYS / , / . / M / N.
You can change these key codes if you want. To do so, you need to replace the word after bind (for example DOWNARROW) before you copy the line and press enter in the Console. A list of all the possible Key Codes can be found at the very end this Guide in an Appendix.
How to use
If you used the default key binds, these are the new controls you can use.
They are divided into four sets, a green one, a blue one, a red one, and a yellow one.
- [Green] : These are the keys used to “Grab” a compatible target
- [Blue] : These are the keys used to change the skin once a target is grabbed
- [Red] : These are special keys used if you want to grab a target that is on you (first person)
- [Yellow] : A special key used to grab the world. It grabs every target that is an object
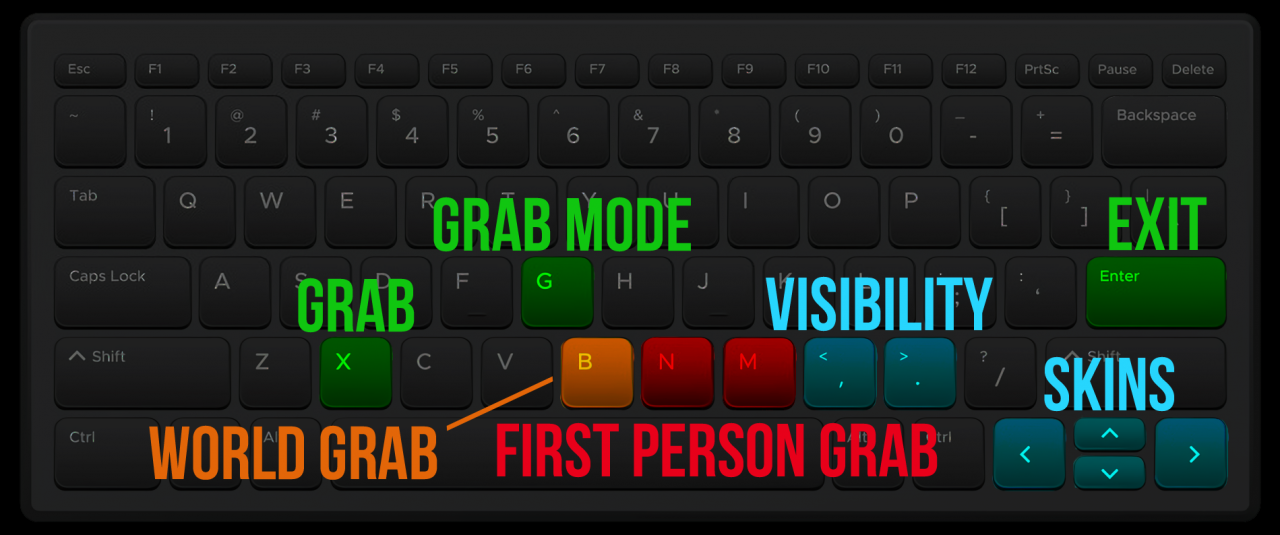
- [ENTER GRAB MODE] (Default = G) : When pressed once, activates the “Grab Mode“. While in “Grab Mode“, compatible targets will become green when approached. When a target is green, it can be grabbed with the Grab key.
- [GRAB] (Default = X) : When a target is green because both “Grab Mode” is active and the user is near the target, pressing this key will grab the target and enable the skin selector.
- [EXIT] (Default = ENTER) : Locks the skin in place, exit the skin selector, and resets everything.
- [NEXT SKIN / PREVIOUS SKIN] (Default = LEFT / RIGHT ARROWS) : When a grab is secured, allows the user to change the skin (texture) of the selected part of the target.
- [NEXT BLOCK / PREVIOUS BLOCK] (Default = UP / DOWN ARROWS) : When a grab is secured, allows the user to switch between different parts of the target to change their skins independently, if the mod allows this.
- [HIDE / SHOW] (Default = , / .) : When a grab is secured, allows the user to hide or show the selected part, if the mod allows this.
- [ENABLE FP GRAB (CHARACTER)] (Default = N) : When pressed, allows the user to grab himself (the character he is playing).
- [ENABLE FP GRAB (ITEM)] (Default = M) : When pressed, allows the user to grab the item he is currently having in his hands.
- [WORLD GRAB] (Default = B) : When pressed, allows the user to grab every object in the world at once (that all share the same RNG) to change their skins.
Here is a step by step image tutorial on how to change the skin on a compatible (test) mod : Honoka from DOA5. It will teach you how to use the Skin Selector.
First, press on the [ENTER GRAB MODE] (Default = G) key to activate the Grab Mode.
Here, the Grab Mode is active, but we are too far from Honoka. We need to get closer.
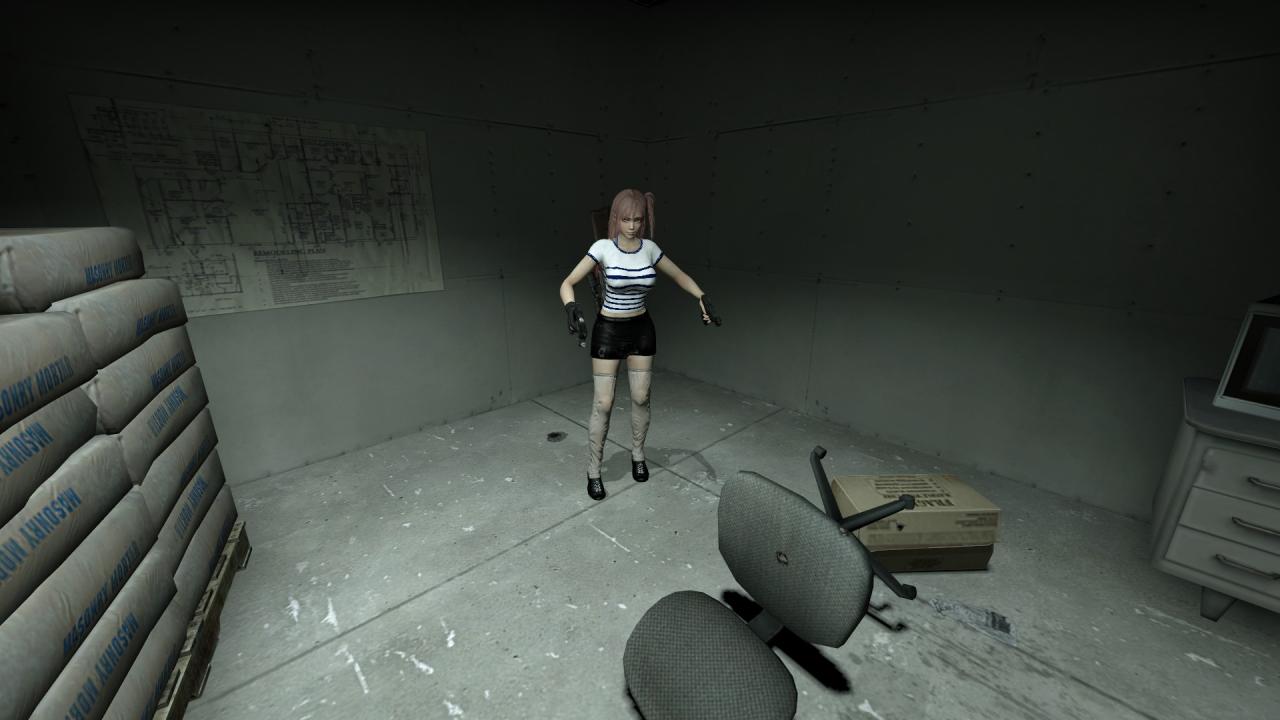
When we get closer while in Grab Mode, the compatible Honoka mod will glow green. When a target is green, it means it can be grabbed.
Now you need to press [GRAB] (Default = X) to grab her and start the Skin Selector.
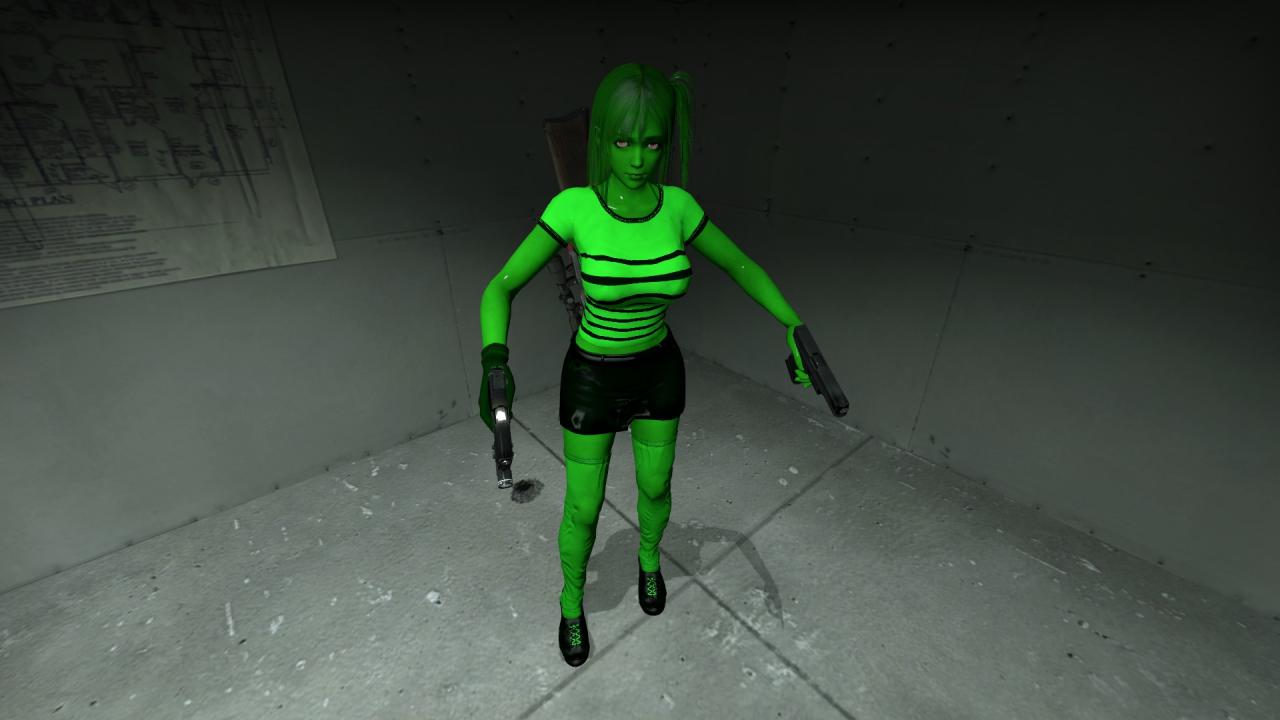
Right when you press the [GRAB] (Default = X) key, Honoka (or the target) will become black, except for the current selected part/block of her model. In this case, it’s her shirt.
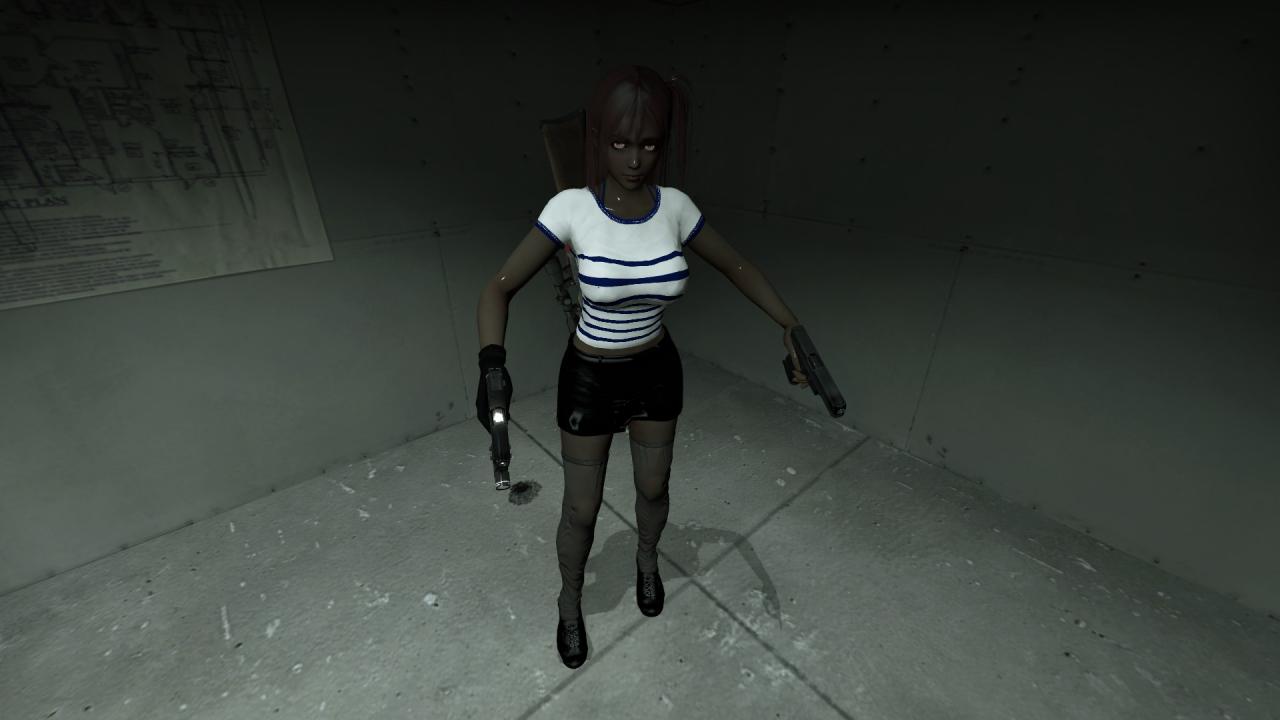
By pressing the [NEXT SKIN / PREVIOUS SKIN] (Default = LEFT / RIGHT ARROWS), you can now change the skin of the selected part. Here, I ended up choosing one with a turtle design on it.
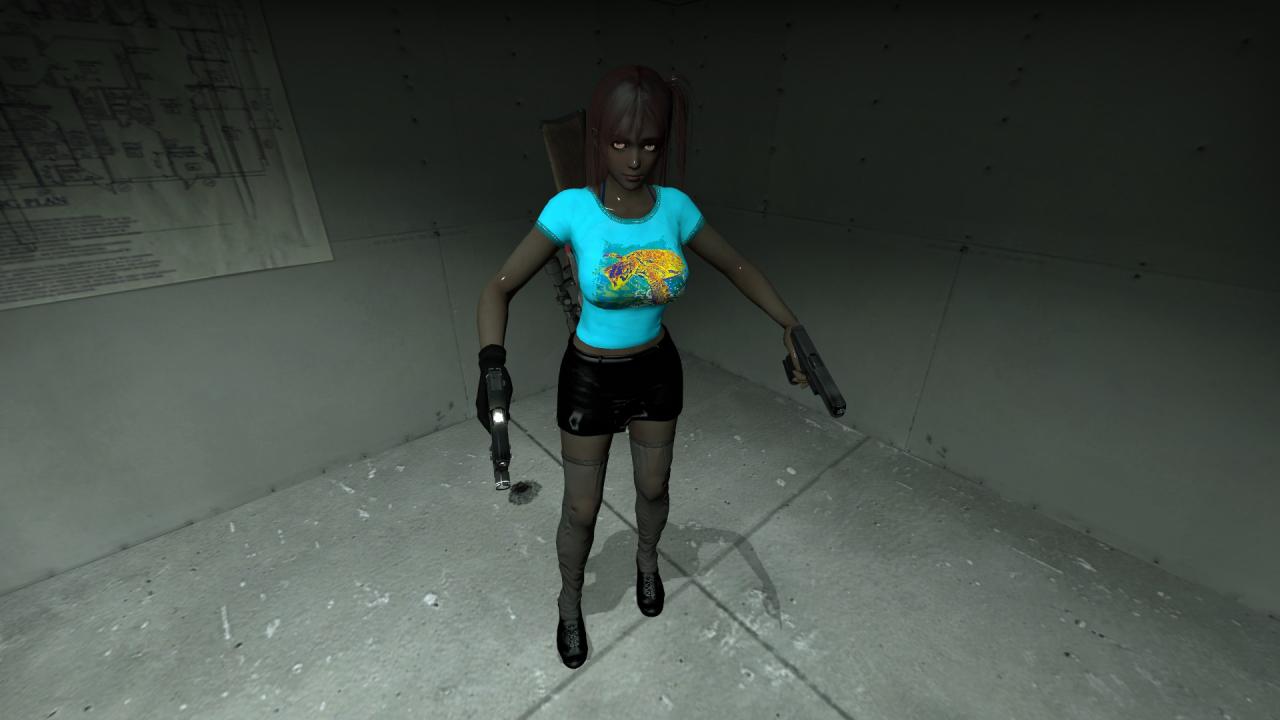
Maybe you don’t like her having a shirt, and you want to remove it. To do so, you can use the [HIDE / SHOW] (Default = , / .) keys to remove it. Here I pressed the HIDE key so her shirt disappeared. Note that not all clothes can disappear; it’s the modder that chooses. Also, you can notice that now, the shirt is still selected, but invisible.
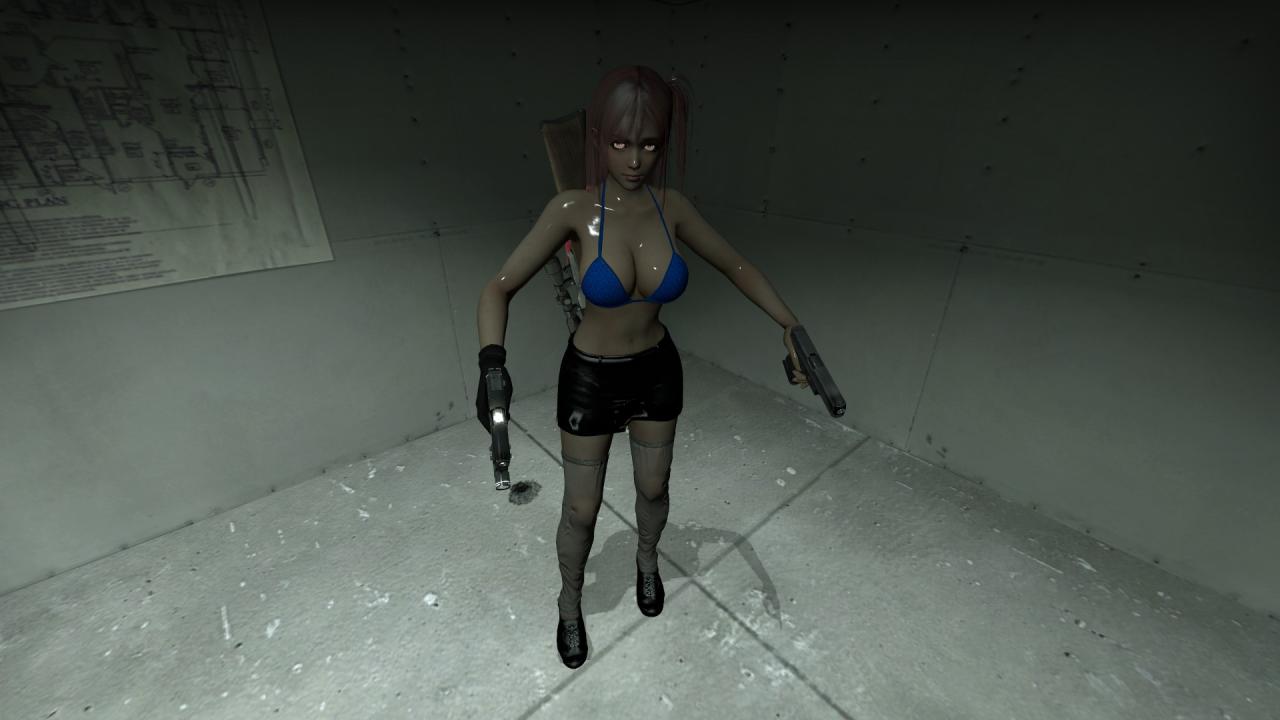
If this bikini skin does not fit your likings, you can change it. By pressing the [NEXT BLOCK / PREVIOUS BLOCK] (Default = UP / DOWN ARROWS), you can reach the bikini, that will become colorful when it gets selected.
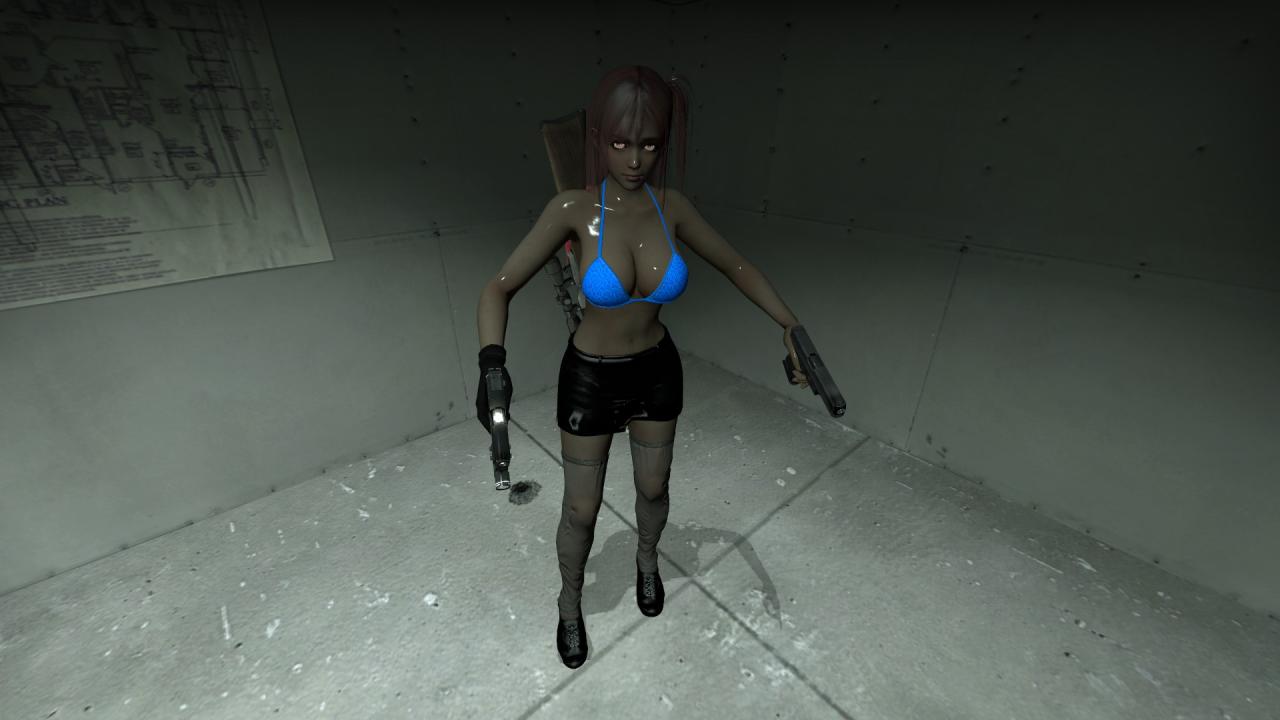
Here again, by pressing the [NEXT SKIN / PREVIOUS SKIN] (Default = LEFT / RIGHT ARROWS), you can now change the skin of the bikini. Here, I ended up choosing one with stripes.
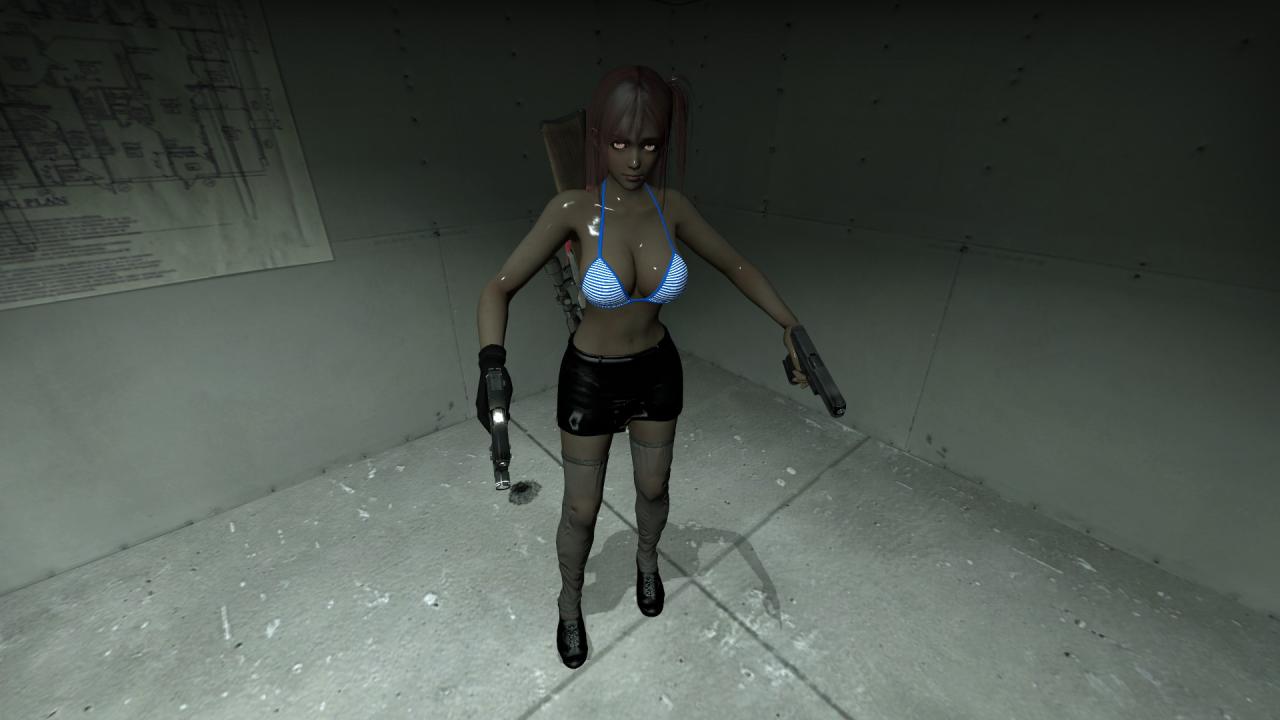
Now you could again use the [NEXT BLOCK / PREVIOUS BLOCK] (Default = UP / DOWN ARROWS) to navigate between parts of Honoka and change or toggle them. Here, I ended up selecting her tights and pressing the HIDE (Default = , ) key to make them disappear.
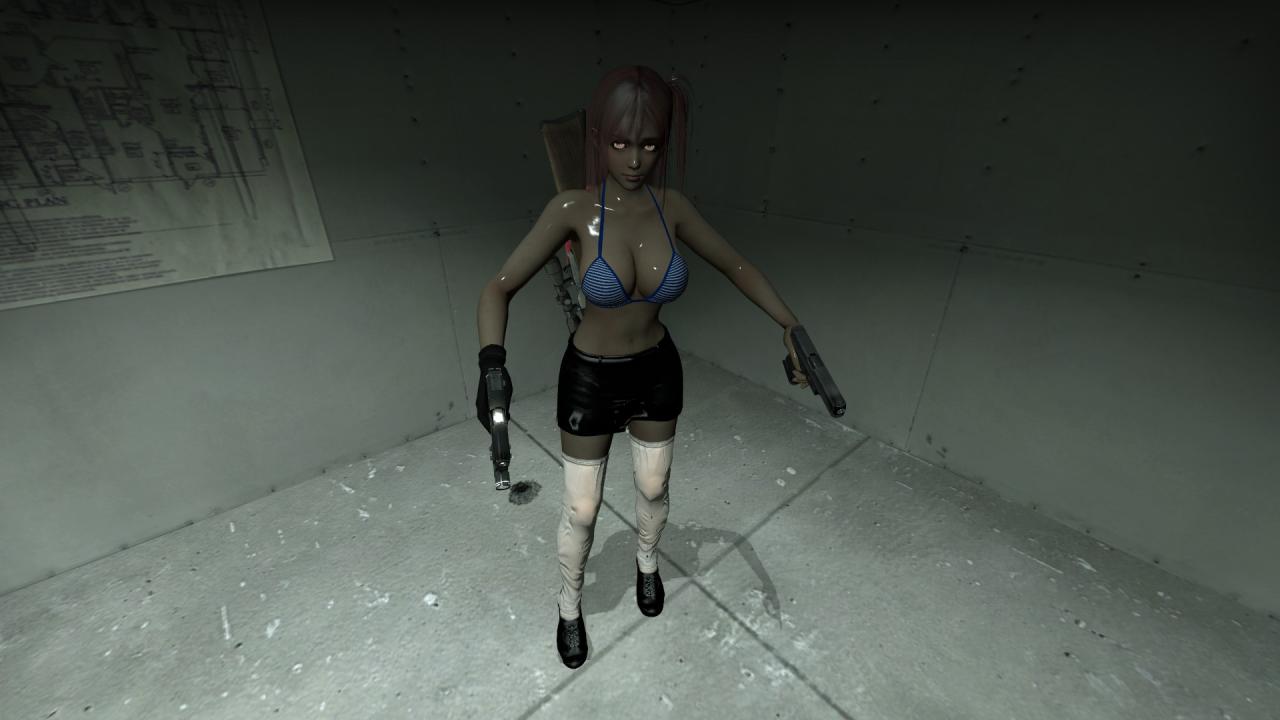
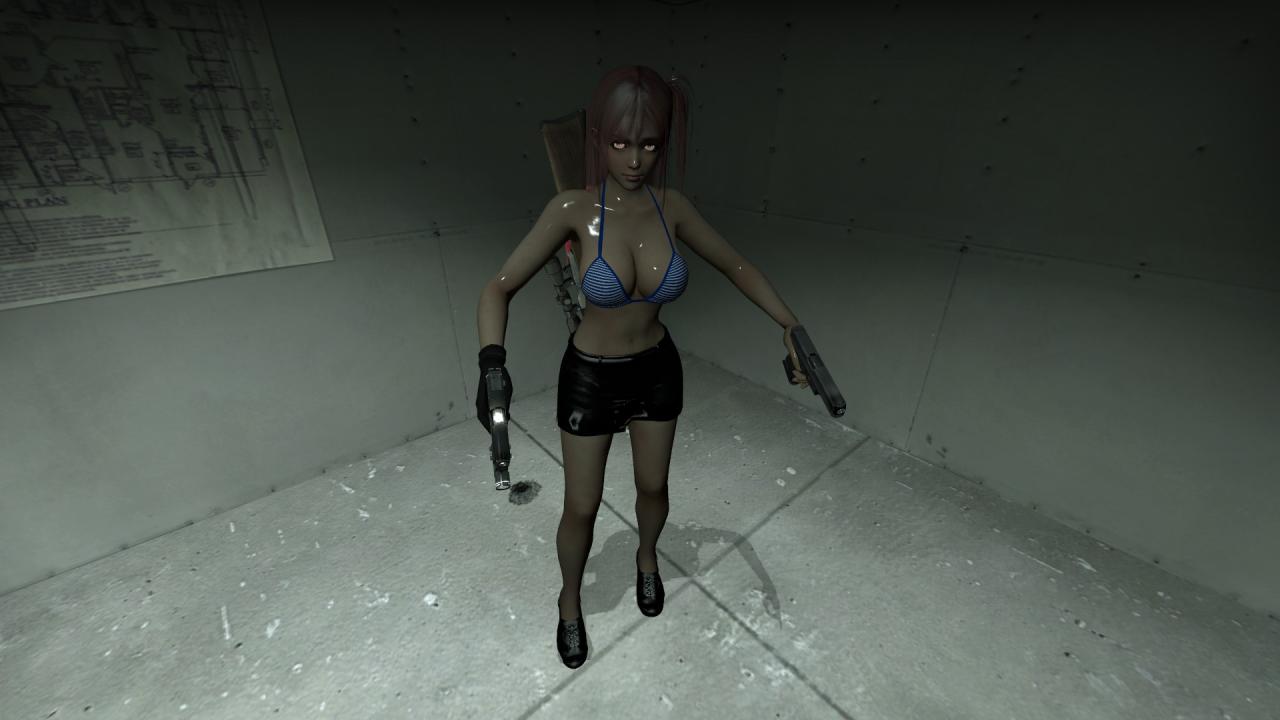
When you are done, press the [EXIT] (Default = ENTER) key to lock the skin in place and reset the Skin Selector. Honoka is now ready to kick ass with your selected skin.
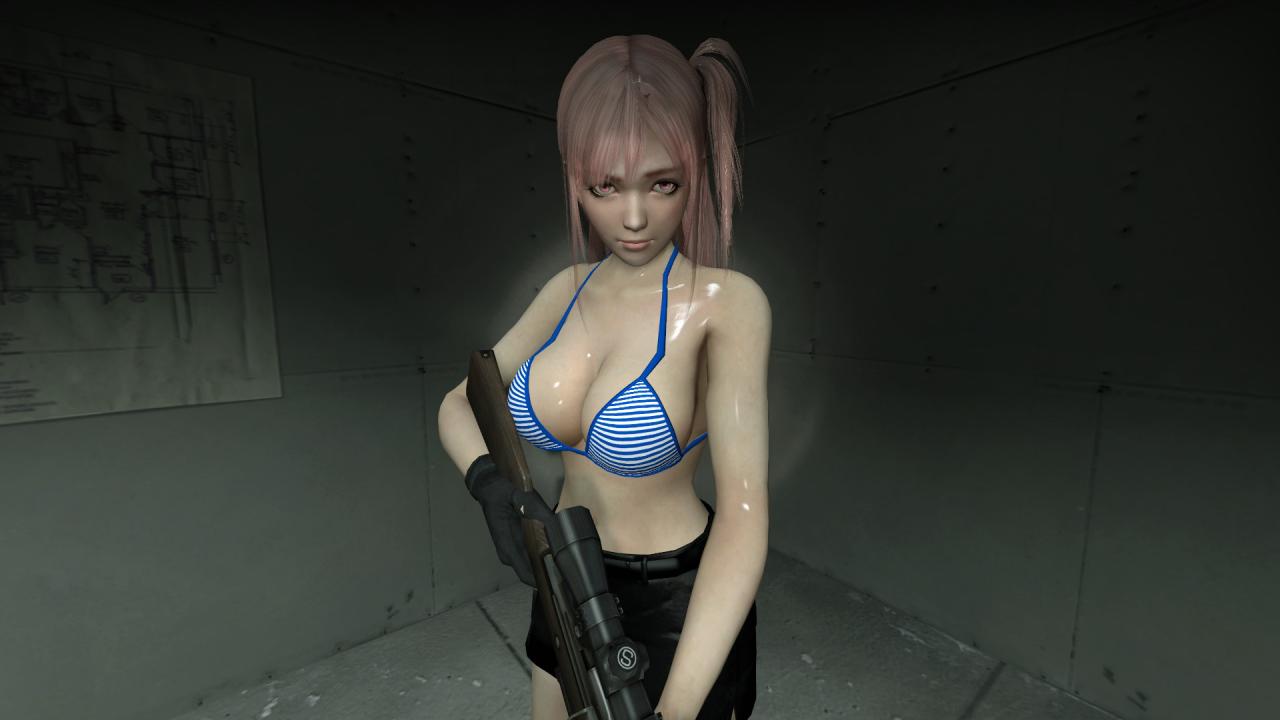
When you want to grab something that is in your hands or the character you are currently playing, just press the [ENABLE FP GRAB (ITEM)] (Default = M) since you want to grab an item in first person. If you wanted to grab your character, you should have pressed on the [ENABLE FP GRAB (CHARACTER)] (Default = N) key instead. Note that now, my gun is green even though I am in first person mode.
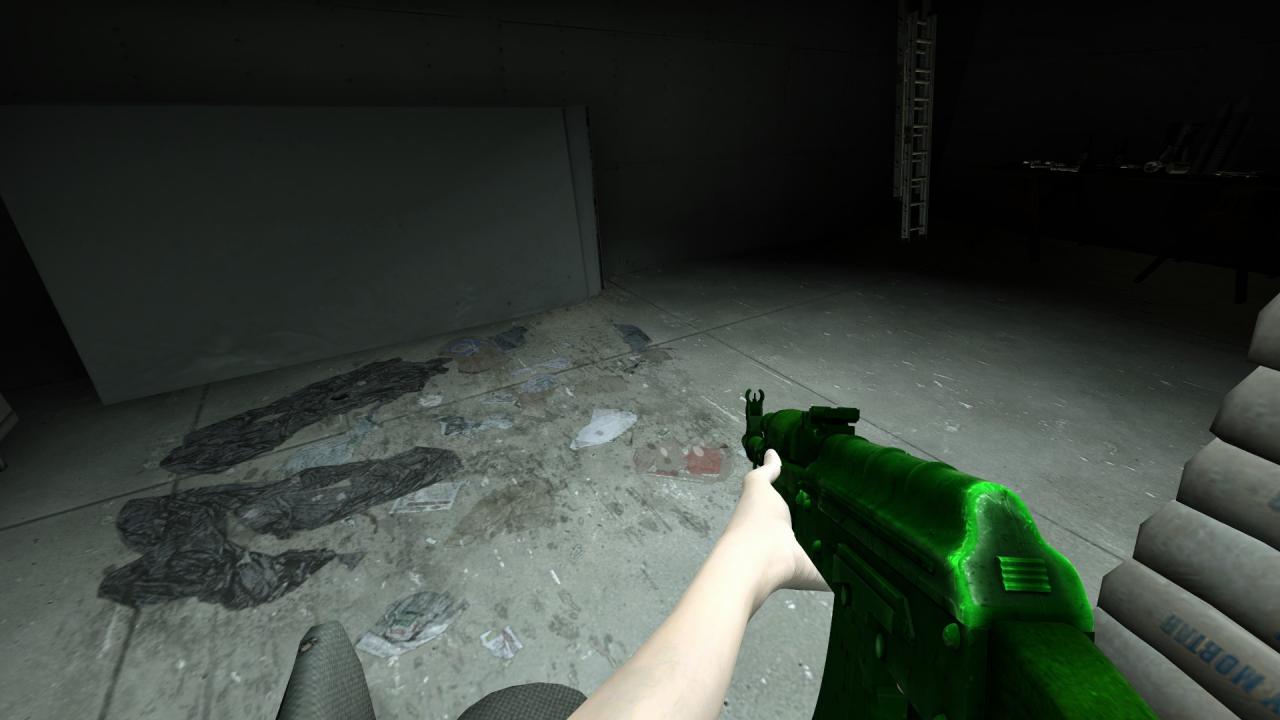
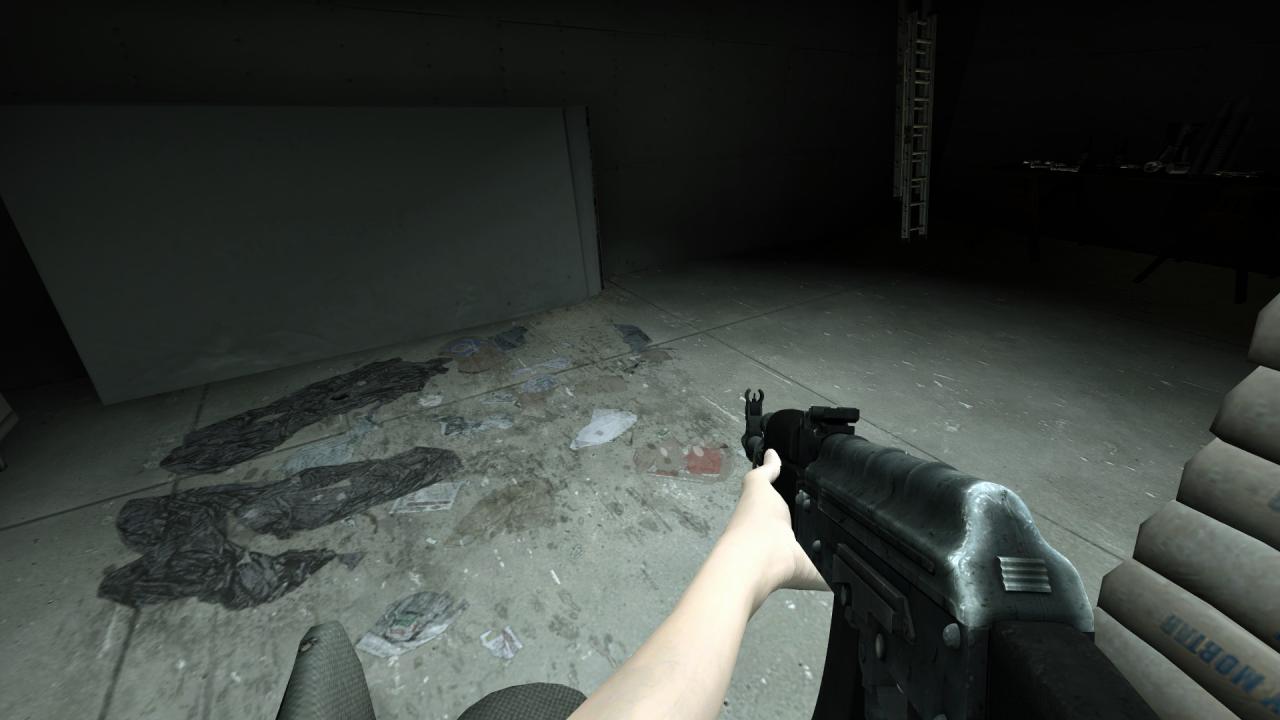
The next steps are the same. Just press on the [GRAB] (Default = X) key and the Skin Selector will start on the target you hold in your hands. Here I used the [NEXT SKIN / PREVIOUS SKIN] (Default = LEFT / RIGHT ARROWS) to switch to a black skin. When you are done, press the [EXIT] (Default = ENTER) key to lock the skin in place. This also resets the First Person Grab Mode.
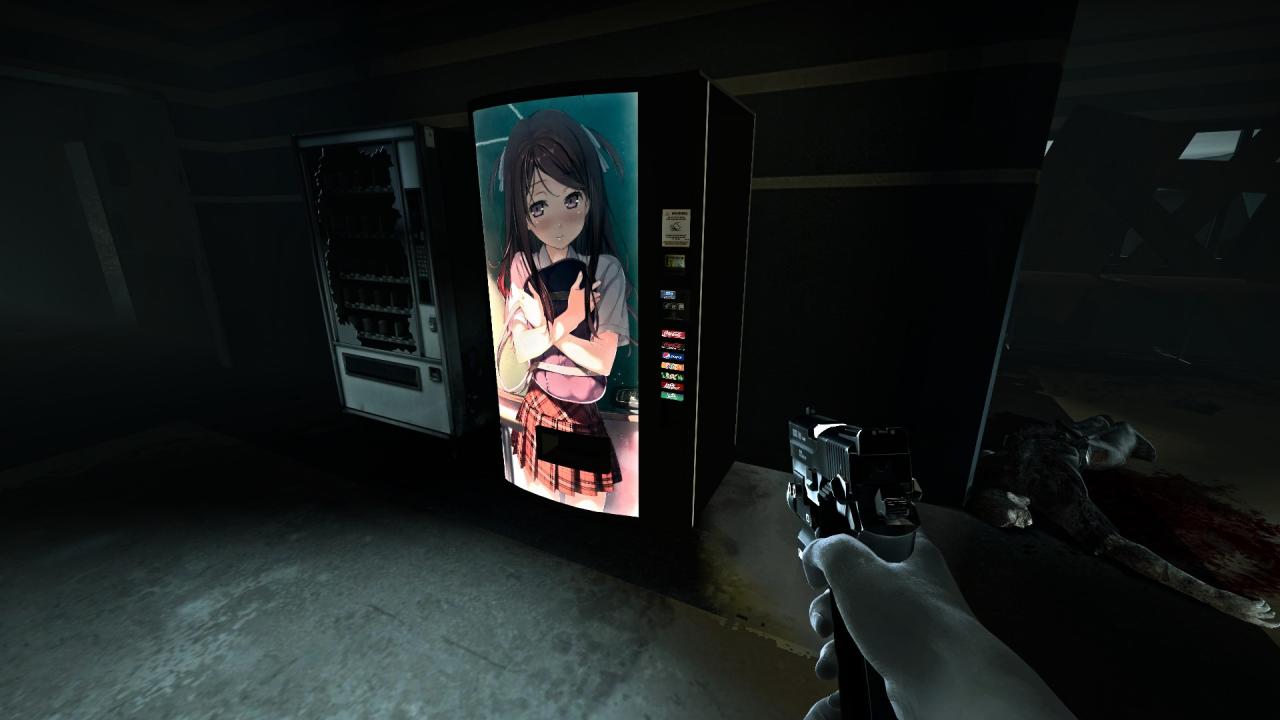
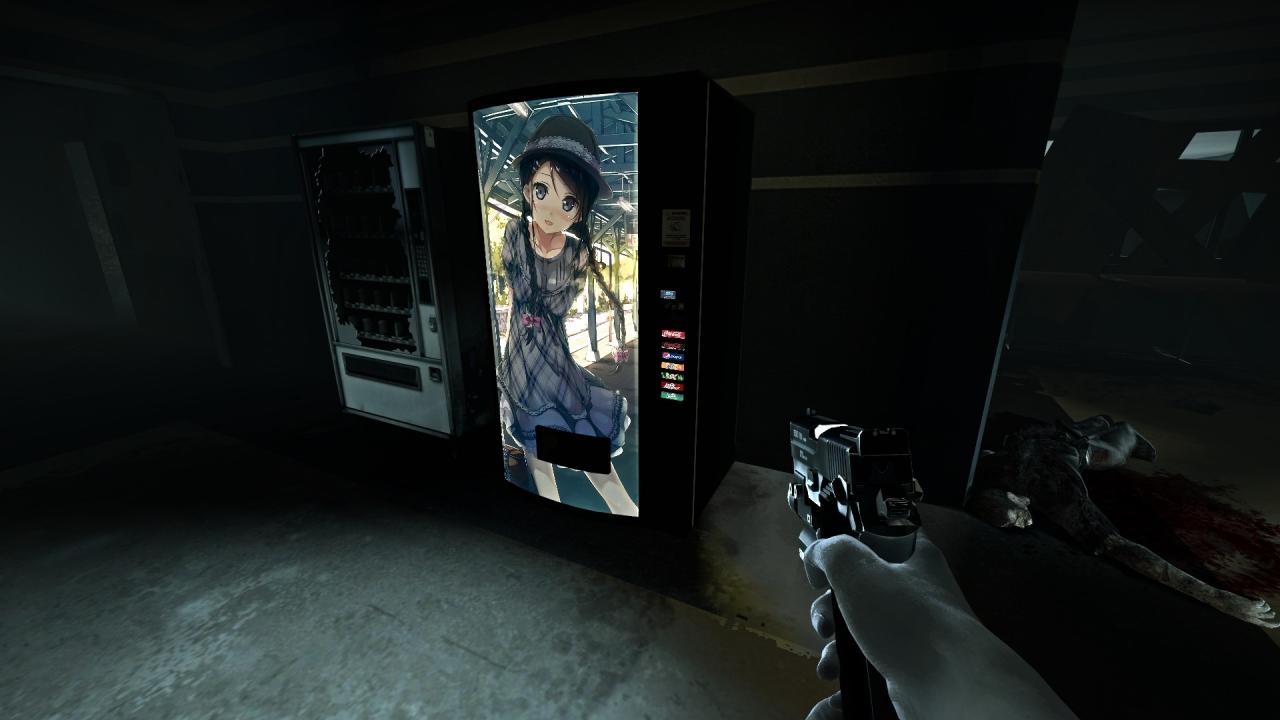
When you want to grab something that is part of the map, like a Vending Machine for example, there is also a special step to do, which is Grabbing the world. Here, I am close to a Vending Machine that is a compatible target.
Just press on the [WORLD GRAB] (Default = B) key. While in this mode, every object in the map can be grabbed at once, no matter the distance between the player and the object. Note that objects that glow usually do not become very green.
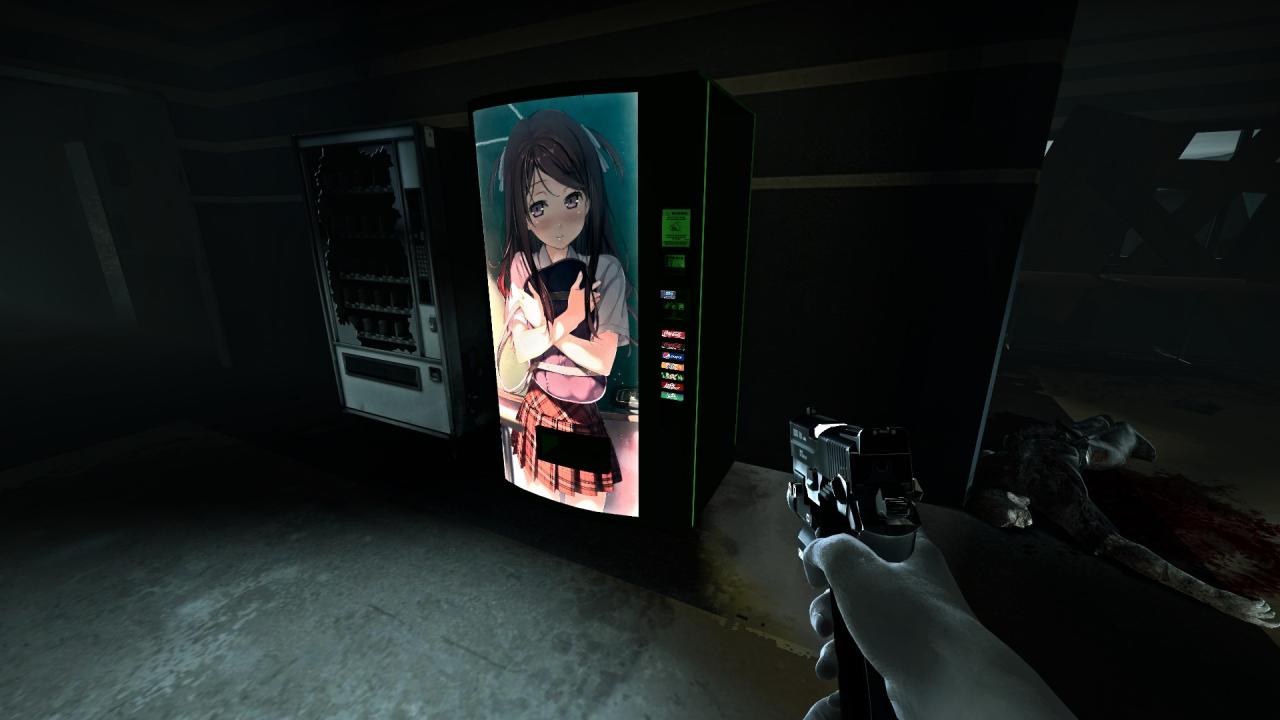
The next steps are the same. Press on the [GRAB] (Default = X) key and the Skin Selector will start. You can then change every skin at once.
MODDERS GUIDE
This whole section of this Guide is dedicated to Modders that want to implement the Skin Selector and RNG in their mods, or convert their RNG Mods to the Skin Selector. The Skin Selector is not only a skin selector, because it can do all what RNG does. In other words, if you already have an RNG mod, or want to make an RNG mod, just use the Skin Selector.
❗ IMPORTANT : The Skin Selector can do anything RNG does. If you are a modder and are reading these lines, you can forget everything about RNG (except maybe complex Model RNG). This is a fresh new start, easier to understand, easier to implement, with more powerful options, that includes everything at once.
The 2 Versions
There are 2 versions of the code. These are also the 2 new versions of RNG. You can forget every other name like True RNG, Real RNG etc. These are the 2 versions :
🅴 Entity Version : Can be used on anything that is an entity
🆆 World Version : Can be used on anything else
The main difference between Entity and World version is that every Mod that uses World version shares the same RNG. In other words, changing the skin of any target that uses World version will also change the skin of any other target that also uses the World version.
It’s easy. If you CAN use 🅴 Entity Version, you SHOULD use 🅴 Entity Version.
And you CAN use the 🅴 Entity Version on this :
- Characters (Survivors)
- Infected (Special and Common)
- Weapons (Guns / Melee etc.)
- Usable items (Medkits / Pills / Adrenaline / Molotov / Pipebombs etc.)
- Pickable items (Gascans / Propane tanks / Fireworks / Gnome etc.)
- Escape vehicles
- Ammo piles
- Objects that can move and that can block the player (TVs / Big Green File Cabinets etc.)
Using the 🅴 Entity Version on anything else will crash the game 🔥.
In other words, you will probably rarely use the 🆆 World Version, that is made only for static map objects. And let’s be honest, there are very few things in a map that people usually want to randomize that are not in the list above. Here is a shot incomplete list of items that need the 🆆 World Version :
- Vending Machines
- Billboards and Bus Stop Ads
- Cars, Trucks, Vans, Buses etc.
- Signs
Make sure to remove any RNG code and all the variables ($) that came with it before doing any of these steps (reverse the mod to how it was before adding the RNG).
Download this mod (you will need to tell your subscribers to download it too) :
Open a VMT file in your mod that do not need to have any randomization (RNG). In other words, a VMT that will not be able to change and that will not use the Skin Selector. In this VMT, add one } at the very end of the code.
Still in this VMT that do not need to have any randomization (RNG), replace…
… at the top of the VMT by this …
{
include “skinselect/greyed_v1.vmt”
insert
{
///////////////////////////////////////////////////////////////////////////////////////////$thisIsACharacter “1” // (0 = yes ; 1 = no)
$thisIsAnItem “0” // (0 = yes ; 1 = no)$activateBoomerEffects “1” // If 1, activates Boomer Effects///////////////////////////////////////////////////////////////////////////////////////////
Note that if you do not see VertexLitGeneric but there is already patch, you need to replace insert { and everything that is above by the code instead.
See this thing that is now in your VMT ?
ONLY if your mod is for an Item (not for a character), swap the values like this.
Repeat STEP 2-4 for every other VMT that do not need to have any randomization (RNG). You can ignore the VMT for the eyes.
These steps activate the black effect on unselected parts when the Skin Selector is active.
Open a VMT file in your mod that needs to have RNG (Randomization), and add one } at the very end of the code.
Still in this VMT that needs to have RNG (Randomization), replace…
… at the top of the VMT by this …
{
include “skinselect/entity_v1.vmt”
insert
{
///////////////////////////////////////////////////////////////////////////////////////////$thisIsACharacter “1” // Is this VMT (MOD) for a Character ? (0 = yes ; 1 = no)
$thisIsAnItem “0” // Is this VMT (MOD) for an Item ? (0 = yes ; 1 = no)$numberOfSkinsThisVMT “1” // Amount of different skins ($frames) for this VMT$activateRNGSkins “1” // If set to 1, RNG (Randomization) of the skins is active
$oneRNGSkinPerMap “0” // If set to 1, every VMT in the map will have the same skin$thisVMTidNumber “0” // The ID of the Block this VMT belongs to
$maxVMTidNumber “0” // The max ID for a VMT in your whole MOD$thisVMTcanDisappear “0” // Can this VMT disappear if the user press on show/hide
$invertAlpha “0” // Must the show/hide be inverted (swapping VMTs)$totalAlphaRNG “0” // If set to 1, visibility (alpha) will be totally randomized
$probabilityToShow “50” // Probability in % that the VMT will show$selectiveAlphaRNG “0” // If set to 1, the $alpha will be randomized using a spectrum
$selectiveAlphaRNGUpper “0” // The material will be visible form this threshold…
$selectiveAlphaRNGLower “0” // … to this threshold (if it is less than this threshold).$activateBoomerEffects “1” // If set to 1, boomer effects will be active on the model (character)
$bumpMapFollowFrame “0” // If set to 1, the $bumpframe will match the $frame for this VMT
$blackIfSelected “0” // Forces the material to be black even if selected
See this thing that is now in your VMT ?
ONLY if your mod is for an Item (not for a character), swap the values like this.
Still in this VMT that needs to have RNG (Randomization), look at this line…
… and REPLACE the 1 with the number of different skins (VTF frames) you have for that VMT.
For example, if you have 10 different skins for this VMT, write “10.0” like this
Note that the number of different skins you have is not the n° of the last frame of your VTF, because there is a frame 0. The number of skins is one more than the n° of the last frame of your VTF.
REPEAT STEPS 5-9 for every other VMT that needs to have RNG (Randomization). Once this is done, your mod is ready for a first test. But there are a lot of ways to improve the Skin Selector, which the rest of this Guide is about.
Make sure to remove any RNG code and all the variables ($) that came with it before doing any of these steps (reverse the mod to how it was before adding the RNG).
Download this mod (you will need to tell your subscribers to download it too) :

Open a VMT file in your mod that do not need to have any randomization (RNG). In other words, a VMT that will not be able to change and that will not use the Skin Selector. In this VMT, add one…
… at the very end of the code.
Still in this VMT that do not need to have any randomization (RNG), replace…
… at the top of the VMT by this …
{
include “skinselect/greyed_world_v1.vmt”
insert
{
Note that if you do not see VertexLitGeneric but there is already patch, you need to replace insert { and everything that is above by the code instead.
Repeat STEP 2 and STEP 3 for every other VMT that do not need to have any randomization (RNG). You can ignore the VMT for the eyes.
These steps activate the black effect on unselected parts when the Skin Selector is active.
Open a VMT file in your mod that needs to have RNG (Randomization), and add one…
… at the very end of the code.
Still in this VMT that needs to have RNG (Randomization), replace…
… at the top of the VMT by this …
{
include “skinselect/world_v1.vmt”
insert
{
///////////////////////////////////////////////////////////////////////////////////////////$numberOfSkinsThisVMT “1” // Amount of different skins ($frames) for this VMT$thisVMTidNumber “0” // The ID of the Block this VMT belongs to
$maxVMTidNumber “0” // The max ID for a VMT in your whole MOD$activateRNGSkins “1” // If set to 1, RNG (Randomization) of the skins is active///////////////////////////////////////////////////////////////////////////////////////////
Still in this VMT that needs to have RNG (Randomization), look at this line…
… and REPLACE the 1 with the number of different skins (VTF frames) you have for that VMT.
For example, if you have 10 different skins for this VMT, write “10.0” like this
Note that the number of different skins you have is not the n° of the last frame of your VTF, because there is a frame 0. The number of skins is one more than the n° of the last frame of your VTF.
REPEAT STEPS 5 to 7 for every other VMT that needs to have RNG (Randomization). Once this is done, your mod is ready for a first test. But there are a lot of ways to improve the Skin Selector or the RNG, which the rest of this Guide is about.
Customizing the settings
At this point, you did the only steps needed to make the Skin Selector work with the most basic options. But you can do much better and customize the user experience even more. The next small sections will help you improve your mod with Skin Selector and RNG (Randomization) so it will be just perfect, and will offer the most customization options to your end user.
Most of the customization options are avaliable for the 🅴 Entity Version, but that’s usually the one you will be using anyway. Each one of these improvements can be done separately.
🄴 🅆 Change skins separately
Difficulty :

Skills required : Ø
Description : It is possible to allow the user to change different parts of the model (different VMTs) separately, so he can really fully customize each one of the VMT, therefore each part of the model (usually, different pieces of clothing).To allow the user to change different parts of the model separately, you will need to assign an ID (starting at 0) to each VMT that has Randomization (RNG) elements.
For the first step, you need to use your brain cells to identify how many parts of your model have to be randomized separately. For example, let’s say you are making a character mod, and these are the things that the user can change, each in a separate VMT.
– Cap (your character has a cap that the user can show or hide)
– Hair (your character has different hair colors that the user can change)
– Skirt (your character has a skirt that can change color or be removed)
– Belt (your character has a belt around her skirt that can be removed with the skirt)
– Shoes (your character has different skins for her shoes)
In this example, the Belt and the Skirt are linked, and should randomize together (it would be stupid that the belt and the skirt could appear separately). Since these two must be linked together, you would have 4 groups (Cap / Hair / Belt+Skirt / Shoes).
You then need to assign an ID to each of these groups, starting at 0. For example :
0 : Shoes (1 VMT)
1 : Skirt + Belt (2 VMTs)
2 : Hair (1 VMT)
3 : Cap (1 VMT)
For the best user result, try to make it so lower IDs are for clothes at the bottom of the character and higher IDs for clothes at the top of the character
Now that your brain grouped the clothes or whatever your model is made of, it is time to edit the code so it knows what goes with what. Do you see this in the VMT ? :
In every VMT, you need to replace the 0 by the highest ID you just thought about. This value will be the exact same in every VMT that has this value.
In my example, this would be 3, which is the highest ID (for the Cap), so in every VMT where there is this $maxVMTidNumber, it should be equal to 3.
The last step is to set the actual IDs for each of the VMTs that have Randomization (RNG) elements. Do you see this line that says this VMD id Number ? :
I think you guessed it, you must replace the 0 by the IDs you just assigned at STEP 1, for each VMT that have Randomization (RNG) elements. Usually, this value will be different, but for VMT that need to randomize together, it will be the same.
In my example, both the VMTs for the Skirt and the Belt would therefore have an ID of 1 like this :
Still in my example, the value in the Hair VMT would look like this :
Still in my example, the value in the Shoes VMT would not change and still look like this :
Once you have done that, the code will do the rest, and allow the user to switch between the blocks (parts) you just assigned.
🄴 🅆 Matching skin and bumpmap
Difficulty :

Skills required : Ø
Description : Allows the $bumpmap to match the $frame if needed.The Skin Selector allows the $bumpmap to always match the $frame. This is useful if each skin needs a different $bumpmap. It’s turned off by default because you likely do not have different bumpmaps for each of your skins.
Do you see this line in the VMT ? :
If you change the value to “1” like this, so the $bumpmap always is the same as the $frame.
🄴 Make a part disappear
Difficulty :

Skills required : Ø
Description : Allows the user to toggle a VMT on and off (making it fully invisible or fully visible).The Skin Selector also comes with the possibility for the user to press on a key to hide the VMT or to make it appear again. This can be used to remove pieces of clothing, caps, or guns accessories for example. By default, a VMT cannot disappear. If you want the VMT to be able to disappear when the user presses on the HIDE/SHOW keys, follow this step :
Do you see this line in the VMT ? :
If you change the value to “1” like this, the randomizer will now allows this VMT to disappear.
🄴 Swapping parts
Difficulty :

Skills required : Ø
Description : Allows the user to switch between two VMTs in the same block, allowing for a simple Model RNG.The Skin Selector allows the user to hide a VMT when he presses a key, but this can be changed so instead of a HIDE/SHOW, there is a whole VMT swap.
This can be used for example to make hair appear after a cap is hidden, or to truly and fully swap between VMTs, which allows for a simple Model RNG swap. You could, for example, swap between gun attachments.
Make sure the $thisVMTcanDisappear variable is set to 1 in both VMTs that need to swap.
Make sure the IDs of both VMTs that need to swap ($thisVMTidNumber) is the same (please refer yourself to the 🄴 🅆 Change skins separately section to learn about IDs)
For example, in both VMTs, you would maybe have :
In ONE of the two VMTs that need to swap, change the $invertAlpha value to 1 like this :
Now one of the two VMTs will have its $alpha work in reverse, and show when the user press on HIDE, and hide when the user presses on SHOW, which allows for VMT swap.
In the VMT you just modified at STEP 3, add this like to make sure the VMT is not visible at start :
🄴 Change the RNG mode
Difficulty :

Skills required : Ø
Description : Allows the user the change the RNG mode to allow one design per map or to turn off RNG completely.By default, the RNG (Randomization) is turned on and randomizes every single entity with matching designs between the world and the view model (“Pure RNG” under the old names). In other words, the default settings are better than anything that was ever made public. It is possible to change the RNG mode so that it will choose one single random skin for the whole map (“True RNG” under the old names). You can use it if the Pure RNG causes problems.
Do you see this line in the VMT ? :
If you change the value to “1” like this, the randomizer will now only select one same skin for the whole map and the skin the user picks will always match the skin in hand.
Note that no matter this setting, if the user changes the skin using the skin selector, it will always match.
If you want, you can also turn the RNG (Randomization) off. For example, you could want to offer the user exotic hair color for your character, but not make them default, so you can turn off the randomization while still allow your user to choose between them.
Do you see this line in the code ?
If you change the value to “0” like this, it will turn off the randomization (RNG) for this VMT, but the user will still be able to use the Skin Selector to change the skin.
🄴 Model RNG
Difficulty :

Skills required : Ø
Description : The Skin Selector also comes with a Model RNG engine that allows Modders to actually randomize VMTs to make certain parts of their models appear or disappear.Model RNG comes in two different forms, but both have the same objective : totally hide or show a VMT or swap between VMTs at random, creating the illusion that there are different models. In reality, all the VMTs must be on the model already, since there is no way to swap bodygroups using VMTs.The two different forms are :
🅣 Total : The VMT visibility will be randomized independently from any other VMT.
🅢 Selective : The VMT will be randomized along a spectrum from 0 to 100.If among your VMTs that need a visibility randomization, one must be visible when one is invisible (VMT swap), or two VMTs must be visible or invisible together (VMT link), you need 🅢 Selective. In other cases, you can go with 🅣 Total.
STEP 1
Do you see this line in the code ?
Change the value to 1 to activate Total RNG for the visibility.
STEP 2
Do you see this line in the code ?
If you want, you can change the default value of 50 to any other value between 1 and 100. This is percentage (%) of chance that the VMT will be visible. If you set the value to 1, you will never see it, and if you set it to 99, you will always see it. For example, if you want the VMT to be visible 1/3 of the time you need to set the value to 33 (as per 33%) like this :
STEP 1
Do you see this line in the code ?
Change the value to 1 to activate Selective RNG for the visibility.
STEP 2
Now, you need to think. The code works with a spectrum that goes from 0 to 100, and you will soon be able to specify between which values your VMT must show.
As per a quick example : imagine you have a gun with 3 attachments : a bayonet, a silencer, and a flashlight, and this is what you want :
– The bayonet must show 50% of the time but always with the flashlight
– The flashlight must show 75% of the time
– The silencer must show 25% of the time, and must always show alone
If you were to represent this on a scale from 0 to 100, you could represent it this way :
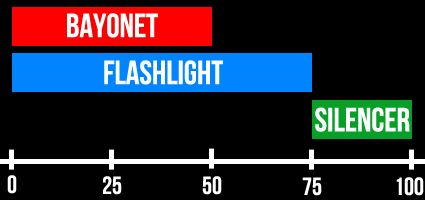
This means that the bayonet must show from 0 to 50.
This means that the flashlight must show from 0 to 75.
This means that the silencer must show from 75 to 100.
These underlined values are what you need to enter in the VMTs.
Do you see this in the code ?
You need to replace the first value by the lower limit that you determined just moments prior, and the second value by the upper limit.
Therefore, in my example, the VMT for the bayonet would look like this…
… the one for the flashlight would look like this…
… and the VMT for the silencer would look like this.
Note that to not let any gap, I needed to put 75 in both VMTs. This will not result in the two materials showing together and does not let any gap. But if you want, you can let gaps, there is no need to fill the whole spectrum from 0 to 100; if you do let gaps, sometimes, none of your selected VMTs will show up.
🄴 Remove Boomer effects
Difficulty :

Skills required : Ø
Description : Allows the user the stop the boomer effects in the VMTsBy default, the code enables the Boomer vomit effects. But maybe, it just looks wrong on your character, or in a specific VMT. You can therefore turn these boomer effects off. You can also turn this effect off in the greyed VMTs, which is the only parameter that can be modified in these.
Note that you do not need to turn the effect off if you make a non-character mod, it will just not work.
Do you see this line in the VMT ? :
If you change the value to “0” like this, it will turn off Boomer Effects for this VMT.
🄴 Fix hair problems
Difficulty :

Skills required : Ø
Description : Allows the user to fix hair problems if they look funky.If your character has different hair colors, passing it through the regular code can cause problems because L4D2 trend to not like that the $alpha of a $translucent material changes.
Therefore, I made a version of the code that does not touch to the $alpha. Obviously, it makes it impossible for your character hair to disappear, but well, that’s the tradeoff.Therefore, to try and solve lighting bugs the code could cause on hair, follow this step :
Do you see this line in the VMT at the very beginning ? :
If you change it to this, it will deactivate all $alpha randomization and changes, therefore possibly making the hair of your character look better.
Note that to optimize your mod, you can also do this step if you do not use the $alpha features for the current VMT. It will save computing power for the end user, because the version without all the $alpha options does less operations per second.
🄴 Code optimizations
Difficulty :

Skills required : Ø
Description : Simplifies the code to diminish the potential crashes.The Skin Selector is not a light script, and on some low end computers, it can sometimes cause crashes. The exact reason is not truly identified, but to minimize these, I also provide lighters versions of the code with cut off features, that should better work on all computers.
Do you see this line in the VMT at the very beginning ? :
If you do not use the visibility ($alpha) features for this VMT, change it to this :
… but if you do not use he visibility ($alpha) features AND you also do not use the 🄴 🅆 Change skins separately feature, you can change it to this instead :
HELP CENTER
This is the Help Center. Try to find your problem here, and try the solution to fix it. If your problem is not listed or the fix does not work, feel free to ask about it in the comments.
Troubleshooting 1 :
Cause 1 ▶ You forgot to download the CORE Mod or it is not activated.
Cause 2 ▶ You did not copy and paste the code over the VertexLitGeneric { (STEP 3 or 7)
Cause 3 ▶ You did not copy and paste the code over a preexisting patch { (STEP 3 or 7)
Cause 4 ▶ You did a typo while doing the steps in 🄴 Code optimizations
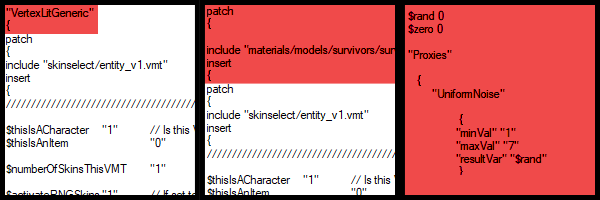
How to Fix : Check that the mod is downloaded and activated. Check that you do not have two patch { }, two include { } or two insert { } in your VMT. All the things in red down below are wrong and should not be in your VMT. Delete them (note that you need to delete the whole Proxies block, and all old variables for RNG).
Troubleshooting 2 :
Cause 1 ▶ You used the 🅴 Entity Version on something not supported.
Cause 2 ▶ Your PC is too weak for the amount of complex Proxies mod you have.
Cause 3 ▶ You did a mod for Bill and Bill’s corpse in The Passing shares the same VMT
How to Fix : First, try to disable every mod except your mod and the CORE MOD for Skin Selector, and test with only your mod. If it still crashes, it’s that you probably did 🅴 Entity Version on something not supported. Use 🆆 World Version instead. If it did not crash when you removed all your mods, try to do the optional step in the 🄴 Code optimizations section.
Troubleshooting 3 :
Cause 1 ▶ You specified a number of skin that is too high for the VMT
How to Fix : You need to make sure that the value for $numberOfSkinsThisVMT is the number of skins you have. This number is the n° of the last frame of your VTF + 1. Try to lower the value of $numberOfSkinsThisVMT for the VMT that causes problems.
Troubleshooting 4 :
Cause 1 ▶ You forgot to do STEP 3 (set the VMT for the greyed parts)
Cause 2 ▶ Your VMT has $allowdiffusemodulation set to 0
How to Fix : Check that you did the STEP 3 correctly, and that your VMT does not contain $allowdiffusemodulation 0. If it does, just remove $allowdiffusemodulation 0.
Troubleshooting 5 :
Cause 1 ▶ Mistake while doing 🄴 🅆 Change skins separately or not doing that at all.
How to Fix : Do 🄴 🅆 Change skins separately if you haven’t done it. If you did it, the error can be caused by two things: two VMTs have the same $thisVMTidNumber value when they should not, or the $maxVMTidNumber is not the same in all VMTs. Make sure $maxVMTidNumber is the same in every VMT, then check if you did not assign two same $thisVMTidNumber by mistake.
Troubleshooting 6 :
Cause 1 ▶ Forgetting to tell the code it is an item.
How to Fix : You likely forget to do STEP 8. Make sure the variables are $thisIsACharacter “0” and $thisIsAnItem “1”.
Troubleshooting 7 :
Cause 1 ▶ Code limitation
How to Fix : If you used 🆆 World Version, there is no fix. Tell me this happened and I might try to update the code to reduce it. If you used 🅴 Entity Version, you can try to 🄴 Change the RNG mode or to do the second 🄴 Code optimization (the one at the bottom).
[Appendix] Set a mod as required
If you make a mod with the Skin Selector, you need to tell the future subscribers of your mod to actually download the CORE MOD with the Skin Selector in it. If they don’t do that, their mods will look like a bunch of white lines and they won’t be happy.
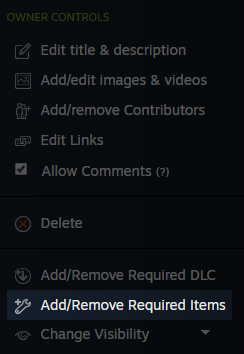 You’re probably intelligent enough to know that you can ask them to do so in the description of your mod, but you can do better and force a message to appear when they subscribe to your mod, telling them to also download the CORE MOD. To do so, follow these steps.
STEP 1
Go to the Mod you just published on the Workshop and look for the Owner Controls pannel on the right of your mod page.
Look for the Add/Remove required items and click on it. It should take you to another page where you will be able to
STEP 2
On that new page, go the the “Subscribed items” tab and click on it. A list of all the mods you are subscribed to should appear.

STEP 3
Look for the CORE MOD you downloaded to make your Skin Selector compatible mod and click on the big ╋ that appears on the left in the list. Wait a few seconds and the Mod should now appear at the bottom left of the page.
Then click on Save & Continue in the bottom right corner, and refresh your mod page by clicking on the F5 key on your keyboard. If you did it right, a Required item table should have appeared
[Appendix] List of all possible Key Codes
ENTER
ESCAPE
SPACE
!
#
$
BACKSPACE
&
‘
(
)
*
+
,
–
.
/
0
1
2
3
4
5
6
7
8
9
:
;
<
=
>
?
@
A
B
C
D
E
F
G
H
I
J
K
L
M
N
O
P
Q
R
S
T
U
V
W
X
Y
Z
[
\
]
^
_
`
a
b
c
d
e
f
g
h
i
j
k
l
m
n
o
p
q
r
s
t
u
v
w
x
y
z
{
|
}
~
BACKSPACE
UPARROW
DOWNARROW
LEFTARROW
RIGHTARROW
ALT
CTRL
SHIFT
F1
F2
F3
F4
F5
F6
F7
F8
F9
F10
F11
F12
INS
DEL
PGDN
PGUP
HOME
END
KP_HOME
KP_UPARROW
KP_PGUP
KP_LEFTARROW
KP_5
KP_RIGHTARROW
KP_END
KP_DOWNARROW
KP_PGDN
KP_ENTER
KP_INS
KP_DEL
KP_SLASH
KP_MINUS
KP_PLUS
CAPSLOCK
JOY1
JOY2
JOY3
JOY4
AUX1
AUX2
AUX3
AUX4
AUX5
AUX6
AUX7
AUX8
AUX9
AUX10
AUX11
AUX12
AUX13
AUX14
AUX15
AUX16
AUX17
AUX18
AUX19
AUX20
AUX21
AUX22
AUX23
AUX24
AUX25
AUX26
AUX27
AUX28
AUX29
AUX30
AUX31
AUX32
MWHEELDOWN
MWHEELUP
MOUSE1
MOUSE2
MOUSE3
MOUSE4
MOUSE5
PAUSE
That’s all we are sharing today in Left 4 Dead 2 Skin Selector (&RNG) (Users/Modders Guide), if there are anything you want to add please feel free to leave a comment below and we’ll see you soon.
Credit to Ellie
Related Posts:
- Left 4 Dead 2: How to Change FOV 2020
- Left 4 Dead 2 The Last Stand 30 New Achievements
- Left 4 Dead 2: All Console Commands Guide
- Left 4 Dead 2 The Last Stand Campaign Achievements Guide
- Left 4 Dead 2 All Golden Freeman Locations (The Last Stand DLC Included)

Installed the mod according to the first option (just downloading the steam workshop mod), and it shows up in the keybinds list, I edited them all to the keybinds you used in this guide, yet when I press them in-game nothing happens, I know this is an old post but I still hope to get some help.