For new players of Hatsune Miku: Project DIVA Mega Mix+, this guide will provide new players some tips and tricks on how to perfect songs a bit easier/gain more score on songs.
Introduction
Do you suck at Project Diva?
Don’t worry we all do!
Progress on this game takes real time, blood, sweat, and tears – we all make sacrifices for Miku.
This guide aims to help you understand Project Diva a bit better if you are new or want a refresher! Feel free to comment any problems you encounter and the community will try to help!
THIS GUIDE IS MAINLY FOR CONTROLLERS, BUT THE TIPS/TRICKS APPLY FOR ALL!
Where to begin:
Firstly, I recommend all players change their macro/bindings (I’m only doing this for controller as it’s all I know)
You can do this through customisation of songs, like so:
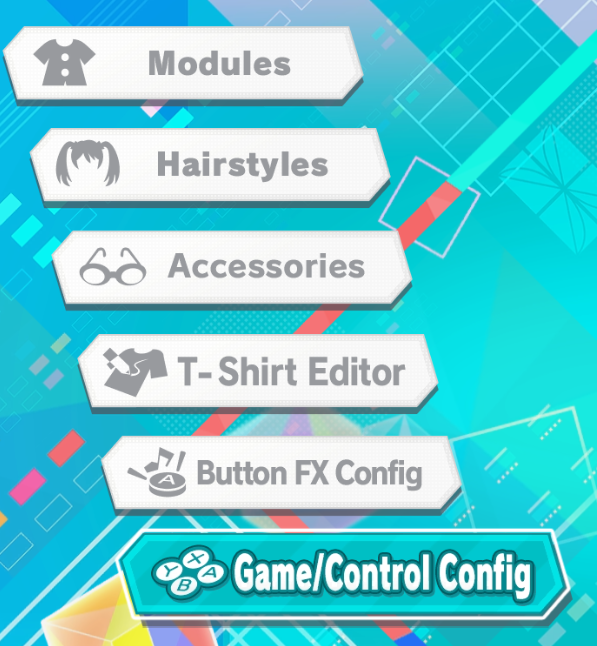
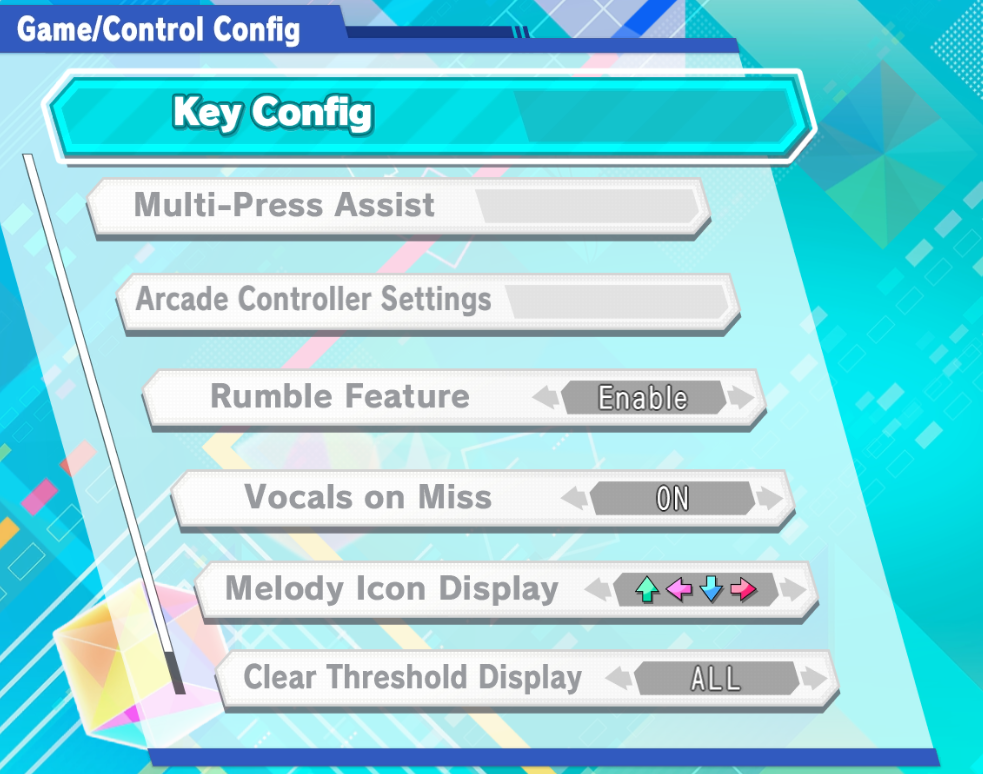
1. Put your quadruple holds/presses (the four buttons all at once) onto RT/LT
2. Put the left and right notes on RB or LB
3. Put the up and down notes on RB or LB (which ever one you did not use above)
So you will want them to look like so (RB/LB does not matter which way you choose, these are just mine):
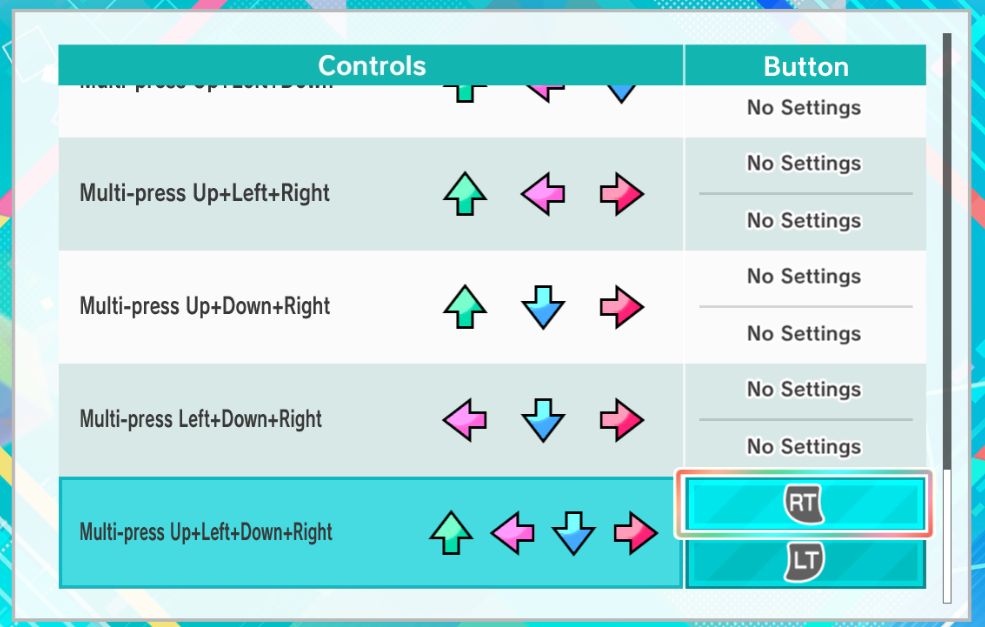
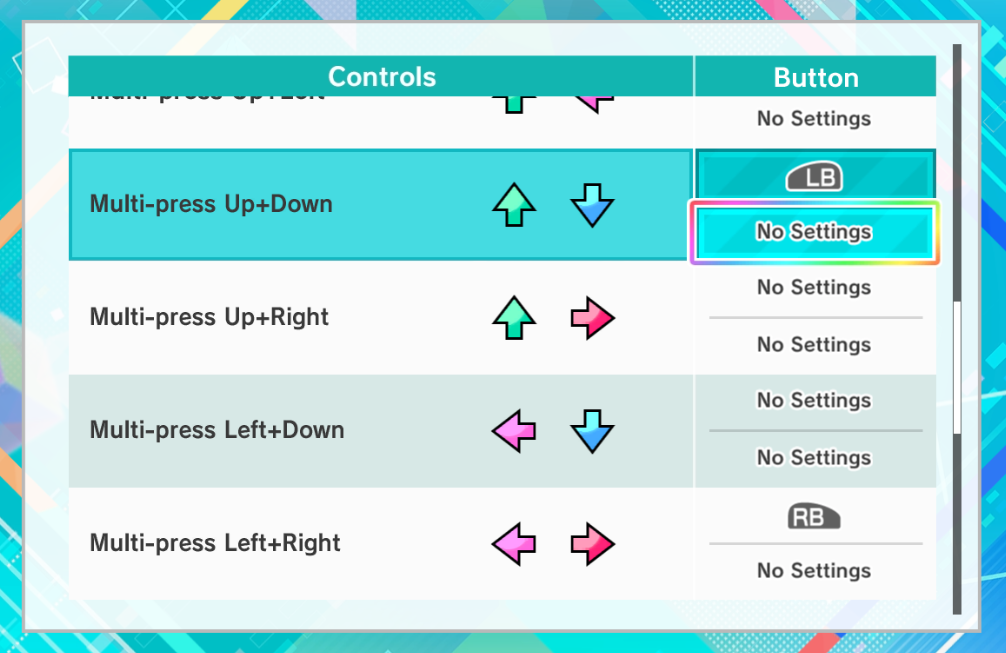
There is also a Hisokee video, where they explain general tips and tricks and the above techniques, you may also like to watch found here. I recommend giving it a watch as its easier to see than explain sometimes!
By doing steps 2 and 3 you will make those awkward opposite button holds easier by making it into 1 simple button press – just don’t forget which side is which!
By doing step number 1 you get another simpler button press, but, most importantly you get to cheat the hold system. This works by any hold note you have pressed, hold down RT or LT and let go of the hold, RT/LT will then hold that note for you whilst you have your hands free as if you were not holding anything! And if more holds are incoming you can switch between RT/LT to continue with more holds each time. This is quite complex to explain so here’s another Hisokeee video explaining/showing how it works:
With this technique you can gain more hold points than you usually would and it allows your hands to keep up with the songs rather than having them stuck awkwardly on a hold note.
I recommend you start with these macros as it can be quite jarring to learn otherwise (people often get reliant on sliders on RB/LB as its easier) – however, it does come with practice and it may not be for you and you can change the macros to fit your play style.
I’ve given some strategies to dealing with 4 notes and some 2 note holds. But what about the others and how do you hold them? I will tell you what I do to deal with them below:
For double notes: hit one note with one side of the controller and the other note with the other side (if its up/down or right/left hit the relevant bumper)
For triples: fat thumb the two notes found next to each other and use the other side of the controller to do the last note (triples in the game are: x, y, b/up, left, down/triangle, square, X or y, b, a/left, down, right/square, X, circle, harder ones do show up in the harder charts – beware those ones!)
For quadruples: just hit LT/RT if you’ve changed your bindings or you could fat thumb the two closest notes on each side of the controller
Tips and tricks
So, if you have done the above and grasp the basic concepts of what the macros help you with then there are only a few more general tips I can give:
1. Beware holds
Just because there are hold notes does not mean it’s good to hold them! Sometimes its better to let certain holds go to hold onto incoming holds – this can be quite difficult to figure out but after playing a song a few times you will see what I mean (Teo on hard is a good example – those holds are best done singular and released when you see the next hold, bar a few – go play it you will see what I mean after awhile)
2. Use the practice feature
Sometimes its good to use the practice if there is a section you are particularity struggling. OR you could just replay the same song 1000000 times all the way through until you get that one part right
3. Do not be scared to use both sides of the controller i.e. USE BOTH HANDS
You have your XYBA/YXAB (etc) and your D-pad. USE THEM BOTH! It’s very handy for triple notes (example X, left on d-pad, X), use it for alternating quick notes, and its handy for holds if you don’t want to put them on RT/LT just yet. USE THE D-PAD, USE IT!
4. Turn off double/triple/quadruple note assist
If it shows you what notes you have to be pressing for doubles/triples/quadruples, GET RID OF IT. RIP THAT PLASTER OFF! You become too reliant on it telling you, that you don’t actually know how to do it. Once you get to extreme you will not know what you are doing or what to hold. Learn it on hard so moving to extreme becomes easier.
5. Arrows or buttons?
You can change the button icons in customization – do what you find easiest! I always find arrows best allowing for easy readability and if you switch controllers its easy to understand, but this is my personal preference, not necessarily yours, play around with it!
6. Go with the flow
We all succumb to the pressure of this game, so if your hand suddenly switches to using the d-pad consistently mid song, go with it, the moment you start thinking you have made a mistake you will mess up, go with the flow and switch back to the other side of the controller at your own time/when the song allows it.
7. Take breaks
Project diva hurts. Not just your hands but your soul – you get that one safe at the end? Hurts man – take a break, stretch, touch some grass, come back to it tomorrow.
Related Posts:
- Hatsune Miku: Project DIVA Mega Mix+ How to Unlock Refresh Rate, Install Mods and Custom Songs
- Hatsune Miku: Project DIVA Mega Mix+ Kasane Teto Vocal Pack
- Hatsune Miku: Project DIVA Mega Mix+ 100% Achievements Guide
- Hatsune Miku: Project DIVA Mega Mix+ How to Fix Incorrect Input Issue
- Hatsune Miku: Project DIVA Mega Mix+ All Song List (Extra Song Pack DLC)
