For Dome Keeper, this guide will show you how to easily go infinite (or as close as the game lets you) in Prestige Mode
The Goal
This guide expects you to have finished a few runs in normal mode, as we won’t be going into gameplay basics. You will also need to be able to reach a certain point in Prestige Mode on your own, as the setup for the strategy requires it.
Sadly, the Prestige map isn’t infinite, and being able to keep going won’t help us once the resources have run dry. It is, however, large enough for you to have a several hour run with thousands of blocks mined, so let’s get started!
Recommended dome
This strategy can be done with the Sword dome, but will be more effective with the Laser dome. I suggest that you pick the Laser dome when starting, aiming for the Double laser upgrade.
You can do this strategy starting with whatever defensive gadget you’re best at using. However, as this we will be trying to keep a single flying enemy alive you should avoid getting the projectile reflecting upgrades for your defensive gadget. For the same reason you should also avoid the withering upgrades for the monster repellant.
The Setup
- The Stun Laser module
- The Teleporter module
- Basic defenses and resources until the modules have the upgrades required for the strategy
As you can see from the list we won’t be able to kick off the strategy right from the start, as we will be needing a fair bit of both iron and water to get things going. We also need to be lucky with the modules offered, as we will be able to gather more points the earlier we can acquire both the laser and the teleporter.
We can kick off a limited version of the strategy as soon as the stun laser is properly upgraded, but we won’t reach our maximum potential until the teleporter is at full power.
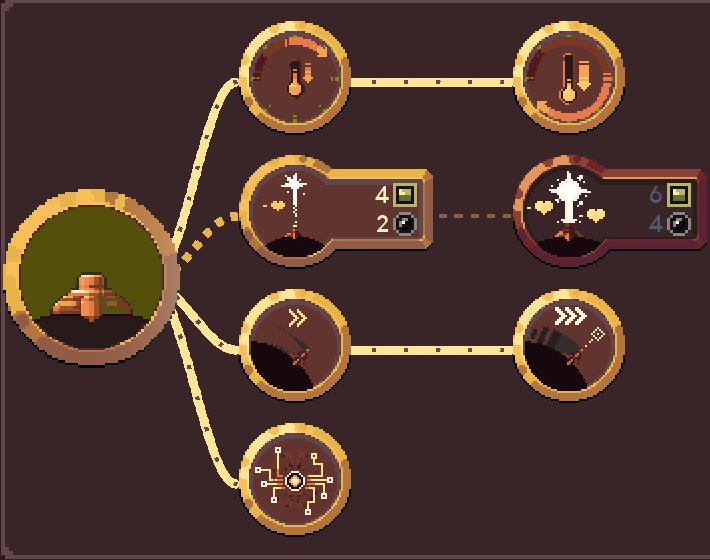
For the laser you will need to get everything but the damage upgrades. Your upgrade tree should look like this:

I repeat, DO NOT get the damage upgrades, as they ruin the entire strategy!
For the teleporter you will eventually want to get every upgrade. However, if you are short on resources you can save the range upgrade for later, as it’s mostly used for convenience.
This guide expects you to be able to reach mid-game on your own. What I mean by this is that you have to be able to find both required modules along with upgrade materials, as well as staying alive by upgrading your character and your dome’s offense/defense.
The strategy
The basis for the first part of this strategy is the Stun Laser and the basic flying monster.  The Stun laser with full cooldown/movespeed/AI upgrades will be able to always fire at the flying monster before the monster can fire at your dome. When the laser goes into cooldown the monster will enter its “cloud form” and move to a new position. Thanks to the upgrades the laser is able to reposition and keep up with the monster every time. Without full upgrades a monster shot will slip through every now and again, and eventually wear your dome health down. The AI upgrade is, of course, needed so that you can go off mining while the Stun Laser keeps you safe.
To get started once you have the required upgrades you just play a wave normally, but leave one flying monster untouched. When every other monster is dead the Stun Laser will now keep the flying monster stun-locked. Unfortunately, this won’t work forever. We avoided picking up any damage upgrades for the damage laser, but it will still deal 0.01 damage in its base form. This means that even if it takes a very long time, the monster will eventually die.
The second part of the strategy is the Teleporter. Using this in its upgraded form we can keep warping resources back to base while mining. Unlike the Lift module, the Teleporter keeps working even during monster waves. When you find resources, just put them in a pile or down a shallow shaft and chuck your teleporter into the middle!
Now, you might be thinking “If the Stun Laser is blocking the monster, why can’t I just fly back the minerals myself?”
There’s a very good reason you can’t fly resources yourself; Stall prevention. It seems the developers planned for the Stun Laser tactic and added a stall prevention to the game. Every half minute the game spawns two basic melee monsters, one on each side of the screen. Luckily, we can counter this by using our trusty Teleporter. Every time the enemies spawn we pop back to our dome, kill the enemies, then go straight back to mining. Yes, this is going to be tedious, but that is the price we pay for success. For this reason it’s very important to always bring your teleporter with you and never go too far away from it.
You can track the spawn timer with the beeping monster icon that appears when the wave timer
![]()
The fastest way to kill these two enemies is with the double laser upgrade for the Laser dome, as you can pop them as soon as they appear.

Where to go from here
Your goal has now shifted to mining every single resource block and will later move to getting the maximum number of prestige points. In order to achieve this you will have to balance increasing your multipliers with surviving as many waves as possible.
Until you’ve cleared out the map I’d recommend upgrading your weapon and defensive gadget in a way that allows you to manage waves while taking as little damage as possible, since every cobalt you don’t have to use for repairs can be used for score. Remember to keep 30 iron and 2 cobalt ready for the Leave the planet upgrade and that juicy 2x multiplier. You will want to save it for when the monsters finally overwhelm you.
You will still have to be able to mine the blocks you find, which will take longer and longer as you go into the mine. The limiter here is really how much of your own time you’re willing to spend, though unless you want to go at a snail’s pace at the deepest levels I’d recommend some speed upgrades and upgrading your drill to the 50- or 60-iron level (70 is overkill in my opinion).
You really don’t need more than one or two upgrades in carrying capacity, as you will always be bringing the Teleporter to the resources.
Your goal is to get whatever offense and defense upgrades that allows you to survive the longest. As you will still have to face a few waves while using the stall tactic (remember, the flying monster won’t live forever) you can squeeze out some extra points by upgrading the multipliers early, as long as you can do it without the dome getting damaged (need that cobalt for points!).
I’d recommend scrapping all modules other than the required ones. A lot of the dome modules are based around cycles, and since we will be keeping the timer locked when stalling most of their functions will be useless to us.
You could use modules that aren’t based around cycles, such as Drillbert & Sensor, but since they only save you a bit of time the resources spent to upgrade them could instead be used for extra points.
The only module I’d consider getting is the Condenser. The only reason for this is the Overcharge upgrade, which could help us survive for a few waves longer when we are ready to face the monsters.
Once you’re done mining it will finally be time to face the monsters. Spend your upgrades as you prefer, keeping in mind that the only goal is to survive for as many waves as possible. Keep in mind that some extra cobalt for repairs could be more useful than adding extra multipliers once you reach higher levels. Also, remember to save the resources needed to leave the planet once your dome is about to crack
That’s all we are sharing today in Dome Keeper How to Go Infinite, if you have anything to add, please feel free to leave a comment below, you can also read the original article here, all the credits goes to the original author caggen2340
Related Posts:
- Dome Keeper Tips and Strategies Guide
- Dome Keeper 10 Tips to Get Started
- Dome Keeper Quick Finish Achievement Guide
