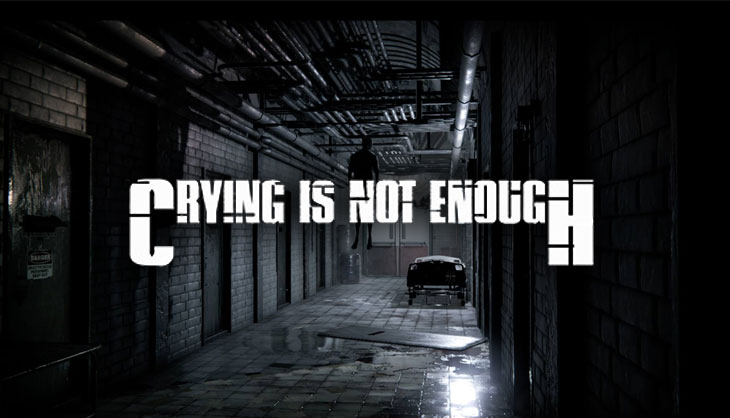
For Crying is Not Enough Remastered players, this is a 100% walkthrough guide of the game, if you are looking for some tips of during the play
Tips
- Explore everywhere. I don’t bother listing every ammo and health pickup. Take your time and look for stuff everywhere. Enemies don’t respawn, so there’s no need to rush.
- Keep an eye out for wooden crates with a red cross on them. These are breakable and contain ammo/health.
- Playing Cubica is an easy way to get ammo. Ammo is awarded at 10, 20, 35, 50, 100 points. You get the following:
- 10 points: pistol ammo or shotgun ammo x2
- 20 points: pistol ammo x3 or shotgun ammo x2
- 35 points: pistol ammo x5 or shotgun ammo x3
- 50 points: pistol ammo x5 or shotgun ammo x3
- 100 points: pistol ammo x5 or shotgun ammo x3
Hence it’s usually worth playing to 35 or 50 points.
- You don’t have to kill everything. Enemies de-aggro very quickly. This is especially true in the large open areas like airport/warehouse. Only 10 kills are needed for the achievements.
Part 1
Answer your phone on the kitchen counter.
Objective: Head to the Hospital
There’s an Arcade Machine in the living room. It’s inactive, but know what to look out for when you need to save.
Exit the apartment and the building.
Proceed down the alley for a cutscene.
 I Care
- Travel to the hospital.
Go inside.
Objective: Head upstairs and talk to Dr. Miller
Use the elevators on the right at the back to go upstairs.
Go down the hall to where it splits and enter Dr. Miller’s office for a long cutscene.
 You will be prompted to save.
Down the only path.
Objective: Find Eleanore
Further along is an Arcade Machine.
Arcade Machines require Scratched Bronze Coins to use.
They provide two functions:
- a minigame called Cubica
- save/load
It’s recommended you play Cubica whenever you save. There are three achievements tied to this minigame:
Retro Kid
- Play cubica for the first time
Stranger Things
- Get 11 points playing arcade.
Mame Master
- Get 100 points playing cubica.
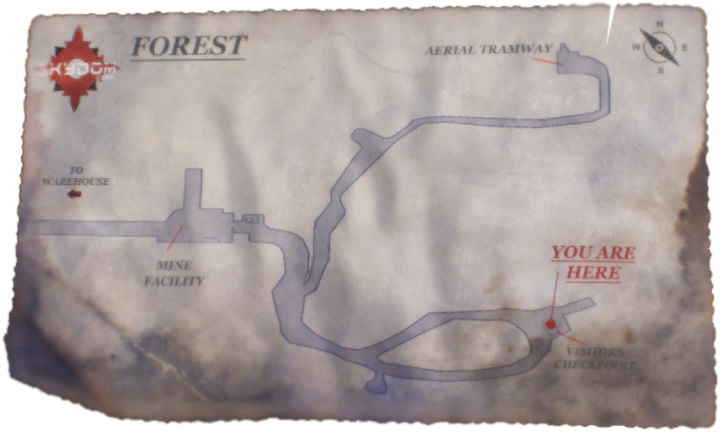
As the path opens up, grab the [MAP] on the left.
Inside the Visitor’s Checkpoint you can find:
- A lockbox with 1957 etched on the side.
- A [NOTE] on the bed.
- [MEDICAL FULL SYRINGE] and [PISTOL AMMO].
Loop back the way you came (see map) and follow the path going northwest.
Along the way you’ll have your first enemy encounter.
 It’s starting to feel good
- Kill the first enemy.
At the fork, follow the path to the Mine Facility.
Grab the [FULL CANISTER] off the truck at the end.
Return to the fork and take the right path.
You’ll eventually reach an Arcade Machine.
Go inside the building and use the Full Canister to fill the yellow fuel tank.
Pull the lever on the red mechanism to power on the cable car.
3/4 up the stairs, an enemy will spawn that I recommend killing with melee for an achievement. There are plenty more opportunities later on, but this one’s alone and the save point is nearby.
 Better Bad things
- Kill an enemy with melee.
At the top, use the cable car to the next area.
 Go down to the bottom and exit the building.
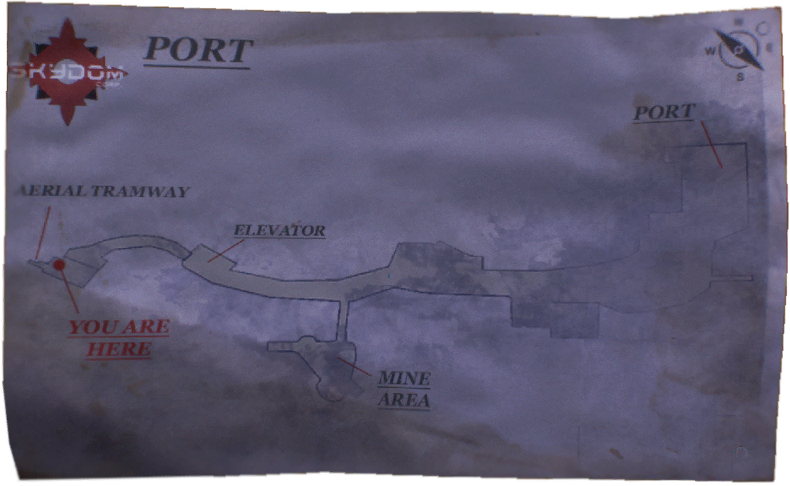
Grab the [MAP] before going down the path.
Use the elevator to go down, and walk through the radioactive gas for another cutscene.
Part 2
Exit your cell.
Objective: Escape the prison and find Claire
Go down the hall and upstairs.
Press the button on the wall to call the elevator and take it up.
 You are in the Mine Area in the Port map.
On the upper level is a [NOTE].
Take the only way out and crawl through the gap.
You exit past the radioactive gas from earlier.
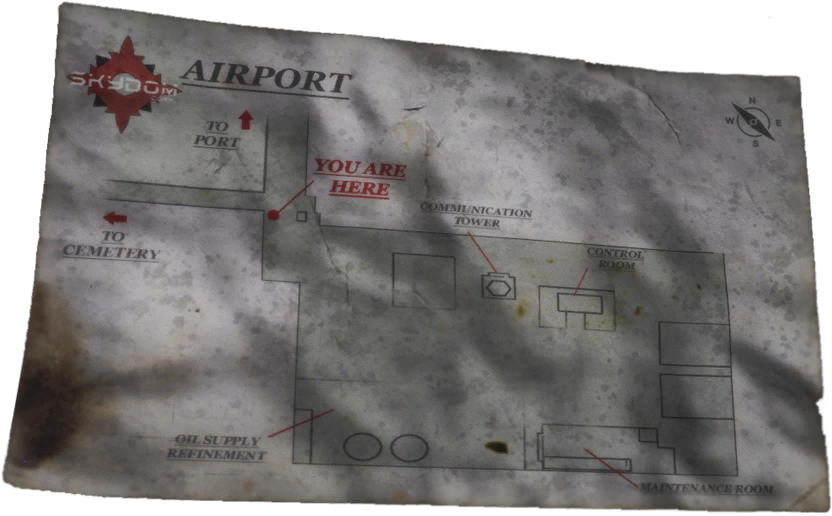
Go to the Airport (find it on the in-game map).
 Serial Killer
- Kill more then 10 enemies.
Walk down the road for a cutscene.
Objective: Restore the communication with the outside world and destroy the only functional plane
Grab the [MAP] opposite the security booth before entering the airport proper.
Around the back of the security booth is the Arcade Machine.
In the Control Room is a [LEVEL 1 KEY CARD] with the code 4431.
Also in the Control Room is a lever next to an electrical panel on the wall you can use.
In the Maintenance Room there are stairs leading up to a locked door. You’ll return here much later in the game.
Scour the area for ammo before grabbing the [SHOTGUN] in the back room.
Kill the enemies that spawn in. The big guy will take ~12 shotgun shots to kill.
Exit the airport.
 In the area marked Port in the east, there is a [DETONATOR] on a table and an Arcade Machine.
Go to the Warehouse.
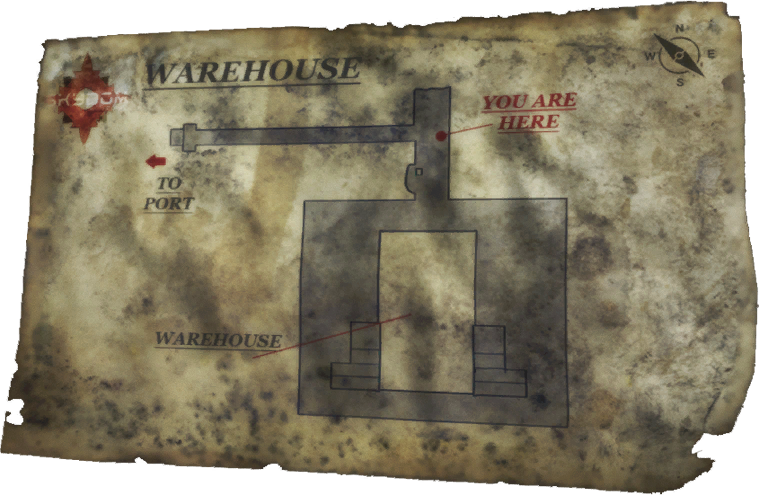 At the end of the bridge is the [MAP] for this area.
Grab any ammo nearby and save at the Arcade Machine before entering the warehouse.
Inside the warehouse is the Pyro Boss.
Dodge its flames and kill it with the shotgun. You may need to shoot the tank on its back, I can’t be certain. It’ll take a while but you should be well stocked at this point.
 Steel and fire
- Kill Phyro Boss.
Enter the unlocked room in the southeast and take the [EXPLOSIVE MATERIAL – C4] from the shelf. Combine this with the Detonator you found earlier.
Return to the Airport.
 Blow up the plane in the hangar in the East with the C4 (use it from your inventory).
Climb the communication tower and use the radio.
Solve the puzzle by lining up all three coloured signals with the Amplitude and Frequency knobs.
– Red: Frequency – turn 3 times
– Green: Don’t move
– Blue: Amplitude – turn 3 times; Frequency – turn 2 times
Exit and return to the prison under the Mine Area.
Objective: Follow Claire to the Cemetery
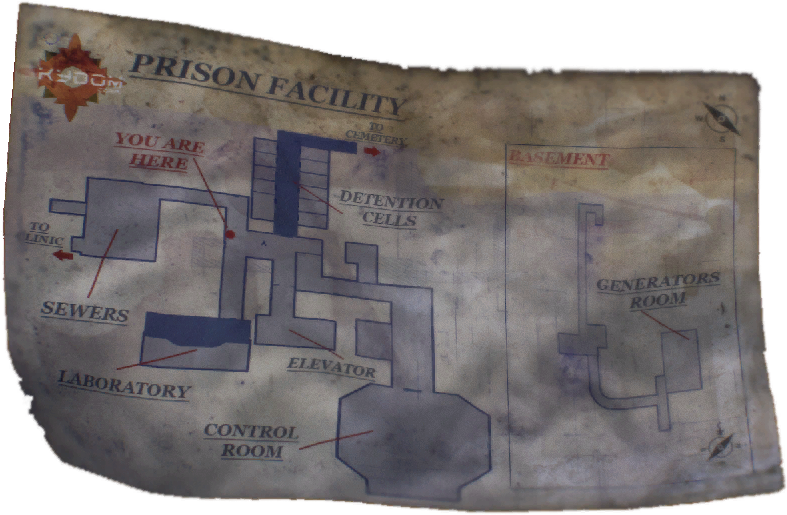 Down the stairs, the way ahead to the Detention Cells is now locked. 4431 unlocks it.
Inside is a new type of enemy. Get hit once by its needle to get infected with radiation.
 Kim Jong Un Style
- Infected for first time (radiation).
Heal radiation with Potassium Iodate.
 Addicted
- Use radiation pill.
In one of the cells is a [NOTE] on a bed. It mentions the code 3285.
Open the Laboratory with 3285.
Examine the body on the table and the x-rays on the screen.
There’s nothing else inside but a few items, we’ll be back later.
If you’d like the [MAP], it’s on the wall just past the chain link door if you turn right after coming down the stairs.
Otherwise follow the path through the Detention Cells to the Cemetery.
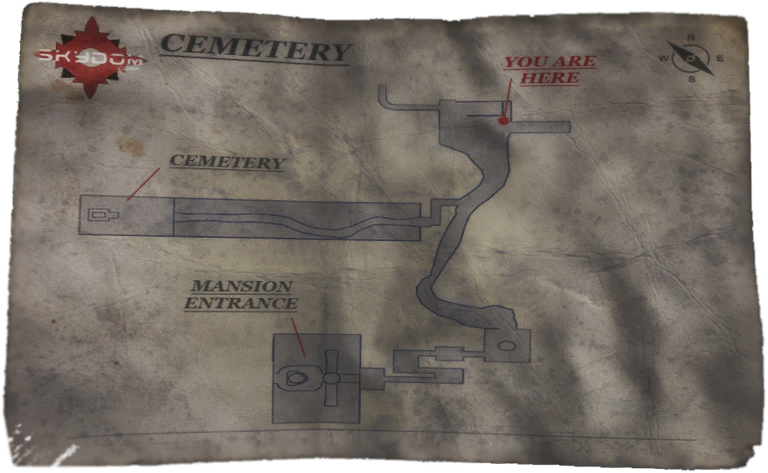 Follow the path until you’re outside.
Walk behind the truck to find the [MAP].
Proceed down the tunnel to the east and find the [SECOND LEVEL KEY CARD] by a dead body.
Continue south along the path to an Arcade Machine.
Head up the stairs to the cemetery.
Inside, on the left is a [NOTE].
Proceed further in for a short cutscene.
Objective: Find your way to the Mansion
The Cemetery and Mansion are both locked, so return to the Prison Facility.
Part 3
 Along the way to the Control Room is a small room on the side with a with a number panel.
Open it with 1957 and grab the [WORKING FUSE] from the power box inside.
Unlock the Control Room with your new key card.
Follow the perimeter of the room along the upper floor to find a [NOTE] on a counter.
At the back of the middle area are stairs leading down to the bottom.
Down here is a valve you can turn.
Return upstairs and exit the Control Room.
In the hallway north of the Laboratory is a door leading down to the basement. Use in-game the map to find it if needed.
In the Generators Room, restore the power box with the Working Fuse.
Return upstairs.
Go to the Sewers.
Walk through the sludge to the other side and grab the [WOLF PLATE] on some boxes.
A nearby room has an Arcade Machine.
Return to the Cemetery.
 Go to the mausoleum where we saw a cutscene earlier.
Insert the Wolf Plate to begin a puzzle.
On the five animal tiles are a tiny circles. We must point these circles to what the animal feeds on.
– Eagle > Sheep
– Chicken > Grass
– Sheep > Grass
– Wolf > Sheep
– Fox > Chicken
Press the button in the centre to finish the puzzle.
Enter the next area.
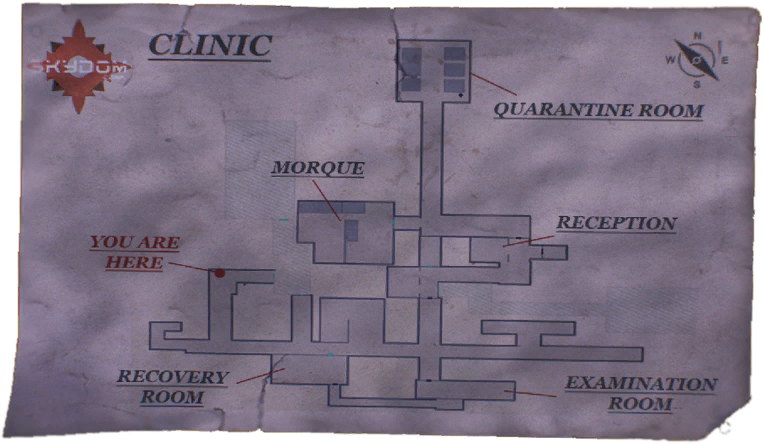 Head left at the first fork and grab the [MAP] at the end.
Return to the fork and continue.
In the Recovery Room is a [DOCTOR’S REPORT] on Subject 046.
In the Examination Room is a [DOCTOR’S REPORT] on Subject 047 and other items.
The long path in the southeast contains an Arcade Machine.
Past the Arcade Machine leads to the Mansion Entrance, but the mansion itself is locked. I still recommend going there now to unlock the front gates, as you’ll need to go through there later.
Continue north towards Reception and eventually reach a puzzle.
The solution is to have all the sums of the rows and columns equal to the numbers around the outside. There are multiple solutions, one being:
1 2 3 3 2
1 2 2 2 2
1 0 1 1 2
1 1 2 1 2
3 1 4 2 0
Through the door and on your left is Reception. Take the [DIARY] off the desk.
Go to the Quarantine Room and find the [INDUSTRIAL DOOR KEY].
There’s a [NOTE] in one of the patient rooms.
There’s also an Arcade Machine here which I recommend using as there’s a ‘boss’ ahead.
Enter the Morgue to face the next boss.
If you haven’t already, let yourself die for an achievement.
 Welcome Gamer
- Die for the first time.
You’re stuck with him so the only strategy is to run around the room and shoot when you can. It takes about 10 shotgun shells to kill him.
After killing circular saw man (who’s not really a boss), search for items.
In one corner is a [NOTE] in the doctor’s hand.
Use the valve to drain the large tub of blood in the middle of the room and pick up the [SAFE BOX KEY].
Exit out the doors opposite Reception to return to the Prison Facility. Going down the hallway south of Reception spawns the circular saw man again, so you don’t want go that way.
Return to the Airport via the Port. Run as the circular saw man spawns behind you as cross the Mine Area. You are safe after the crawl section.
 Unlock the locked door upstairs in the Maintenance Room.
Exit the airport. As you leave, the circular saw man will be waiting for you by some trucks. It’s very easy to sprint past this one.
Use the cable car to return to the Forest at the beginning of the game.
The circular saw man spawns again as you approach the cable car building. Either sprint straight past, or lure it outside and go around.
Part 4
 You-know-who is waiting for you again at the bridge. Not the big wooden one, but the shorter one after the plane. More enemies are also waiting ahead, but you can sprint past everything.
Open the lockbox in the Visitor’s Checkpoint for a [STACK OF 25 SILVER PIECES].
Make your way back to the cable car. Along the way, our friend will be waiting for you not long after the hanging body and will still be at the bridge (assuming you didn’t kill him earlier). You can sprint past him both times.
Take the cable car.
The circular saw man will be there again in the building after the cable car ride (or maybe not if you killed him earlier?). You can’t sprint past him on the narrow walkways, so wait for him to come to you at the top.
Go to the Prison Facility. Our friend won’t be in the Mine Area even if you didn’t kill it earlier.
The circular saw man spawns again after going down the stairs. I recommend just running straight through to the Cemetery.
 If you unlocked the gates when I mentioned it earlier, you can head straight to the mansion killing a few enemies along the way. Otherwise go through the clinic.
At the Mansion Entrance, combine the two stacks for a Stack of 30 Silver Pieces.
Use the Stack of 30 Silver Pieces on the Judas statue.
To solve this puzzle, you must step on the button that’s behind the statue. Repeat 4 times as it rotates.
Take the [GOLDEN MANSION KEY] from the statue’s hand.
Approach the mansion for a cutscene.
Objective: Find more about your Parent’s death
There’s an Arcade Mansion in the far right corner when facing the mansion if needed.
Enter the mansion.
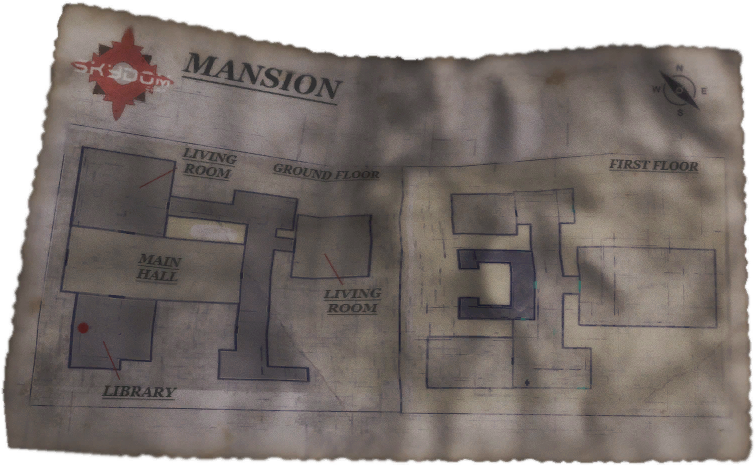 In the Library on the wall is the [MAP].
A [NOTE] on the desk.
Behind the desk in the Library is a bookshelf you can use the Diary on.
Return to the main hall and examine the grandfather clock to receive [ZORLAFEXIN 500G]. Kill the enemies that spawn.
In the Living Room (north) is page 122 of [RICHARD’S JOURNAL].
Enter the Living Room (east), which is the Dining Room, and note something missing from the dining table.
In the hallway outside the Dining Room, go north to find page 109 of [RICHARD’S JOURNAL].
Grab the [USED AXE] at the bottom of the stairs at south end of the hallway.
Exit the Mansion.
Return to the Prison Facility. Going via the Clinic will still spawn the circular saw foe in the hallway, so you may wish to take the long way round.

Return to the Mansion Entrance.
Use the Head on the fountain just outside the mansion.
Use the Zorlafexin on the fountain afterwards.
Take the [F2 MANSION KEY].
Save and enter the mansion.

Our circular saw friend is back one last time as you open the door. Kill him.Upstairs, at the south end of the hallway is the final Arcade Machine.
In the bedroom at the south end is a [NOTE] on the table and a [GOLDEN KNIFE] on the dresser.
Place the Golden Knife on the Dining Room table for a short cutscene.
 Houdini Skills
- Solve all puzzles
Enter the Living Room for another cutscene.
Finally, go upstairs and enter the room that’s open now for the ending.
 Sleepy Hollow
- Headless little boy
That’s all we are sharing today in Crying is not Enough Remastered 100% Walkthrough Guide, if you have anything to add, please feel free to leave a comment below, and we’ll see you soon.
Credit to alphabetsoup
