I’ve created some unofficial addons for the Anyland client, to add multiple undo/redo, customizable dialogs, and a syntax for custom body tells. This guide will show you how to install them.
Setup
- Unity Mod Manager[www.nexusmods.com] (direct link[www.dropbox.com])
- Latest AnylandMods ZIP[github.com] (Github project page[github.com])
- UnityModManagerConfig file with Anyland pre-added[github.com]
Extract UnityModManager wherever is convenient, but don’t use the Anyland installation directory or it might not work. Copy my UnityModManagerConfig file into the same directory, overwriting the existing file.
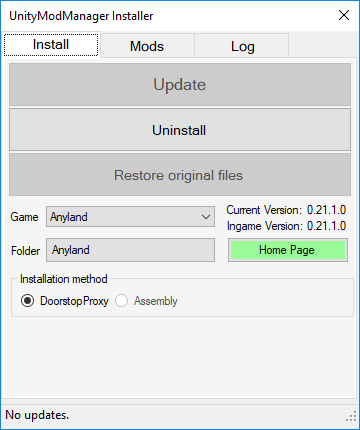
Open the UnityModManager application. Where it says “Game”, select Anyland. Click the button below it, and navigate to your Anyland installation directory. If you don’t know where this is, then it’s most likely C:\Program Files (x86)\Steam\SteamApps\common\Anyland. Make sure “DoorstopProxy” is selected.

Finally, select the Mods tab, and drag/drop the AnylandMods.zip file you downloaded into the window, or click “Install Mod” and browse for it that way.
You might only see two mods listed; this is just a display glitch and they should all work fine in-game.
You will know it’s installed properly if you see a new “Mods” button on the main menu. You will also see the UnityModManager screen appear (on desktop, not VR) when you start Anyland.
PersonalizedUI
Besides looking cool, this can potentially be very useful when combined with scripting.
Note that this is a clientside effect only; other players will not be able to see it. That said, things like “Do Creation Part” commands will work as expected.
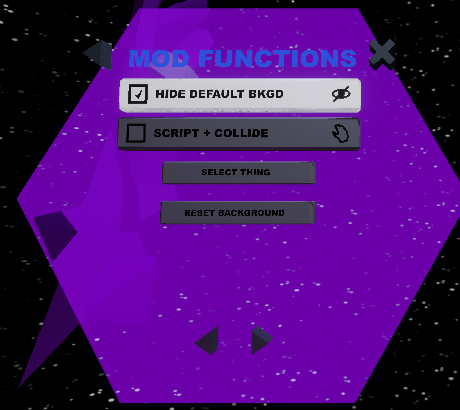
To customize your dialogs, context laser the Thing you want to use, press the Copy/Paste button on the back, and then copy the thing ID. Then, push the Mods button on the main menu, and select “Change UI Bkgd”.

If you do not want the default gray background to show up on top of (or behind, or wherever) your thing, select “Hide Default Bkgd”.
Push “Select Thing”, and you will see a preview. If you like the way it looks, select Yes.
If you want scripts to work, you will need to select “Script + Collide”. There is a confirmation dialog box before you enable this, and you are encouraged to try pushing the two gray areas in different places to test, to make sure you don’t accidentally have a collidable thing that makes buttons unpushable.
If you do end up making your dialogs unusable, you can delete or edit the mod’s configuration file manually. It is located in the Mods folder inside your Anyland installation directory, in the “PersonalizedUI” subfolder.
Speaking of the config file, you can also customize the colors of text, buttons, and checkboxes there, though this will sometimes stop working, and the colors don’t seem to be exact.
MultiLevelUndo
Note that there are two known bugs:
- Newly-placed thing parts will have a couple entries in the undo history already, changing position and/or size. If you accidentally trigger this, simply push Redo, unless of course you serendipitously want to keep the new position/size.
- If you change the scale of a part, then undo, then turn on the option to scale parts uniformly, and begin scaling it again, it will revert back to the proportions you undid before. If this happens to you, simply undo the bugged scale, move the part, undo the move (optional), and then try scaling again.
ScriptableControls [SECTION UNDER CONSTRUCTION]
A side effect of installing this mod is that if your controllers have analog sticks, the teleport laser will not activate unless you do so by moving the stick upwards. This is to free up the other input (pressing trackpad or analog stick) for custom actions. (See ‘R’ below.) I’ll likely add an option in the future to toggle this behavior.
The following conditions are currently supported:
- C – Context laser button is held
- D – Delete button is held
- F – Fingers are closed around the controller (requires Valve Index controller)
- G – Grip is held
- H – [s]Something is being held[/s] (not yet working)
- L – Currently holding the input to control your “leg” (works even if none is attached)
- M – Hand is moving
- N – Same as M, except a higher velocity is required.
- Q0 – Hand is moving mostly left. (X-)
- Q1 – Hand is moving mostly right. (X+)
- Q2 – Hand is moving mostly downward. (Y-)
- Q3 – Hand is moving mostly upward. (Y+)
- Q4 – Hand is moving mostly backward. (Z-, toward your back)
- Q5 – Hand is moving mostly forward. (Z+)
- R – Teleport button is held.
- T – Trigger is held.
- X0-2, Y0-2, Z0-2 – Hand is located in this section of a 2x2x2 grid centered in front of your head.
Written by flarn2006
