A user manual for most of the basic features of the WorldEdit mod,made by the user FunkyShit. This guide assumes no previous knowledge in modding the game,but does assume a certain level of familiarity with playing the game and navigating its menus.
00 – Introduction
-This guide is presented to you exclusively in Canadian English. It is the only language I know. If you wish to translate this guide to another language,then I invite you to,on the stipulation that you credit me for the original guide.
-One of the mod’s major features,templates,will not be covered,as I have been unable to make said feature actually work. Research has revealed the issue to be on my end of the equation,but I have no idea what the issue might be.
-The mod’s author,FunkyShit,is very active at the time of writing this guide (May 9th 2019),rolling out updates seemingly every day. As a result,take this guide with a grain of salt. Hopefully,core functionality won’t change so much as to completely invalidate this guide.
So,without further ado,let’s get into it.
01 – First Steps
So,now that you’re subscribed to WorldEdit,you need to activate it. Launch the game. When the main menu loads,click on the “Mods” button.
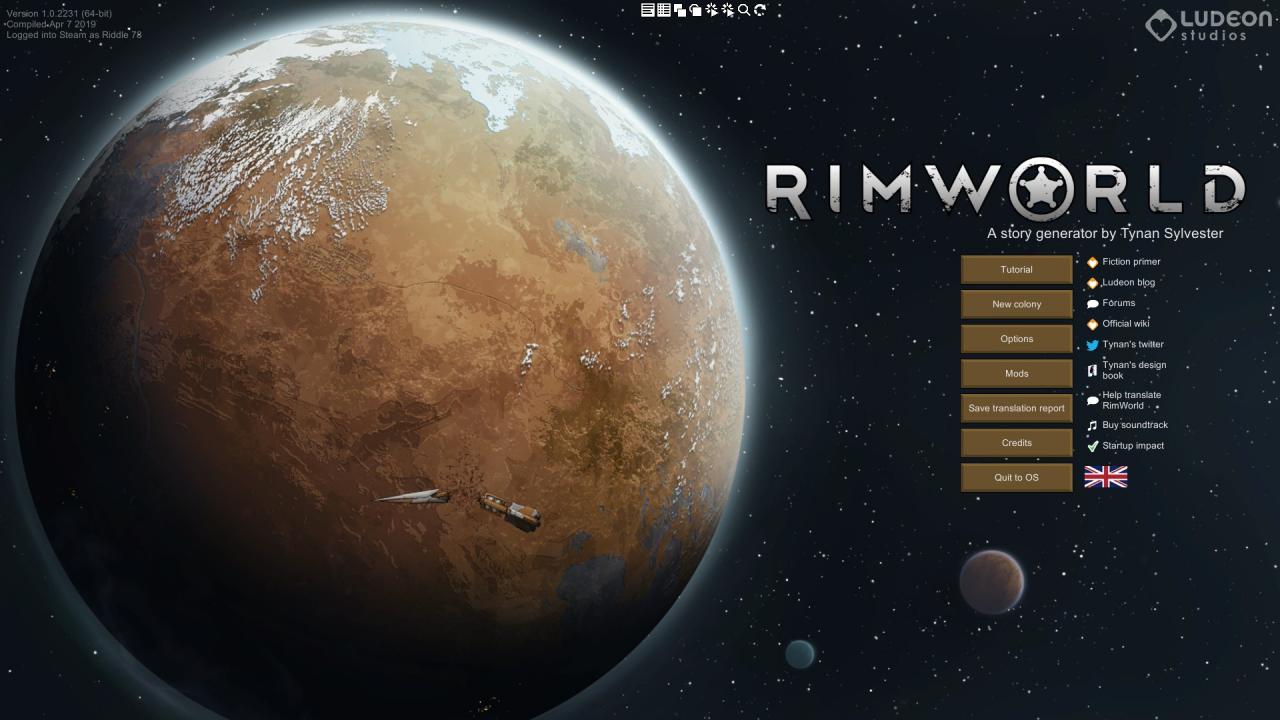
This is your mod manager. Here,you can activate and deactivate your mods,and alter load order. Load order is a term used to describe the order in which your installed mods are loaded into the game. Mods that load earlier are towards the top,and mods which load later towards the bottom. As a rule,if there is any overlap in functionality or edits between mods,the ones that load later will have their versions of the edits and functions in play. That being said,however,WorldEdit is,as far as I’m aware,unique in what it does,and load order only really matters when you have a large number of mods installed.
Now,find WorldEdit on the left side panel,and click on it. The right side panel will show you information about the mod. Return your attention to the left panel,and you’ll notice some symbols beside the name of the mod. While the mod is deactivated,there’s a red X,indicating that the mod is not active. By clicking this red X,it becomes a green check mark,letting you know that the mod is now active. The next symbol to appear is a grey-white box with slashes through it. By clicking and holding this box,you can adjust WorldEdit’s position in the load order. For the purposes of this manual,I’m going to assume your only mod is WorldEdit.
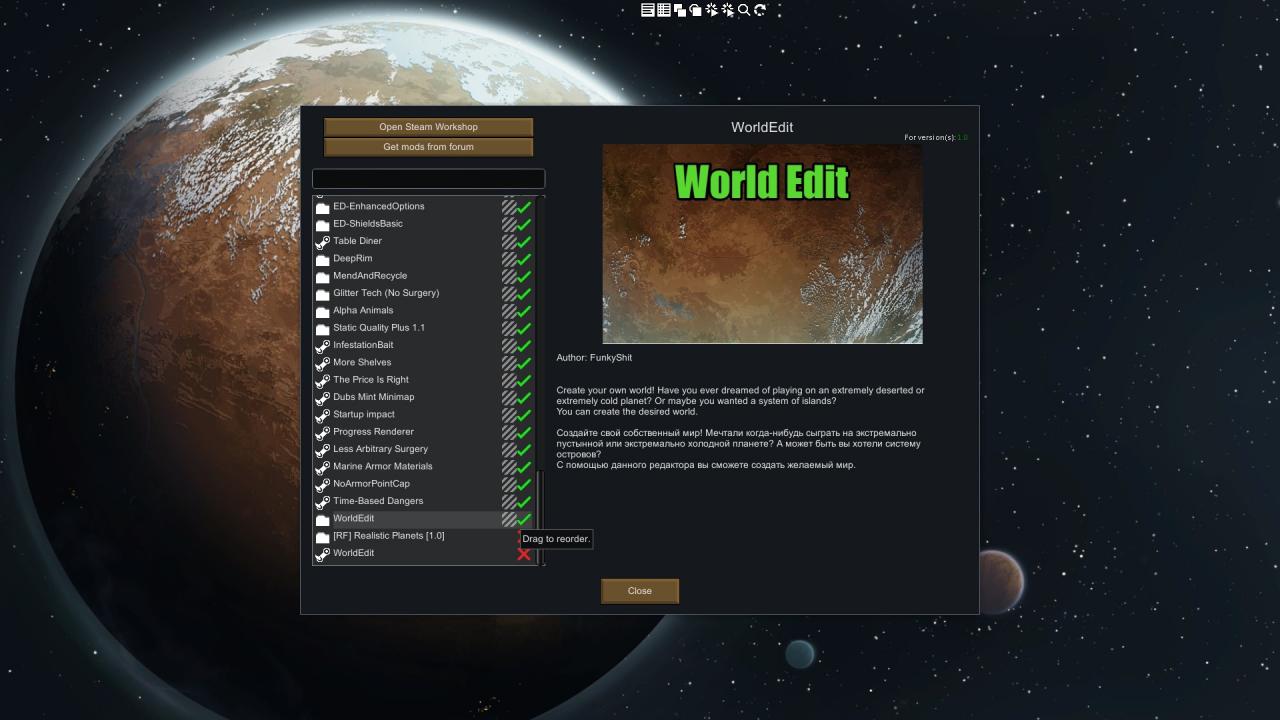
A word of warning; You might have noticed a “mod” called Core up at the top of the list. This is the RimWorld game itself. By disabling this mod,RimWorld as we know it will cease to function until you reactivate it. Further,by putting other mods above it in the load order,you are likely going to break those mods. Core is what I like to call a Master File. It’s essential for other mods to work,either by providing a code library,or by being the base game. So,do yourself a favour,and always check that Core is active and at the top of your load order before leaving the mod manager.
Now,most mods for RimWorld include mod-specific settings. Further,when playing with mods,it is a very good idea to turn DevMode on. While,yes,DevMode enables cheating,it also gives you access to the console. The console records code events going on under the hood,and prints a report whenever something behaves unexpectedly. When reporting issues with mods,one of the first things mod developers will ask for will be the console log. So,do everybody a favour,and turn on DevMode.
From the main menu,click the “Options” button. On the window that pops up,find and activate DevMode. If you’ve selected “Permanently disable developer mode” in the past,then I have no idea how to help you,but Google probably does.
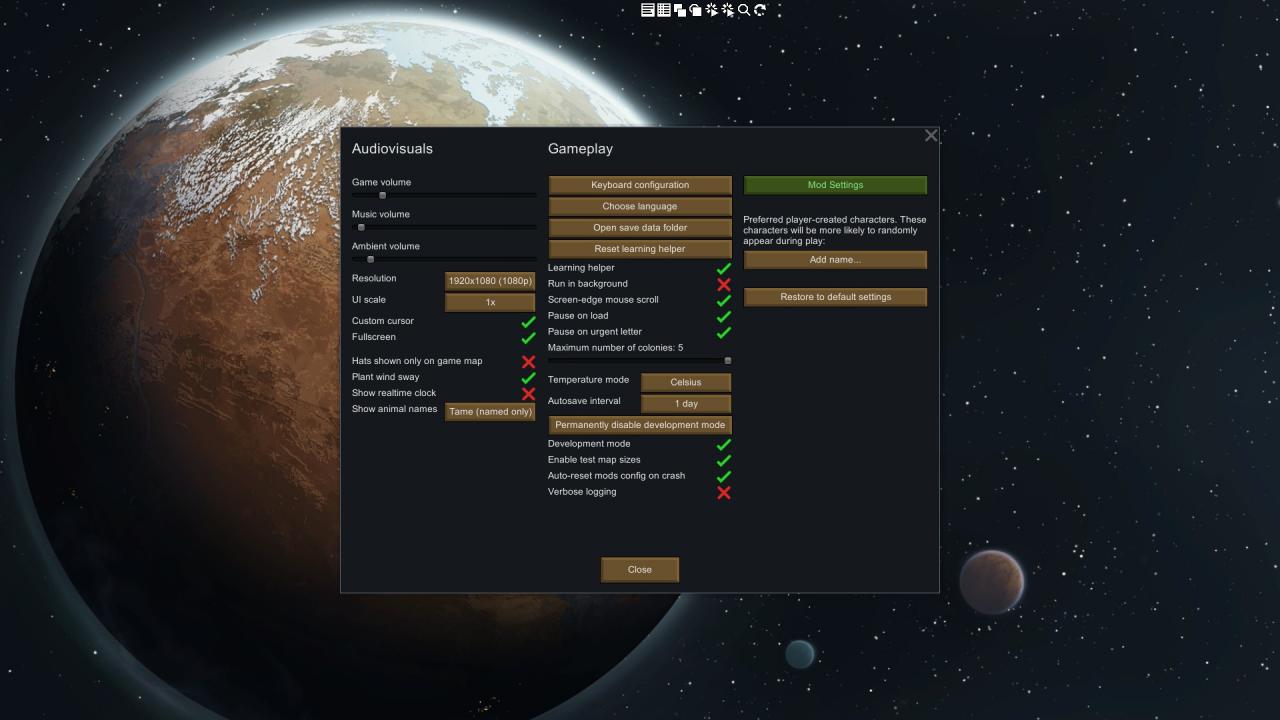
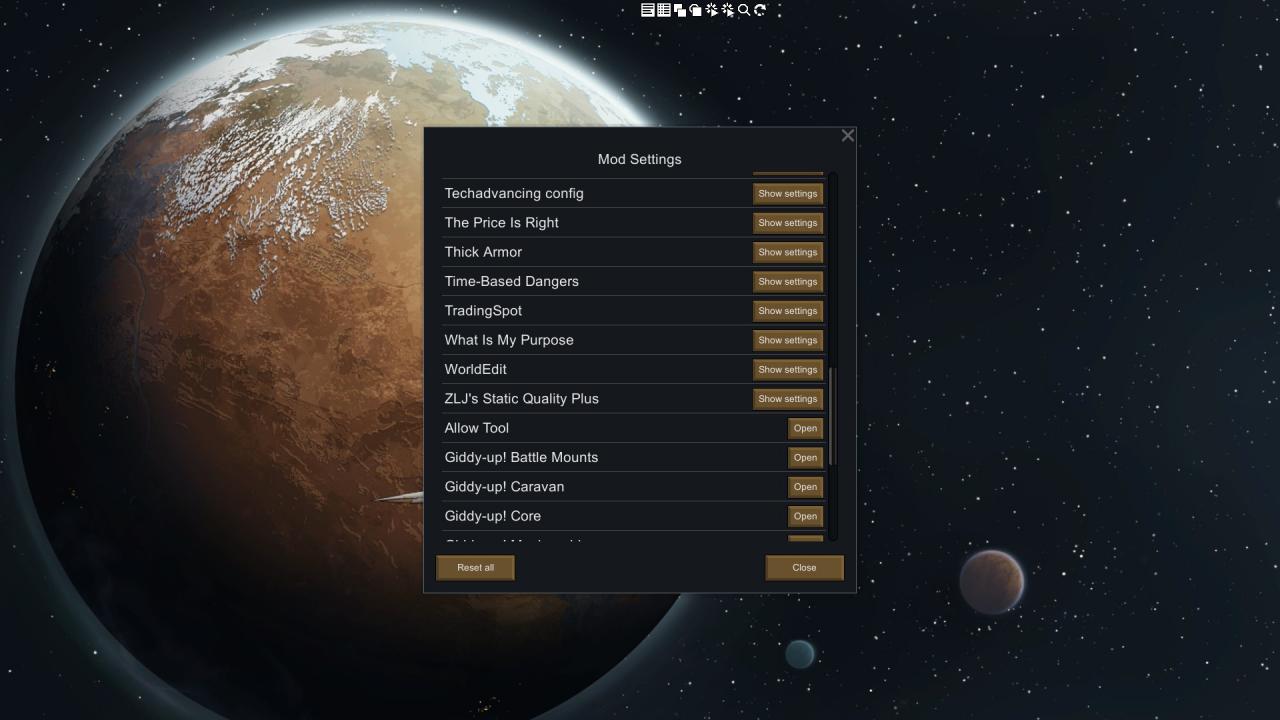
Once you’ve enabled DevMode,click the wonderfully green “Mod Settings” button. Once you’ve done that,look for WorldEdit,and click the “Show Settings” button.
The settings in here are rather important. Here’s a reference,and let’s go over this from top,to bottom.
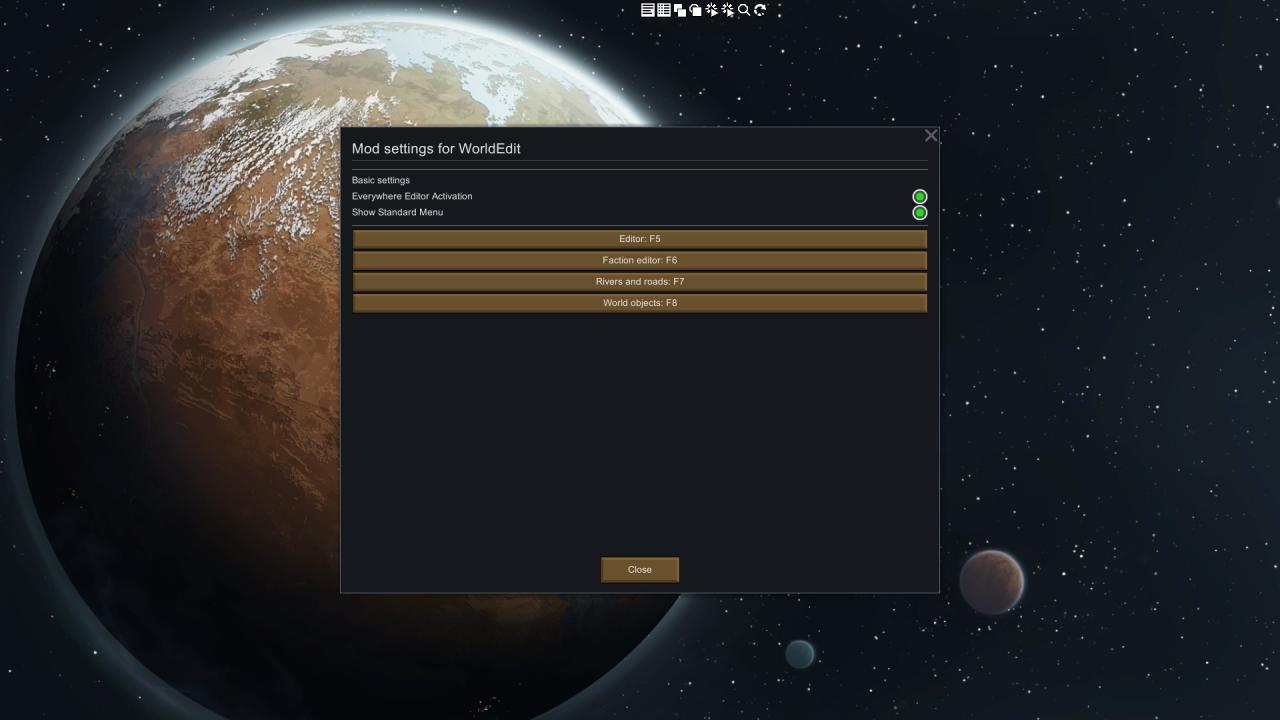
1) Everywhere Editor Activation: By activating this,as I have,you won’t have to activate WorldEdit’s features manually every time you generate a new planet.
2) Show Standard Menu: WorldEdit adds its own UI to the planetary map. However,FunkyShit recognized that this can cause issues,and allows us to use the game’s standard UI,for the most part,while using WorldEdit. If you find that WorldEdit’s UI is either not working,or not to your taste,turn this on.
The next four options are all hotkey settings. The first brings up your primary tools,the Editor Panel. After that is the Faction Editor,if you feel like grooming the planet’s politics ahead of time. Then there’s the Roads and Rivers Editor,which allows you to throw down roads and rivers in the world,to suit your needs and tastes. Finally,there’s the World Objects Editor,which allows you to edit those atlas labels on landmasses and bodies of water.
Now that you’ve been informed of these settings,set them up however you please,and let’s make ourselves a new planet to play with.
02 – Worldgen and Editor Panel Overview
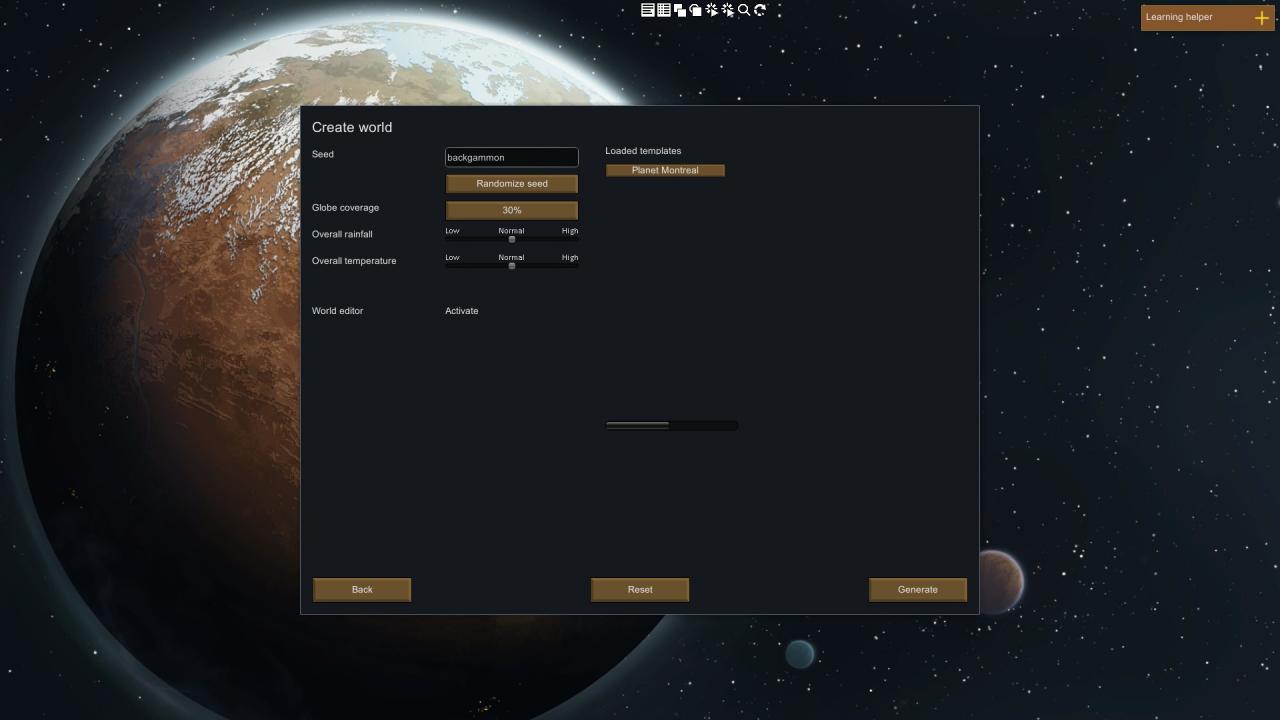
This is the first change you’ll feel. So,on the left,beneath our standard options,is the option to enable WorldEdit’s features for this world. In my game,I have it turned on at all times. If you don’t,then this’ll be a simple toggle button,which defaults to off. Turn it on if you wish to edit your planet. Now,to the right is the templates list. For you,this’ll be empty. For me,I only have the one for the sake of example. As I’ve said before,I cannot get the templates feature to work for love nor money,so I’ll leave it undocumented here. However,if you can get it to work,simply click the template’s name,then click the “Load Template” button that appears beneath the scroll bar.
Now,then. Let us generate our planet. Click the “Generate” button,and wait.
When your planet finishes generating,the Editor Panel will be brought up automatically. Here’s that it looks like; Let’s go over each button and section.
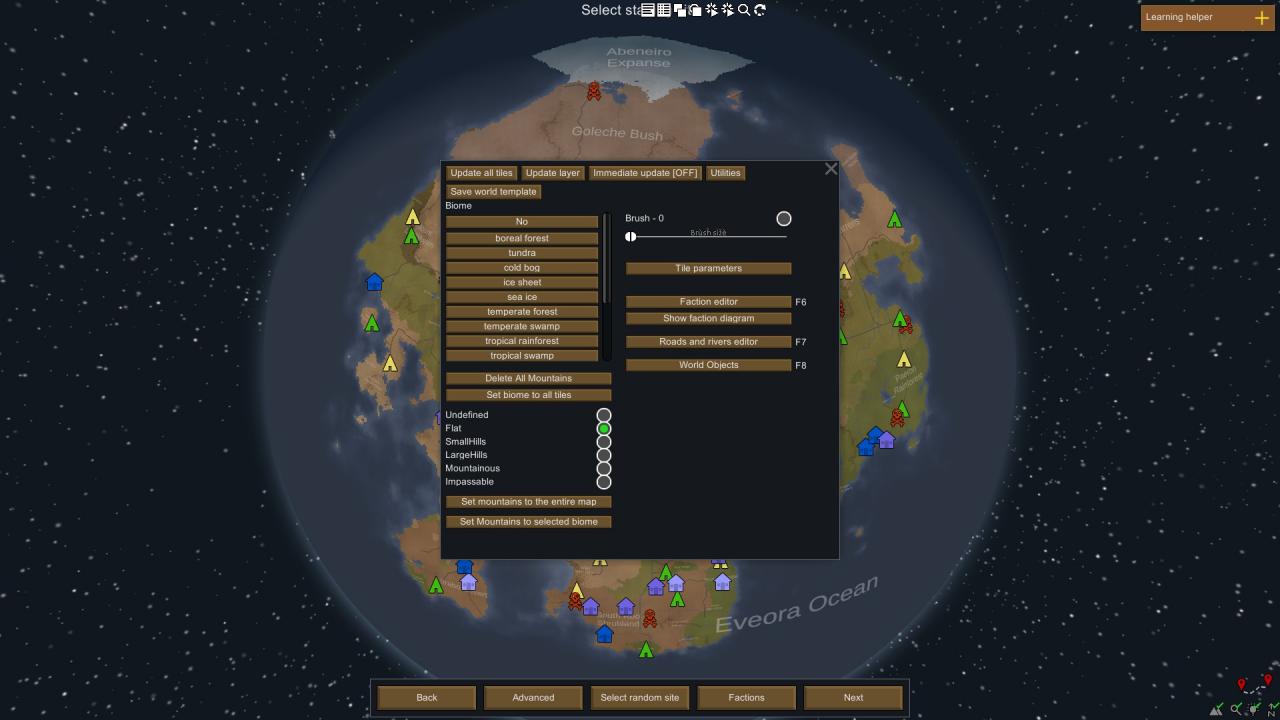
Across the top,there’s a series of buttons. “Update all tiles” does what it sounds like; When you click this button,every tile is saved and reloaded. This is the single most reliable way to commit any changes you make. However,this can take some time,depending on world size,mods loaded,and CPU speed.
The “Update layer” button summons a window with all of the worldgen layers. Clicking the appropriate button will update that layer,and that layer only. It’s an advanced feature,and should only be used if you know precisely what you are doing,and need to save some time.
The “Immediate Update” button is a toggle,and the word in the square brackets lets you know its current state. It defaults to off. By turning it on,any edits you make will be visually shown to you,though you should still use the “Update all tiles” button to make certain that your edits are committed.
The “Utilities” button brings up some advanced features that most users likely won’t use,and is safe to ignore under most circumstances.
The “Save world template” button does precisely as it says. It brings up a new window where you name and describe your template,and then save it. These templates are saved in the “AppData/RoamingNow/Ludeon Studios/RimWorld by Ludeon Studios/Saves/WorldTemplates” directory. AppData is a hidden directory by default,and each user on your computer has a different AppData folder,so you might need to do some sleuthing to actually find the thing. WorldEdit lacks a means to delete world templates in-game,so knowing this directory is important,should you ever want to delete templates.
Now,let’s go down the left side of the Editor Panel.
The first is a list of biomes available in the game. If you have mods that add biomes (Rainbeau’s Realistic Planets support is still in the works),then they’ll be present here. Do yourself a favour,and click “No” right now. What this will do is ensure that,if you misclick anywhere,the biome won’t be changed.
The next button is “Delete all mountains,”and it does exactly as it says; It knocks down all the mountains on the planet.
The “Set biome to all tiles” button changes every tile on the planet to match the biome you have selected,including bodies of water.
Next is a list of mountain types. Again,do yourself a favour,and click “Undefined.” If you misclick,you own’t accidentally make a mountain somewhere,or knock one down.
The “Set mountains to entire map” button does precisely what it says,and drops a mountain of the specified size on every single tile on the map,including the water.
The “Set mountains to selected biome” button takes what you have selected for mountains and biomes,and applies those mountains to every tile in every such biome that exists on the planet. For example,if you have Extreme Desert and Impassable selected,then click this button,every single Extreme Desert tile on the planet will gain an Impassable Mountain.
On the right side of the panel,we have a brush selector. By default,you only edit one tile at a time. If you want to,or need to,edit multiple tiles at once,then this is for you; Click the button to turn on brush mode,then select the size with the slider. Treat each tile like a pixel,and you’ll go far.
The “Tile parameters” button pulls up a new window,which gives you a few nifty options to play with for that tile. We’ll go over them in a different section,as most users will make use of these functions,and this section’s getting long.
The “Faction editor” button brings up a new window,where you can edit just about everything there is to edit about factions,from relations,to townships,to their leaders,right down to their icon colours. The Faction Editor will get its own section.
The “Show faction diagram” button is simply the vanilla game’s Factions screen. All it does is show you,at a glance,the planetary political climate… Such as it is.
The “Roads and rivers editor” button brings up,you guessed it,another window! In this window,you can create and remove rivers and roads. This is a deceptively powerful tool that can be difficult to use,if you don’t know what you’re looking for. This’ll get its own section to cover it more deeply.
Finally,the “World Objects” button brings up a window that allows you to edit what the game calls World Features,or World Objects. They are,more or less,named regions on the map,great for adding flavour to your edits. This will be getting its own section.
With the overview done,let’s start looking at the windows more closely.
03 – Tile Parameters In-Depth
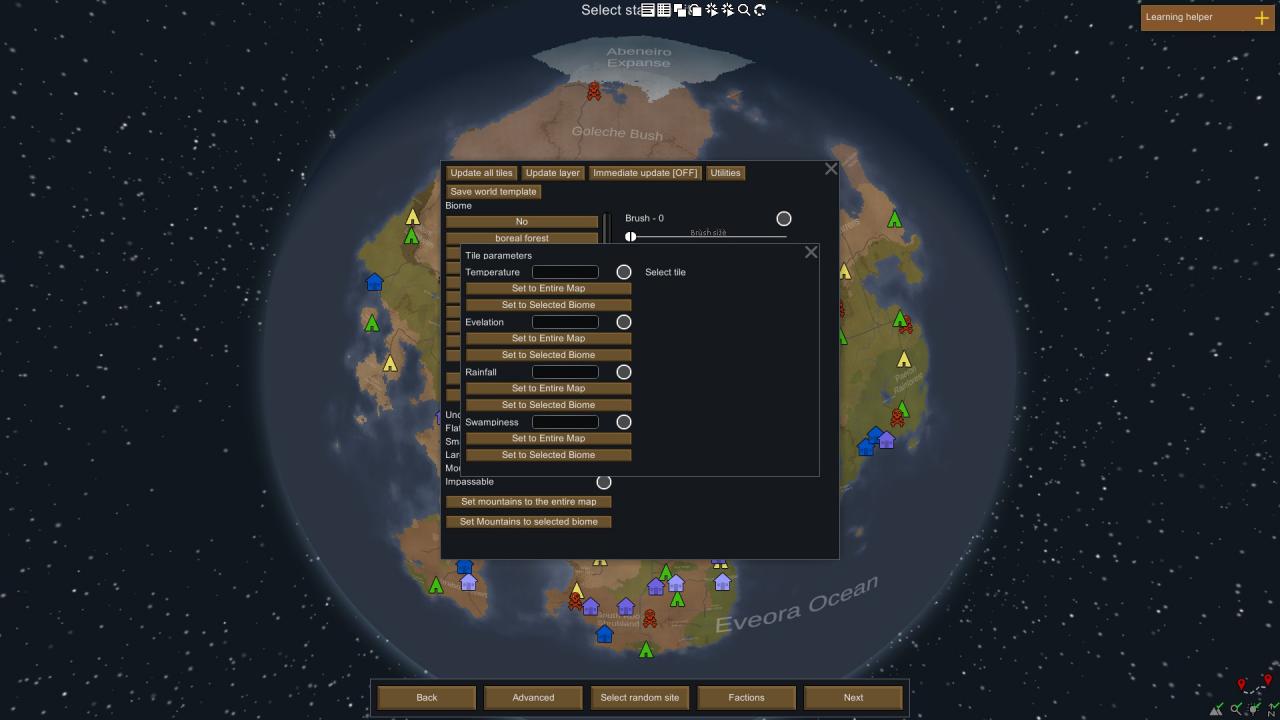
Let’s go from top to bottom.
-Temperature determines the average annual temperature for the tile. If you want to alter your growing season,this is the thing to edit.
-Elevation determines your distance from sea level,which itself is 0. Negative values put you under sea level,positive values above. For the most part,this has no real impact on your game. However,for lakes and oceans to work,they must be below sea level. It’s also a good level to put the adjacent tiles just above sea level.
-Rainfall determines the average annual rainfall the tile gets, in millimetres. In gameplay,this determines how frequently it rains. Note that,if wildfires rage for long enough,the game will force a rain shower to put it out.
-Swampiness is the one stat that the game doesn’t show you. This stat determines the relative amount of still bodies of water that exist on the tile. Things like,well… Swamps,as well as puddles and ponds. Most Temperate Forest tiles have this value well below 1,so I’m going to go out on a limb here,and assume that 1 will turn the entire tile into a monstrous bog.
All of these stats have the typical global effect buttons,as well.
Now,if you have a tile selected,the right side of the panel reveals some more information; A list of available rocks on the tile,which can be added to or removed from at will,alongside the option to update the list of rocks whenever you click on the tile,as well as the option to toggle caves,though that would only really work if there’s a mountain of some description on the tile.
This panel can be used to force some pretty major changes to the tile,all told.
04 – Faction Editor In-Depth
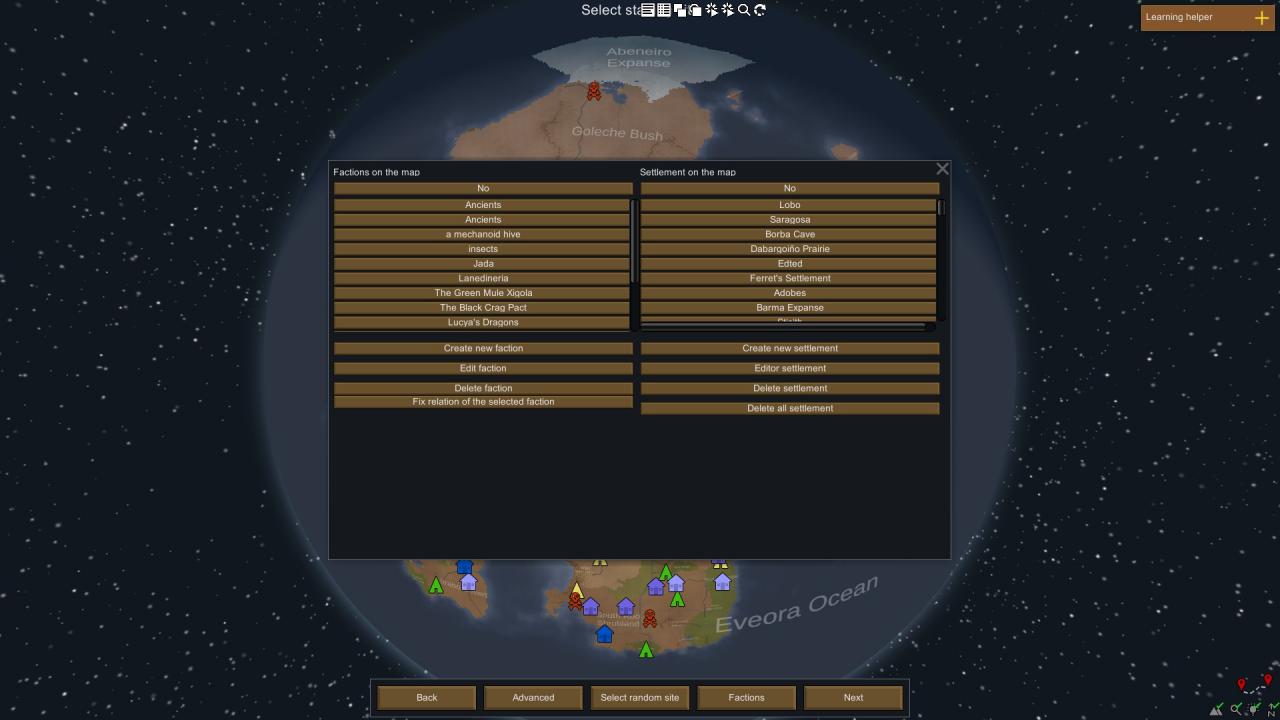
On the left side,we have factions. On the right,we have townships. The list of factions include “hidden” factions that you can’t have traditional relations with,such as the Ancients,and mechanoid hives. Clicking a faction button targets it for the buttons below. Your faction will be on this list,as well,typically at the bottom,listed as “New Arrivals.”
The buttons are as follows,
-The “Create new faction” button is exactly what the tin says; It lets you cook up a new faction for the planet. You’ll have to fill out the specifics,yourself.
-The “Edit faction” button lets you,what else,edit the currently selected faction’s specifics. It is here where you can alter the faction’s relationships with others,their leadership,and the icon’s colour.
-The “Delete faction” button consigns the faction to oblivion,removing them from the planet. Serves them right. Probably.
-The “Fix relation of the selected faction” does… I’m not rightly sure. I presume it returns the relationships to defaults,but I don’t know.
On the townships side of the screen,each button on the list on the top half of the panel is a town. You click a button to target that town,and use the buttons below to modify it. And these buttons are…
-The “Create new settlement” button is precisely what it sounds like. Click the button,and fill out the fields to make a brand new settlement,owned by the faction of your choice.
-The “Editor settlement” button allows you to edit the currently selected settlement. Don’t mind the typo; English isn’t FunkyShit’s first language.
-The “Delete settlement” button prompts the ground to open up and swallow the settlement whole without a trace. Probably. What matters is that the settlement might as well have never existed to begin with.
-The “Delete all settlement” button is the planet glasser. Every single township on the planet is wiped. No towns. Not settlements. No colonies. No colonies,that is,but your own.
05 – Roads and Rivers Editor In-Depth
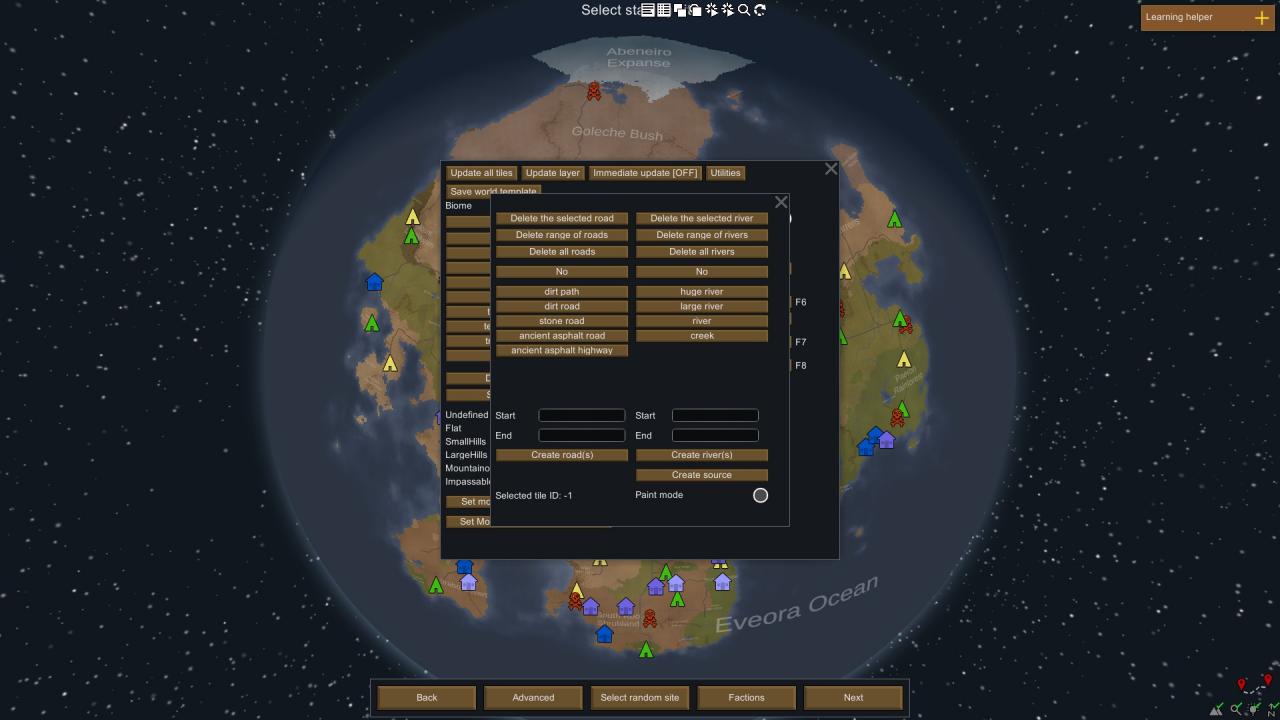
You might be noticing a theme; The panel’s quite neatly divided,this time between rivers and roads,and the controls for both. So,a quick rundown.
-The left half is dedicated to roads. The right half is dedicated to rivers.
-The top half is dedicated to selecting what you want to put down. The bottom half is dedicated to the controls for these elements.
-Both rivers and roads have global controls for deletion.
Now,let’s get into the meat of this; Actually putting down a road or a river. It’s a little more complicated than select-and-click. Hope you’ve turned DevMode on,because it’ll help plenty.
If you click on any tile on the map,and open the Terrain tab, in this information,you’ll find the game’d ID for that tile. It’s this value that the Roads and Rivers Editor needs in order to draw its roads and rivers.
Armed with this information,you get the tile ID for the tiles on either end of your planned river or road,select the kind of river or road you want,then punch in these values in the “Start” and “End” text boxes,then click “Create road” or “Create river”. The game will then draw the appropriate feature between these two points. However,it likely won’t be a straight line. If you want precise control over where the road or river goes,you can either get a long list of tile IDs,or use Paint Mode. In Paint Mode,you can simply click on the tiles to make your rivers and roads.
There is also a “Create source” button on the river side of the panel; This is used to create a water source for your river.
Now,the Roads and Rivers Editor does show you the ID of the currently selected tile,allowing you to skip having to open the Terrain tab.
06 – World Features Editor In-Depth
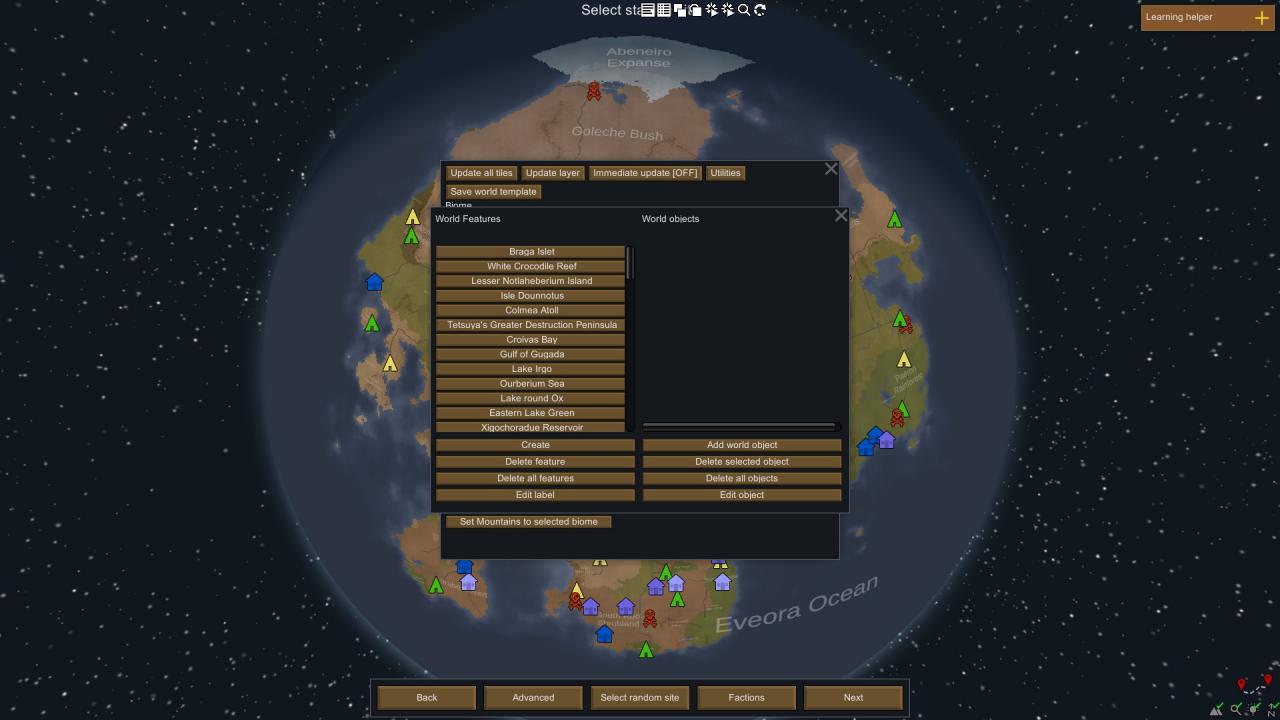
Not exactly a complicated affair. The left hand side shows us the existing world features,the right hand side shows us the world objects. For me,that second list is empty,so it strikes me as redundant. Who knows; Maybe it is useful,and I just don’t know it. Beneath these halves are buttons,glorious buttons. The buttons enable creation,deletion,and editing of their respective things. Rather simple,with no real gameplay impact,so I won’t spend much time on it.
07 – Applied Editing
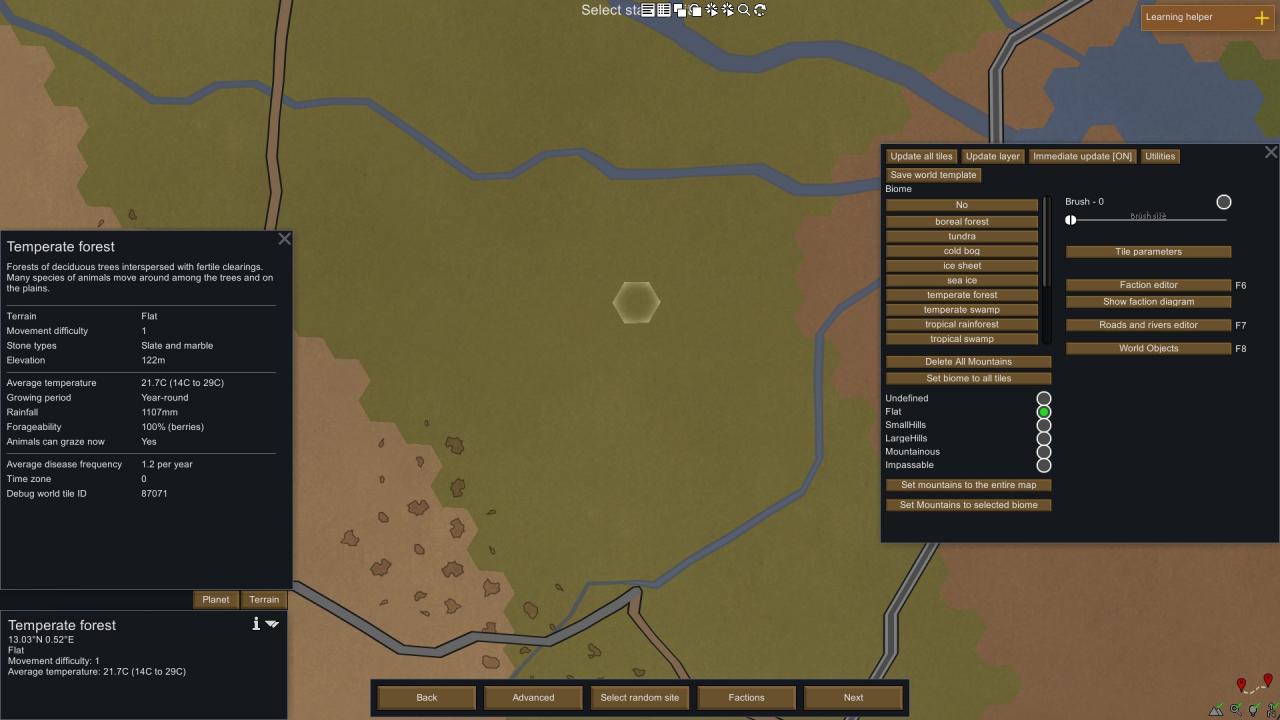
This one.
Now,a Temperate Forest is a nice biome. A safe biome. Great for agriculture. Under most circumstances,the environment itself isn’t actively hostile.
Let us change that.
So,select the tile you want to alter,then select a new biome from the Editor Panel. Like,say…
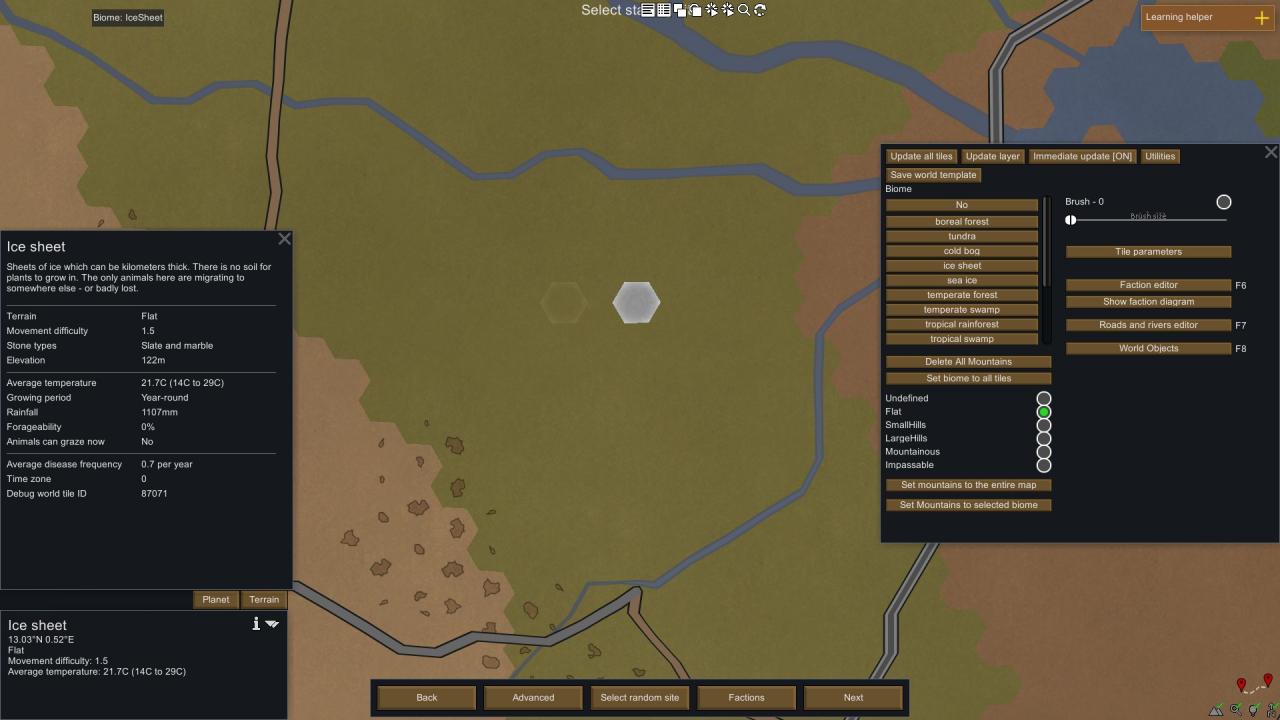
An Ice Sheet. Much better. Note that by changing the biome to an Ice Sheet,we haven’t changed the average temperature or rainfall,meaning that we still have a year-round growing season,which means temperatures are permanently above the freezing point of water. On an ice sheet.
What I’m getting at here,is that changing a biome changes nothing more than the ground type,the flora (Plants),and fauna (Animals).
Now,I’m a man of more sane sensibilities,so let’s change that back to a Temperate Forest. But,you know what we need? A defensible position! Let’s bring a touch of Dwarf Fortress to the Rim,and live under a mountain. Just like before,let’s select our target tile,then select the mountain type we want. In this case,Mountainous.
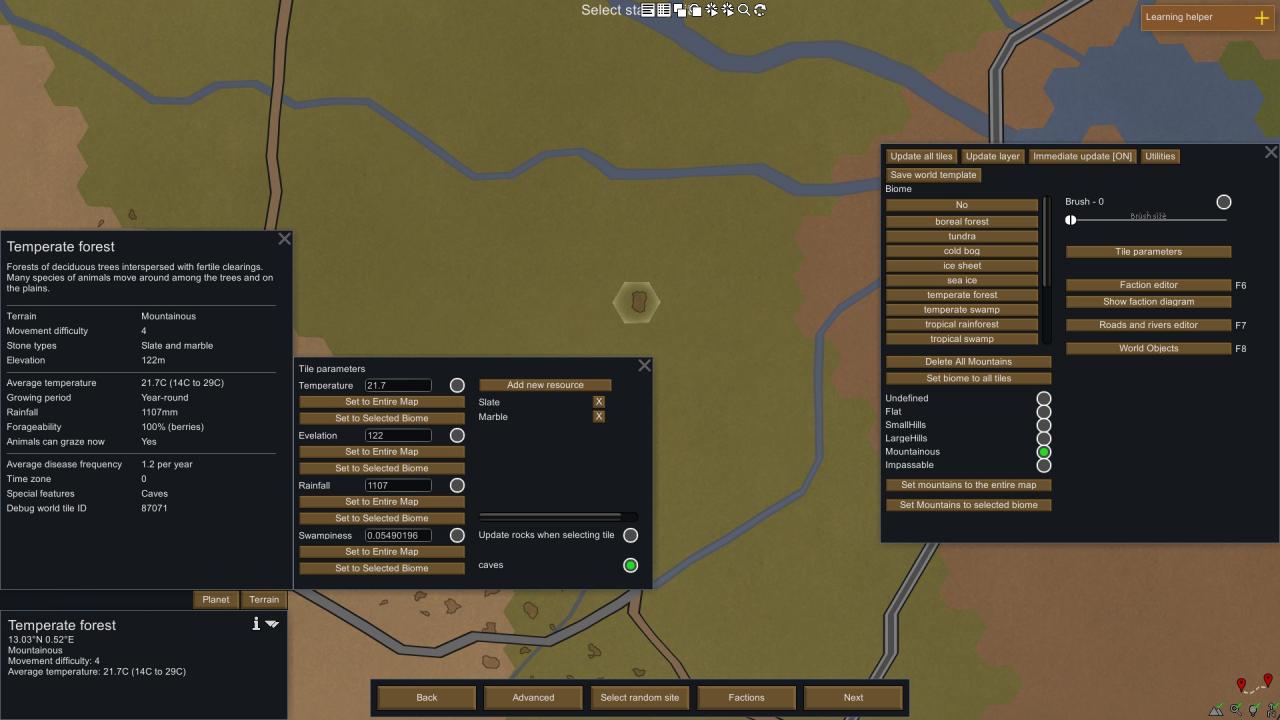
Now,something happened,here. Originally,this tile was a plain. Now,when we slapped on a mountain,the game decided,on its own,to give it some caves. Pretty nifty,but I don’t like caves. They’re nothing but security risks.
But,you know what? I think an Ice Sheet’s not as insane as I initially thought. Ancient alien terraformer devices! Yeah,let’s go with that! But,we need a road! So,let’s install one. So,let’s get the tile ID of our little bizarre fortress. 87079? Alright. Stick a pin in that,and let’s get the tile ID of where that stone road meets the dirt road,to the South. 13391? Sweet! Let’s open the Roads and Rivers Editor…
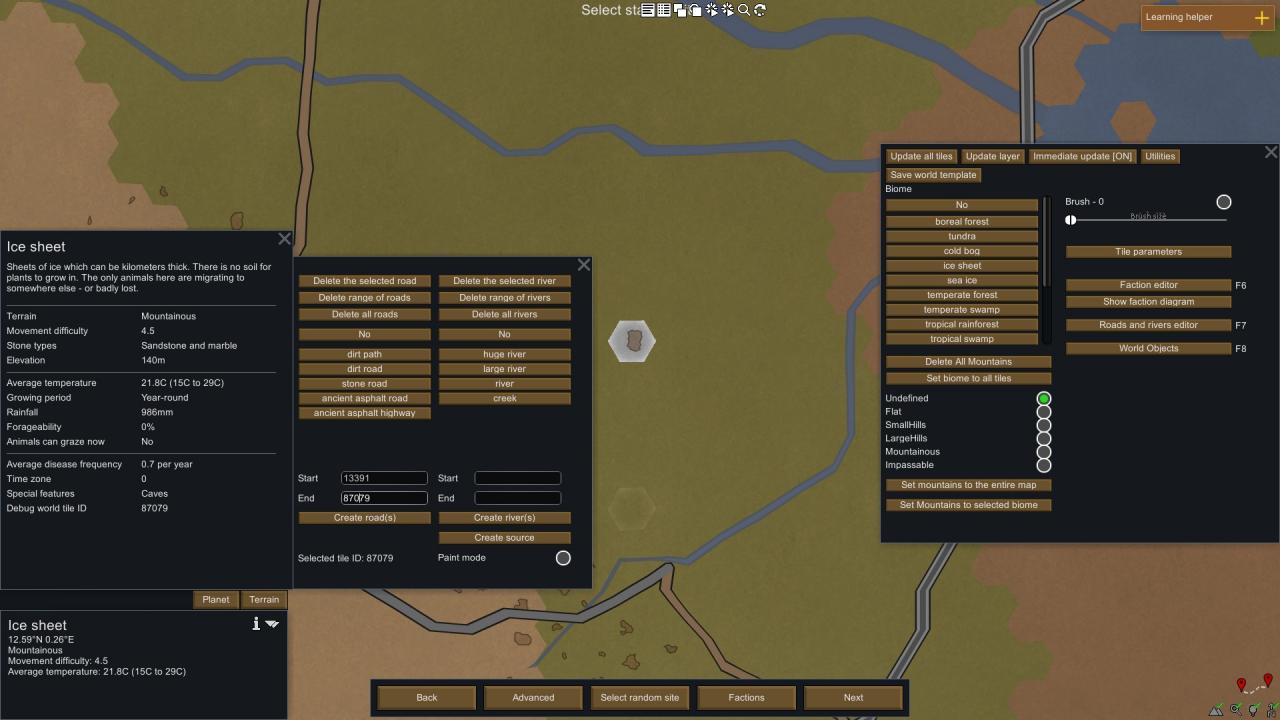
…And plug those values into their appropriate boxes in the roads side of the Roads and Rivers Editor. We select our desired road; I think a stone road will do quite nicely. Push the create road button…
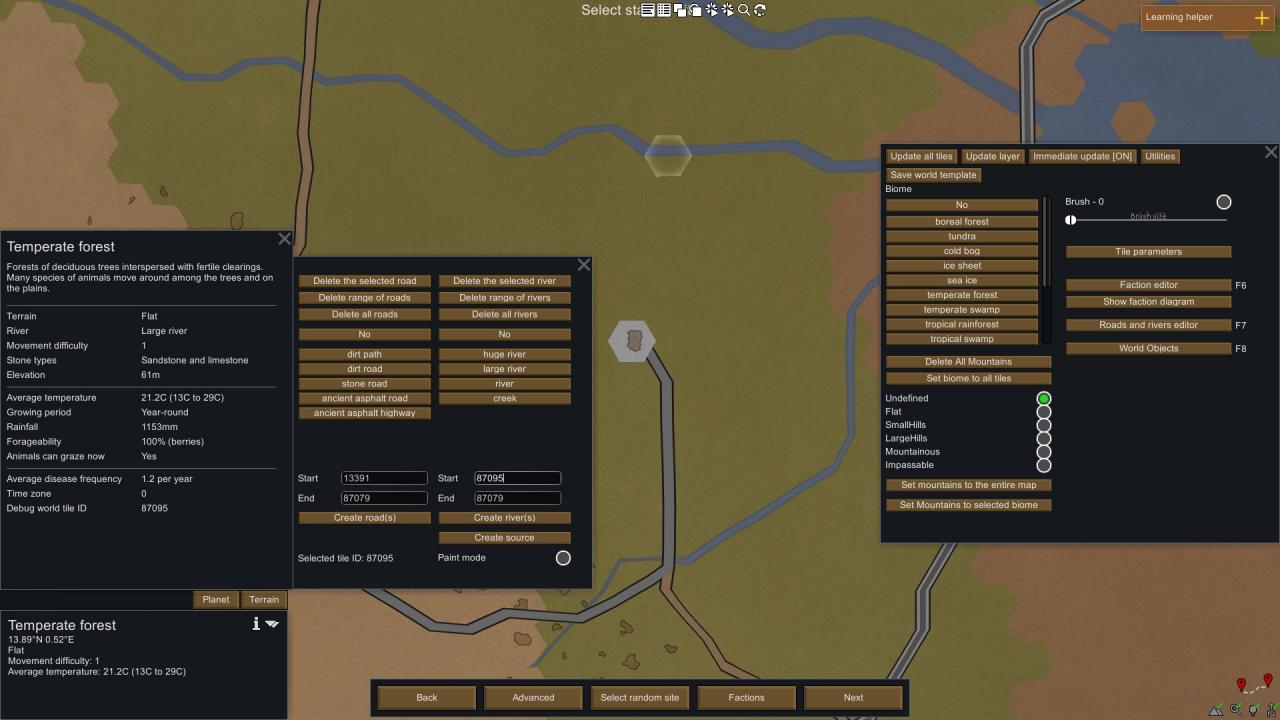
And bam! We’re on the grid! But! We need flowing water! For… Reasons. Water wheels are a thing,right? And would you look at that,there’s a large river flowing to the North. Let’s pluck up that tile’s ID,and plug in that alongside our mountain’s tile ID in the river side,select Large River,and push our magic button…
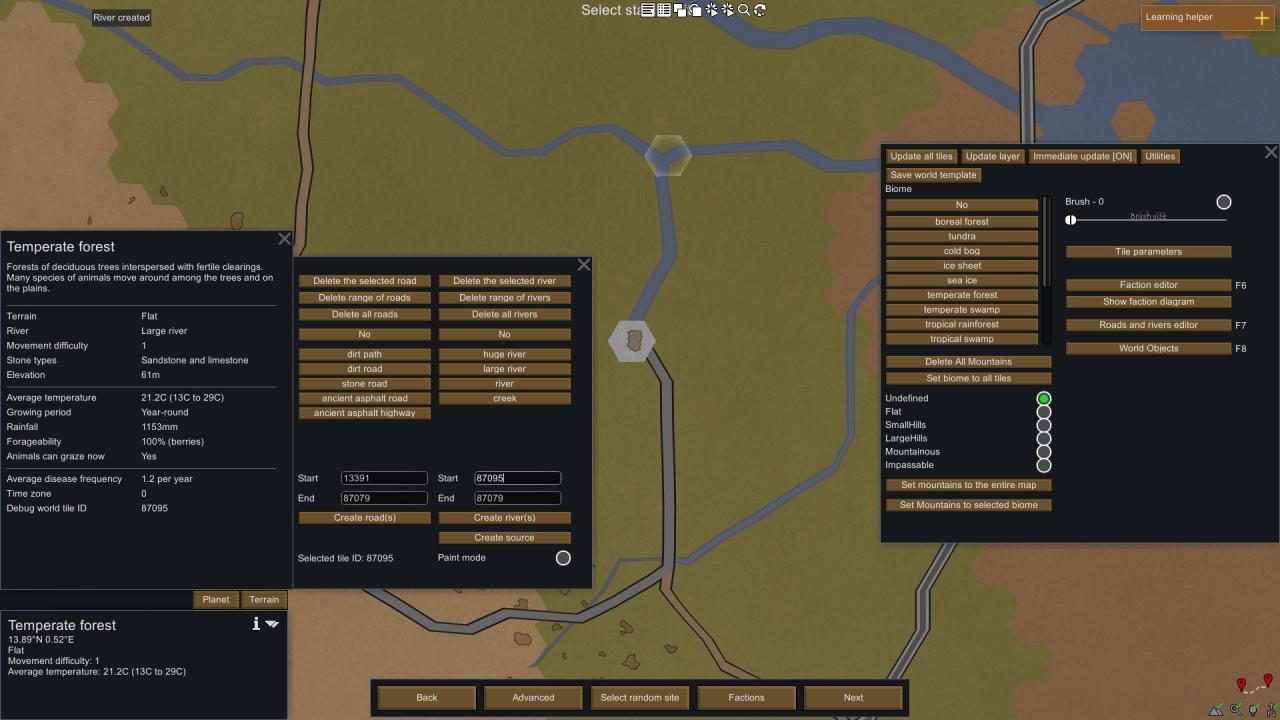
And just like that,we’ve dug a canal across countless kilometres of terrain,diverting a river’s flow towards some forsaken ice sheet that defies all logical sense!
Editing terrain is easily one of the most involved aspects of this mod. Editing factions is,comparatively,insultingly easy,and editing world features is insultingly easy,so I won’t go over those.
