Assemble with Care is a simple point and click game with 13 levels, in which you are tasked to repair different devices.
Notes:


Estimated 100% time: 1h if you skip the story (but it’s cute so read it!)
1. Arrival
- Flip the pages and UNPACK.
- Rotate the briefcase and click on the clasps to open it.
- Click on the items and unpack by placing the items outside the suitcase.
- Click CONTINUE.
 Welcome to Bellariva
Complete Level 1
2. Lullaby
- Flip the pages, and click RESTORE.
- Pick up the cassette player and put it in the middle.
- Flip it to reveal a battery cover.
- Use the screwdriver to open it.
- Take out the cover and remove the batteries from inside.
- Place new batteries inside.
- Close the cover, put the screw inside and screw it in.
- Now take the audio cassette and place it in the middle.
- Use the pencil on it.
- Take the cassete-player again and click on the eject button.
- Now place the cassette inside.
- Close it and press play.
- Flip the pages and press CONTINUE to finish the level.
 Goodnight, My Darling
Complete Level 2
3. Shattered
- Flip the pages and click RESTORE.
- Start by putting the base in the middle and flipping it.
- Pick up the glue and apply it on the base.
- Now place the large foot on top.
- Apply more glue, and put the other foot piece.
- Now pickup the piece on the left (Hand with a book), and put it on top.
- Apply more glue, and place the torso on the statue.
- Apply more glue on the missing hand part, and on top.
- Now put the hand, and head on the statue.
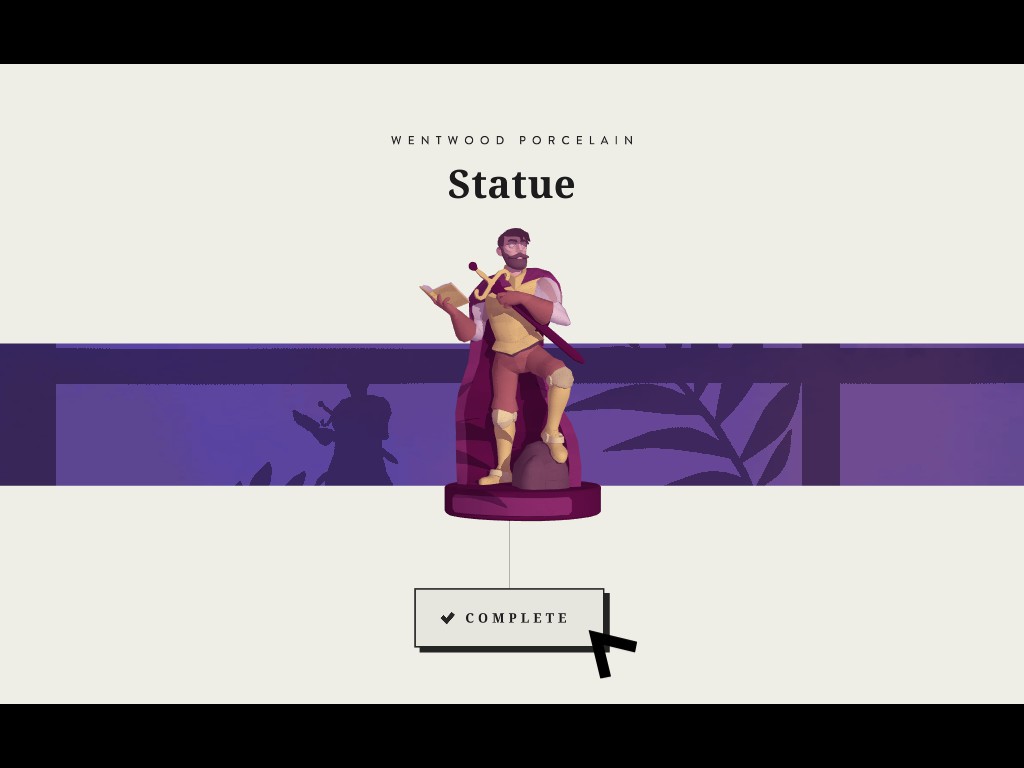
- Flip the pages and click CONTINUE to finish the level.
 Statue of Limitations
Complete Level 3
4. Disconnected
- Flip the pages and click RESTORE.
- Pick up the yellow phone, place it in the middle and flip it.
- Use a screw driver to unscrew the 4 screws.
- Rotate the phone so that the yellow part is on top, and put it on the table.
- Unscrew the cover near the number dials with the screwdriver.
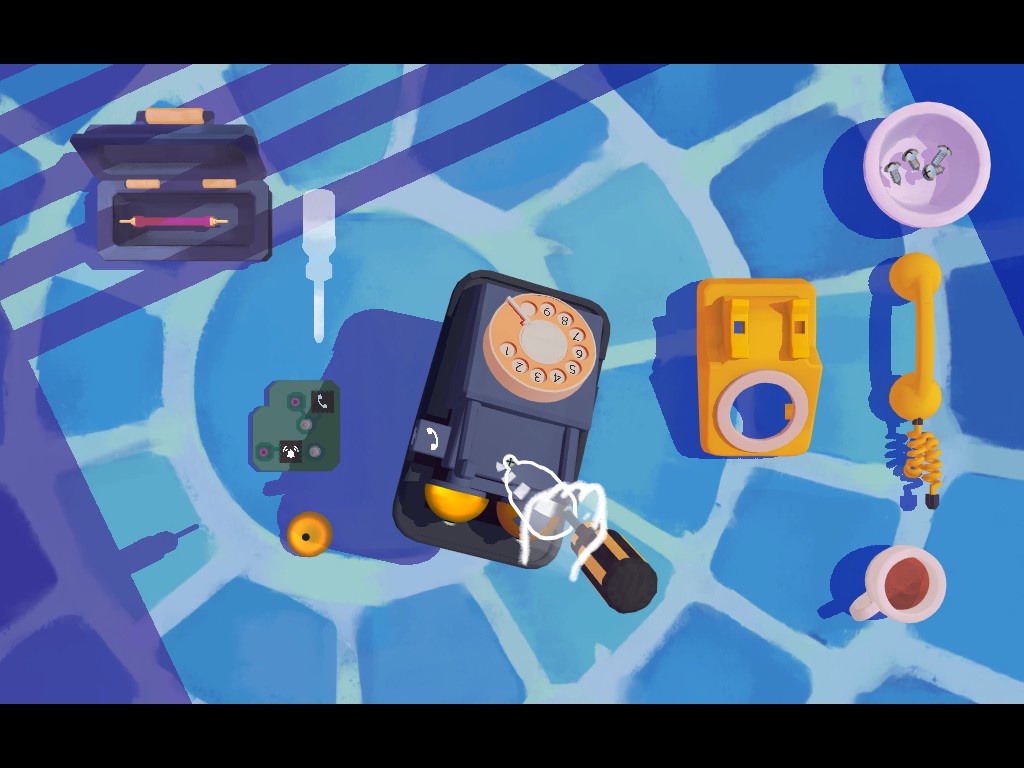
- Place the number dial part on the table.
- Now drag the pink cable and put it in the toolbox on the top left.
- Remove the broken green piece from inside, and replace it with a new one.
- Connect the pink cables with the correct slots ( Alarm icon to alarm icon, and phone icon to phone icon)
- Flip the phone, and you will see one of the bells is broken.
- Remove it with the screwdriver, and replace it with a new one.
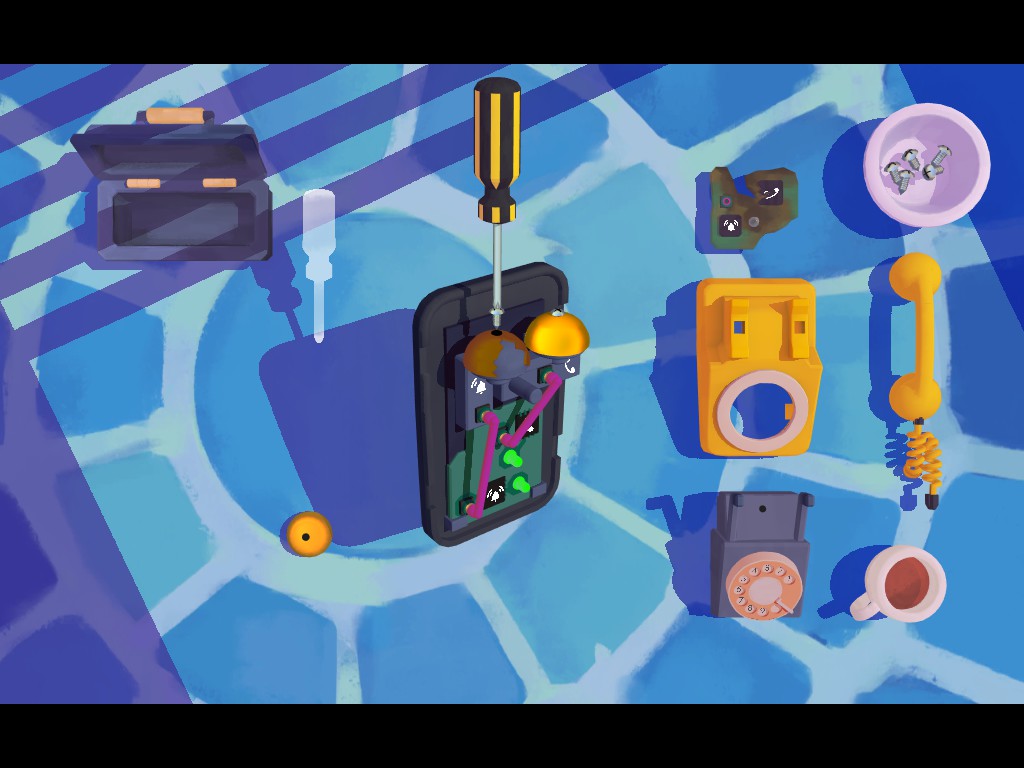
- Place a screw and tighten it.
- Put the dial part and use a screw on top to tighten it.
- Place the yellow phone shell and place 4 screws on the back.
- Flip the pages and click CONTINUE to finish the level.

Complete Level 4
5. In Focus
- Flip the pages and click RESTORE.
- Take the camera and place it in the middle.
- Use the screwdriver and unscrew the 4 screws on the outer shell.
- Now take out all the pieces you can from the camera.
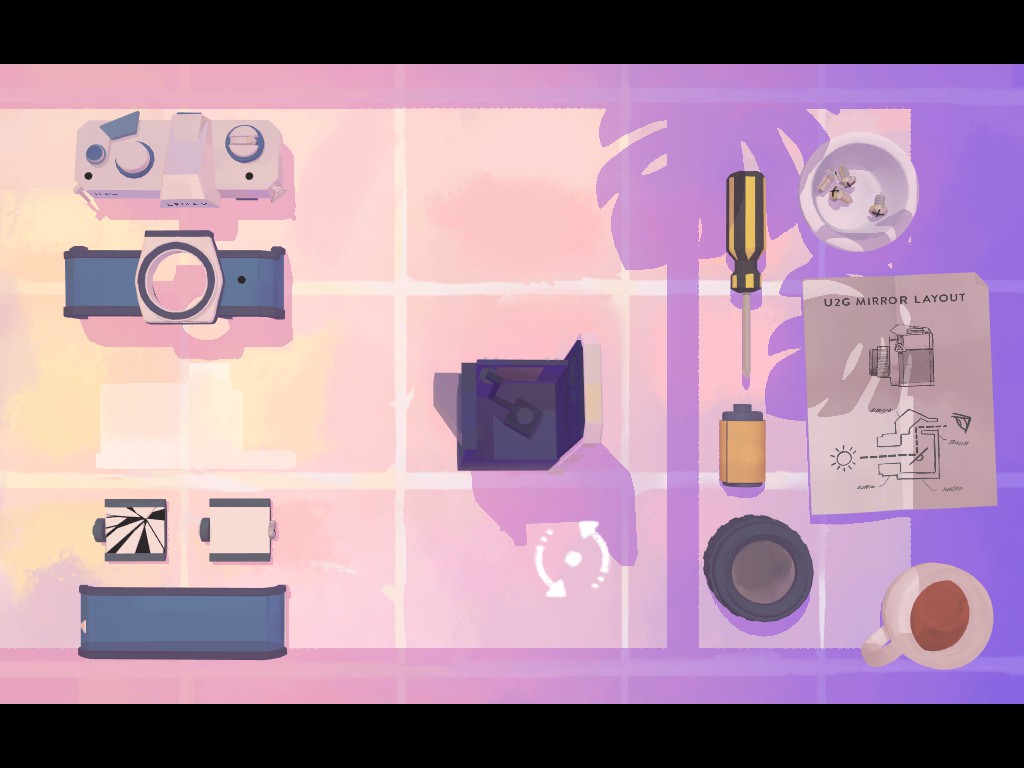
- Put the new mirror inside the camera.
- Adjust the mirror with a screwdriver like in the screenshot:
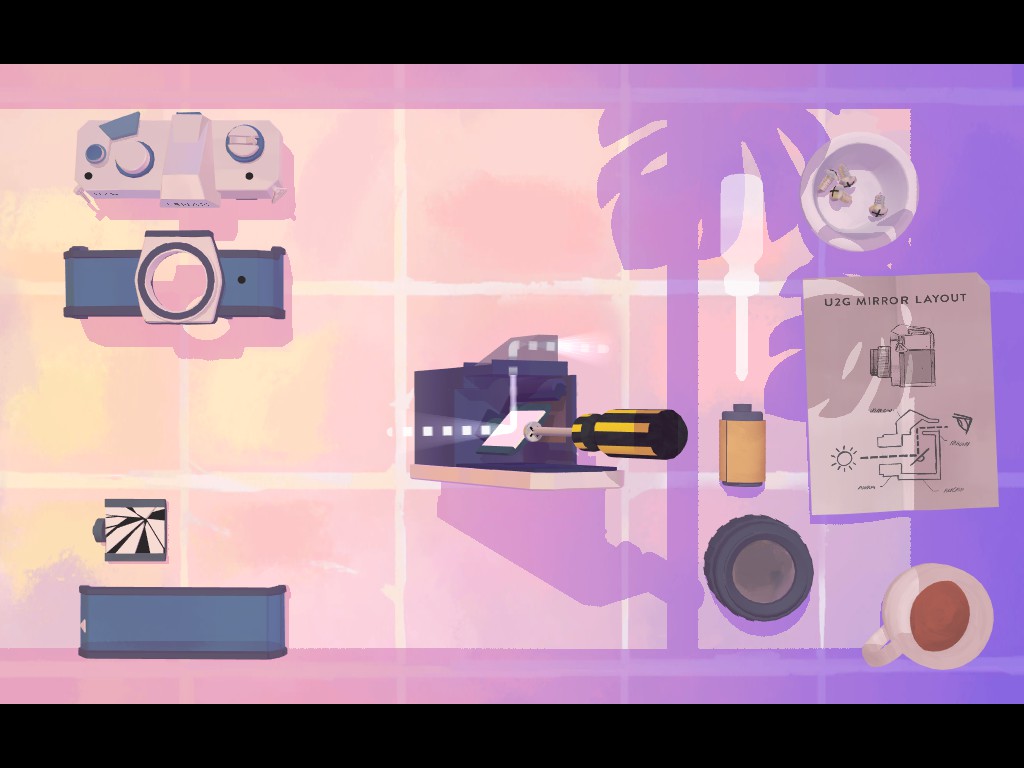
- Put the yellow film near the mirror.
- Put all the pieces together on the camera, and lastly tighten all 4 screws.
- Flip the pages and click CONTINUE to finish the level.
 Life Through a Lens
Complete Level 5
6. In The Dark
- Flip through the pages and click ASSEMBLE.
- Pick up the large part; put it in the middle and flip it.
- Unscrew the 2 screws.
- Take out the cover and put it on the table.
- Place some glue on the top right part. and put the white part on top.
- Now attach the cables like in the screenshot so the lights will be green.
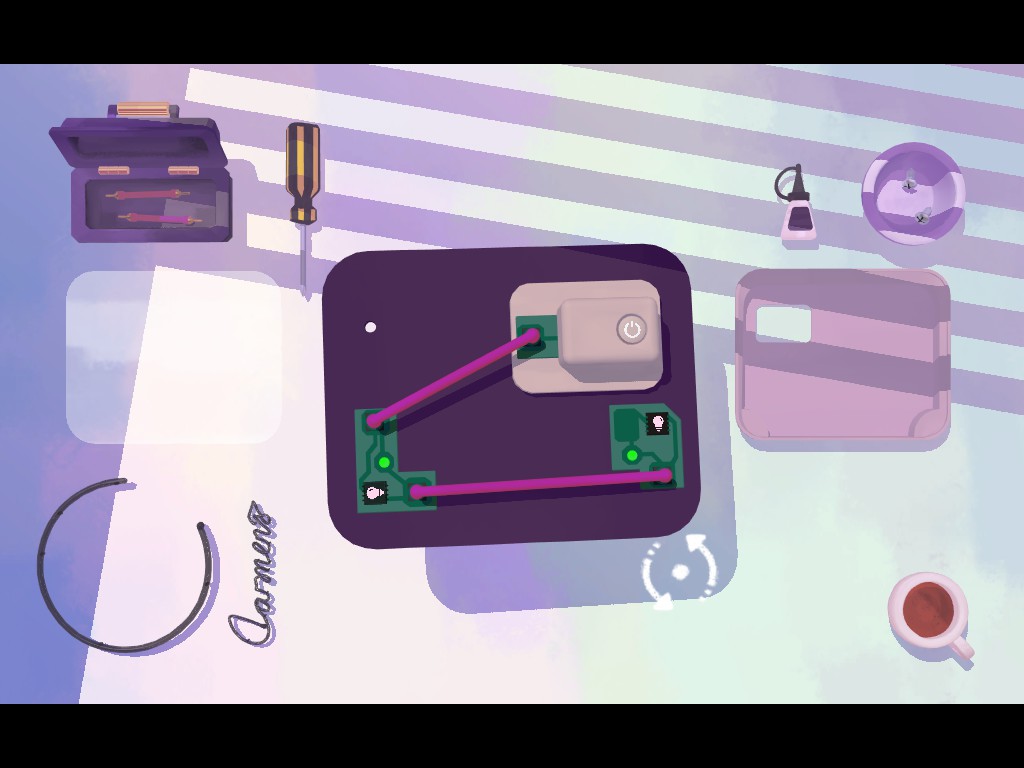
- Flip the device and place the circle, and the letters on it.
- Flip the device again and press on the power button.
- You now should get another green part.
- Flip the device, and put some glue in the middle part.
- Attach the new green part, and put a cable like in the screenshot:
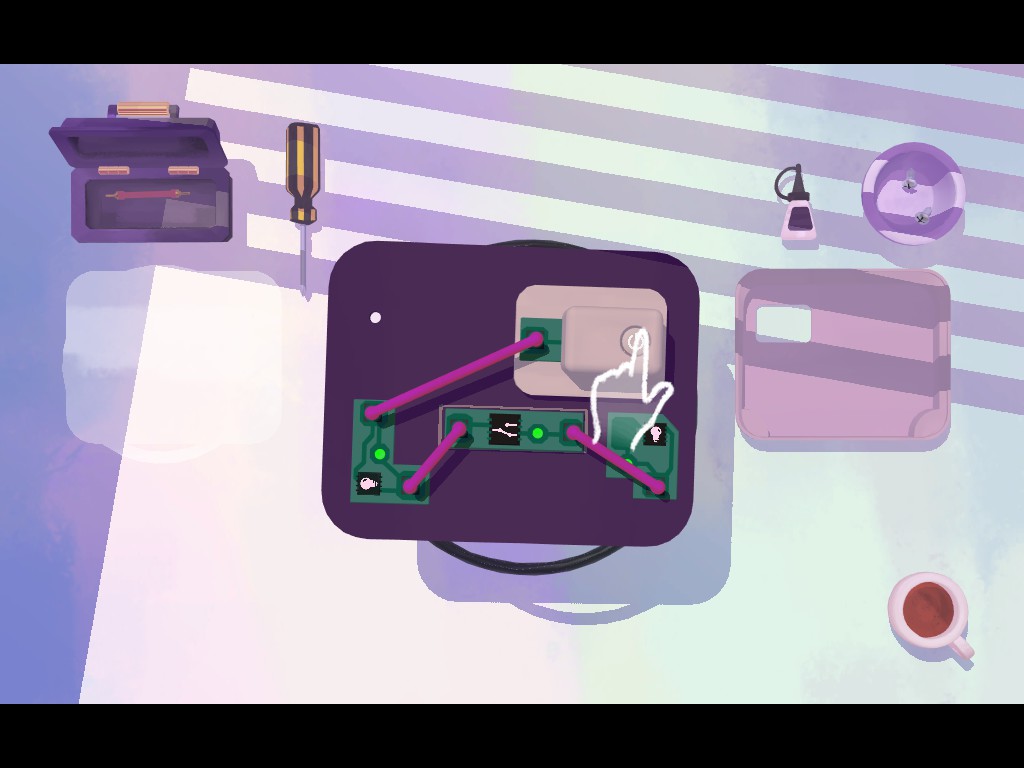
- Press the power button and you will get another part.
- Pickup the device and flip it.
- Apply some glue and attack the new green part.
- Attach the cables like in the screenshot:
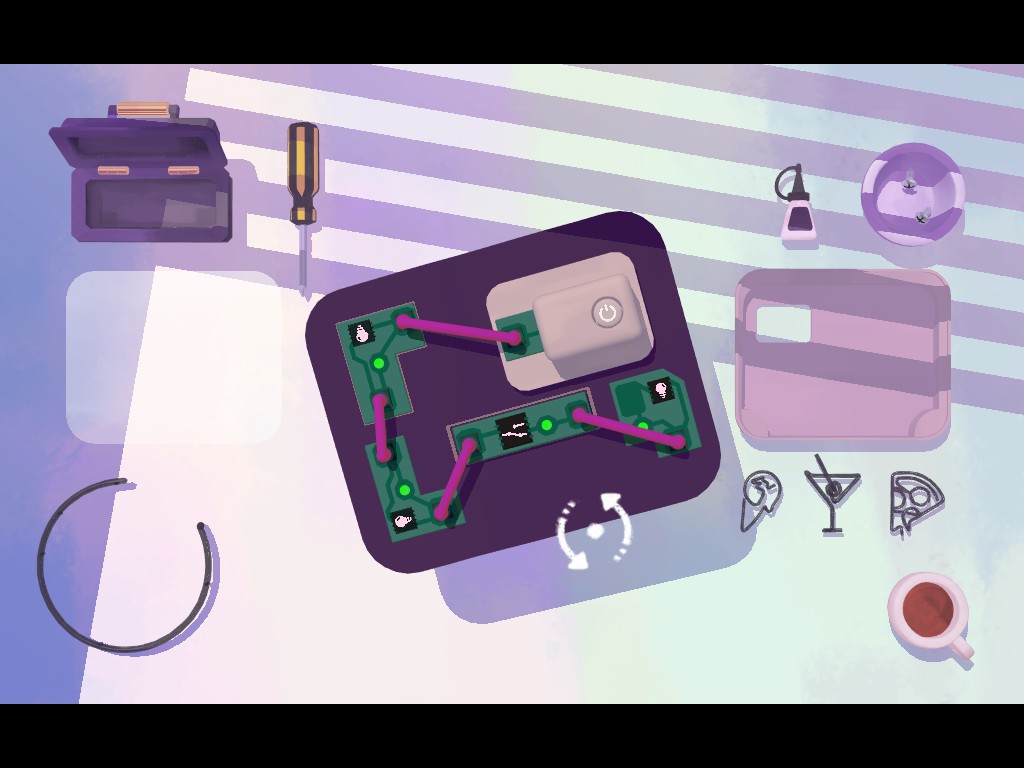
- Flip the device and put any of the 3 neon lights on the empty slot.
- Put the cover and tighten the 2 screws.
- Now press the power button.
- Flip through the pages and click CONTINUE to finish the level.
 Everything is Illuminated
Complete Level 6
7. Playing Up
- Flip through the pages and click RESTORE.
- Pick up the handheld device and take out the battery cover and the battery.
- Remove all the covers you can.
- Remove the cables, and place them in the toolbox.
- Remove the broken screen, and replace it with a new one (at the back)
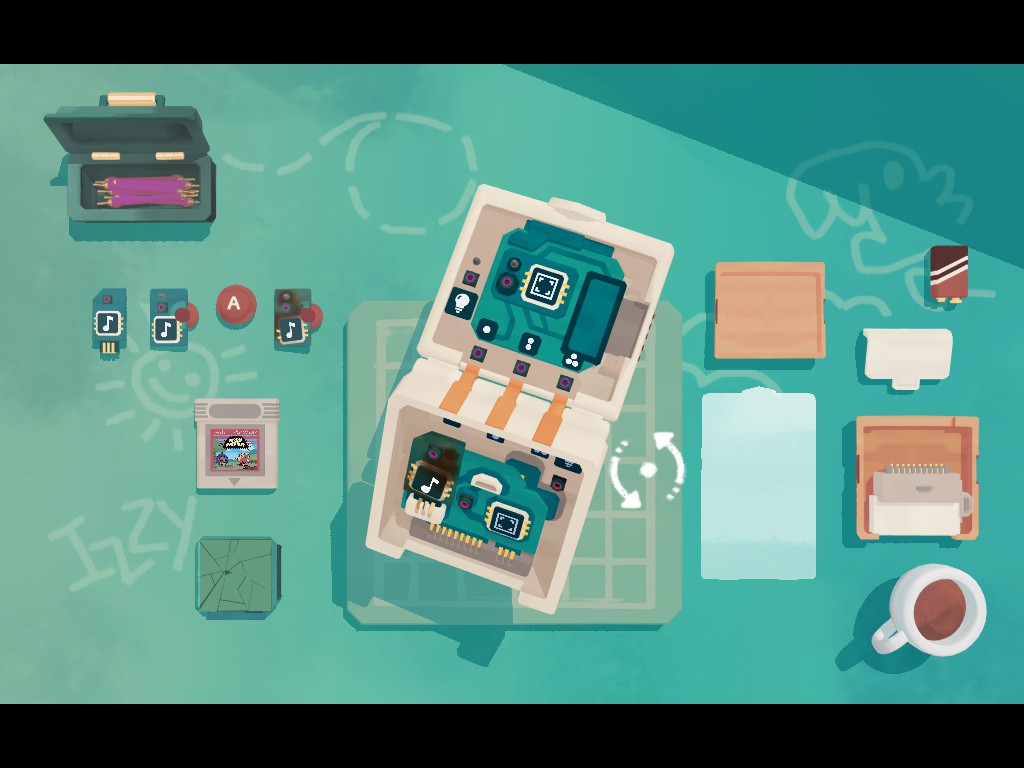
- Place a sound chip on the screen.
- Remove the bottom part, and take out the broken A button.
- Replace it with a new one.
- Put the lower part pack on the device, and remove the broken rusty sound part.
- Replace it with a new one.
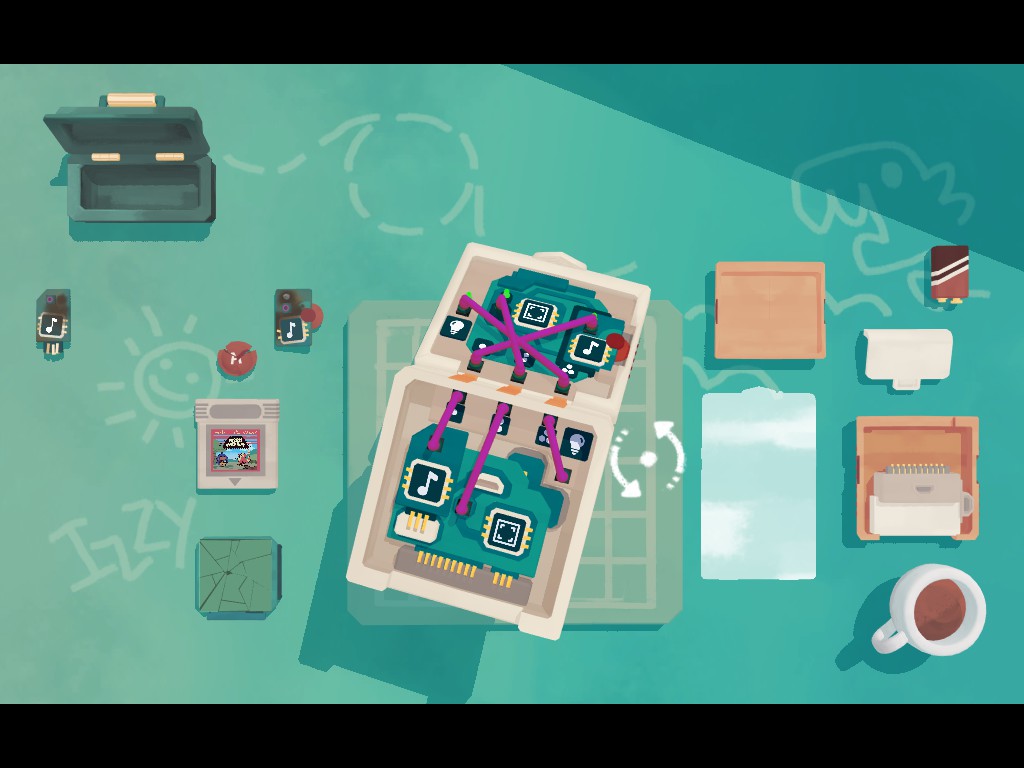
- Attach the cables like in the screenshot:
- Put all the covers back on the handheld.
- Place the gaming cartridge inside and flip the ON switch.
- Press A and play the mini-game with the arrow keys.
- When you reach the chicken take a picture of it with A.
- Flip the pages and click CONTINUE to finish the level.
 Game Over
Complete Level 7
8. Momentary
- Flip through the pages and click RESTORE.
- Pick up the watch and put it in the middle.
- Flip it and take out the wristband.
- Use the screwdriver and remove the 4 screws.
- Remove the cover, and the inner part.
- Pick up the broken pieces and remove the cogs from them.
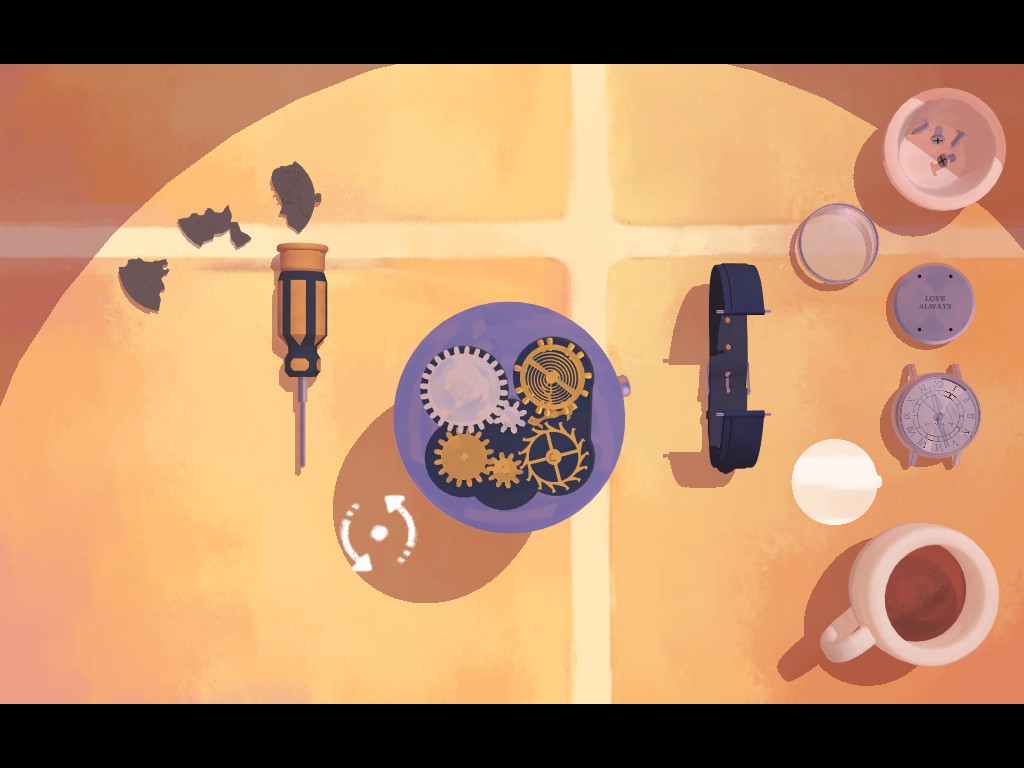
- Now put the working watch part, and put put all the cogs as in the screenshot below:
- Rotate it and place the final cog inside.
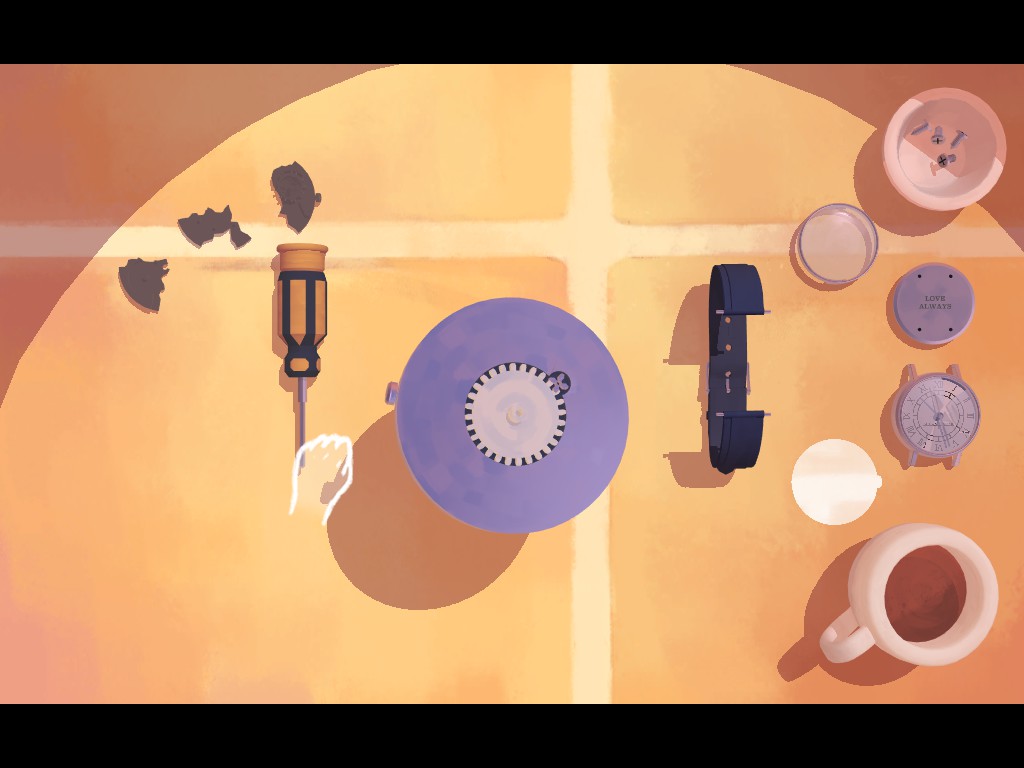
- Pick up the watch part with the broken glass cover, and put it in the middle.
- Remove the 2 screws with the screwdriver.
- Remove the clockhands, and the broken glass cover.
- Replace it with a new glass, and put the clockhands back.
- Place the 2 screws again and tighten them.
- Place the mechanism, and the cover and put 4 screws back on.
- Finally put the wristband back on the watch.
- Flip through the pages, and click CONTINUE to finish the level.
 A Fix in Time
Complete Level 8
9. The Bigger Picture
- Flip through the pages and click restore.
- Pick up the projector and put it in the middle.
- Use the screwdriver to remove the 2 screws on the side, and 2 screws on the top part.
- Remove the cover on the side, and remove the whole upper part.
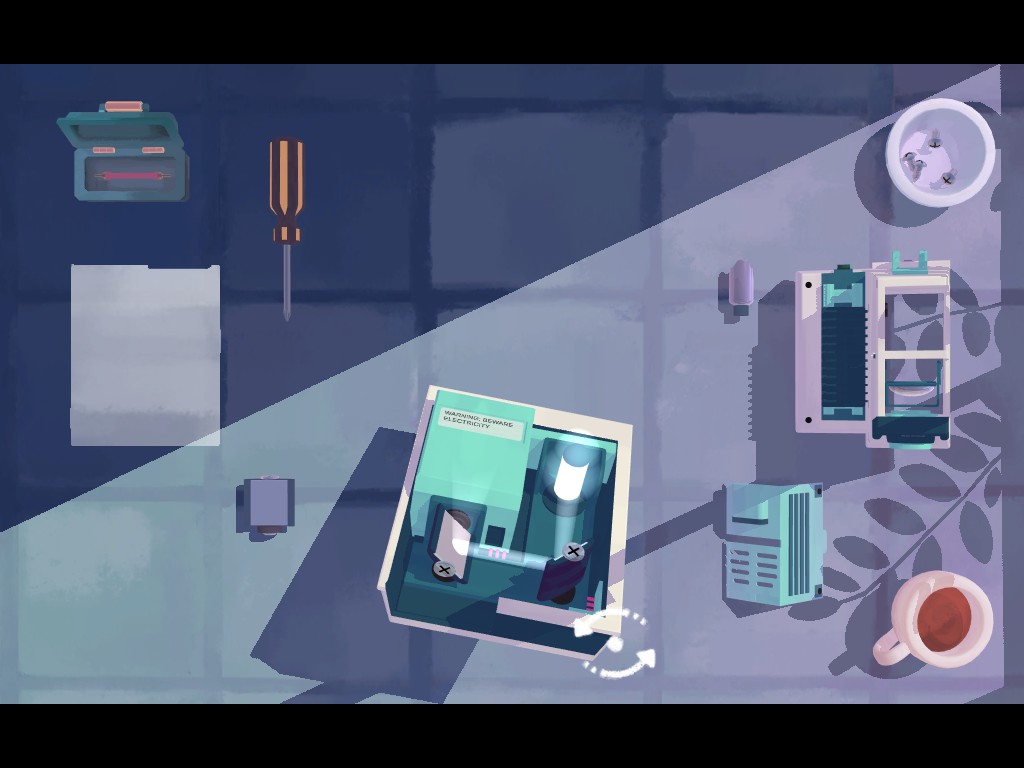
- Remove the broken lightbulb, and replace it with a new one.
- Now put the 2 mirrors like in the screenshot below:
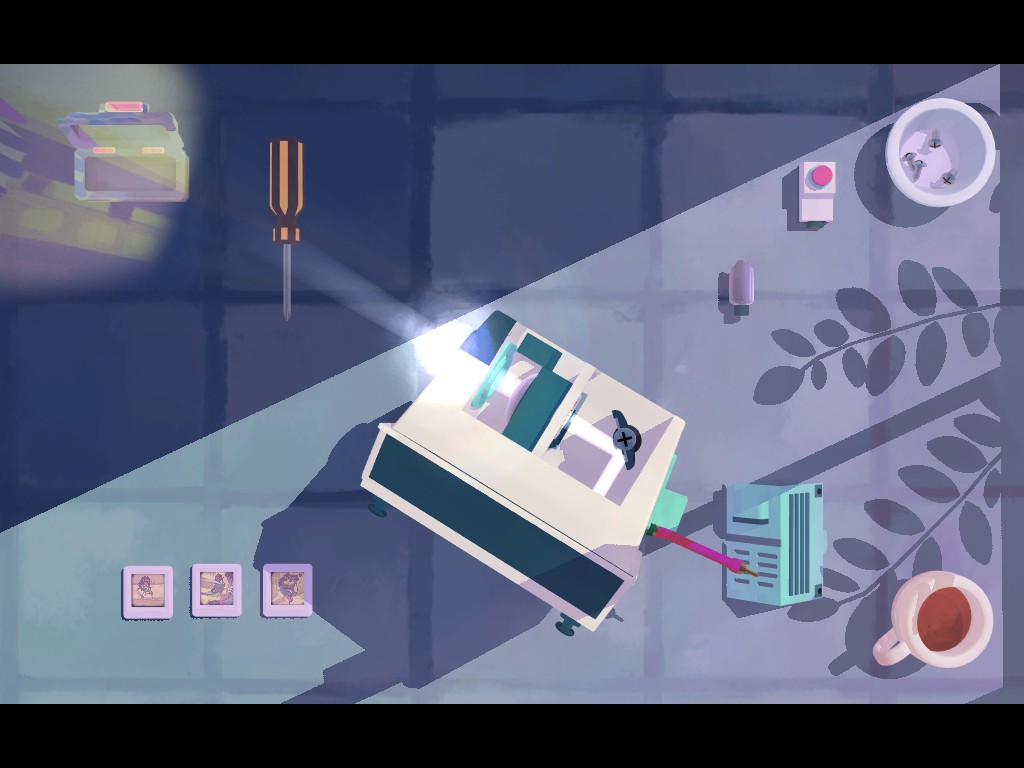
- Put he second part on top of the projector, and place a mirror inside.
- Use a screwdriver so that the light will be redirected like in the screenshot:
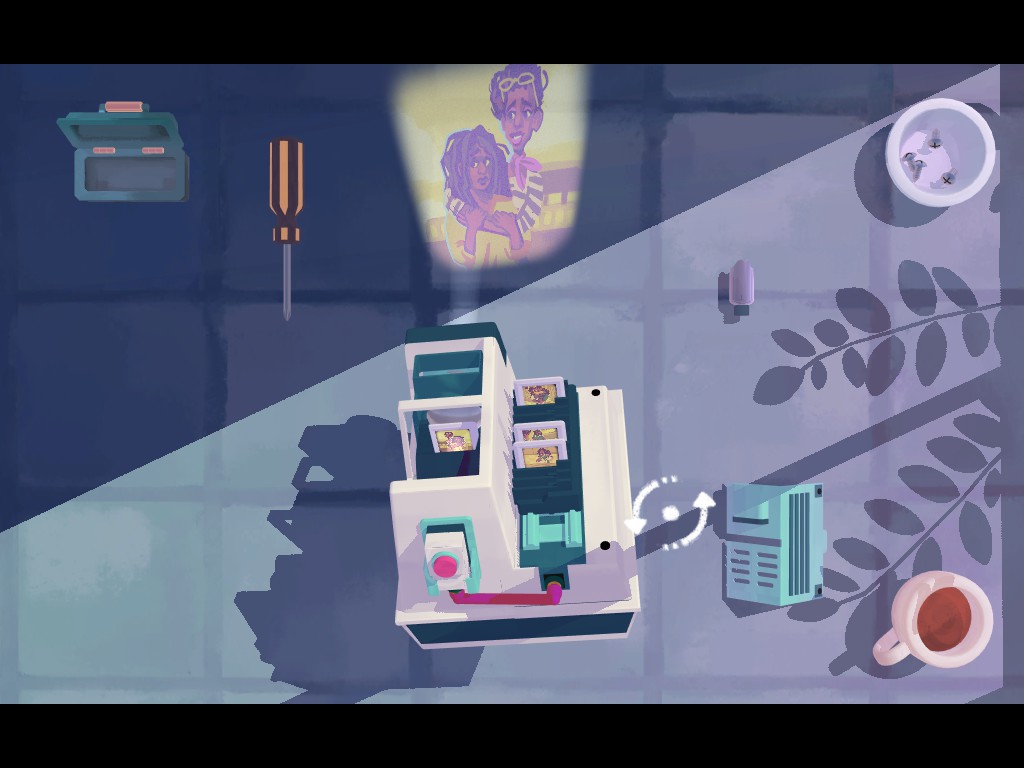
- Put the clicker in the slot behind the projector, and connect it with a cable.
- Also place the slides inside (Order Doesn’t matter)
- Put back the cover, and place 4 screws back on.
- Finally click on the button a few times until you see all the slides.
- Flip through the pages and click on CONTINUE to finish the level.
 Slide Away
Complete Level 9
10. Boiling Point
- Flip through the pages and click ASSEMBLE.
- Pickup the large red base and place it in the middle.
- Simply place all the parts on top of it to assemble the gas lighter.
- Once done, flip the gas switch and light it with matches. You have to open the match box and light the match.
- Pick up the pot and place it on top of the gas lighter
- Fill it up with BROTH.
- Place carrots inside 1x
- Place broccoli inside x3
- Tomatoes x2
- Mushrooms x3
- Stock 1x
- Now use the ladle on the soup.
- Flip through the pages and click CONTINUE to finish the level.
 Hello, Master Chef
Complete Level 10
11. Harmony
- Flip through the pages and click RESTORE.
- Put the record player in the middle and take off the cover.
- Take off the vinyl record, needle and another cover.
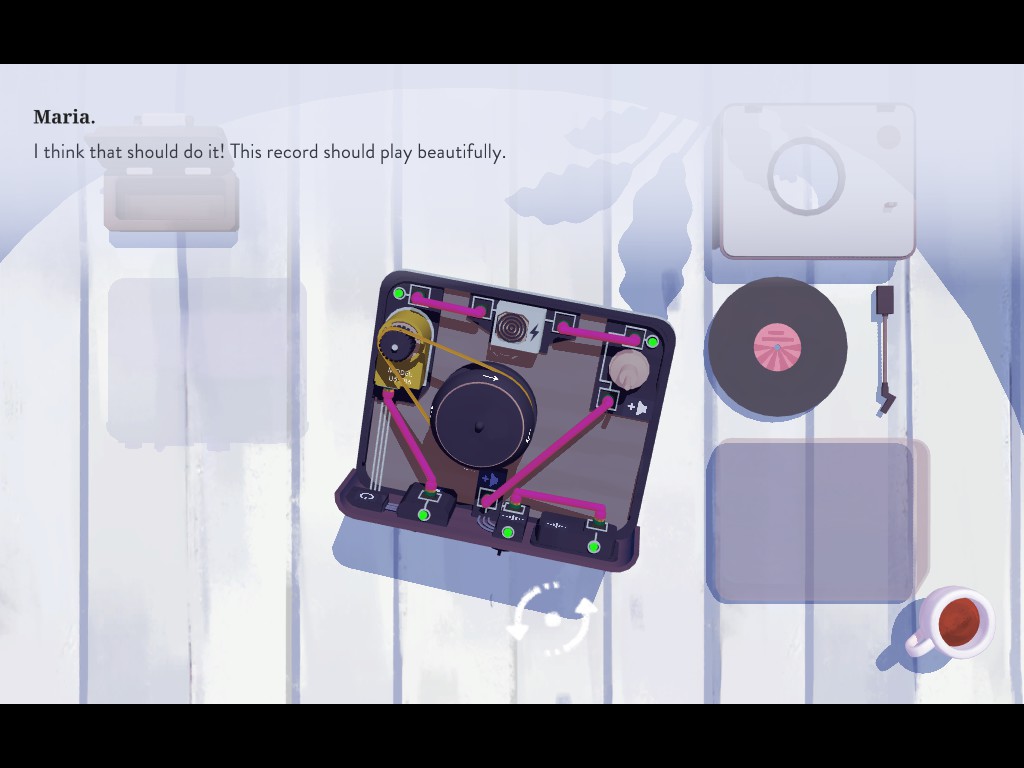
- Connect all cables as in the screenshot below:
- Now put everything back together.
- Flip the player, and press on the power button.
- We find out that the record is not playing correctly
- Take it all apart again.
- Remove the rubber from the middle, and the cable attached to the yellow part.
- Remove the yellow part, and replace it with the gray part.
- All should be like in the screenshot. make sure all lights are green:
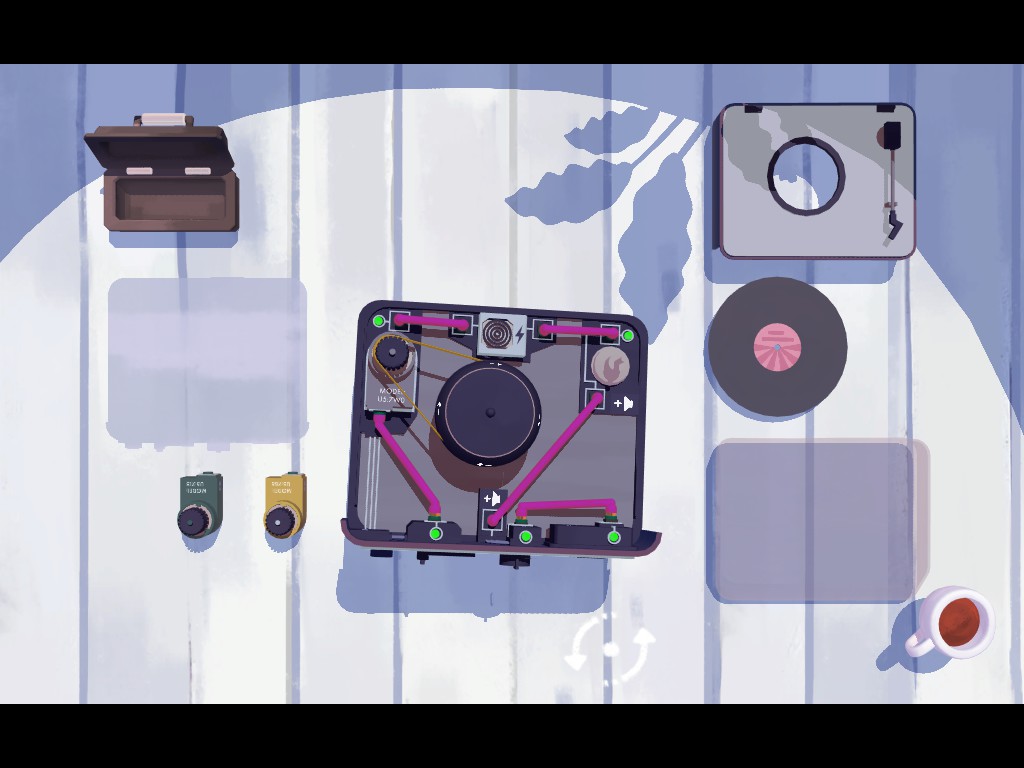
- Finally assemble everything, and press on the power button and make sure to set the speed to 45.
- Flip through the pages and click CONTINUE to finish the level.
 Turning the Tables
Complete Level 11
12. A Father’s reprise
- Flip through the pages and click RESTORE.
- Pick up the music box and place it in the middle.
- Click on the top part to open it.
- Use the screwdriver to remove the 2 screws.
- Remove the piece holding the picture, and the picture itself.
- You will now get a new picture.
- Pick up the music box, and put some glue on the place where the old picture were, and put the new one.
- Place back the frame holding the picture, and place the screws back on top.
- Remove the 2 top parts of the music box, and flip it.
- Remove the little drawer, and use the screwdriver to remove the 4 screws.
- Flip the music box, and remove the broken mechanism.
- Put the music box on the table, and the mechanism on the middle.
- Remove all the broken pieces:
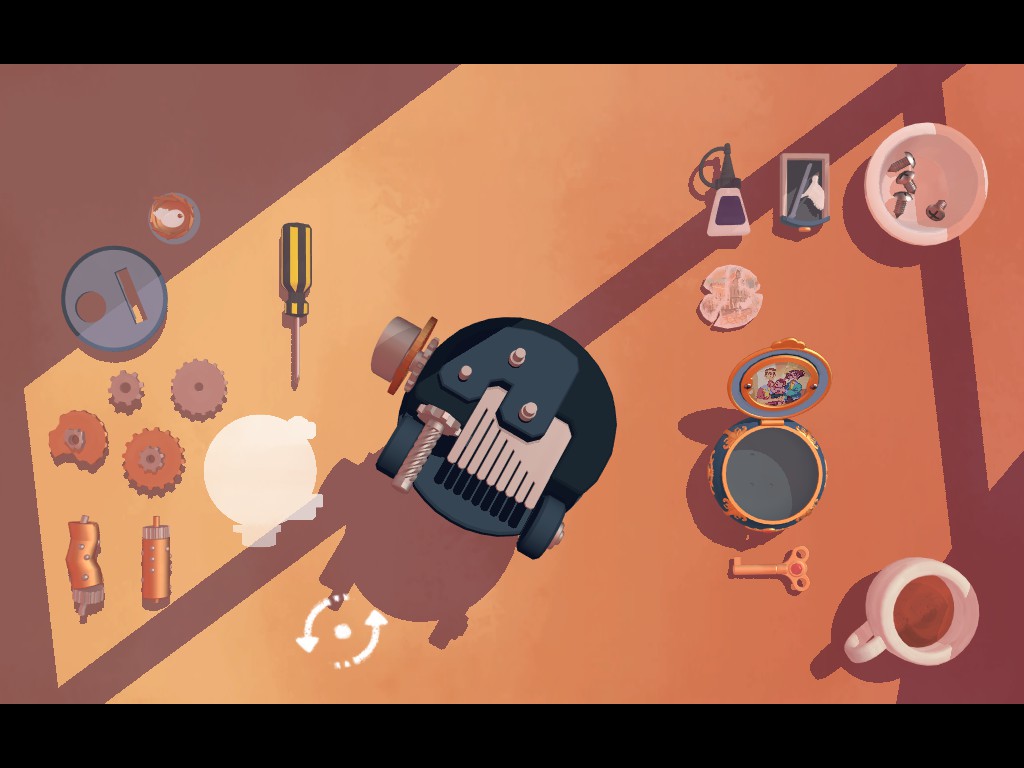
- And replace them with new.
- Fixed mechanism should look like this:
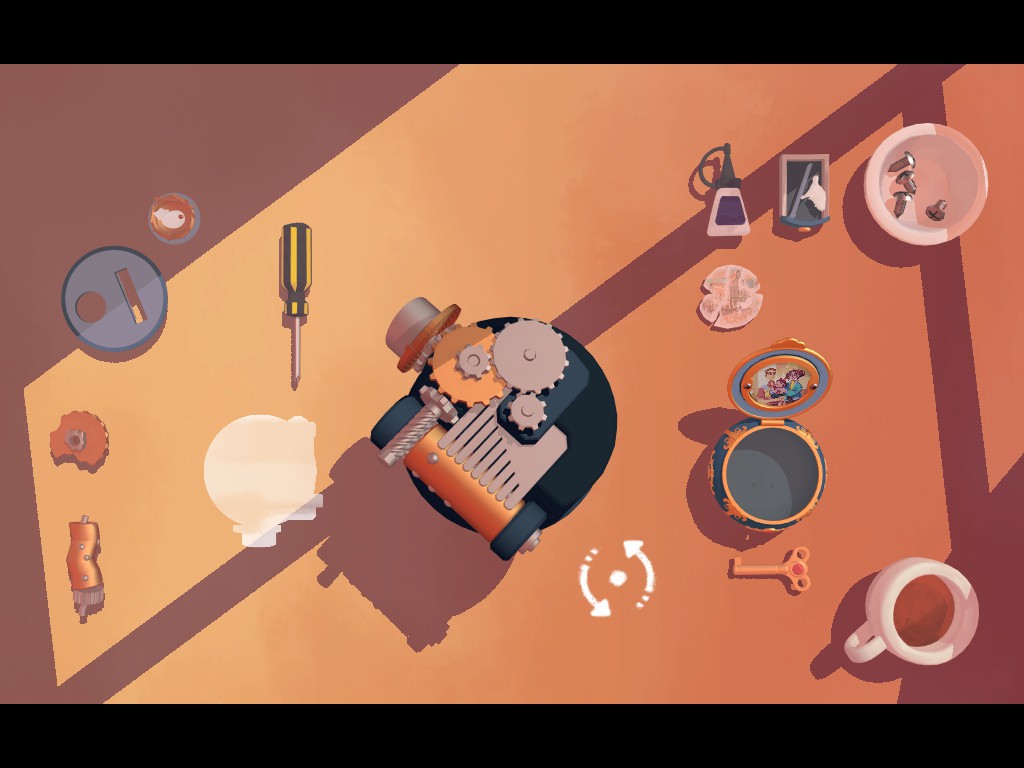
- Now place the mechanism back inside the musicbox, and place 4 screws on the back.
- Place the little drawer in the middle, and take the bird from inside.
- Place the little drawer, and the rest of the parts back onto the music box, and the bird on top in the empty slot.
- Finally use the key on the music box.
- Flip through the pages and click CONTINUE to finish the level.
 Thank You for the Music
Complete Level 12
13. Departure
- Flip through the pages and click pack
- Put the briefcase in the middle and open the clasps .
- Simply place everything inside
- Flip through the pages and click DIAL.
- Flip through the pages of the credits and click on FINISH.
 Only a Phonecall Away
One Last Thing
