This guide will give you some tips and tricks as to how the in-game mechanics work. Minimal spoilers, no secrets locations, no puzzle solutions (check another guide for those).
The Beginning
If you are reading this guide to understand the beginning, you should probably consider refunding this game, as you will not enjoy it.
Anyway, you start by placing a single crystal into a receptacle to power a door that opens. Easy enough. But what comes next may seem to perplex you unless you know about the workings of basic logic.

One might call this a conjunctive (AND) gate. As the mural shows, AND needs both inputs to send its output.

One might call this a disjunctive (OR) gate. As the mural shows, OR needs only one input to send its output. Having both inputs is fine too.

One might call this a XOR (eXclusive OR) gate. As the mural shows, XOR needs only one input to send its output, but having both inputs is not OK.
Note: in general, P XOR Q = (P OR Q) AND NOT (P AND Q) = (P AND NOT Q) OR (NOT P AND Q). These formulas may help when it comes to understanding the bitmasks.
After getting three stones from the logic gate tutorials, plug them into the doors accordingly and move on.
The Grasslands
So now that you understand basic logic, here you learn the last logic gate:

One might call this a negatory (NOT) gate. As the mural shows, if nothing is powering NOT, it powers itself, but otherwise NOT is shut down by being powered.
As you use logic to solve the puzzles in this area, you’ll eventually get four stones. This time plugging them into the doors is a little less trivial, as the door expects only one ultimate symbol. You’ll need to combine them using logic — a process called bitmasking. Here’s how to think of it: Imagine overlapping the two symbols. Then:
- AND means “select only the overlaps”
- OR means “select everything that’s active”
- XOR means “select everything except the overlaps”
- NOT simply means “invert”
In a sense, AND is like multiplication and OR is like addition.
TIP: suppose you have two tiles A and B, and one shape (A) closely resembles your goal, but that you just need to subtract a few pixels from A, and that you can use B to do it. “A minus B” (subtraction) means A AND NOT B, so in other words, negate (invert) B and then AND it with A.
After a little practice, this stuff should become second nature to you.
The Jungle
Before entering the jungle, you should’ve scanned a certain symbol and projected it onto a wall. Although you don’t need it much, never forget that you can rotate your projections! If you forget, you will lose out on a lot of lore. Fortunately, as an opening-world game, you can always go back — there are no points of no return.
Now, after unlocking the door, a staircase will make way to the jungle. Really this is exactly like the grasslands, except the puzzles are laid out in 3D. The button (previously on a pedestal) is on the ground and always leads directly to crystal receptacles, to activate them. Don’t be fooled by the 45° rotation of the logic symbols — they mean exactly the same things as always.
Simply study the puzzle to solve it (don’t forget to inspect the ground lines closely). You already know everything about how to solve this puzzle as long as you’re adept at applying logic. If it helps, grab a piece of paper and map out the puzzle.
There are three puzzles to solve in this area. After you do them, you should be able to move on (unless you want to use your projection tool to open as many of the 5 walls from since the very beginning for secrets and lore!).
The Lift
Here is perhaps a little break from logic. You are confronted with two buttons, neither of which seems to do anything (though you might’ve noticed that one looks like a selector). The first key to solving this is not on the panel of buttons, but instead to the side. You can pick up rocks from a height. Once you realize that, you can unblock the waterway and the lift should be fully powered and active.
If you were looking around at all, you might’ve noticed a green mural to the side. This is the key to the quickest lift operation: go to levels 3, 6, 4, and 1, in that order. There are more logic/bitmask puzzles to solve along the way, as well as a secret wall at level 0.
The Swamp
In here, you go a step further: you get to design your own shapes! However, you are limited to what can be done on each of the pillars, namely, their indicated shape and logic operation. Additionally, the “–” pillar is simply a “reset” pillar: all pixels will be turned off. To begin to turn pixels on, you need either OR, XOR, or NOT pillars.
The first puzzle is rather trivial, as the only pillars are OR pillars. Although you won’t lose your tile, you will need to tread carefully, as the swamp water is dangerous.
The second puzzle introduces the concept of moving platforms. Although most of these seem one-way, they aren’t really. Often there is a way to get back to where you started. At the end of the second area, you get to use AND pillars to pare down a shape until it’s correct.
The third puzzle has three OR pillars in addition to a NOT pillar. Don’t worry, you won’t need DeMorgan to help you! This puzzle is easier than it seems (use some paper if you need to track the bitmasking operations without waiting for too long on moving platforms).
The last area is really a different part of the first area, and the only pillars are XOR pillars. Experiment with these until you get the right shape.
If you did well, you should’ve made it to the temple entrance. There are four murals to scan that pertain to how each of the bitmasks work (though you will need to poke around a bit in the third area to find the NOT mural).
There is also a hidden puzzle with a special focus on XOR bitmasking. To access it you’ll need to find the hidden wall first and come back when you have the correct shape.
The Temple Entrance
You are greeted with some pillars, a little pew, and two doors. At this point, you can only enter the left door. Later, you can enter the right door. Be sure to scan the three murals lying around, as they will help you understand what goes on behind the right door.
All that you have previously done was mere training for things to come.
The Plateengineer’s room
This blue area is where you learn about combining two stones with a select logic operation to form one — step on the floor button to begin. Using the machine is easy: insert one or two stones into the horizontal slots and a blank stone (also known as a signal plate whenever it has a screen on it instead of a predetermined design) into the socket at the top, select a logic operation (NB NOT is independent of the other three here), and voilà, a new pattern is created.
Any pattern you created can be placed into the machine, which can in turn create different patterns. Still, you may be limited to what the stones (not the signal plates, but the stones with predetermined designs on them) allow you to do. Nevertheless, it’s possible to solve the first half of the puzzles of this section without needing to insert anything you created back into the machine.
Once finished, you’ll end up getting two cups and a red stone with this pattern:
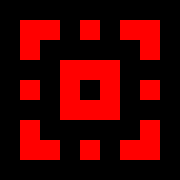
This stone will become important later, so don’t lose it.
You can now use the cup to fill it with liquid and pour it into the designated tub right next to the green-lit door in the temple entrance to access the Alchemist’s room. You can also get there via the courtyard (i.e. fountain area), which serves as a hub of sorts.
The Alchemist’s room
This green room is where you create potions of all sorts. To use the machine:
1) Insert a blank tile. When you first arrive there should already be a tile in the machine.
2) Select the desired proportions of red, green, yellow, and blue liquids by using the buttons on the sides. The tile will change, appearing to begin to form rings.
3) Press the button on the top to fill the central basin with liquid. Note that this button is a XOR button — and not for no reason!
4) To drain the liquid and start over, press the bottom left button.
The current combination of liquids in the basin is displayed above the basin. There are cups so that you can drink this liquid, or use it to fill in certain tubs with a green design on the bottom. If the mixture is incorrect, it’ll just drain out, but if the mixture is correct, it’ll light up green and you’ll be rewarded with a stone with the mixture you just created on it.
The first two puzzles to solve are easy. To solve the rest, you’ll need to fill the basin more than once without draining. If the basin looks full, don’t worry — everything’s under control. But you might wonder, how do you create a potion recipe that looks like this:
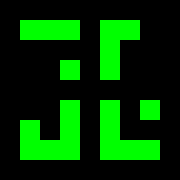
Well, start with this:
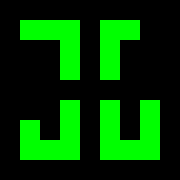
And then enter this:
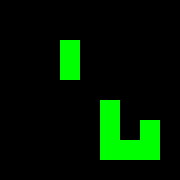
so XOR will make it look like this:
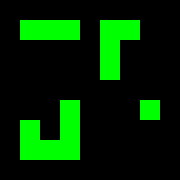
And we’re almost there. You just need to enter this:
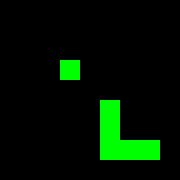
so that one more XOR will make it look like this:

And we’re done.
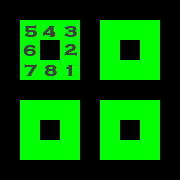
In general, to create more complex potions:
1) “Add” until you get to the highest pixel in the indicated recipe.
2) If the nearest lowest pixel is inactive, use XOR to get rid of it. For example, if pixel 7 is the highest one active but pixel 5 is not, start by “adding” to get pixel 7, “add” to pixel 5, and then XOR the result. Then you have pixels 6 and 7 active without having pixel 5 active.
3) Continue in this fashion until you match what’s on the recipe.
NB you can do this with all four liquids simultaneously, or by modifying one liquid at a time. That’s part of the beauty of XOR — it doesn’t change anything that’s combined with blank space.
Upon completing this room, you should receive a key that has this shape:

It’s surrounded by a red light, and the key allows you to enter the forgery, where the shaper’s work is done.
NB if you visited the courtyard, you might’ve previously noticed doors like these — with red, voxelated keyholes — yet been able to do nothing about them.
The Shaper’s room
Here is where the shaper forges 3D shapes of all sorts. About the machine:
- The central figure with the hammer forges (or rather, shapes) your desired shape. More on that in a bit.
- There are indicators on either side of the figure that tell you how much substance you have to work with. With insufficient materials, you cannot forge anything, and the indicators will blink red. You can always add more material by inserting either stones or already forged materials.
- The central machine works using a 3D layering system: blue stones and signal plates affect one of seven layers, red stones are pre-made shapes.
And here’s how to use the machine:
1) Press the bottom button (single line) to reset/clear the 3D shape.
2) Insert a stone into the machine.
3) Use the button with multiple lines (second from bottom) on it to cycle through the layers until a desired layer is selected. This step does not matter if the stone is red.
4) Use the arrow button (second from the top) to “import” the shape into the layer.
5) Repeat the previous two steps until the desired 3D shape is created. There is a visual helper on the right side of the machine.
6) Press the top button to forge your shape.
Behind the machine, up a small flight of stairs, you’ll find lots of stones, signal plates, and a plateengineer’s device to work with. Hope your logic and plateengineering skills are up to snuff!
And now the puzzles: there are six puzzles in this area, each of which needs a forged stone key to access the next. Each stone key can be built layer by layer in any direction, be it horizontal, vertical, front-to-back, top-to-bottom, etc. Observe the slots carefully, and use what you know and what you have to forge the keys to the puzzles. A little bit of 3D thinking is required, but it shouldn’t be too complicated.
Nothing special happens upon completing this room, but you should be able to forge the key to enter the next area.
The Crystaltician’s room
Here is where crystals and stones are colorized. Unfortunately the machine is inactive. To bring it back to life, you’ll need to solve each of the six puzzles around the outside of the room using only two yellow crystals.
The first puzzle is a cinch: just an AND gate.
The second puzzle introduces a new mechanic: self-sustaining power sources. Once activated, they won’t deactivate, making the puzzle easier to solve. Work your way through the AND gates to reach them.
The rest of the puzzles in this room have a twist: there are stones that can be brought out and recessed. Each puzzle has four tiles that bring out stones in the indicated pattern. Look carefully at the power lines and make sure all the lines align to progress through the puzzle. Use everything you know to solve the puzzles, and if a puzzle looks complex, keep calm, remain analytical, and it won’t look so daunting after all. Sometimes working backwards can help, but the key is in activating the self-sustaining power sources.
After completing this room, you have access to the machine. A pedestal with two buttons on it pops up: the top button cycles through six colors, and the bottom button activates the machine — simple as that.
After completing all four rooms (Plateengineer, Alchemist, Shaper, and Crystaltician), it’s time to focus on that fountain in the center of the courtyard.
In between the doors to the forgery (red door) and the crystal colorizer (yellow door) is a hidden path. Follow that path and project onto the wall the correct shape. The blockheaded figure will open its arms to reveal two keys: one is a socket for a stone, the other requires a key from the forgery. You don’t yet know the correct pattern for the stone, so go to the forgery and create the requisite shape for the key, and place it in the slot. The blockheaded figure’s eye will light up to indicate which shape it expects. Go create that shape by any means and insert it into the socket. A passageway to what looks like a chapel of sorts will open up.
In this chapel, there are four murals. I recommend scanning them, as they will be useful. In the center is a little elevator, but it is not for mere unarmored beings. Try to enter it, and the panel on the left will light up after you’ve been scanned (said panel is also scannable); nothing will have moved. So how do you get the elevator to move? Murals everywhere have been providing hints, and here’s the answer:
1) Grab the red stone from the Plateengineer’s room (the red one; see the relevant section above for the one I’m referring to).
2) Use it in the Shaper’s room to forge/shape a helmet, similar to what all the blockheaded figures are wearing. Just place it into the machine and hit the arrow button — no layering needed!
3) Enter the Crystaltician’s room to turn your helmet white.
4) Go into the Alchemist’s room and create the mixture indicated on the green mural in the chapel (if you scanned the mural, you can just view it on your device, and by moving your device aside you can freely press buttons). Drink this mixture.
5) Finally, put on your helmet.
After completing these steps, the elevator should recognize you as armored and move up. Teleportation devices are now active (and there are in-game instructions on how to use them).
Before moving on, there are several murals to scan besides the two panels in the elevator: one in the Plateengineer’s room, one in the Alchemist’s room, one in the Crystaltician’s room, three in the Shaper’s room, and three in the courtyard hidden behind walls that require projections of certain shapes (one of which you need a teleporter for — look up!). There is also a mural at the very center of the chapel.
Now the fountain: there is a little machine up some stairs next to the fountain, and with it three yellow stones. The machine rotates three different rings (inner/small, middle/medium, outer/large) of the fountain corresponding to each stone. Rotate the rings until water is flowing throughout the whole fountain. Note that if you tried to do this earlier, you may have noticed that you need to solve the puzzles in all four surrounding areas.
Once the rings are aligned and water is flowing everywhere, the fountain should rise up and give way to a stairway, which leads into a cave, where the mines are.
All that you have previously done was mere training for things to come.
Entering The Mines (and the Excavator)
To enter the mines you need to use a teleporter, and to use a teleporter, you need a helmet. If you don’t have the helmet, read the previous section. Once you have a helmet, teleport to the other side of the gap and follow the path down to a small room with a mine cart (be sure to scan the mural down there while you can!). Place the cart on the active rail, enter the cart, and be prepared for a ride. It’s a rough landing, and you’ll need some way to get back out. If you look around, you’ll find another red stone that looks like this:

This can be used to forge another mine cart. Look around for a teleporter that’ll take you straight back to the forgery — it’ll be up a slanted fallen pillar. Note that you can take objects with you through the teleportation devices, so hang on to the stone as you teleport.
OK, so you forged a new mining cart, teleported back with it, and placed it back on the track. Good. Now ride this mine cart back and follow the scenic paths (whose views feature an excavator and some more scannable murals behind walls requiring projections), relocating your mine cart as needed. Eventually, you’ll see a steep staircase, and if you climb it to the top, you’ll find that you need a stone. The stone is off on some side path, and it’s purple. Find it and plug it into the machine to start the excavator. Once you’ve done that, the excavator should keep running, so ride your mine cart again, ride the excavator over to the next area, and take the mine cart. You’ll soon be in a new place.
The Mines (Plateengineer’s part)
Here you learn to control the mining carts designed to carry the materials that go into making crystals. You activated the excavator, so the first step is to fill the mining carts.
Perhaps your first reaction to this area was, “oh look, more puzzles.” Indeed, and these mining carts move automatically, programmed by the signal plates you place into the sockets. Here’s how it works:
- Each mining cart can handle up to four instructions at any one time. These are displayed above the mining cart.
- A mining cart changes instructions any time it reaches a purple square. The active instruction is displayed above the mining cart as an enlarged symbol.
- Sometimes mining carts share instructions. When this happens, they generally try to keep in sync even when the track lengths between purple squares are different.
- If a mining cart turns red, it means the instructions are invalid and/or impossible, or that the cart ran out of instructions. When this happens, the cart will return to its initial position.
- If a mining cart reaches a processing location (indicated by a blue shape that’s also on all the buttons in the game), all instructions are temporarily put on hold.
And here are the instructions for programming the cart:
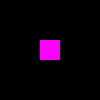
Go left:
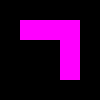
Go right:

Go straight:

Turn around:

Stop (practically unused):
On the tile these are read from left-to-right, so for example:
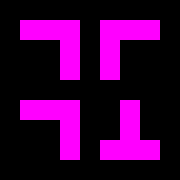
would read “left, right, left, straight.”
There are several places to program signal plates for the mining carts. Use the buttons on the sides to cycle through the instructions. You should be able to handle the rest.
Your first goal: to fill the mining carts with material and move them to where the arms are. It may take a couple of iterations to pull this off — it’s OK if your carts turn red, no materials will be lost. The arms will then dump the contents to the next cart for further processing. Just keep solving these cart puzzles until you reach the end of this area.
And at the end of this area is a place you can project shapes onto. If you look around, you can see some predetermined shapes in yellow that you can scan for use (while you’re at it, there are three murals in the first part of this area to scan as well). Raise the right tracks, and both you and the mining cart can be moved to the next location for further processing.
The Mines (Shaper’s part)
This is the second step of processing, where the stones are ground down to the right size. If you look around, you’ll find some parts of the machine are out of order. First, buttons need to be pressed to start the grinders. There are two grinders, but one of them has a missing gear, and will not operate without it.
If you looked at a certain mural, then you have a hint: forge a new gear. You are given a blue stone to work with:
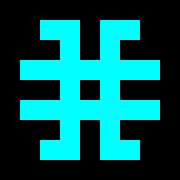
On the other side of the area from where the mural is, look for some stairs down, and you should find a red teleporter. Take the blue stone you were just given with you back to the forgery to create a new grinding gear. To do that use

for layers 1 and 7 (the tile should already be in the forgery), and

for all the other layers. It should come out smooth, with no marks of voxelation (NB all the keys you first forged had this voxelation — marks from the 3D grid).
After creating the grinding gear, teleport back to the mines with it and put it into position. Both grinders should now work, and there should be material ready to fill the mining carts.
The rest is fairly easy: solve the mining cart puzzles. Along the way, there are waystations that you can pre-program to refill the mining cart with more instructions so that it won’t revert back to its initial position. The mining cart may need to use its last current instruction when it reaches the waystation, or else it will turn red. The waystation should also be activated before the mining cart is even moved to begin with, or else the mining cart won’t receive its new instructions and turn red because it ran out of instructions.
Oh, and don’t forget to look around for yellow symbols to scan and project onto the central pillar so that you can progress. There are two in this area, one on each side.
The Mines (Alchemist’s part)
The third step is to process the stones into crystals by applying the correct concoction. On the backside of the central machine you should see a mural with the concoction used to process the stones. For reference, here it is:
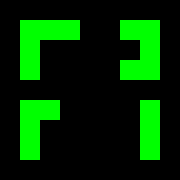
If you look around, you should find a teleporter leading to the green potion room. Create the mixture, take a cup of it back to the mines, and fill the indicated tub. Once done, there should be processed material ready to fill the mining carts.
Once again, the rest is fairly easy: solve the mining cart puzzles. Nothing new or fancy this time.
Also keep an eye out for yellow symbols. I found only one, but maybe there’s a second one somewhere out there?
The Mines (Crystaltician’s part)
The fourth and final step is to colorize the crystals. This is just a matter of solving the mining cart puzzle, which are the trickiest ones so far.
At the end is a giant door. Once you have the colorized crystals in the correct carts below, they can be sent off. The door should open, and you ride one last mine cart to…
The Ascension Chamber
All that you have previously done was mere training for things to come.
Therefore, I won’t even explain anything here, as by the time you reach this area, you already know all you need to know to solve the puzzles in this area. The first few puzzles are a combination of logic gates with bitmasking — if a wire or gate is active, that pixel is “on;” otherwise it’s “off.” You will get four stones with new patterns on them (and no, they don’t do anything special when plugged into the forging or potion making machines). The final puzzle uses mining carts and projection. When you finish, you will be able to enter the chamber, where you can choose to transcend, which is one ending to Memorrha. Or you can look around for clues if you do not wish to transcend, but instead have something else in mind.
That’s all for now. I’ll clue you into the actual puzzle solutions in a future guide.
Written by Stanley[B27]
