Here you will find a comprehensive guide to the game that I am putting together slowly…mostly for my own benefit. The game itself is reasonably simple on the surface level. But you can do extremely well if you know exactly how to play, what is what and how to do that.
⋆Starting Note⋆
This is just my beginning note regarding the game. It is definitely a chill game, mostly for relaxing. This guide is my accumulated notes and knowledge on the game that I will adapt, change and update as much and as often as I can.
The game has actually a rather comprehensive build list, and can be quite thrilling if you play it right. And that’s what this “guide” is for. It is my ideas, my wants and needs captured in a guide that others can also use when the time comes.
I hope you enjoy. Please let me know if I have missed anything and if you’d like more info on something else.
⋆The Basics⋆
Now that that’s out of the way, here’s the basics, punks.First, you boot up the game…Kidding.
There are two game modes currently:
- Sandbox
- Highscore
I am mostly going to be focusing on the highscore mode. This is because, well..you can do anything in sandbox for all I care. The highscore mode is where everything I touch on will be of most importance. Feel free to explore the different areas with sandbox, though.
In highscore mode, it is your goal to get as much stuff as you can into the island all while trying to maintain your score and make sure that you don’t underperform.
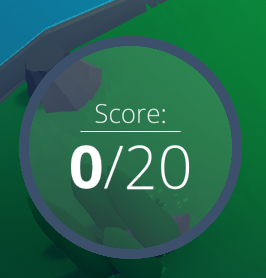
The game will start you at a 0/20 meter, if you want to call it that. This is basically a meter to tally where you are points wise when you begin to build, but don’t worry we will touch on that later. No stress now. This is just the basics.

You will be prompted to click on the middle plus button where you can begin your building process. This is where your decision making process will begin. And trust me, the first pick counts!
Now..lets get into those builds.
⋆The Basic Buildings (All of them)⋆
This is where the guide isn’t going to be the most easiest thing to read. This will be slightly dense, but I will try to break it down as best I can. I am going to go through every type of building group that I know and break each piece down as best as I can and with to the best of my knowledge. These are in no particular order, and are more for you to fish through in order to see what and how you want things in your cute little island.
I WILL ONLY DEFINE EACH THING ONCE AS IT IS A LOT OF WORK GOING THROUGH THE ENTIRE GAME TO TELL YOU STUFF THAT I KNOW IS ALREADY ON SCREEN BUT I WANT TO MAKE A GOOD GUIDE OR I WILL CRY AND MY DAD WILL THINK I AM A LOSER AND IF THE DEVS READ THIS THEY MIGHT NOT THINK I CARED ENOUGH WAHAHA.
Please love me, devs. I love your game.
It’s about to get hard.
I am going to cover the most basic packs. These are the ones that nearly everyone will screw up on when they play the first time. It is PIVOTAL that you place these correctly to even begin the game or you will not get passed these packs. You will get stuck in a loop of only being able to reach these packs, and you will feel sad, disappointed and probably like your mother doesn’t love you.
LUMBER PACK
The Lumber Pack consists of three items; two Lumberjacks and one Sawmill.
The Sawmill gets bonus for each nearby:
- Lumberjack (7)
- Warehouse (6)
- Statue (4)
The Sawmill loses points for each of these in range:
- Sawmill (-12)
The Lumberjack gets bonus for each nearby:
- Sawmill(5)
- Tree(1)
- Statue (4)
The Lumberjack loses points for each of these in range:
- Lumberjack(-6)
Place the lumberjacks where ever their a trees. Try to have them in range of each other and most definitely in range of your sawmill.
SEAWEED FARM
The Seaweed Farm consists of three items; two Seaweed Fields and one Seaweed Farm.
BASE SCORES: 1 for Fields and 10 for Farm
The Seaweed Fields gets bonus for each nearby:
- Seaweed Farm (9)
- Plateau (4)
- Statue (3)
- Seaweed Field (1)
The Seaweed Farm gets bonus for each nearby:
- Seaweed Field (4)
- Statue (3)
The Seaweed Farm loses points for each of these in range:
- Seaweed Farm(-24)
FARMING PACK
The Farming Pack consists of three items; two Fields and one Mill.
BASE SCORES: 3 for Fields and 8 for Mill
The Mill gets bonus for each nearby:
- Warehouse (5)
- Field(4)
- Statue (5)
- City Centre(3)
- Mason (2)
The Mill loses points for each of these in range:
- Mill(-20)
The Fields get bonus for each nearby:
- Mill (5)
- Resort Oasis(3)
- Plateau(3)
- Statue(5)
- Field(2)
BREWING PACK
The Brewing Pack consists of six items; three Lumberjacks, one hop field, one sawmill and one brewery.
BASE SCORES: 5 for hop fields and three for the brewery (all else applies as above).
Remember, I will only define those I have not defined before.
The hop fields gets bonus for each nearby:
- Resort Oasis(3)
- Hops Field(2)
- Statue (4)
- Brewery(4)
The Brewery get bonus for each nearby:
- Hop Field(5)
- Seaweed Farm(2)
- Warehouse(2)
- Statue(4)
The Mill loses points for each of these in range:
- Brewery(-11)
CITY PACK
The City Pack consists of six items; three Mansions, two houses and one city centre.
BASE SCORES: 1 for mansions, 1 for houses and 15 for city centre(all else applies as above).
Remember, I will only define those I have not defined before.
The Mansion gets bonus for each nearby:
- City Centre (8)
- Shaman (6)
- Statue (5)
- Wall Plateau (6)
- Plateau (6)
- Fountain (3)
- Park (2)
- Market (2)
- Tower (2)
- Jewelry (2)
- Mansion (1)
The mansion loses points for each of these in range:
- Circus(-3)
- Wall (-3)
The house get bonus for each nearby:
- City Centre (6)
- Shaman (5)
- Statue (4)
- Wall Plateau (3)
- Plateau (3)
- Circus(3)
- Fountain(2)
- Market (2)
- Temple(2)
- Tavern(2)
- Tower(2)
- Mason (2)
- Park (1)
- House (1)
The House loses points for each of these in range:
- Wall(-2)
- Jewelry (-2)
The city centre get bonus for each nearby:
- Fisher (7)
- Statue(5)
- Mason(4)
- Mill (2)
- Seaweed farm(2)
The House loses points for each of these in range:
- Shaman(-5)
- Resort Oasis(-15)
- City Centre(-40)
SHAMAN
The shaman consists of six items; one shaman, one city centre, one lumberjack, one mansion, two houses.
BASE SCORES: (all else applies as above).
Remember, I will only define those I have not defined before.
The Shaman get bonus for each nearby:
- Statue(5)
- Temple(5)
- Flower(3)
- Seaweed field(2)
The shaman loses points for each of these in range:
- Mason(-6)
- City Centre(-10)
- Another Shaman(-13)
WATER PLATEAU
The water plateau consists of six items; one water plateau, two mill, two seaweed fields, one seaweed farm.
BASE SCORES: 13 for water plateau (all else applies as above).
Remember, I will only define those I have not defined before.
The water plateau get bonus for each nearby:
- Sawmill(3)
- Statue(2)
- Water Plateau(1)
- Tree(1)
FISHER
The fisher consists of six items; one water plateau, one shaman, one hops field, one field and two fishers.
BASE SCORES: 4 for fisher (all else applies as above).
Remember, I will only define those I have not defined before.
The fisher get bonus for each nearby:
- City Centre(7)
- Warehouse(2)
- Statue(2)
- Hut(1)
- Seaweed Field(1)
The fisher loses points for each of these in range:
- Seaweed Farm(-4)
- Another Fisher(-11)
FOUNTAIN
The fisher consists of six items; one shaman, two mansions, two houses and a fountain.
BASE SCORES: (all else applies as above).
Remember, I will only define those I have not defined before.
The fountain get bonus for each nearby:
- City Centre(7)
- Park(3)
- Statue(3)
- Mansion(3)
- House(2)
The fountain loses points for each of these in range:
- Another fountain(-15)
HUT
The hut consists of six items; one mansion, one house, three huts, one fountain.
BASE SCORES: 4 for hut (all else applies as above).
Remember, I will only define those I have not defined before.
The hut get bonus for each nearby:
- City Centre(6)
- Shaman(2)
- Statue(2)
- Seaweed Farm(1)
The hut loses points for each of these in range:
- Sawmill(-1)
- Lumberjack(-1)
- Warehouse(-1)
- Brickyard(-1)
- Mill(-1)
- Mason(-1)
PARK
The park consists of six items; two parks, two mansions and two houses.
BASE SCORES: 2 for park (all else applies as above).
Remember, I will only define those I have not defined before.
The park get bonus for each nearby:
- Resort Oasis(5)
- Fountain(4)
- Temple(4)
- Tower(3)
- Hop Field(3)
- Field(2)
- Plateau(2)
- Statue(2)
- City Centre(2)
- Tree(1)
- House(1)
- Mansion(1)
The park loses points for each of these in range:
- Wall(-2)
- Warehouse(-2)
- Brickyard(-3)
- Lumberjack(-4)
- Mill(-4)
- SawMill(-5)
—
⋆The Advance Buildings⋆
This list will be for what I would call the more advance buildings. These are the buildings you will get to once you have placed a majority, if not all, of your previous packs in the last step. These buildings are very important and wager big points which will mean you could lose or fail with these bad boys.
Here is a quick rundown of these buildings:
These buildings wager in points as drastic as nothing, all the way to minusing 75 off of your counter. These means that they are very important to place down.
—
Here are the proximity markers as per my last chapter.
- Brickyards:
Positive Mason 5, Warehouse 4, Sandpit 4, Statue 3. - Sandpit:
Statue 3, Brickyard 3. - Mason:
Brickyard 4, Statue 3, Warehouse 3, Tower 2, Market 2, City Centre 2, Plateau 2, Temple 2, Wall 2, Shaman -5. - Tower:
Temple 8, Mason 5, Mansion 1, Park 1, Wall 1, House 1. - Warehouse:
Brickyard 7, Mill 7, Gold Mine 7, Fisher 6, Brewery 5, Mason 5, Sawmill 4, Statue 4.
Resort Oasis -5. - Circus:
Statue 10, House 4.
Mansion -5, Temple -25. - Gold mine:
Gold Vein 35, Warehouse 10, Jewelry 10, Statue 5.
Resort Oasis -15. - Market:
Warehouse 20, City Centre 5, Statue 4, Mason 4, Fisher 3, Mansion 2, House 2. - Jewelry:
Gold Mine 30, Statue 6, Mansion 5, Wall -3, House -4. - Resort Oasis:
Hop field 7, Plateau 6, Fountain 5, Park 5, Water Plateau 5, Statue 4, Flower 2, Field 3, Brewery 2, Fisher 2, Tree 1, Mill -3, House -5, Brickyard -5, Lumberjack -5, Mansion -7, Sawmill -10, Gold Mine -10, City Centre -10, Mason -10, Warehouse -10. - Tavern:
Brewery 18, City Centre 8, Statue 4, House 2. - Temple:
Statue 40, Mason 25, Shaman 15, Mansion 10, Wall 10, City Centre 10, Tower 10, House 8, Park 5.
Tavern -20, Gold Mine -20, Warehouse -20, Circus -20, Market -20, Mill -20, Brickyard -20. - Walls:
Temple 15, Market 8, Jewelry 5, Mason 5, City Centre 4, Plateau 4, Statue 4, Park 2, Mansion 2, House 2. - Wall plateau:
City Centre 4, Statue 2.
These buildings are a little bit more complicated than the packs from the last chapter. But if they are place correctly, even on a small bout of land, you should be absolutely fine. I will play a game for the normal packs, and one where I will demonstrate the more advance packs in the next chapters.
⋆Playing a Basic Building Game⋆
⋆Babies First Expedition⋆
After you’ve maxxed your first level (which can happen very quickly or very slowly as you saw in my last video), you’ll be ready to make your first expedition!
I’ve made a video here which shows you how I placed my more advanced buildings, including a circus, gold mine, temple and towers. You’ll see in the video that some buildings, as previous mentioned in my breakdown of the buildings, will always give you minus points. But sometimes it is worth the hit to get leaping forward!
In this video, I will show you the very first expedition level that I got. Be aware, obviously, each level is different. I was very lucky to get an island with amazing space, a gold mine and lots of spread out resources. Sometimes, it ain’t that easy. Watch below (or feel free to skip to the end to see a bustling town!):
You’ll also notice that in ISLANDERS, you always max out an island and then you have no way of moving forward on that island. Which, to me, kinda sucks. But that’s what sandbox is for!
⋆A Tough Level⋆
It was great for Mason’s, but not so much for lumberjacks (which I made a mistake in picking!).
The moral of the story is…It’s okay to lose a start again!
ISLANDERS is a fast game, and you’ll not even notice the time go passed if you do choose to take your time with it. Watch (me fail miserable) below:
⋆Achievements⋆
For now, I will list them all:
- Newcomer – Finish your first game.
- Traveler – Explore 10 islands.
- Adventurer – Explore 20 islands.
- Explorer – Explore 30 islands.
- Settlement – Reach the 2nd island.
- Colony – Reach the 3rd island.
- Empire – Reach the 4th island.
- Sprinter – Reach the 2nd island within 90 seconds.
- Athlet – Reach the 3rd island within 4 minutes.
- Builder – Build 100 buildings.
- Constructor – Build 500 buildings.
- Architect – Build 1000 buildings.
- Nice Spot – Earn 25 points from one building.
- Brilliant Position – Earn 50 points from one building.
- Perfectly Placed – Earn 75 points from one building.
- Advanced – Score 500 points in one match.
- Professional – Score 1,500 points in one match.
- Expert – Score 3,000 points in one match.
- Puzzle Solver – Reach a score of exactly 100.
- Slow Burn – Reach a score of 1,000 without ever having more than 6 buildings in your inventory.
- Mayor – Earn 2,000 points.
- King – Earn 10,000 points.
- Emperor – Earn 20,000 points.
- Islander – Reach a score of 800 on the first island.
- Wealthy – Have at least 12 buildings in your inventory at once.
- Investor – Lose a total of at least 100 points in one match.
Written by spooks
Related Posts:
- ISLANDERS: Tips and Tricks to Plan Forward
- ISLANDERS: Achievement Guide
- ISLANDERS A Quick Guide For Beginner (Tips And Hints)
- ISLANDERS Steam Achievement Perfectly Placed Guide
