A text-based guide to Soulash 2 – aimed for beginners.
The game doesn’t have tutorial, and is very, very oldschool.
Explains basic things about the game and how to survive for few early hours.
World Creation
So, the first step you need to do before you start playing is to… generate a world.
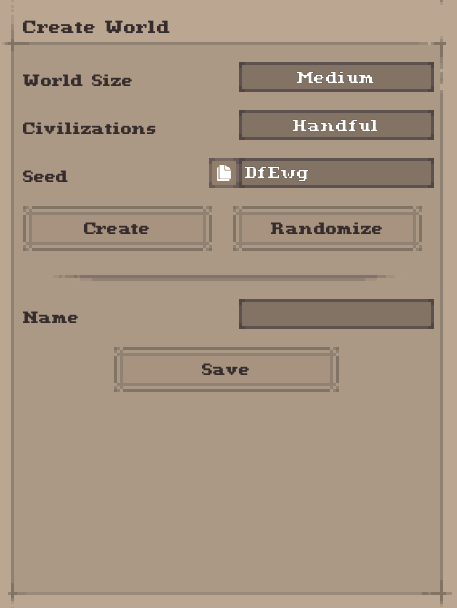
There ain’t really many options here, but lets go through them:
– World Size – How big the map is
– Civilisations – How many towns spawns on the map
– Seed – random letters and numbers that world generator uses as a starting point.
– Name – the name of your world (mandatory)
Once you selected all the options, filled up name, you can hit up create to create your world.
I suggest hitting randomize a few times, to generate a world that you feel will suit you.
Once you click save, the history generation will start and will go for roughly 100 years.
The important bit here, is that over time, settlements grow (or shrink) and they are categorized by tiers from 1 to 3.
Below screenshot shows dwarven and elven settlements – mine is tier 1 dwarven settlement, while stone keep is tier 2 dwarven settlement. Likewise white tree is tier 1 elven settlement, and white tree with a tower is tier 2 elven settlement.
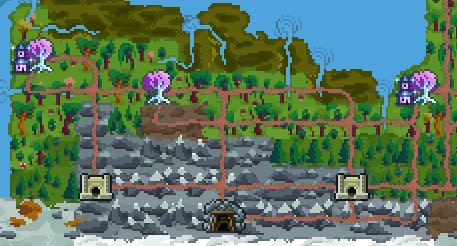
You can look at the settlements first creating roads, and then you may see sprite changing.
For first game I advise to continue the similation for additonal 50 to 100 years (clicking on year allows you to select years, while clicking on progress forwards simulation) before creating character, to get at least human (small huts with red roof on plains) or dwarves (mines/keeps in mountain regions) to tier 3.
This is because settlement tier determines what kind of advanced buildings towns can, and playing without a toolmaker, armorsmith and weaponsmith on map would be… quite rought start.
– Pay attention where you start the game, as your character cannot travel over water/ocean tiles. Its better to have a single, massive continent then multiple isles.
– Different races excel at different skills, can craft and teach different things, and may have access to different materials.
– Settlement density doesn’t really matter.
– Different POI (Points of Interest) can spawn in different biomes.
– World wrap works vertically, so you can travel to the left side of map by going max to the right or vice versa.
– Some specific buildings can only appear in cities that reached specific tier. For example, human towns of tier 1 will not have any weaponsmiths or armorsmiths.
Character Creation
You have three options for your starting character.
- High Fantasy – Slow, but safe start.
- Dark Fantasy – Default mode: roguelike with permadeath, but with a twist.
- Hardcore – Not recommended. Delete world on character death.
Though it may be counterintuitive, I recommend ‘Dark Fantasy‘, and this is by the virtue of having faster skill learning (x3 rate!). You can still build a base, and hoard items, food, coins and everything else for your new characters which will kickstart their growth in case your current character died.
High fantasy can cause you to be unable to move due to starvation and thrist – basically endless hell, without ability to suicide – so having a fresh start after dying in familar world would be a boon here.
There are five races to choose from, along with some portrait customization to bo done, but they don’t really matter that much, except two notable exceptions:


Dwarves and Rasimi (cat-folk) starts with infravision, and this handy ability means that they can perfectly see in the dark, but their view range in bright daylight is cut by half. So you can ditch having to run around with a torch. You can equip torch in offhand though, so it’s not really that big of a problem – but if you’re unfamilar yet with the game systems and crafting, it could be quite a pickle.
Later on you can find various stuff that gives you glow radious, but just imagine having almost zero visibility while running in a cave or dungeon.
Finally, you can select three starting skills, and each of them can give you a starting gear pick.
You can technically learn all the skills, but learning Pyromancy is hard and wrapped in much mystery, so if you don’t want to miss it early you may as well pick it up.
What the starting skills does – it raise your level in skill to lvl 5, and increase your skill cap to 20 (instead of 10). It also allows you to pick some starting items.
Each level in every skills gives either: stat point (blue soul), recipe for crafting, passive skill, active skill or rune to improve your abilities.
Below are some skills that are either recommended or not recommended:
Mandatory:

You should pick it as one of starting skills, and go with knife and waterskin. The reason for that will be explained in section about Food and Water. This is extremely important!
Recommended:

Learning it if you didn’t picked it up at start is quite problematic. It contains great ranged skills, worthwile even if you don’t spec into int. But even if you’re not planning to use it in combat, leveling it to lvl 20 will give you a few extra stat points.
Picking a family gives you a slight discount when buying materials from family stocks.
Food and Water
The fun part.

Hunger (green bar) and Thrist (blue bar) slowly lowers over time and can cause you to be incapicated (for low level high fantasy characters) or die (for dark fantasy characters). Which ends your adventure almost as surely as arrow to the knee or dragon breath.
The mechanics even though annoying, are not overly handicapping – even if you don’t have any food, once you get to 0, the bar will fill back to 100 – albeit you will gain starvation or dehydration level. Only when starvation and dehydrationlevel gets to level 5 (so the bar goes down to 0 five times) would it be game over.
Starvation and Dehydration levels are depicted as smaller, purple bars on Hunger and Thrist bars.
Though later on the food/water mechanics are just slight inconvicences, for new character the ability to gather food (and having waterskin) is what makes a difference between life and death.
This is why we picked up adventuring – it gives access to knife and waterskin – both of which will help us survive.

Food comes with many forms, and whenever you can eat something depends if it has ‘food’ property or not. If your character has food in inventory, it will automatically eat it when needed, so you don’t need to remember about it.
Food also doesn’t rot, so you can carry as much as you feel comfortable with (and your carrying capacity allows!).
Below I grouped four main methods of getting food:
- Foraging – When running around zones, you may sometimes find bushes or tree you can interact with, and they award you a small amount of fruits. This also depends on the biome you’re in – savanna may have date trees, forest can contain raspberries, blackberries and strawberries bushes on top of apple trees. Elven settlements usually have orchids with apple trees, that you can pick up freely, so if you’re low on food and near to elven settlement feel free to visit it. Doesn’t require any tools.Low efficiency.
- Butchering – Corpses of the dead can be salvaged to provide meat, with animals providing much more meat (up to 8) then human-likes (0 or 1). Killing few wolves at Ambushed Caravan is usually enough to last few in-game days. Butchering requires a cutting tool (a knife or cleaver). Medium efficiency.
- Harvesting – Some towns (usually human) contains not-protected plant fields, which you can harvest for grains. Then mill them, and bake a bread of them, or just sell them to vendor and buy food directly. Some civilizations (like Dwarves) have laws that protect their mushroom farms, so always check if you can pick/harvest something by right clicking on it. If the action to pick it up/harvest it is on red border, it means its illegal, so refrain from doing it. Requires harvesting tool (sickle or scythe). High efficiency.
- Fishing – Once you hit lvl 12 of adventuring skill, you can craft fishing rod. And this is almost permament solution to your food problems. It requires water source (usually river, and they are pretty common) and having fishing rod in the inventory, and then you can click on water tile (each of them) to have a chance of catching fish. Once fish is catch, you can select it in inventory and press ‘U’ to salvage it – it will yield between one and few fish meat. Requires fishing rood. Off charts efficiency.
Meat and Fish Meat can be cooked – it usually provides more nurishment and cost more.
To cook you need to stand next to fireplace (you can construct one in building menu using 4 firewood), open inventory, select the meat you want to cook and click ‘Cook’ button (or hit ‘u’).
You can hold left-alt when ordering to cook a meat, to cook the whole stack.
Fishes are special in that regard, that once you get a fish, it goes to your inventory – and raw fish is not edible.
You need to click on the raw fish, and hit ‘Salvage’ button or press ‘U’ to turn fish into sashi… into fish food. There is literally no reason to not do that for all the fishes you catch once you’re done with fishing.

Water is way more straighforward – and when traveling on overworld your character will automatically drink water to fill up its thrist meter when crossing over rivers and settlements (and will also refill any water containers in inventory).
The important bit here is that water can be kept in waterskin (or later on, barrel) for later use so get one ASAP if you haven’t started with it. The tricky part here is that waterskin is available at adventuring level 6, so not every NPC can make them.
Usually innkeepers in human towns can make you one.
On top of that every settlement is supposed to have water source in settlement center – either a well, or a pond. It may be on different Z-level (so you may need to take stairs up or down and look around).
You can also drink directly from the river or ponds you find during your adventures.
Stats Explained
The game features fairy easy stat and combat system, that defines how well your character performs at specific tasks.
Most of stats have a tooltip which shows what exactly its used for, so this section of guide will only list the recommendations.

Most of the stats provides multiple bonuses to different secondary statistics, which you can see in tooltip.
My recommendation is to always try to raise strength and endurance to at least 20 base, that’s because:
– Strength increases carrying capacity by 2 per point, among other things.
– Endurance increases hp by 5 per point, and also reduces amount of fatigue you gain by resting, and every two points increase physical resistance by 1, among other things.
Basically heavy weapons users (axes, swords, maces) get damage bonus from high strength.
Light weapon users (daggers, bows and polearms) get damage bonus from high dexterity.
Magic skills scales off character intelligence.
Honorable mention to ‘Willpower‘, as it boosts hp regeneration, stamina regeneration during rest and non-physical resistances. All three stats are superb. I’d say if you can, also raise it to 20 base – this will allow you to focus on physical resistance on your armor, while still being able to fend off monsters that deal non-physical damage without suffering massive damage.
Fatigue deserves special mention here, even though its not really a stat.
Most actions the charracter takes costs stamina (yellow bar), and when you’re out of stamina you need to rest (‘r’ key). Resting restores stamina, but also caps the available stamina by introducing fatigue.
Rest button:

Stamina bar with darker, brownish fatigue:
![]()
At some point – when you go without sleeping – the character will just have about 11 stamina left, and will not be able to do anything until you hit ‘sleep’. Sleeping progresses time, and removes fatigue as well as restores stamina.
Sleep button:
![]()

They are also pretty well explained when you hover on tooltips, so only recommendation here is that hit is important (improves accuracy of your attacks) and damage is a king. Unless you want to go with daggers and bows, in which case you need to invest in dexterity – so you can actually manage to bring parry to decent values.
This is because there are attacks that automatically hits, and there are attacks that bypass armor, so I’d say having a decent amount of endurance (and thus, health) is the safest defensive stat you can get.

- Health Regeneration: Health is regenerated once every 10 turns, even in combat, so it’s a good stat to raise.
- Passive stamina regeneration is totally not worth it, as the materials that increase it only increase it by a very little amount, and one rest which cost one turn restores a good deal of stamina.
- Movement speed is great, but is extremely hard to get at low levels.
- Sneaking is strange, as it actually allows you to snipe enemies – you can fight next to two aggresive NPC’s like wolves, and only the one you aggroed and hit would be aggresive. The other will not see you. Its also used for pickpocketing and thievery skills, but as my character doesn’t invest heavly in dexterity its hard to say how worth it is.
- Hearing allows you to see red enemy exclamation marks if they fail their sneak check against you, which can help – for example you see enemies moving in caves, behind closed doors or just around the corner. Didn’t find any enemies that would be sneaking though.
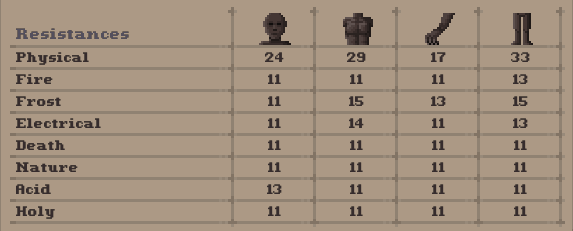
When an attack is rolled, it can hit one of the body parts – body, arms, legs or head.
So if you decide to go with heavy armor, but wear a diadem on top – be prepared that hits to the head will hurt you.
Each resistance point reduce the damage by 1 (to a minimum of 1), so enemies that have damage lower then your armor will point just deal 1 damage to you per hit. But the reverse is also true, and that’s why having decent damage helps with killing.
Howering over resistance explains it beatifully – which slots contributes to which body part resistance, how much chance is there for hitting specific body parts, and so on.
It’s also worth mentioning that every two points of endurance increase physical resistance on all body parts by 1, and every two points of willpower do the same for all non-physical resistances.
Training Skills
Even though your character can learn all skills, he can’t master them all.
All skills are trained by using them – you can hover over a skill to check what actions are used to gain experience in it.
Below a short guide how to raise the skill to level 10 with minimal effort:
- Weapon Skills – To learn specific weapon skill (Axe Fighting, Sword Fighting, Mace Fighting, Thievery) you need to equip a specific weapon (axe, sword, mace or dagger respectively) and just hit stuff with it. After you unlock your first skill(s), using them will also grant you additional experience.
- Athletics – If you didn’t started with athlethics and you’re at level 0, you need to find a stairs up. Once you go up, go to the edge and just jump down. It will cost you 25 health points, but after few attempts your Athletic will go up to level 1. Once there, you can just cut down a tree or find a body, right click on it, and drag it around till your Athletics is level 5. Once there, you get an option to throw stuff, so start throwing that log until you hit level 10.
- Crafting Skills – Find an object that can be salvaged, and salvage it till level 1. Once there, just craft level 1 recipe till your skill is at level 10. Carpentery can be trained by salvaging wooden items or firewood, which is a drop from uncommon trees (maples, spurce, etc.). Tailoring by salvaging clothes, usually dropped by bandits and townsfolk (rags don’t count). Weaponsmithing by salvaging weapons, and Armorsmithing by salvaging metal armor and shields. Leatherworking by salvaging leather armors.
- Construction – Claim a region (it costs 100 gold, info about that in ‘Base Building’ section) and just build and deconstruct stashes or build campfires till you hit level 1. Once there, you can slowly build your own hideout – Construction level quite rapidly with minimal investment.
- Pyromancy – If you didn’t picked it up at character creation, you need to learn it. Find first how to learn it and then learn it, and once you progress to level 1, then spam the skills. But this is not an easy task. If you started with it, just spam the skills.
Hint: You can dualwield weapons to train two weapon skills at the same time, or double the pace of training single weapon skill, as each weapon got its own separate attack that adds experience.
You can only raise the level of each skill up to its skill cap.
Take a look at this screenshot:
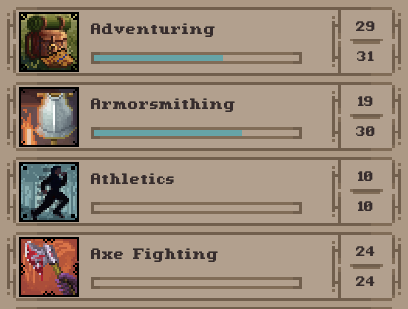
There are two numbers next to each skill.
The number above is your ‘current skill level’, while the number below is your ‘skill cap’ for specific skill. So my armorsmithing is at level 19.
The number below represents skill cap, so to what level you can train the skill by usage.
My armorsmith skill cap is 30, so I can level it up to level 30 by using it.
If your skill reached the cap, then no more advancements for you.
To increase skills cap you need to have find two things – a person who have skill higher then you in specific skill and loads of coins.
And finding both of these things is tricky at least.
Once you talked with NPC, if NPC have any skills higher then your, you can ask him to teach you for a hefty amount of coins:


Paying the NPC for specific training will increase your skill cap by 1 for that skill, allowing you to level up your skill further then starting cap of 10 or 20 (for selected skills). This will also increase you potency by 1.
The coin required to raise the skill is determined by your current skill cap, at low levels (10-14) raising a skill costs 60 gold, then it raises to 120, then to 200, then to 400, 800 and so on.
Hint:
You can check the skills of NPCs by pressing ‘K’ (it opens knowledge tab) and searching for NPC that offered to teach you something. You can use the search bar to type in NPC name, and then click on ‘Skills’ tab (next to Relations and Crafter tabs) to see the NPC skills:
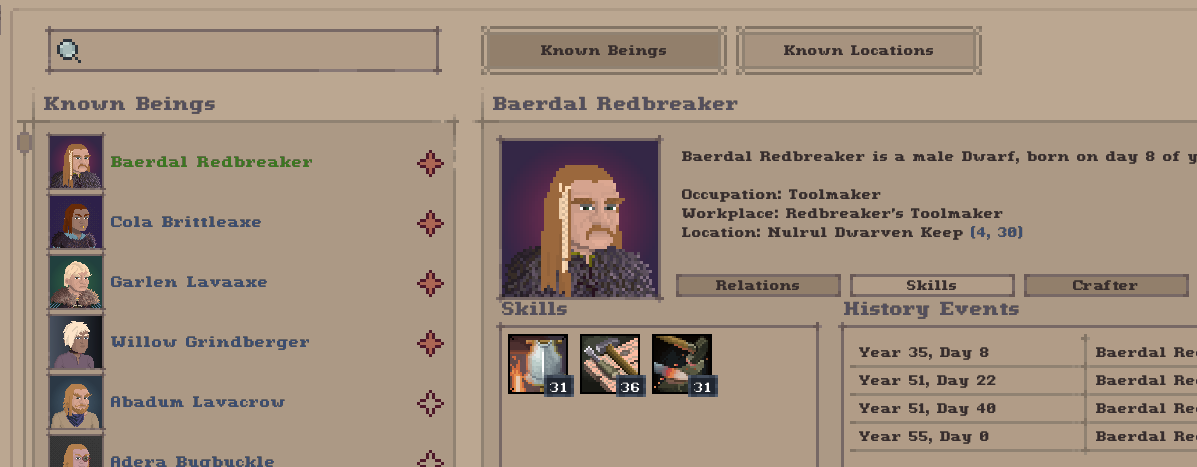
You can also mark NPC as favorite by clicking the small star next to their name.
This actually makes it worth to slowly go through town, talking with NPC and checking their skills and marking best teachers for specific skills you want to learn later on.
Hint: When you are reaching skill level 50, you may found out that there are no trainers that are able to train you. You can play for some years in hope some of the NPC in high 40’s range will raise their skills (they tend to get better over time) before they die of old age, or you can try challanging higher difficulty level POI’s in hope of finding items that may help you progress further.
At game start you can only reach three skills at lvl 50 – but only if the skills you wanted to train are the skills you picked up during character creation.
This is because each character has something called potency, which you can see above your skills:

At game start you potency will be showing as 170/300 – this is because there are 14 skills, and you start with level cap of 10 for 12 of them, and level cap of 20 for 3 of them which you selected.
But there is no rule that says you need to reach lvl 50 in your chosen skills – you may freely mix the abilities, bonuses and recipes to create the playstyle you like, as increasing skills only unlock new abilties/boosts/stat points/crafting recipes.
It’s worth checking what each skill unlocks after getting into a game for a bit, to better plan your character ‘career’.
Hint:
Technically, once your character gets older your potency should increase (and your physical stats will be lowered to simulate ‘aging’), but so far after about 30 hours only 8 in-game years passed for my character. And he is dwarf. And dwarves lives 200 years. Imagine being a teen forever… ugh.
Adventuring
So where you could get all that meat, leathers, bones and loot?
The answer is – during adventures!
When roaming on the world map, sometimes your character can discover placed marked by red question markets.
These are POIs or ‘Points of Interests‘, and range from graveyards and pillaged caravans, to spider infested forests and dark keeps. Also dragon caves.
You can bravely venture into a POI, but the thing that is important to consider is that even at game start, some of the POI’s can spawn with higher difficulty, and venturing there is an easy way to bite the dust.
So what can you do, to even the odds?
When visiting any town or village (or just clicking on it on world map and howering over the buildings list to the left), you can ask NPC about directions, and check if there is a hunter cabin or an inn.
Once you find town that contains either of these buildings, go ask any NPC about direction to them.
When you arrive at inn or hunter cabin, just talk to an NPC (you can hold shift and hover over him if he is an innkeeper or hunter) and you will be able to ask him about places of interests nearby:

Once you ask about them all, and venture back to world map – you would be able to see them marked on map.
A jungle town surrounded by POIs:
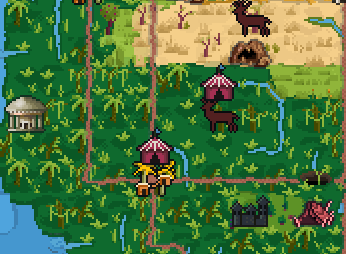
You can click once on any location and on the left side of the screen you will find the name and difficulty of the encounter:


For starters, I suggest going only to the easy ones, venturing onto troublesome ones once you get a better weapon and skills, and full set of armor.
Difficulty ranges are:
- Easy – enemies are usually either bandits, or normal wild animals
- Troublesome – enemies are more elite, you may start encountering dire animals here
- Hard – no idea, im scared >.>
- Extreme – no idea, im scared >.>
There are two additional skills I recommend, as they allow you hastly retreat from most foes in case you see the combat going against you.
These are:


At Adventuring level 9 your character will discover new POIs in a range of 2 on world map.
At Adventuring level 14 your character will automatically discover the POI types and difficulty of locations.
Reducing the nessesity to visit towns or hunters for informations.
Crafting
Even if you didn’t start with any crafting skills, you can pick up the skills by salvaging the existing items. You can do that by pressing on the item in inventory, and clicking on ‘Salvage’ button or pressing ‘S’.
Salvagable items that awards skill experience will be marked as such in item tooltip!
Here is an example of item that when salvaged, will grant tailoring experience.
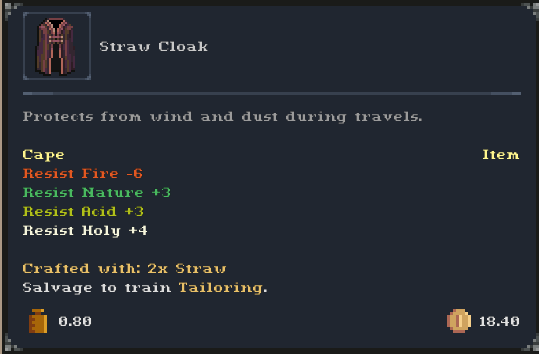
Once you reach out level 1 in specific craft, you can start crafting items to progress at faster pace – either selling the products for coins, or salvaging it for more experience.
You can check all your known crafting recipes by pressing ‘C’ or clicking crafting button (above action bar, first from the left).
When hovering over crafting recipe, you can see that most of them requires both ‘tools’ and ‘materials’:
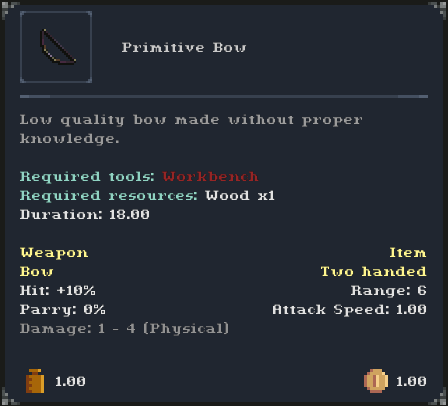
This is slight misleading – tool here means that it requires you to be standing next to workstation.
So this recipe:
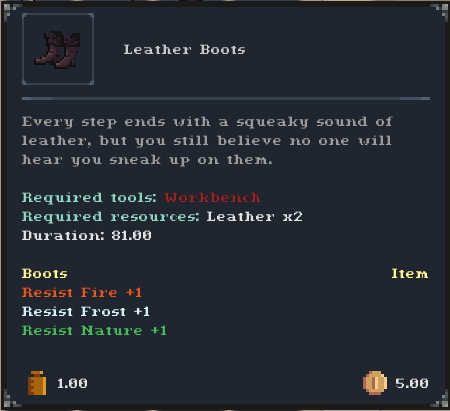
Requires the exact same workbench as previous one – there are no ‘Carpentery’ workbenches, and ‘Leatherworking’ workbenches.
Most craft recipes requires your character to be standing next to proper workstation.
You can also stand next to NPC workstation and craft without any issues, and free of charge.
There are six workstations categories that are utilized for different crafts:
Workbenches are used to craft majority of stuff that doesn’t fall into being an clothing, weapon or armor.
There are three kind of workbenches, two that are available via Carpentery Skill, and one that is available via Construction Skill.
Beside ‘Log Workbench‘ that for whatever reason is 25% slower, they all behave the same so you can just pick whatever you feel looks nicer in your interior.


Furnances are used mostly to smelt ores to bars, but dirt furnance can also be used for cooking. Though compared to Campfire, its almost 2.5x slower. So you shouldn’t really build and use dirt furnance.


Used to create clothes or refine base tailor materials.

Required to create majority of metal items.


Required to create potions.


Required to cook your food.

Each item comes as a different recipe, and to craft an item, you need to fill all material slots with required material type.
There is also another type of slots, called magic ingredients, which are optional – you can find various magical substances to further reinforce your items.
An example of armorcrafting recipe that requires one metal bar (of any kind) to craft:
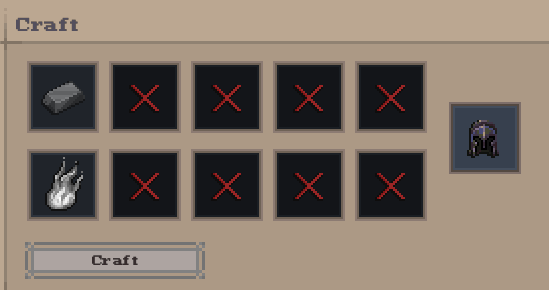
Different materials (and there are lots of them) grants different bonuses to your crafted items, and most advanced crafted items have both different base stats and different number for material components and magic components.
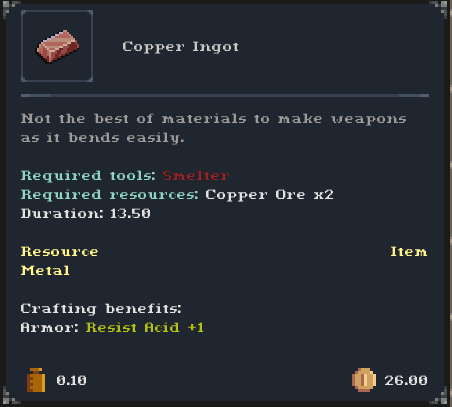
Take a look for this example, this is Copper Bar, which is the first metal you can use in the game:
And compare it to much harder, rarer and more pricy steel:
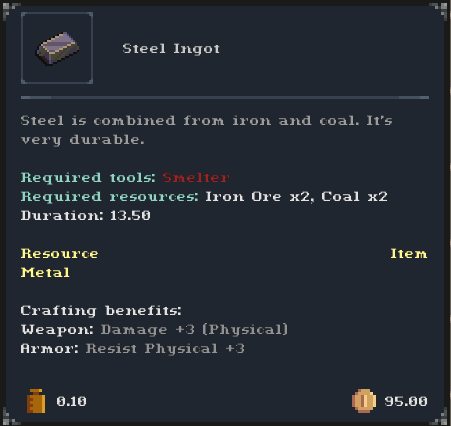
Thus, Copper Helmet will have Resist Physical +2 and Resist Acid +1 (thanks to our copper bar), while Steel Helmet will have much more superior stats of Resist Physical +5.
Currently its hard to earn money (well, resonable amount of money) just by buying materials from towns, crafting stuff and selling it back.
This is because the price of item is calculated roughly as (item base price + material base price), and selling price for finished crafting items like weapons or armors is always 38%.
So creating stuff from more expensive materials yields less gold then just selling the expansive materials directly – as you can find places where the sale price will be like 88% of item cost.
But the other way around is also true – you can create stuff from cheap and abundant materials, and sell it for (much needed) early game profit!
Base Building
When you decide its time to build a cabin in the woods, or one next to a river, or a glorious mountain keep for your dwarf – it’s time to start base building!
Before we go there, it’s good to have proper tools to get our construction materials:
So grab your pickaxe (to mine stone):

And your hatchet (to cut wood):

You can claim any non-settlement region while being on the world map and paying 100 gold.
To do so, click on a small house icon just above your map:

It will open a dialog in which you can type in the specific base name.
You can have multiple bases.
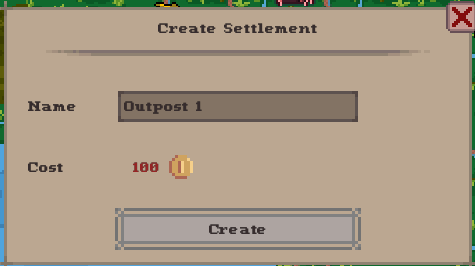
After filling in name, your location should pop up on the world map, and you’ll be able to freely build within it:

Hint:
You can also claim special locations (POI’s) once they are ‘plundered‘, this means that once you get all items from gold chests.
It’s very cool, because some of the locations are really fancy like being a castle or dungeon.
Hint:
Claiming a region should automatically raise your Construction to level 1.
Constructing any building pieces should allow you to improve your Construction skill.
Once on the local map, you can press Build button (default to ‘T’) to see all available buildable pieces.
Build Button:
![]()
Available pieces:
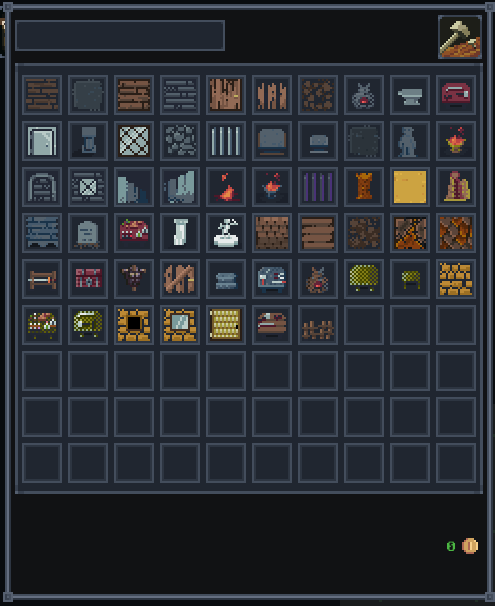
After hovering over any of them, you can see what it is and what materials it needs to make.
Majority of stuff can be build from wood or stone, and new recipes are mainly unlocked with progressing in Carpentery and Construction skills (but some other skills, like Adventuring, also have some building recipes).
Building stuff is easy, if you have right materials you just click on the specific building block, and place it on the map.
You can also change which material to use below your available tiles, after you select a specific tile:
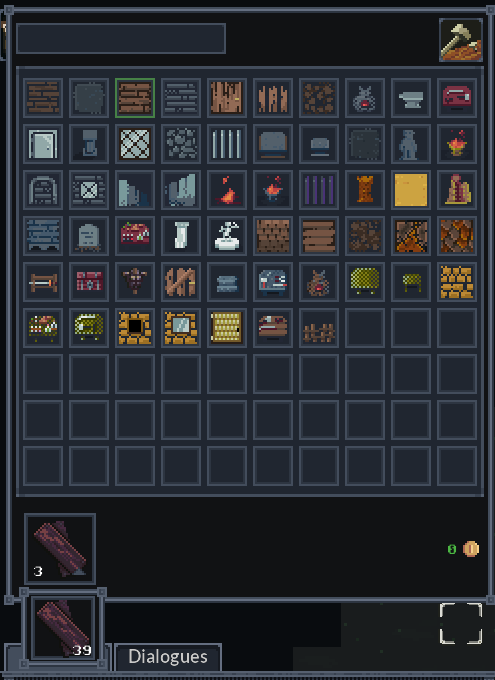
Example:
Anvil requires metals, but it can be build with 6 copper bars or 6 mithril bars, and will perform exactly the same no matter which material you use.
There are two important bits here:
– You can only place stuff within your character view range. So if your character is looking not exactly where you want him to look, you need to exit building menu and use alt+click to make him ‘look’ in specific direction. (alt+click doesn’t work if we have build menu open)
– You can build stuff up to few tiles away, but your character will only automatically start constructing tiles if they are placed next to him/her. If you placed it a tile farther, you would need to exit construction menu and click on it to finish construction.
And that’s pretty much it:
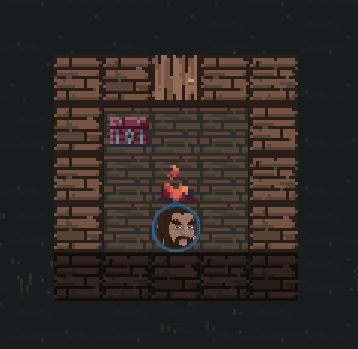
Hint:
The empty bar above the picks is a search bar, so you can type in for example ‘wood’ to filter out all pieces that has ‘wood’ in name, e.g. wooden doors, wooden wall, wood floor, etc.
One of the best features of having a base is a stash, not unlike these you see in NPC towns.
It’s basically a way to store stuff, and your bases persists between your characters (at least, in Dark Fantasy mode) – so its a great place to store stuff to kickstart your other characters growth.
It has unlimited capacity.
Stash:

Once you clicked on it, it open up a menu which you can use to store stuff and gold (on the left is your inventory, while on the right is zone stash):
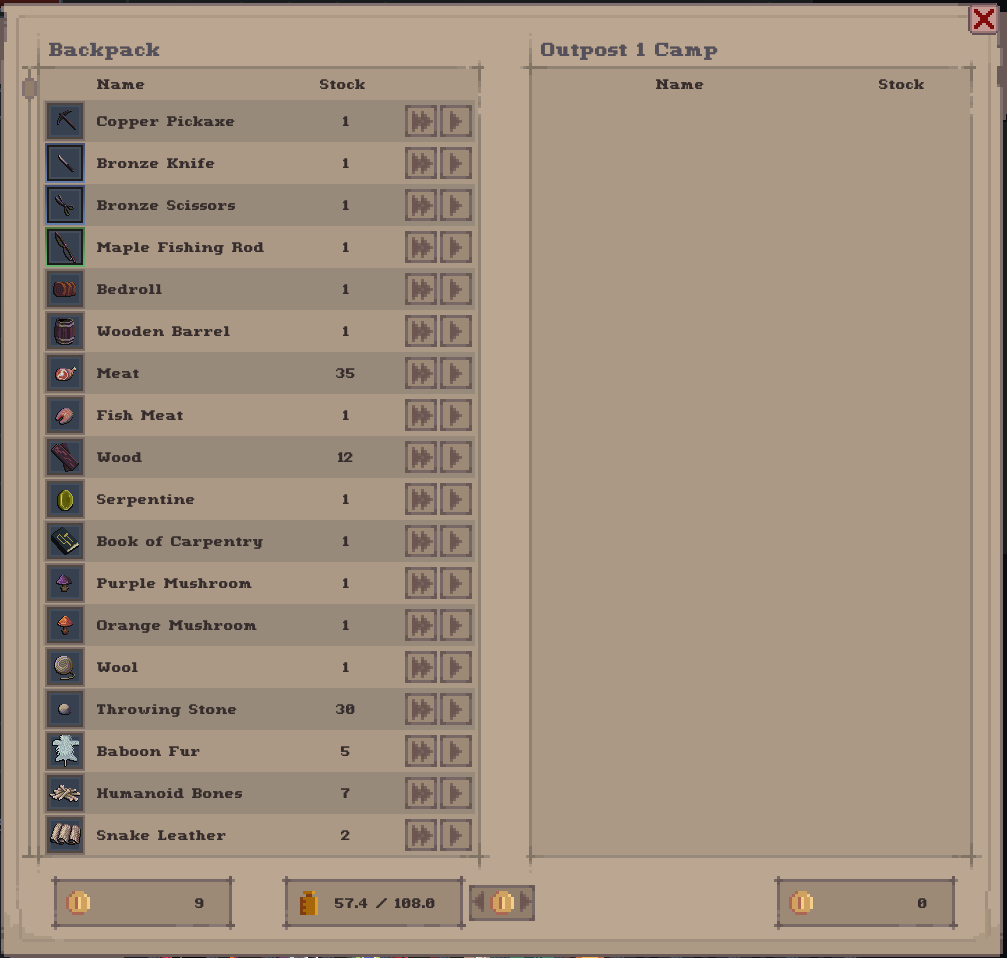
You can also store gold, by clicking on gold transfer button:
![]()
Hint:
All stashes within same local map are connected, so you can just put them at your leisure – I got one next to my crafting room, one in main living room, and few small shacks with stashes next to map edges, so I don’t need to go all the way to my main base to dump some materials.
Stashes between different bases are NOT connected though, so I advise not building too much of bases – inventory management would be an issue.
If you placed an piece in wrong place, or just want to rearange your base a bit – you can right click on any constructed tile in a claimed region, and one of the options would be ‘Deconstruct’.
This will destroy the piece.
It doesn’t return materials.
And it also doesn’t work on ‘floor’ tiles, like bridges, roads, floor unfortunatly (but you can technically build different floor type on them to overwrite them).
Tips ‘n Tricks
- Dualwielding – you can dualwield two weapons by dragging the second weapon to your offhand slot. This allows you to hold a weapon and a torch for example, during exploration of a cave. It also increases your damage and hit chance a bit, depending on weapons used.
- Selling finished products – When selling finished crafting products (like weapons, armor, shields) every town will buy them only for 38% of price. This is because, there is no demand for them in any towns. This makes it problematic for pure crafters to work a profit early, when buying raw materials from the towns. You could try int build or lean heavly into adventuring for passive that gives +10% buy discount, but it’s just better to procure your own crafting materials and sell finished products. This way, in most cases finished product will be worth more then raw material used to craft it – with a notable exception of intermediate products like metal bars.
- Fishing rod – try to craft fishing rod as soon as possible – it requires two wood and level 12 adventuring to craft, and gives you literally unlimited amount of food if there is a river nearby.
- Hold Left Alt to repeat inventory actions – new patch contains queued actions, this can be used to queue cooking food, treshing wheat, and salvaging firewood/arrows among other things.
Additional Tips ‘n Tricks from community:
@Durahan:
- If you have pickaxe and want lot of ore/bars – Look for Human and Rasimi towns with ‘mine’ buildings, you can then ask about the mine and go there to mine a large amount of ores. They don’t get mad at you for doing so.
@Fae.Demon:
- Start Your First Character With Axes – Special wood (from cutting named trees like spurce, oak, maple, etc.) is good early money. Also, firewood for torches or carpentery salvaging.
- Spam Craft Torches to Level Adventuring – Gets you to lvl 12 fast.
- Items for Trade May Go on Sale – Keep an eye out for materials offered at 9% normal cost!
