Remnant II players, this is a guide to unlock every Archetype. Legitimate methods for unlocking only. Includes a list of prime perks / archetype traits to provide a consolidated spot for this info.
Introduction
Guide index on the right should jump you to whatever you’re looking for. If something seems incorrect, incomplete, or unclear, then please let me know.
I want to note I haven’t been able to do the Archon unlock myself since my Cass vendor is bugged to hell taking a vacation outside the map and also out of stock. I will update that section with screenshots as needed when the issue is fixed.
Credits
Most info I pulled from the Remnant 2 wiki[remnant2.wiki.fextralife.com] or the Remnant reddit.
I learned most unlock methods from browsing these, and they gave good information to consider while writing this guide.
Also credits to the Arekks Gaming YouTube channel, which I compared my own experiences to their guides to find consistent elements that could be used to write this guide. If you prefer video guides, I recommend his channel.
Any images used that are not my own are credited below the image.
Prime Perks & Archetype Traits
Prime Perks are only active when the matching archetype is your primary archetype. They are upgraded at level 5 & level 10.
Archetype Traits are active when the matching archetype is equipped in either the primary or secondary slot. After reaching level 10 in an archetype, it functions as a normal trait when the matching archetype isn’t equipped (needs point investment).
 Archon
- Perk: Tempest – Generate 2 / 2.5 / 3 mod power per second. Using a mod Increases all mod generation by 50% / 50% / 100% for 6s / 6s / 10s
- Trait: Flash Caster – Increases Mod and Casting Speed by 5% per point (max: 50%)
 Alchemist
- Perk: Spirited – Can have 1 / 2 / 3 additional Concoction Buffs active
- Trait: Potency – Increases consumable duration by 10% per point (max: 100%)
 Challenger
- Perk: Die Hard – On taking fatal damage, become invulnerable for 2s / 2.5s / 3s and regenerate 50% / 75% / 100% of Max Health. Cooldown: 10m
- Trait: Strong Back – Reduces encumbrance by 1 per point (max: 10)
 Engineer
- Perk: High Tech – Holding engineer skill empowers heavy weapon, giving infinite ammo, increased fire rate, and 25% damage increase for 15s / 20s / 25s. Cooldown: 60s / 60s / 20s
- Trait: Fortify – Increases armor effectiveness by 5% per point (max: 50%)
 Explorer
- Perk: Lucky – Gives 10% / 20% / 35% chance to spawn additional items and rarer drops when defeating stronger enemies
- Trait: Swiftness – Increases movement speed non-linearly per point (max: 15%)
 Gunslinger
- Perk: Loaded – Activating a gunslinger skill reloads both weapons & gives infinite reserve ammo for 5s / 6.5s / 8s
- Trait: Ammo Reserves – Increases ammo reserves by 5% per point (max: 50%)
 Handler
- Perk: Bonded – Dog Companion attempts to revive you to 50% health. Can be used on allies with Command. Requires a relic charge. 120s / 105s / 90s cooldown
- Trait: Kinship – Reduces incoming & outgoing friendly fire by 8% per point (max: 80%)
 Hunter
- Perk: Dead to Rights – Dealing 65 / 65 / 55 ranged weakspot damage extends duration of active Hunter skills by 2.5s / 3s / 3.5s
- Trait: Longshot – Increases weapon ideal range by 0.6m per point (max: 6m)
 Invader
- Perk: Shadow – Casting an invader skill leaves a decoy for 3s. Damage increased by 5% / 10% / 15% to enemies not targeting you
- Trait: Untouchable – Increases evade window (dodge iframes) by 3% per point (max: 30%)

- Perk: Regenerator – After restoring 350 / 300 / 250 health to allies, gain a relic charge (can’t overcap). Requirement increases by 50% per additional player
- Trait: Triage – Increases healing from weapon mods by 5% per point (max: 50%)
 Summoner
- Perk: Ruthless – Dealing damage to your minion enrages them which increases damage, attack speed, and movement speed by 30% / 40% / 50% for 20s.
- Trait: Regrowth – Increases health regen by 0.15/s per point (max: 1.5/s)
Base Archetypes & Archetype Crafting

Getting an Archetype Material unlocks the corresponding Archetype craft at Wallace
Base archetypes can be unlocked right away after the tutorial, gated only by scrap & material costs. (Each material costs 1500 scrap in addition to above crafting costs).
Below is a map of Ward 13 for the vendors and the Archetype Material they sell.
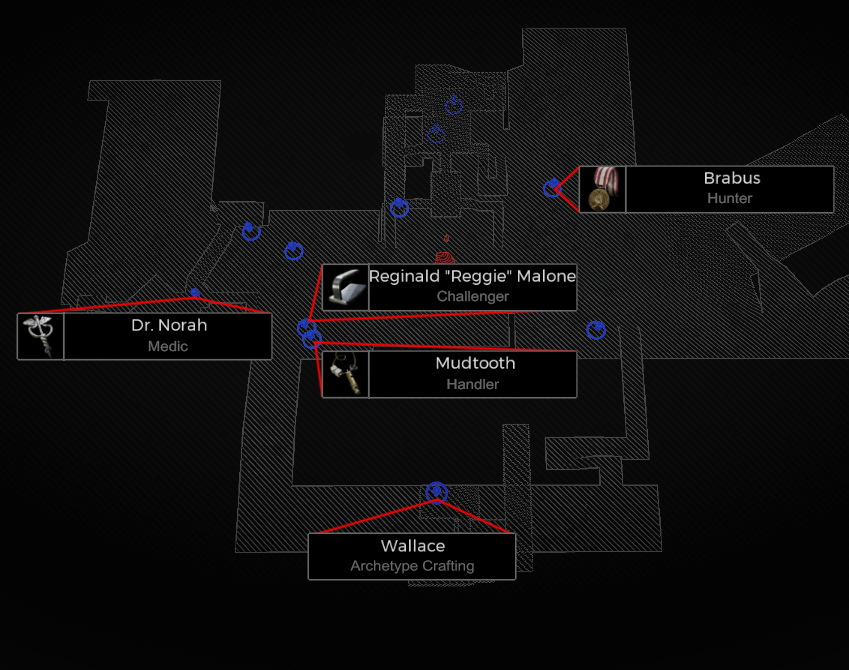
Alchemist (Lonsom)
- Reroll campaign or adventure mode for Lonsom until you get the Morrow Parish starting point
- Find and stand in front of the large wall grates (image below) found in the Morrow Parish zone. It is random which one will trigger the event.
*You may have to progress in the world further, as you eventually re-enter Morrow Parish from a different point.
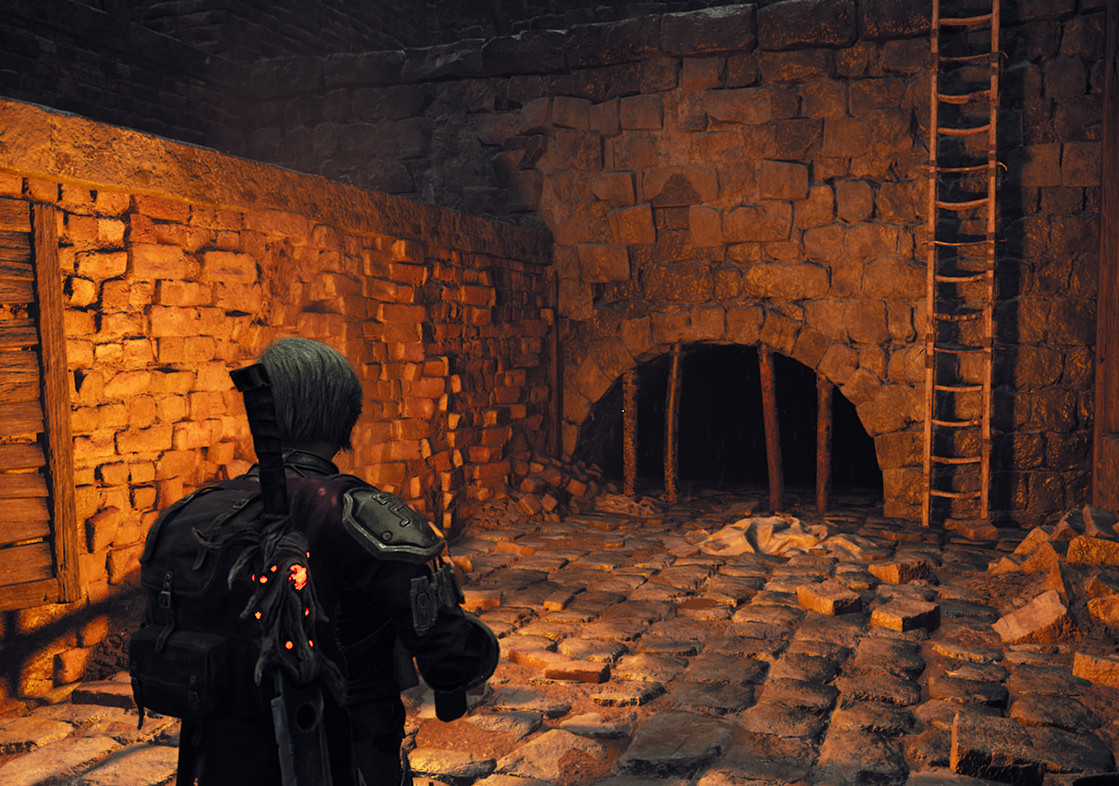
- Eventually, a manticora (the rat creatures) will leap out and grab you, killing you and sending you to an inaccessible zone in the Morrow Parish.
* The forced death reportedly ends a hardcore run.
** If playing multiplayer, non-grabbed players will have to kill themselves to advance the event - After respawning, a manticora will be close by. Killing it will drop the Philosopher’s Stone, the Archetype Material for the Alchemist.
*If you die in this fight, you will respawn at the same point and can face it again without issue.
Engineer (N’Erud)
- In the second open zone of N’Erud (The Eon Vault or Timeless Horizon), look for the Titan’s Reach checkpoint (this is not a dungeon — it is a checkpoint in the open area). If your zone has the Extraction Hub, reroll and try again.
- Find the below rock formation along the edge of the map. The position is random and doesn’t show on your map until actually going in, so just run along the fog barrier while looking out until you spot it.
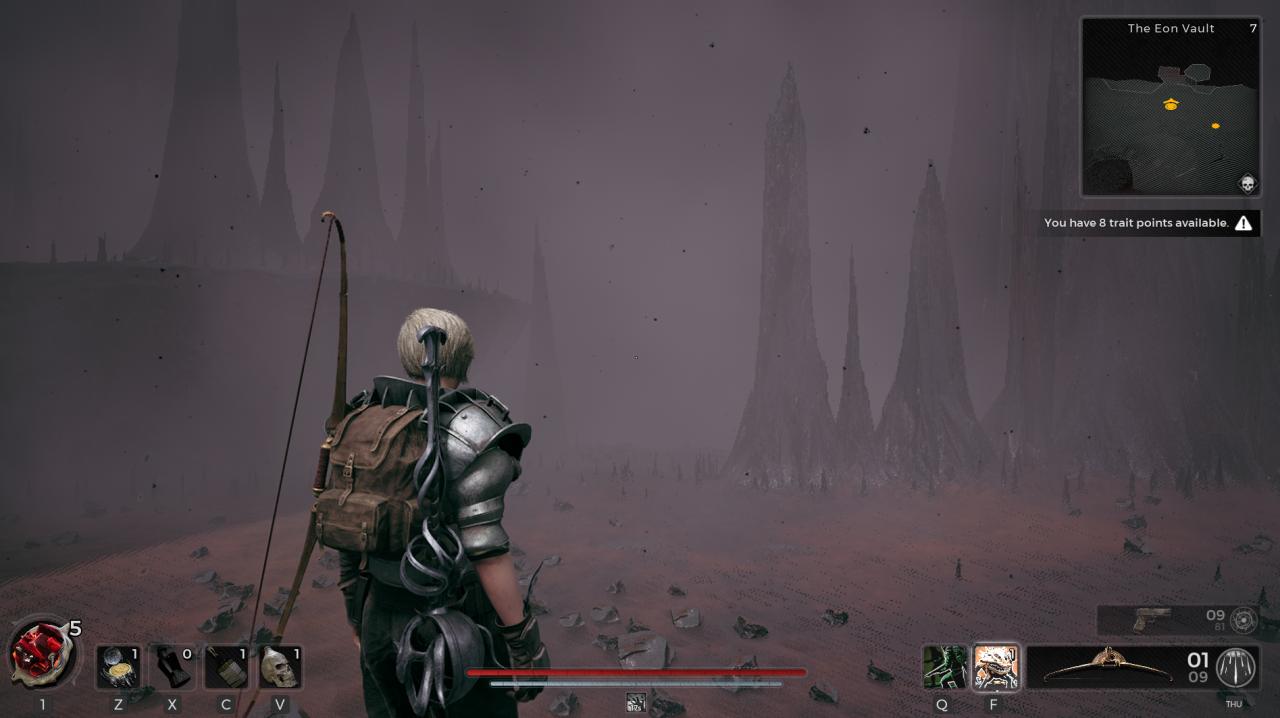
If you’re looking close enough, it can be spotted from quite far.
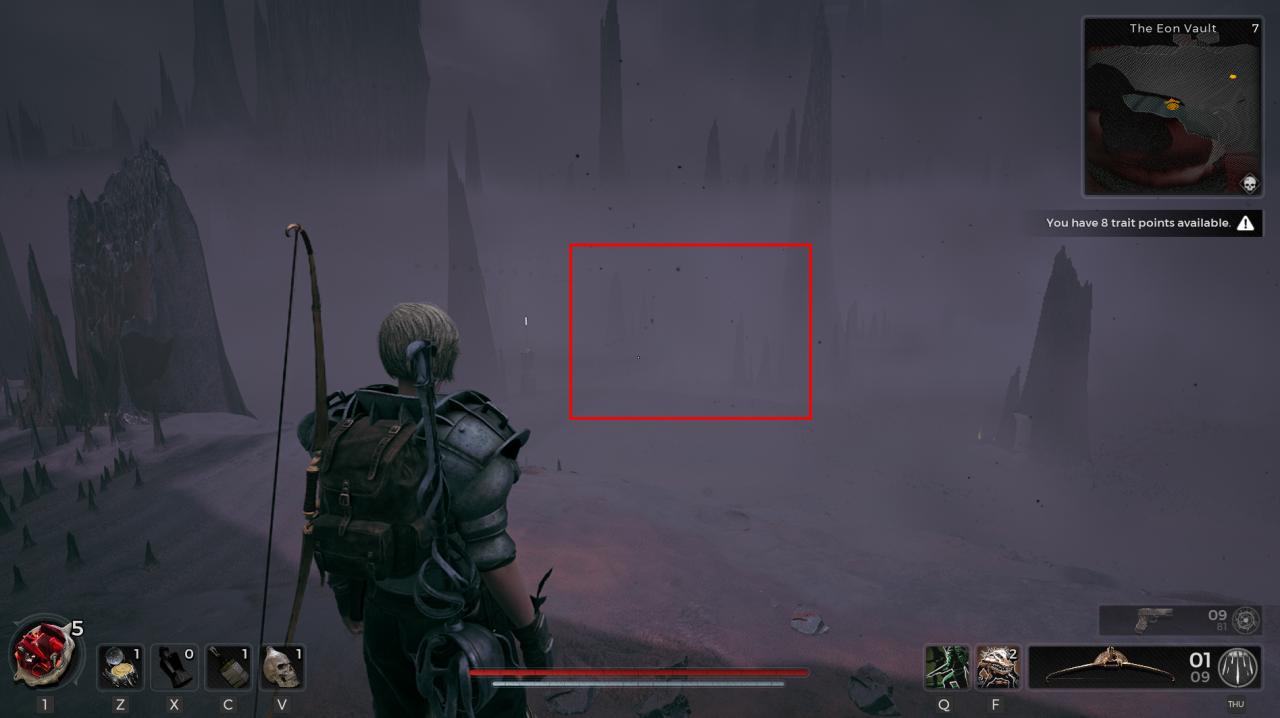
- Run into the fog, note that this starts Blight buildup that will likely result in death. On the far ledge is the Technician armor set. On the lower level is the Alien Device, the Engineer’s Material.
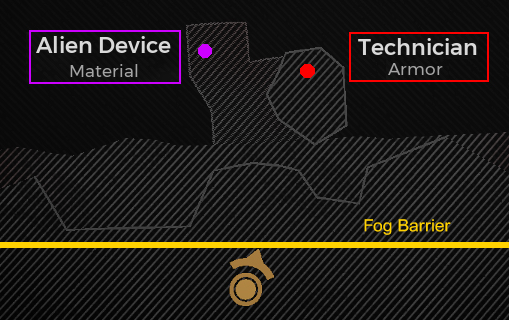 Tips
Tips- Rolling will cover more distance. The cough animation makes you quite slow, but you get a small window as it ends where you can start rolling again.
- Jumping the ledge to the Technician armor is possible (as long as you aren’t coughing).
- There is plenty of time to get both pickups even at 0 Blight resistance if you have some hustle. You can mitigate time pressure with move speed buffs and/or Blight resistance (from gear or 10-minute consumables)
- Dying doesn’t bar you from anything, just requires you to run back (which should be easier as the area should now be on your map)
- Random data: 0 Blight resist gives ~15 seconds, 43 resist gives ~18 seconds. With 10 points in lol-Wayfinder & +3% move speed, it’s tightly doable with no death and 43 resist.
Summoner (Yaesha)
- Find the Bloodmoon Altar on Yaesha. It will spawn in an open, non-dungeon area.
In my experience, it’s close to either the Root Nexus boss or Meidra (lady in the big, blue tree who gives a questionaire) - Give the following materials for the Faded Grimoire
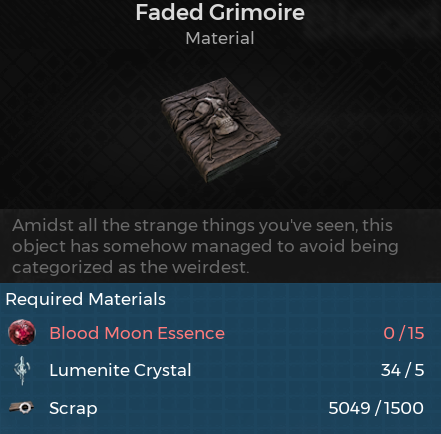
*Bloodmoon Essence is dropped by Root Wisps — small, flying purple balls of light present on Yaesha during a Blood Moon.
There’s a lot of conflicting information on how to spawn Blood Moons. A reddit post from a dev somewhat explains their spawn mechanic. 
My attempt at summary:
- Blood Moon spawns are dictated by a timer (length unknown)
- In a window where it is allowed to by the timer, loading into a Yaesha zone will cause the Blood Moon to spawn
- To reiterate, Blood Moons spawn on loading into a zone. Staying in a zone, no matter how long, will not cause the Blood Moon to spawn.
It is unclear if the “allowed spawn” time is a window (e.g.: between 15mins & 30mins, dead in other slots per hour) OR time elapsed (e.g.: Blood Moon allowed after 1 hour). Anecdotally, the former seems more likely. But without knowing the timer’s length or behavior, it’s difficult to predict a Blood Moon without deep testing.
Below are some Blood Moon myths (they do not work, are not true, etc.)
- Killing the Doe at any point in the Ravager fight triggers/causes more Blood Moons
- You have to leave Yaesha entirely and warp back in to trigger a Blood Moon
Gunslinger (Ward 13)
- Complete two different worlds in campaign mode (the Labyrinth does not count as a world)
- Return to the Labyrinth and talk to Clementine/The Keeper to get a cutscene
- Talk to Mudtooth in Ward 13, select “I had some questions.” then the option asking him to tell you a story. Repeat this until he exhausts all his stories (total 23).
- After listening to them all, Mudtooth will give you the Worn Cylinder, needed to craft the Gunslinger archetype.
*After the last story, there will be no dialogue option to listen to a story. If he says he needs a break or something, you need to progress farther in the main story OR need to go to the Labyrinth for the cutscene
**Right-clicking / pressing spacebar skips the current line of dialogue. There are no “wrong” options throughout the stories.
Explorer
- Defeat the final main story boss on any difficulty. The Archetype Material: Broken Compass will be in your inventory after loading back in with your character
Invader (Root Earth)
The Invader requires the Dreamcatcher weapon. If you already have it, go to Walker’s Dream below.
- Reroll campaign or adventure mode for Lonsom until you get the Morrow Parish starting point
- Get to the Morrow Sanitarium. Find the three stone carvings found at this location and give them to the Head Doctor found in the basement.
- One is in the room across from her office on the first floor
- One is outside in front of the asylum, to the left if you’re facing the entrance
- One is on the third floor, in the second large room
- While on the third floor, go through the open window in the first large room to get the Prison Cell Key
- AFTER giving her all three, open the door with the Prison Cell Key. In her cell you will find the Nightweaver Stone Doll. (She also gives you the code to her office’s safe in her dialogue: )
- Continue through the story until you reach The Tormented Asylum (the Nightweaver’s boss zone). Interact with the Nightweaver’s Web and give the Nightweaver Stone Doll to it to receive the Dreamcatcher melee weapon
- On Root Earth, get to the Corrupted Harbor zone.
- Inside of a large boat, there is an encounter where you are trapped in a large room with enemies spawning in. After the encounter ends, in the same room, go to a doorway that is to your right from where you entered from.
- There is a corpse in the center of a large clearing the doorway leads to. Before or after picking up the amulet, equip the Dreamcatcher and swing it, giving you the Walker’s Dream consumable.
- Use the Walker’s Dream while in the Corrupted Harbor (may require slotting it into a QuickSlot), teleporting you to a mini-checkpoint.
- Continue on the path to fight a boss (aberration version of the tall tripod bois), who will drop the Wooden Shiv, allowing you to craft the Invader archetype.
Archon (Labyrinth)
Credit to community data miners & specifically to u/MotherKosm’s reddit post where they detail the requirements. (scroll down for their thorough write-up).
The Archon is unlocked via the red portal door in the Labyrinth. In order to go through, you have to equip specific items & skills in order to go through. Below are the requirements (and how to get them), and further below are the steps to get to the red door and beyond.
- Equip the Fortune Hunter skill (level 10)
- Equip the Worm Hole skill (level 5)
- Buyable from Whispers for 2725 scrap after beating the campaign on any difficulty
- Found in N’Erud, Seeker’s Rest start. Kill the world boss (Sha’Hala) WITHOUT using the override pin.
- Do not reroll this N’Erud instance until 12 hours have passed, at which point Alepsis-Taura will be open to travel to from the bottom-right of the N’Erud warp map. The Void Heart is a purple light in the distance from here.
- *The 12-hour timer isn’t based on ingame time (e.g., you can close the game). You can bypass it by setting your PC’s time 12 hours ahead
- Buyable from Reggie for 1000 scrap after flopping 100 times while in Ward 13 (while wearing Leto Mark II armor set)
- Note: There are different accounts of what’s needed to get this item in shop. The “safest” which I did is the method is above. The “minimum” method is flop 100 times (red weight, >75)
- Buyable from Cass for 500 scrap
- Cass’s inventory is randomized, speculated to refresh once every 30 minutes (requiring a reload of Ward 13 to refresh).
- Cass is also horrendously bugged, and may leave Ward 13 permanently or never update her shop. You can purchase items from her from other players’ worlds.
- Buyable from Reggie for 500 scrap after dying 15 times (7 times is also reported)
- On Root Earth, Ashen Wasteland, after the first checkpoint, go around the large ramp leading to the trainyard encounter. There is a hole in the wall you must crouch through, Zania’s Malice is through here.
- Buyable from Whispers for 3000 scrap
- Complete Yaesha with The Red Throne start. After the boss, talk to The Eternal Empress without giving her the Ornate Lockbox or Thaen Seed. This will give you the Seal of the Empress ring
- With the Seal of the Empress ring equipped, head to the library in The Red Throne (left path from checkpoint). The floor on the main level will move aside, revealing a room where you can find Ford’s Scattergun
- From the shifting-portal junction in the Labyrinth, head left while facing the portal.
- One medium and two small rock bois later, the far edge of this platform should look over some floating rocks. Jump onto them where they will become a platform. At the edge of this is a large gap — simply wait until a platform appears that allows you to cross it.
- At the end of this path is the *Labyrinth Staff* on an altar (approaching it spawns a boss)
- Crafted at McCabe with a Conflux Prism (Labyrinth cubes boss), Lumenite Crystal x7, and 650 scrap.
Your Character menu should look like this:
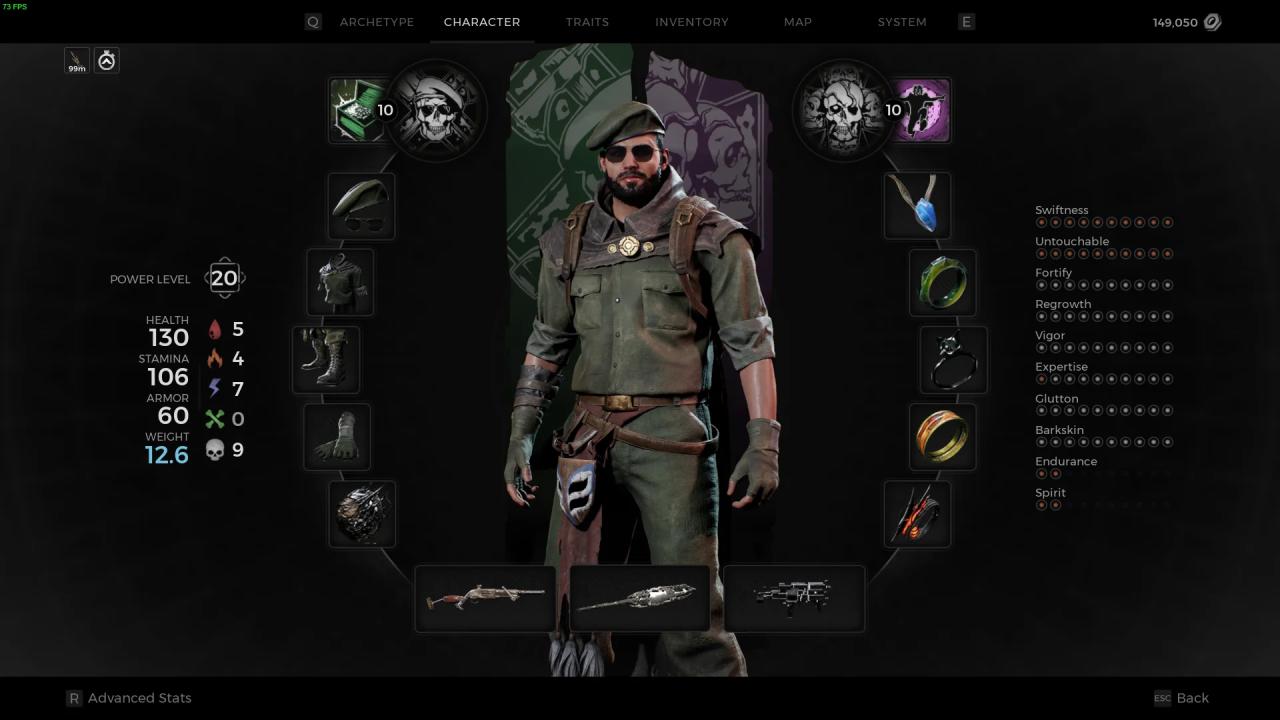 from u/MotherKosm’s reddit post
- In the Labyrinth, get back to the shifting-portal. Wait for the below image to appear and time it to drop on the safe zone.
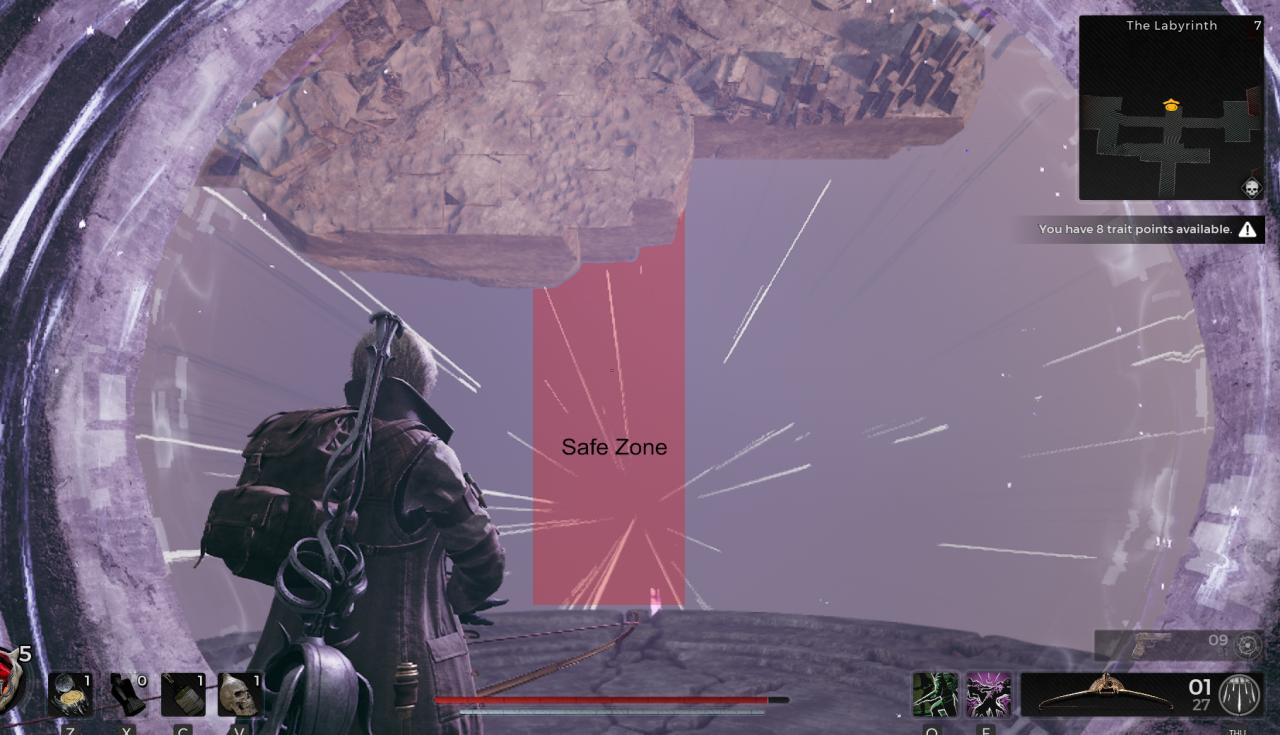
- There are two enemies in this area (flying circle rock boi + big rectangle rock boi)
- With all the above items equipped, interact with the red portal door and use the Biome Portal Key to open it. Interacting with it again takes you to The Backrooms zone, where you’re given a limited amount of time (~1.5minutes) to find three items. The Fortune Hunter skill helps here, though keep in mind nothing stops you from returning to get anything you missed.
- To find the Archon’s Material, Strange Box:
- Go through the right opening after spawning in and go right again
- Go straight until you reach a hallway on your right, then turn left and go straight
- Hit a wall, go through the opening immediately right
- Past this opening, go to the opening on the far left wall and follow this linear path to the Strange Box
Related Posts:
- Remnant II How to Unlock the Engineer Archetype Fast & Easy
- Remnant II Everything You Need to Know about Classes
- Remnant II How to Avoid Negative Trait Point Save File Corruption
- Remnant II Nightweaver’s Web Trade Guide
- Remnant II The Jester Hidden Item Guide
