For SimRail – The Railway Simulator players, this guide will show you everything about dispatching in game, let’s check it out.
The Basics
Although some stations are more east-west aligned, for simplification I’ll refer to mainline traffic as northbound/southbound. Also note I do not have a Polish keyboard, so don’t expect Polish characters in this guide…Trains drive on the right in Poland.
Every signal box has a telephone.
Every telephone has large quick-dial buttons on it for calling neighbouring signal-boxes.
Mouse over the quick-dial buttons to see which neighbour it calls. If that neighbour is AI controlled, the button is blue and the tooltip shows (AI). If it’s player controlled, the button is white and the tooltip does not show (AI).
A number of text prompts can be used to communicate with AI signallers. If the AI understands what you tell them, they will read it back.
You can also use these text prompts to communicate with player signallers (it translates to their language choice). Alternatively you can choose voice chat if you have a mic.
If a neighbour signaller wants to voice chat with you, the phone will ring. Click the handset to answer.
Every train has a unique number to identify it. The basics to remember are:
4 digit numbers – High speed express trains. These trains usually do not stop at small stations, and should be given priority over other trains when necessary.
5 digit numbers – Commuter trains. These trains usually stop at all stations.
6 digit numbers – Freight trains or detached locomotive moves (known as ‘running light’). These also usually don’t stop, beware that freight trains could be slow. 6 digit trains generally have the lowest priority and freight can expect to be held in sidings to let express trains pass them.
Note that Sosnowiec Glowny has 2 timetables. The reasons for this will be explained when we look at that signal box in detail later in this guide.
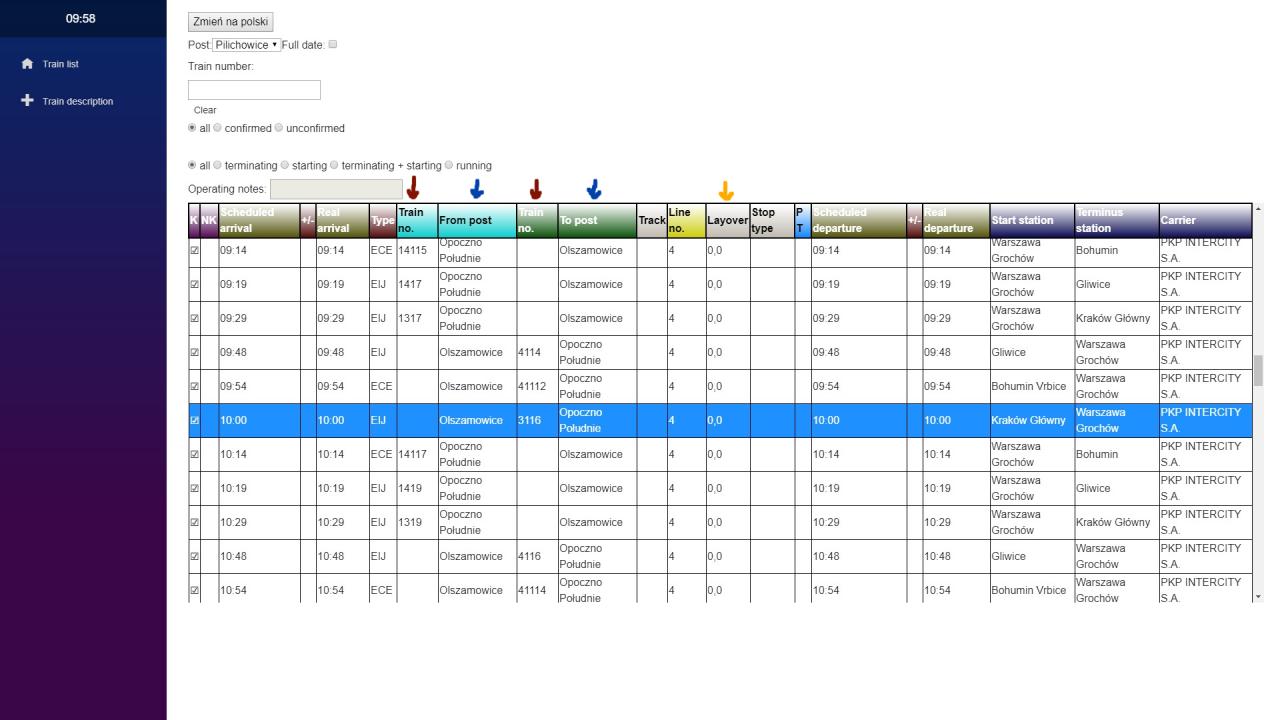
The arrows in the above screenshot point to the columns in the timetable that you will be using most often.
The blue arrows point to the “From post” and “To post” columns. These show which neighboring signal boxes the train is coming from, and which it is going to. Your job is to route the train through your section to where it wants to go. While some signal boxes in the game only have two neighbors, some have more. It’s important to always check where a train is going so you can avoid sending it the wrong way.
The red arrows point to the columns showing the train’s ID number. Which column the number is in indicates which direction it’s traveling in.
The yellow arrow points to the Layover column. If the numbers in this column show anything other than 0,0 it means the train is due to stop in your section, likely at a platform. The “P T” column would show two bits of information in this regard, firstly a roman numeral ( I or II ) indicating which platform it’s stopping at, then a number ( 1 or 2 etc) to indicate which track to use. In some cases, a single platform can serve two tracks.The timetable can be filtered to show a specific train number by typing it in the Train number: search box at the top and pressing enter. Click Clear under the search box to return the timetable to it’s default state.
Computerised signalling
Many signal boxes have been modernised and use computerised signalling. Click the screen to operate the signalling, press ESC to exit the screen view.
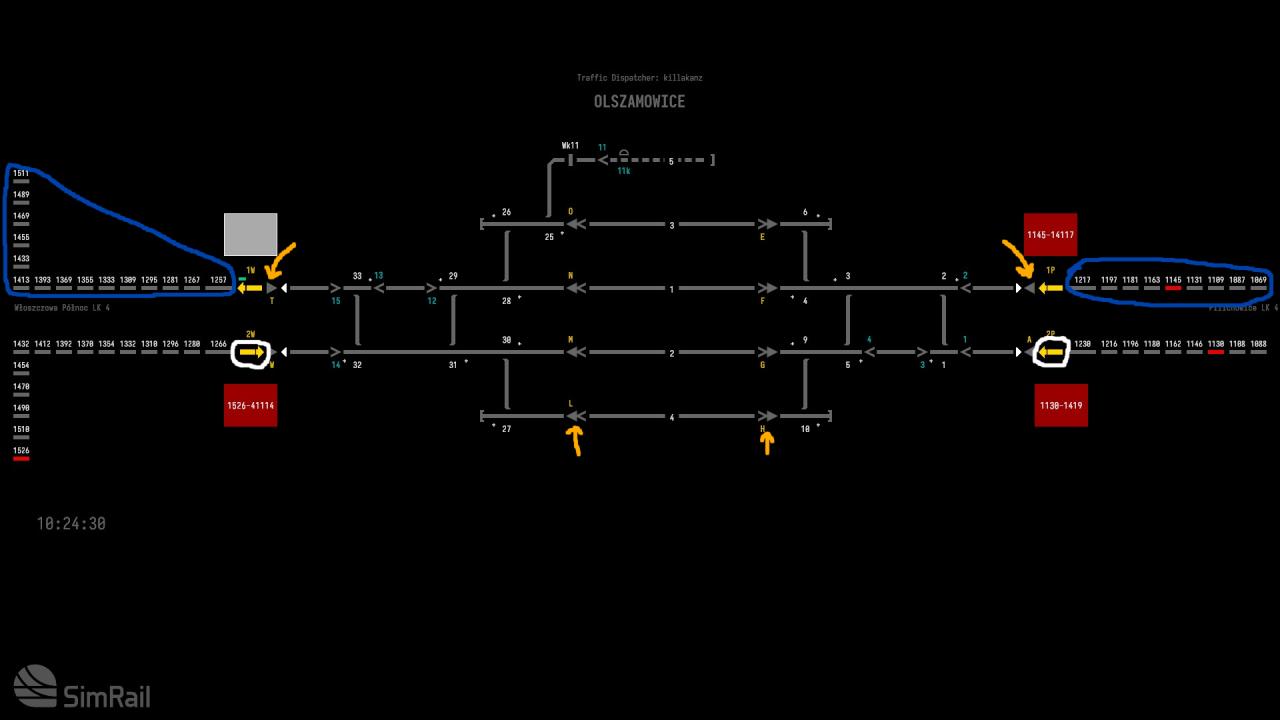
The bits circled in blue are auto-block sections – sections of track where trains are automatically separated by signals. Grey blocks are empty track. When a train is occupying a block, it turns red. When you mouse over a red block, it will show the train’s number. The large boxes next to the auto-blocks will also show which train is in which block, for example the top right box shows that block 1145 contains train number 14117.
Circled in white are the direction interlock arrows for the auto-block sections, these lock in which way the direction of travel is. These can be turned around to allow “wrong way running”, in a process where the signallers on both ends of the auto-block must agree on. More on this later.
The gold hand-drawn arrows point to the “Main Signals” that are primarily used to set routes. Try to use the main signals for setting routes as much as possible.
The smaller < > icons are shunting signals. Routes should not be set from shunting signals unless you are performing shunting moves.
As you probably noticed, train 1419 is wrong-way running on Line 2P. Let’s send it into the siding lane 4, so that later it could be moved across the mainline and back onto Line 1W where it should be going.
First, go to this grey triangle. This is the start of our route. The yellow box appears when you mouse over it…
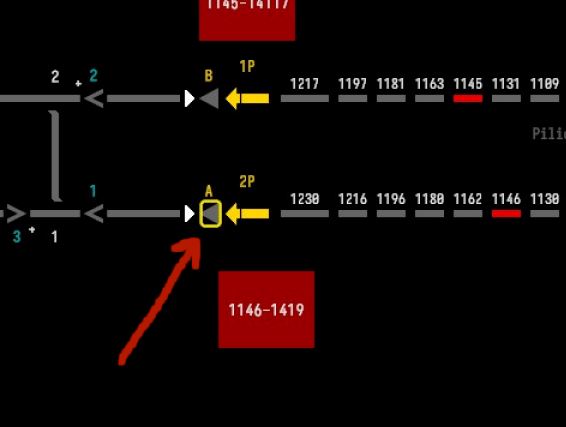
After clicking the triangle, the yellow highlight box turns blue, and possible route destination signals are highlighted.
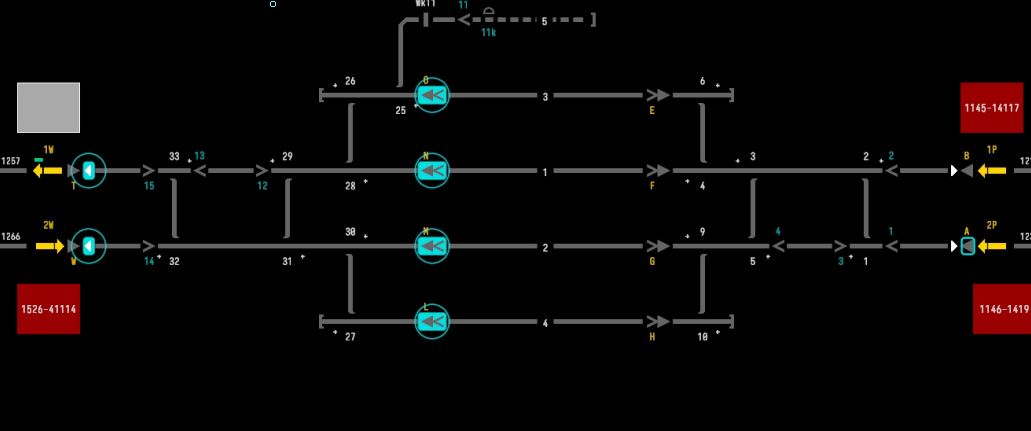
Click the signal in lane 4 to select the route into the siding, buttons will appear at the top of the screen. We will set the route by clicking the TRAIN ROUTE button…

… and then confirm it by clicking Execute.

The system will then change the points and set the signals for our route. This will take a few moments. When complete, the route shows a green line.
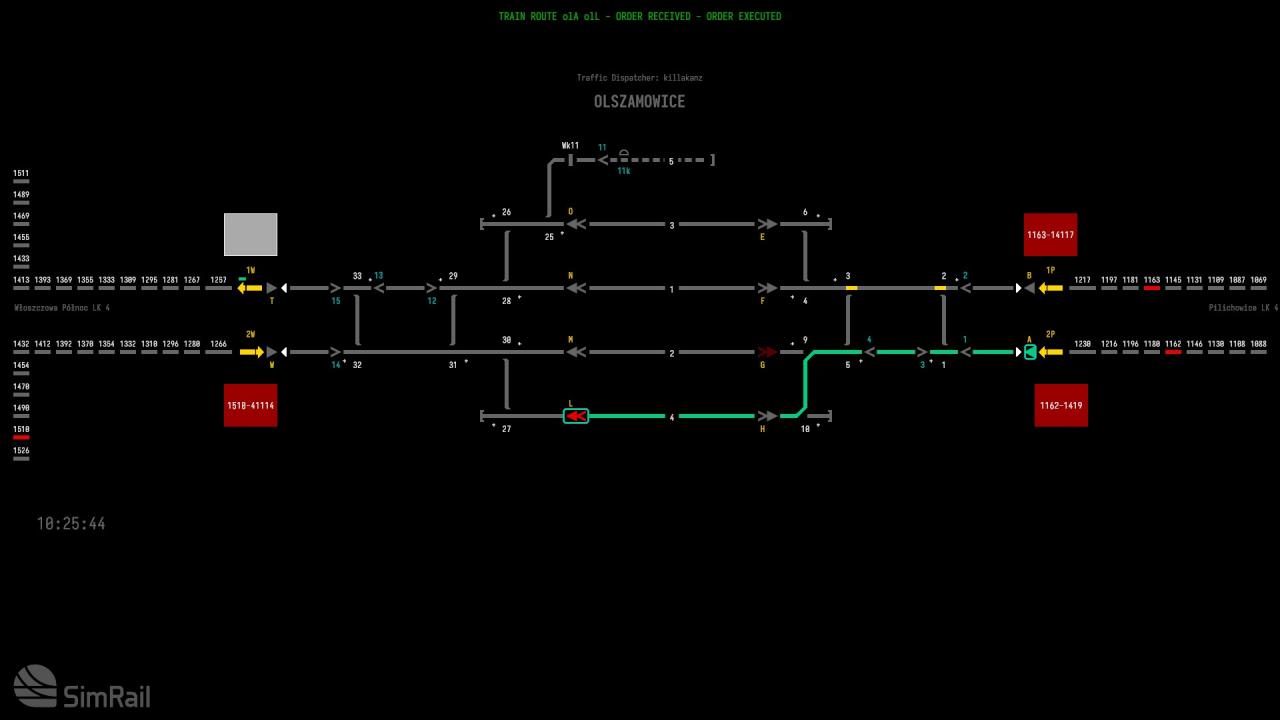 Note that our starting signal is now green, and the siding signal is red as we have not set a route past it. This is what the train driver will see on those signals.
We can also set a route straight through for the train approaching on line 1, by selecting the start signal on line 1 on the right, and choosing the destination signal on line 1 on the far left. The system will make a direct route through the lanes.
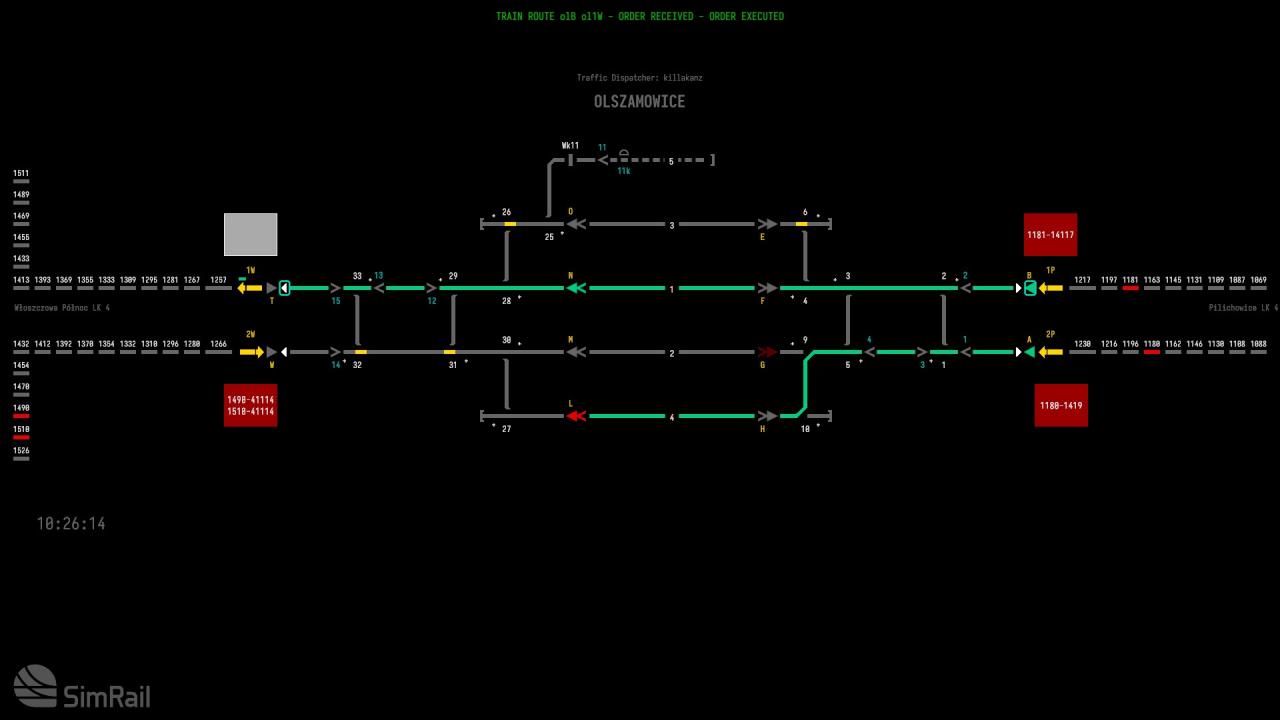
If you have set an incorrect route, you can cancel it by selecting the start signal, then selecting the destination signal. New buttons appear at the top of the screen.
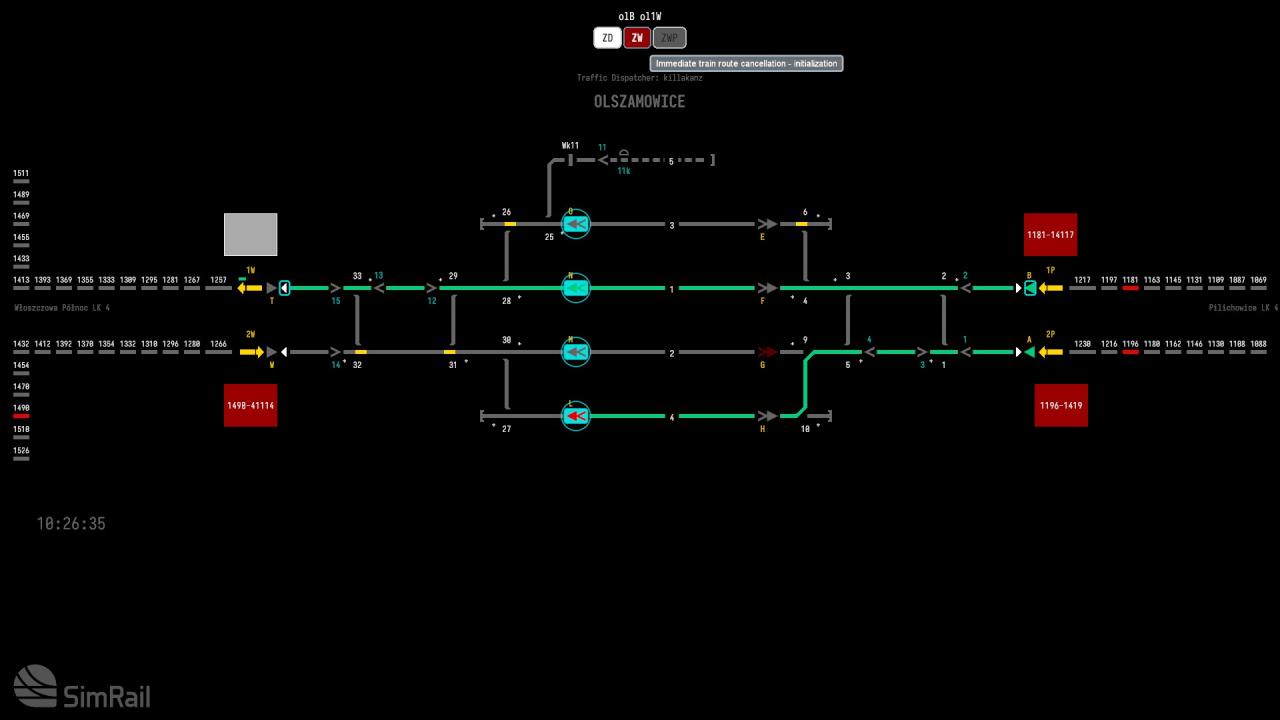 Click the red ZW button to begin the route cancellation. You will then need to confirm this by selecting the start signal and destination signal again and then click the ZWP button. The route should immediately clear.
It is not recommended to cancel a route when a train is too close to it. If the route is cancelled while the train is approaching the start signal, the train driver will receive an unexpected change of signal aspect and may not have time to stop. Remember that trains need distance to stop, drivers on the main line are usually warned of a red signal upto 3 signals beforehand with caution signals. A driver passing a green signal at speed to then be confronted by a red one is not a good scenario…
Pilichowice – In Detail (computerised)
Pilichowice is a computerized signal box.
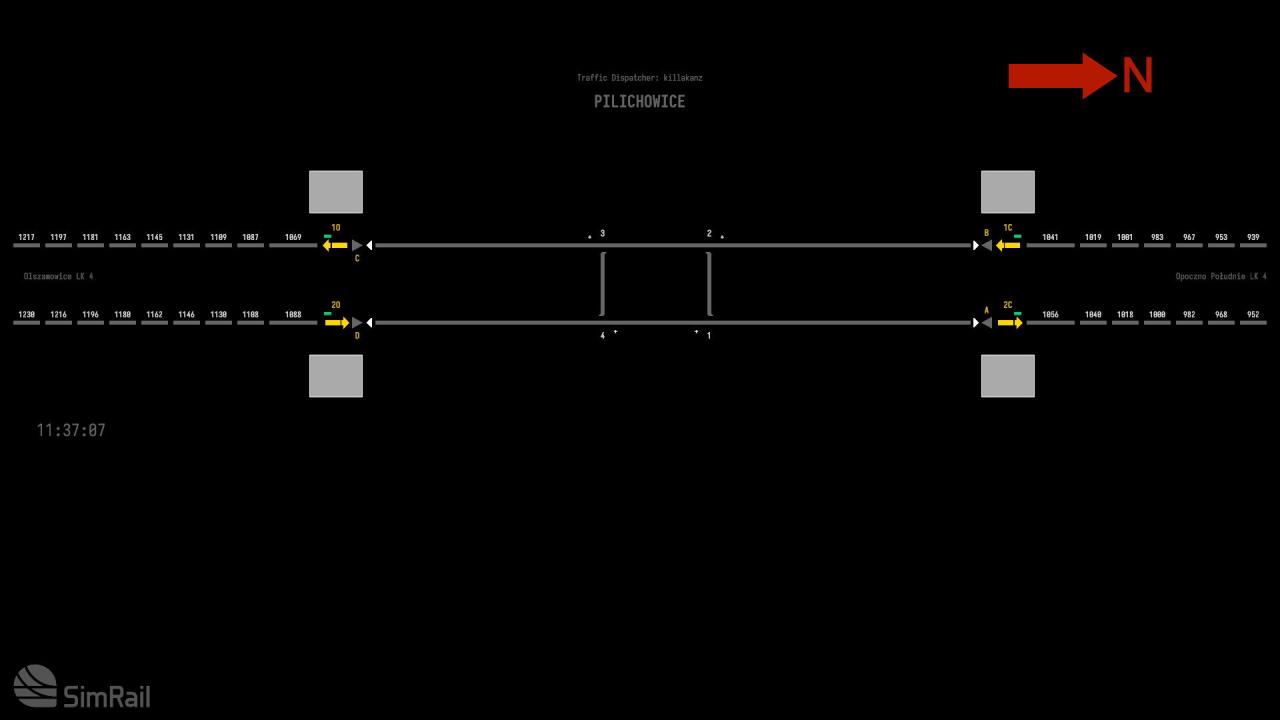
It is the northernmost signal box on the route, and the simplest. The box is oriented so northbound traffic is heading right, and southbound traffic is heading left.
It’s neighbours are:
Opoczno Poludnie to the North
Olszamowice to the South.
The layout consists of two mainline tracks, with crossovers in the middle. There are auto-block sections to each side with directional interlocks. Signals consist of two start signals and two destination signals on each side.
There are no stations or sidings in this section.
Olszamowice – In Detail (computerised)
Olszamowice is a computerized signal box.
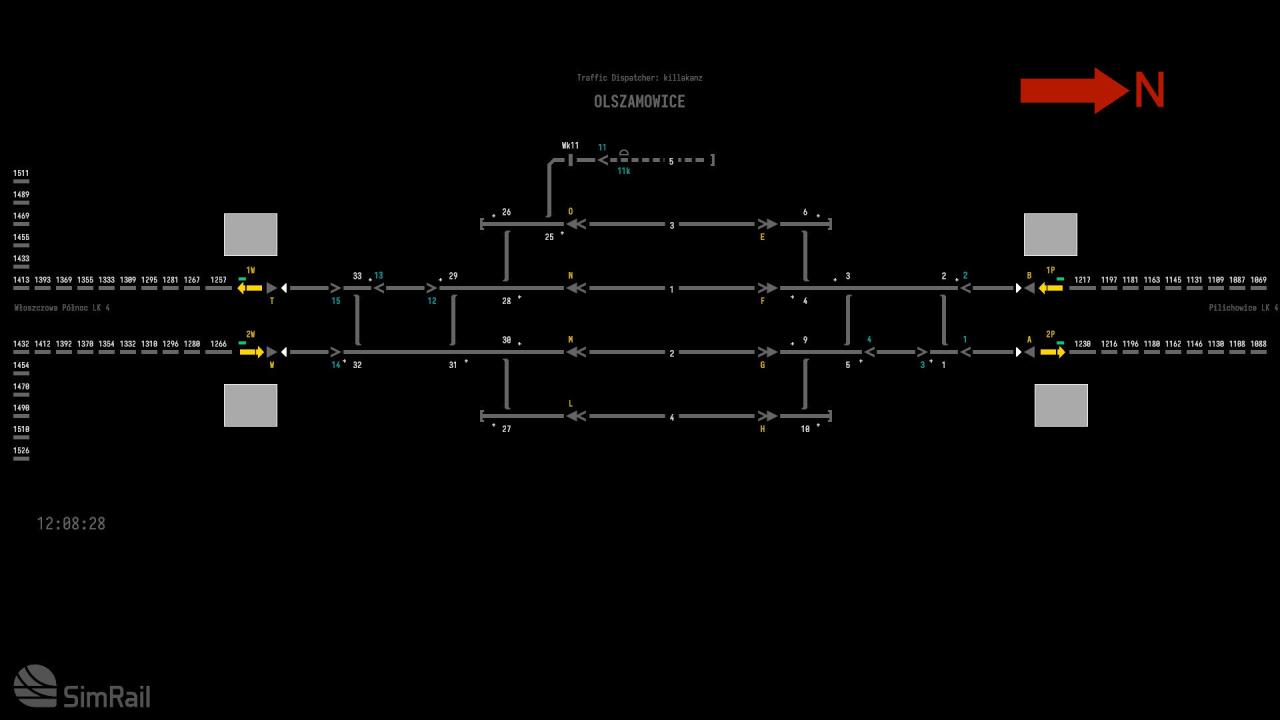
This box is close to the northernmost area of the route. The box is oriented so northbound traffic is heading right, and southbound traffic is heading left.
It’s neighbours are:
Pilichowice to the North
Wloszczowa Polnoc to the South.
The layout consists of two mainline tracks, with crossovers to each side. There are sidings on both sides of the mainline, labelled line 3 and 4, and an industrial yard off siding line 3.
There are auto-block sections to each side with directional interlocks. Signals consist of two start signals and two destination signals on each side, shunting signals beside and between the crossovers, and start/destination combination signals on each lane. All of the lanes can be used for either direction.
There are no stations in this section.
Wloszczowa Polnoc – In Detail (computerised)
Wloszczowa Polnoc is a computerized signal box.
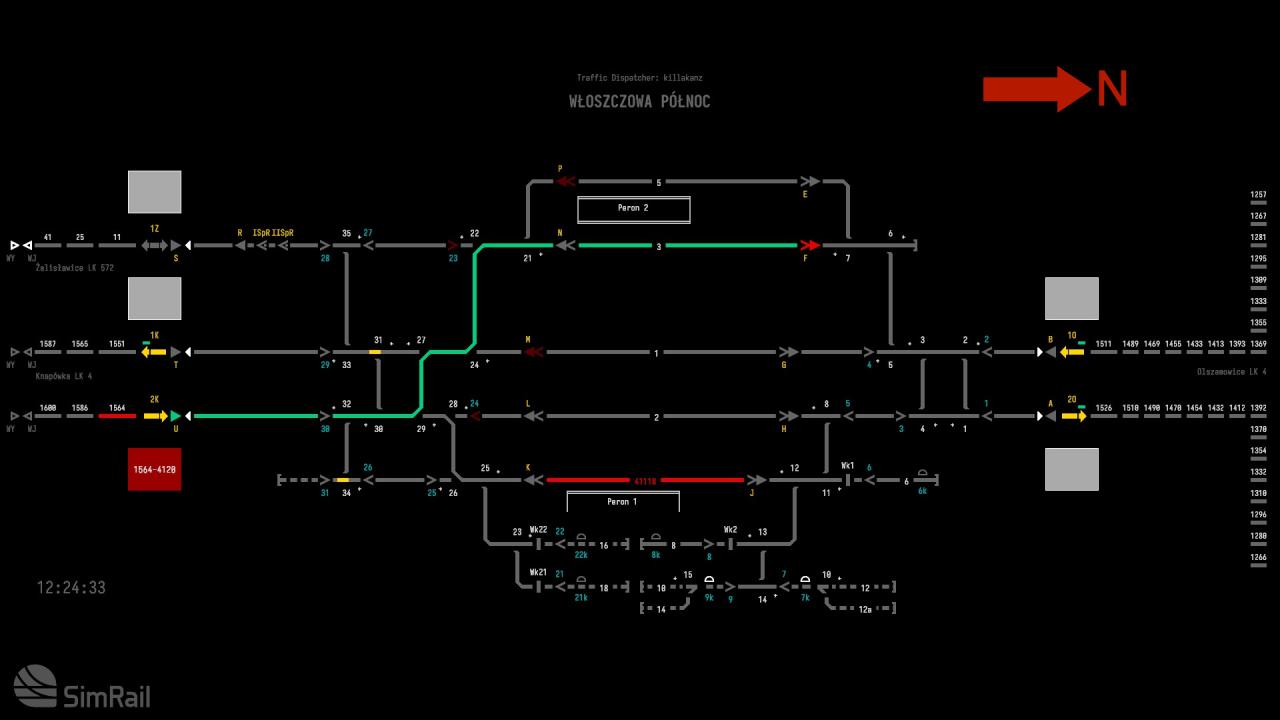
This box is in the northern area of the route. The box is oriented so northbound traffic is heading right, and southbound traffic is heading left.
It’s neighbours are:
Olszamowice to the North
Knapowka to the South.
Zelislawice off a branch line to the South.
The layout consists of two mainline tracks, with crossovers to each side and a branch line to Zelislawice. The branch line is a bi-directional single track.
There are sidings on both sides of the mainline, labelled line 3, 4 and 5. There is an industrial yard with several sidings below lane 4.
There are auto-block sections to each side with directional interlocks. Signals consist of two start signals and two destination signals on each side, start and destination signals on the branch line, shunting signals beside and between the crossovers, and start/destination combination signals on each lane. All of the lanes can be used for either direction.
There is a station here, with 2 platforms. Platform 1 is only served by lane 4. Platform 2 can be served by lanes 3 and 5.
Lanes 1 and 2 do not serve any platforms and can be used as transit lanes for non-stopping services.
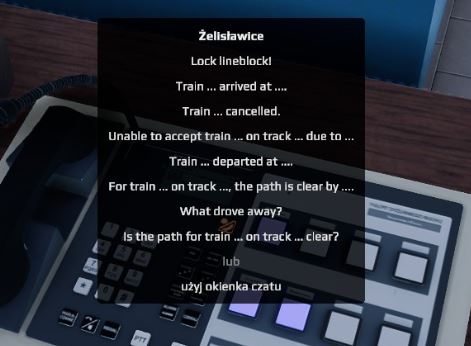
The branch line is a bi-directional single track.
If you are sending a train, you must call the neighbouring box (Zelislawice) and use the text option “Is the path for train … on track … clear?”, entering the train number and track 1. The neighbouring box should reply that the path is clear.
Next you must set the direction interlocking. Click the interlocking arrow and then the WBL button at the top and execute. The interlocking arrow should flash. Once the neighbouring box has accepted the interlocking change, the arrow will stop flashing and show solid yellow. You can now set a route onto the branch line.
If you are receiving a train, the neighbouring box will call you first to ask if the line is clear. If the track is clear, you must respond using the phone with the text option “For train… on track…the path is clear by…”, entering the train number and track requested.
After this wait a few moments. The neighbouring box will set the direction interlocking. When the interlocking arrow starts flashing, click it and click the PZK button to accept the change. The interlocking arrow should stop flashing and show solid yellow. The neighbouring box should then set a route onto the branch.
Knapowka – In Detail (computerised)
Knapowka is a computerized signal box.
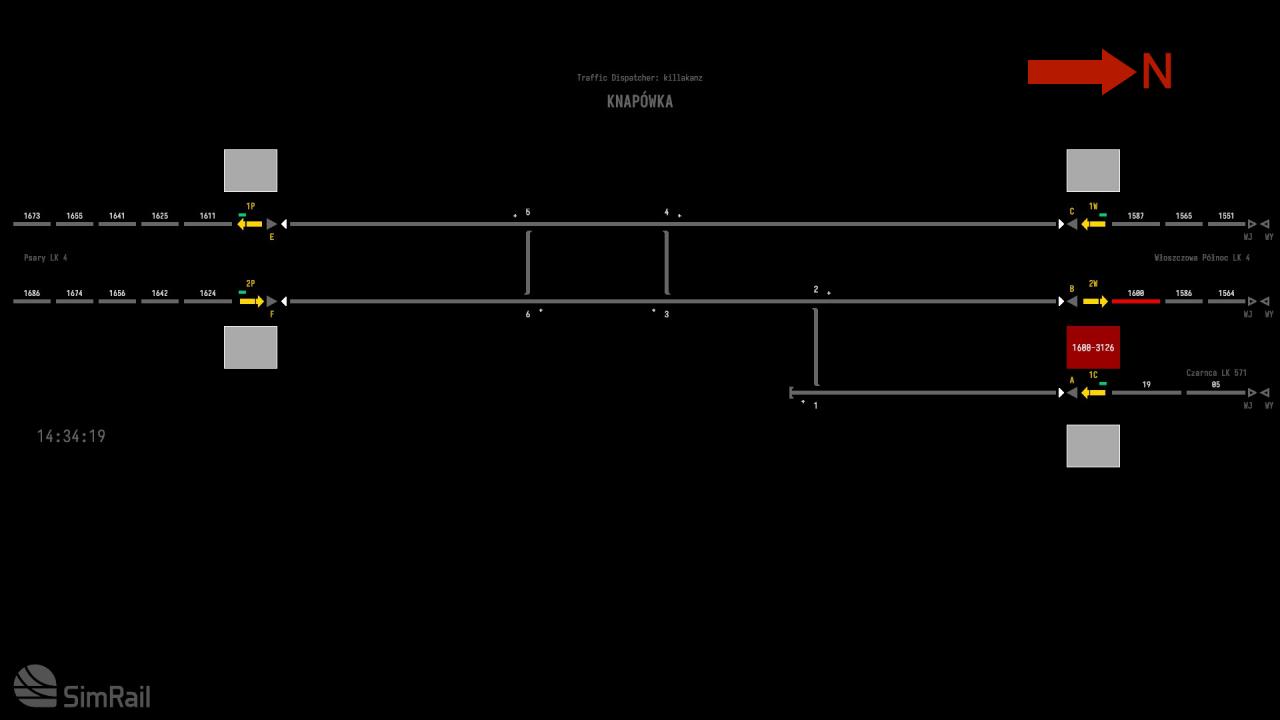
This box is in the northern area of the route. The box is oriented so northbound traffic is heading right, and southbound traffic is heading left.
It’s neighbours are:
Wloszczowa Polnoc to the North.
Czarnca on a branch line to the North.
Psary to the South.
The layout consists of two mainline tracks, with crossovers in the middle.
To the right, diverging off Line 2, is a single track branch line to Czarnca.
There are auto-block sections to each side of the mainline with directional interlocks. The branch line also has auto-blocks and a directional interlock.
Signals consist of start and destination signals on both ends of mainline tracks 1 and 2, and a start and destination signal on the branch line. There are no shunting signals.
There are no stations or sidings in this section.

The branch line is a bi-directional single track.
If you are sending a train, you must call the neighbouring box (Czarnca) and use the text option “Is the path for train … on track … clear?”, entering the train number and track 1. The neighbouring box should reply that the path is clear.
Next you must set the direction interlocking. Click the interlocking arrow and then the WBL button at the top and execute. The interlocking arrow should flash. Once the neighbouring box has accepted the interlocking change, the arrow will stop flashing and show solid yellow. You can now set a route onto the branch line.
If you are receiving a train, the neighbouring box will call you first to ask if the line is clear. If the track is clear, you must respond using the phone with the text option “For train… on track…the path is clear by…”, entering the train number and track requested.
After this wait a few moments. The neighbouring box will set the direction interlocking. When the interlocking arrow starts flashing, click it and click the PZK button to accept the change. The interlocking arrow should stop flashing and show solid yellow. The neighbouring box should then set a route onto the branch.
Psary – In Detail (computerised)
Psary is a computerized signal box.
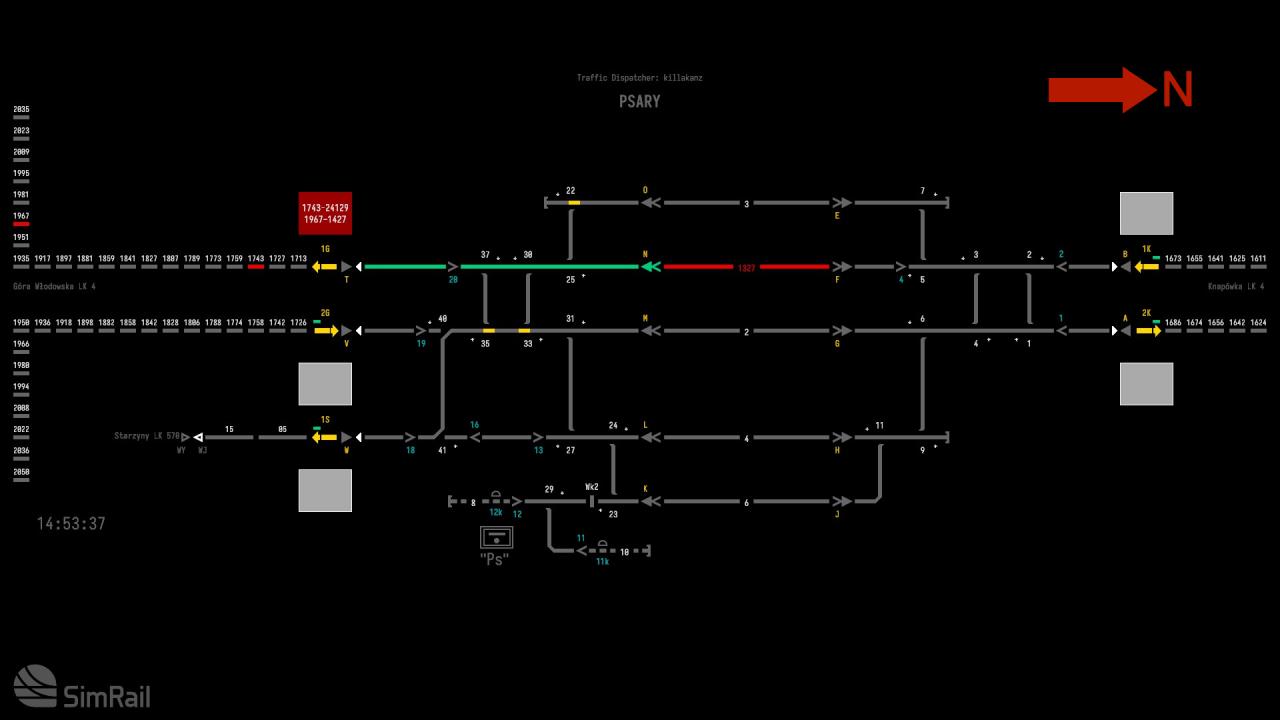
This box is in the central area of the route. The box is oriented so northbound traffic is heading right, and southbound traffic is heading left.
It’s neighbours are:
Knapowka to the North
Gora Wlodowska to the South.
Starzyny off a branch line to the South.
The layout consists of two mainline tracks, with crossovers to each side.
There are sidings on both sides of the mainline, labelled line 3, 4 and 6. There is an industrial yard with sidings off lane 6 to the left.
To the left of the sidings and mainline crossovers, there is a single track branch line to Starzyny.
There are auto-block sections to end of the mainline tracks with directional interlocks. The branch line also has auto-blocks and a directional interlock.
Signals consist of two start signals and two destination signals on each side on the mainlines, start and destination signals on the branch line, shunting signals beside the crossovers, and start/destination combination signals on each lane. All of the lanes can be used for either direction.
There are no stations in this section.

The branch line is a bi-directional single track.
If you are sending a train, you must call the neighbouring box (Starzyny) and use the text option “Is the path for train … on track … clear?”, entering the train number and track 1. The neighbouring box should reply that the path is clear.
Next you must set the direction interlocking. Click the interlocking arrow and then the WBL button at the top and execute. The interlocking arrow should flash. Once the neighbouring box has accepted the interlocking change, the arrow will stop flashing and show solid yellow. You can now set a route onto the branch line.
If you are receiving a train, the neighbouring box will call you first to ask if the line is clear. If the track is clear, you must respond using the phone with the text option “For train… on track…the path is clear by…”, entering the train number and track requested.
After this wait a few moments. The neighbouring box will set the direction interlocking. When the interlocking arrow starts flashing, click it and click the PZK button to accept the change. The interlocking arrow should stop flashing and show solid yellow. The neighbouring box should then set a route onto the branch.
Gora Wlodowska – In Detail (computerised)
Gora Wlodowska is a computerized signal box.
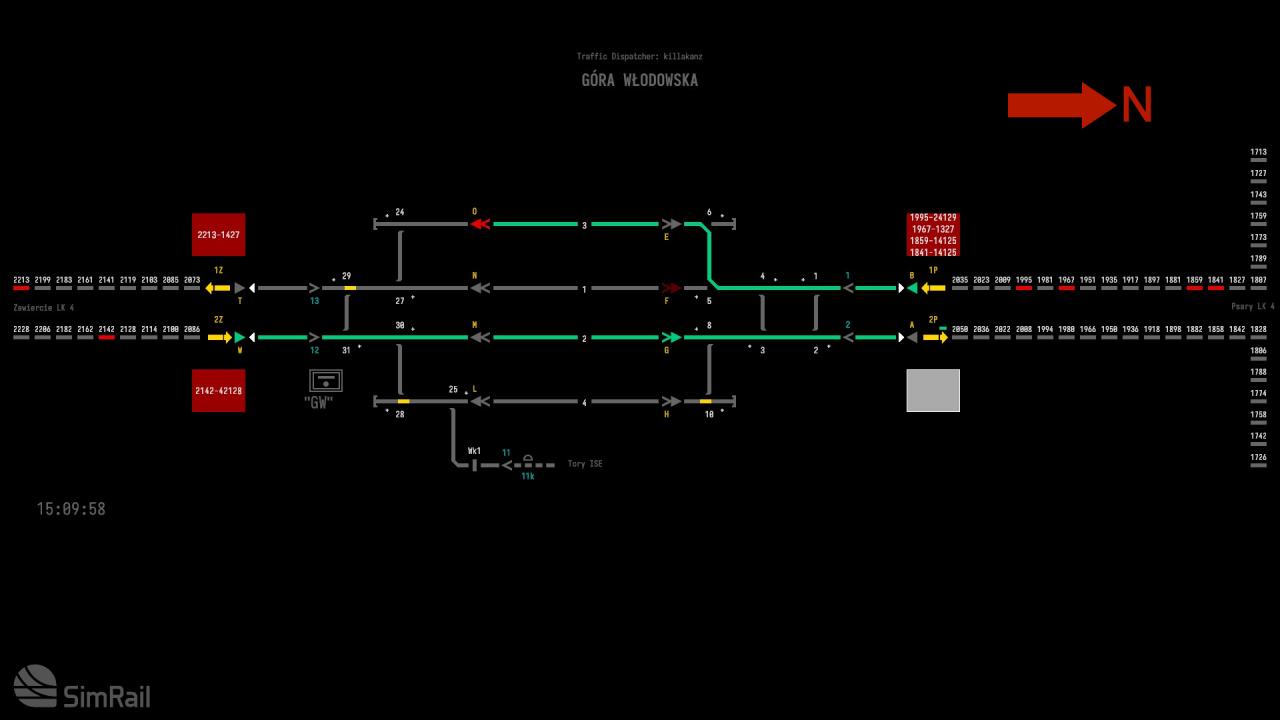
This box is in the central area of the route. The box is oriented west-east, but for simplicity we’ll just say northbound traffic is heading right, and southbound traffic is heading left.
It’s neighbours are:
Psary to the North
Zawiercie to the South.
The layout consists of two mainline tracks, with crossovers on the right side and only a half-crossover on the left side. Note that trains in lanes 2 and 4 cannot cross over to Line 1Z heading south.
There are sidings on both sides of the mainline, labelled lane 3 and 4, and an industrial yard off siding lane 4.
There are auto-block sections to each side with directional interlocks. Signals consist of two start signals and two destination signals on each side, shunting signals beside the crossovers, and start/destination combination signals on each lane. All of the lanes can be used for either direction, but note the limitation of the half crossover to the left.
There are no stations in this section.
Dabrowa Gornicza – In Detail (computerised)
Dabrowa Gornicza is a computerized signal box.
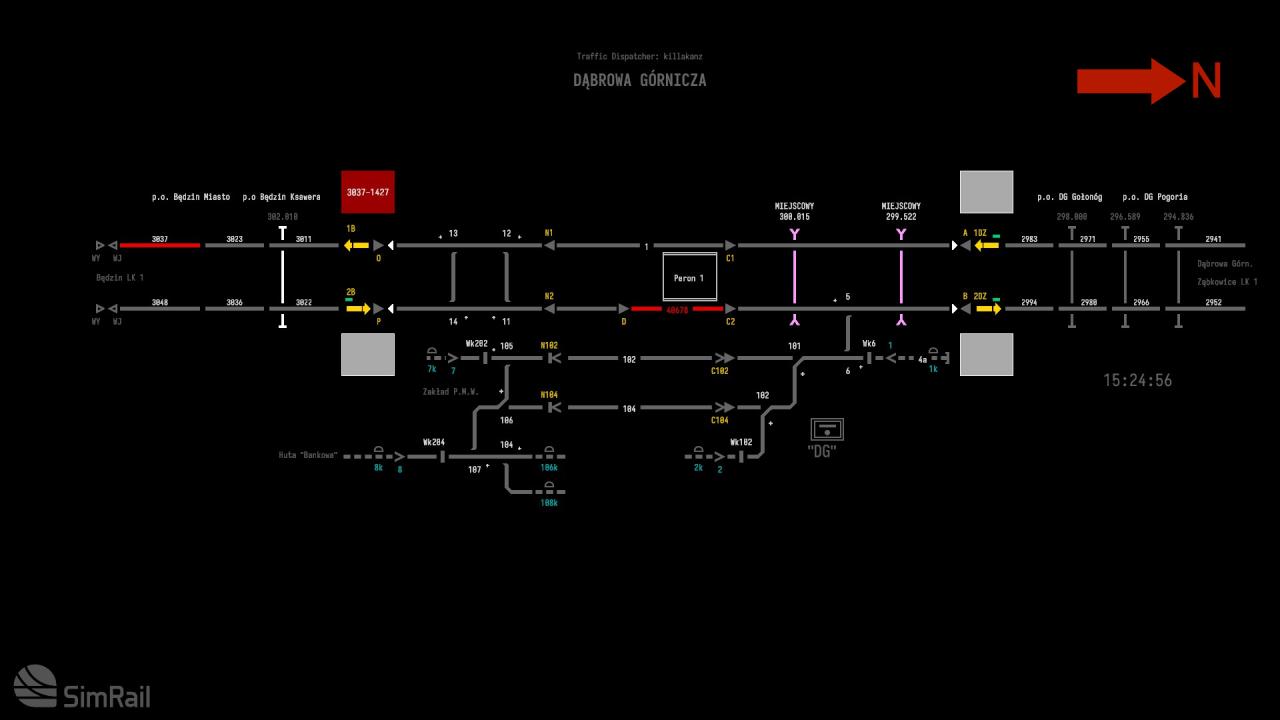
It is the southern area of the route. The box is oriented west-east, so for simplicity we’ll say northbound traffic is heading right, and southbound traffic is heading left.
It’s neighbours are:
Zabkowice to the North
Bedzin to the South.
The layout consists of two mainline tracks, with crossovers to the left. There are auto-block sections to each side with directional interlocks. There are sidings below track 2, only accessible from the right side.
Signals consist of two start signals and two destination signals on each side, as well as signals in the station area.
There is a station here, with 1 island platform served by both mainlines.
This section has 2 signaller-operated level crossings. One is right on the edge of the station platform and must be closed to traffic before northbound traffic can be routed in to the station, as there is a safety overlap. Likewise, both level crossings must be closed to traffic before routes can be set between the station and the northern auto-block sections. Don’t forget to open the level crossings again when the tracks are clear to avoid angering motorists…
Sosnowiec Glowny – In Detail (computerised)
This signal box is not recommended for beginners. Get some practice on other signal boxes before trying this one.
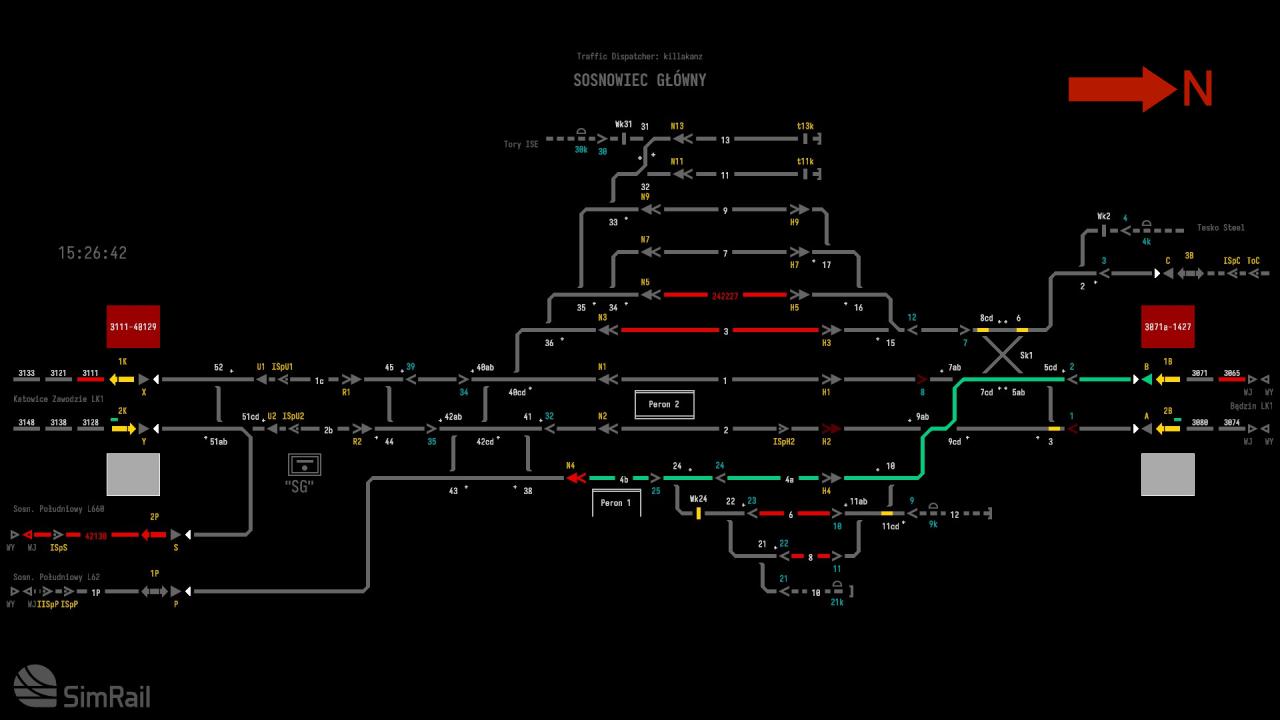
This box is in the southern area of the route. The box is oriented so northbound traffic is heading right, and southbound traffic is heading left.It’s neighbours are:
Bedzin to the North
Katowice Zawodzie to the South.
Sosnowiec Poludniowy off branch lines to the South.
This signal box has two timetables. You can switch between the timetables using the dropdown list at the top, beside Post.
The R52 timetable is for the junction on the left of the layout. The other timetable is for the station area. For trains coming from the south, you should check the R52 timetable first. If the train is diverging from there down the branch to Sosn.Poludniowy, it won’t appear on the other timetable. If the train is heading for Sos.Glowny, it’ll show on the other timetable. Check that for platform number and lane if it’s stopping, and to see if it’s going on to Bedzin.
Trains from the north will show on the other timetable first, then R52.
The layout consists of two mainline tracks, with crossovers to each side.
There are multiple sidings on both sides of the mainline. Note that sidings 3, 6 and 8 are not electrified, so are permanently “occupied” (when they’re actually empty) to prevent trains entering them. Lanes 11 and 13 can only be accessed from the left side and are dead-end sidings.
To the left of the layout are two branch lines toward Sosn.Poludniowy, labelled tracks 1P and 2P. The signaller should be aware that this is a Y junction. Track 2P connects to the mainlines 2K and 1K for the south to/from Katowice Zawodzie. Track 1P connects to the Sosnowiec Glowny station area for the north.
Both tracks 1P and 2P should be considered bi-directional single-track branches and thus the branch line procedure should be followed for both. It is vitally important at this busy junction that the procedure is always followed to avoid trains ending up nose-to-nose and blocking up the network. Remember to always check the track is clear before accepting a train onto them, if the AI box asks if track is clear but it is not, do not tell them it is clear!
Tip:
Trains approaching from Katowice with 42xxx numbers are always heading for the branch line, make sure you send them the correct way!
There are auto-block sections to each side of the mainlines with directional interlocks. Signals consist of two start signals and two destination signals on each end of the mainline, as well as between the Y junction and in all the lanes of the station/sidings area.
There are also start and destination signals on the branch lines, with directional interlocks.
There is a station here, with 2 platforms. Platform 1 is only served by lane 4. Platform 2 can be served by the mainline lanes 1 and 2.

The branch line is a bi-directional single track.
If you are sending a train, you must call the neighbouring box (Sosn.Poludniowy) and use the text option “Is the path for train … on track … clear?”, entering the train number and track number. The neighbouring box should reply that the path is clear.
Next you must set the direction interlocking. Click the interlocking arrow and then the WBL button at the top and execute. The interlocking arrow should flash. Once the neighbouring box has accepted the interlocking change, the arrow will stop flashing and show solid yellow. You can now set a route onto the branch line.
If you are receiving a train, the neighbouring box will call you first to ask if the line is clear. If the track is clear, you must respond using the phone with the text option “For train… on track…the path is clear by…”, entering the train number and track requested.
After this wait a few moments. The neighbouring box will set the direction interlocking. When the interlocking arrow starts flashing, click it and click the PZK button to accept the change. The interlocking arrow should stop flashing and show solid yellow. The neighbouring box should then set a route onto the branch.
Katowice Zawodzie – In Detail (computerised)
Katowice Zaodzie is a computerized signal box.
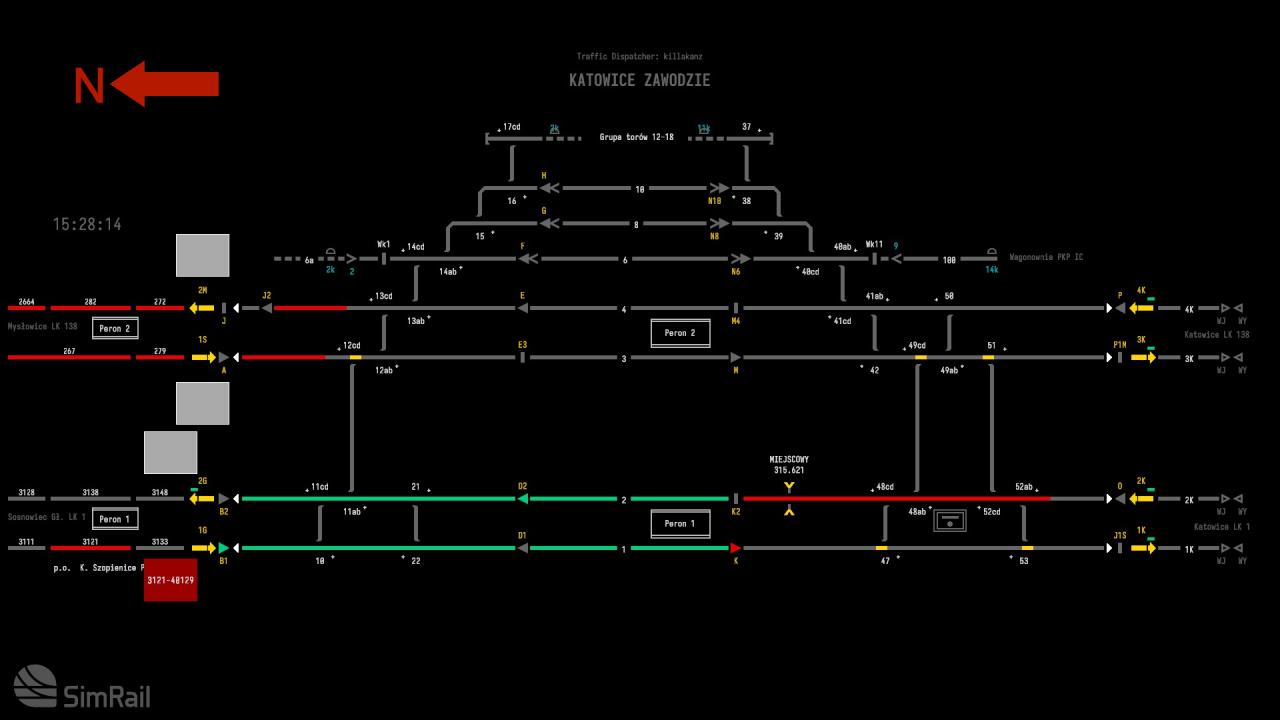
This box is the southernmost signal box of the route. The box is oriented so northbound traffic is heading left, and southbound traffic is heading right.
It’s neighbours are:
Sosnowiec Glowny to the North.
Katowice to the South.
Myslowice on a branch line to the South.
The layout consists of four mainline tracks. To the left, there are two mainline tracks coming from Sosnowiec Glowny. Two additional mainline tracks come from Myslowice, however they are currently not in use and show as permanently occupied to prevent trains being sent there. To the right of the layout, all 4 mainline tracks go to/from Katowice.
There are sidings on both sides of the mainline, labelled line 3, 4 and 5. There is an industrial yard with several sidings below lane 4. Partial crossovers for all four main lines are on the left, and full crossovers for all 4 main lines are on the right.
There are three sidings above the additional mainline.
There are auto-block sections to the left on all mainlines, with directional interlocks.
On the right side, there is just a single block on each mainline, with directional interlocks.
Signals consist of start signals and destination signals on each side of the mainlines, with start signals on each lane in the station/siding area.
Note that trains can go into Lanes 2, 3 and 4 from either direction, but can only leave in one direction. Lanes 2 and 4 can only be departed by heading North, while Lane 3 can only be departed by heading South. Lane 1 and the remaining sidings are bi-directional.
There are two stations here. K.Szopienice to the left is situated in the auto-block area. Beware that some trains stop here.
The main station is in the middle, and has 2 island platforms.
Platform 1 is served by lanes 1 and 2.
Platform 2 is served by lanes 3 and 4.
