Hello and welcome to the official walkthrough of the Space Company Simulator! I’m sure you will gain a lot of knowledge about the game here, as this tutorial will show you all the current features of the game. Ready? Make sure your seatbelt is on & let’s go!
Starting the game
The first thing you have to do is to create your own company. To do that, select “New Game”. Think of a nice company name, choose your motto and get going! You don’t have to worry about the starting bonuses—they don’t really matter that much. But if you want to, then focus on “Science Points”. They will be the most useful at the beginning of the game.
First Steps
Before we begin the walkthrough, let me guide you through the most important elements of the main scene of the game—the first view you get in Space Company Simulator.
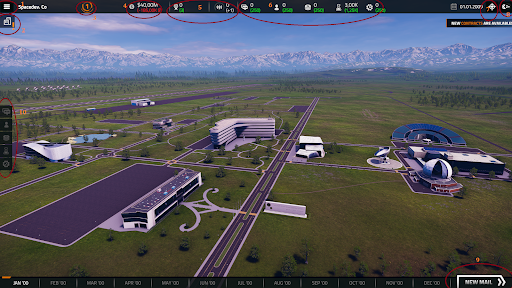
1. Menu button: This opens a menu window, allowing you to save game, load game, change settings, go back to main menu or exit to desktop.
2. Building Mode button: This button switches you to building mode, where you’re able to grow your space company by building new structures.
3. Tier number: The game is divided into 4 “parts”, which we call tiers. Each of them is unlocked through developing some breakthrough tech (we’ll talk about this later). Every tier varies, with different amounts of points and money gained and used.
4. Money: Main resource in the game. It is mainly gained by completing contracts (missions). There are other ways of earning money, but we’ll talk about them later as well. Money will be used to create, build and develop almost everything.
5. Prestige and Lobbyists: Think of prestige as another currency in the game. The more contracts you successfully complete and the more good decisions you make during random events, the higher it gets. A certain number of Prestige points will get you Lobbyists, a very valuable currency that you will spend on certain investors. This will bring you a lot of benefits. So, essentially, being good gets you prestige, prestige gets you lobbyists, and lobbyists get you investors, which helps you grow your company.
6. Department points: (from left: PR, HR, Finance, Science, Production). There are five departments of your company in the game. Each one of them has their own point pool. Points are used to buy “Department Perks”, and in the science department they are used to develop technologies, which we talked about earlier. Let me guide you through what each department does:
- PR – manages conferences, investors and is responsible for prestige gains. It does a lot more, but this will be described in its perks.
- HR – manages managers, astronauts, and all the workers in the game.
- Finance – manages budget, contracts and all your finances.
- Science – develops technologies and monitors space.
- Production – manages building rockets (assembly, depot, and all the other stuff)
7. Contracts button: This opens the contracts window. You can also open it through the finance department window, but this is a shortcut.
8. Mail button: This opens the mail window – you will get news and information via mail.
9. New turn button: The game is divided into years, months, and then turns. Every month has 4 turns. This button switches you to the next turn. When there’s some important mail to read, it will inform you, as you can see on the screenshot above
10. Department buttons: Each one of them will open a certain department window. Check it out, there’s a lot to learn there!
Now that you know these basics, it’s time to accept your first contract. Before you do this, skip a few turns to get your “small rocket launcher” built. Go to the “contracts” window, and select the “Foreign start” contract. This is a contract that will introduce you to shooting rockets. Very cool.
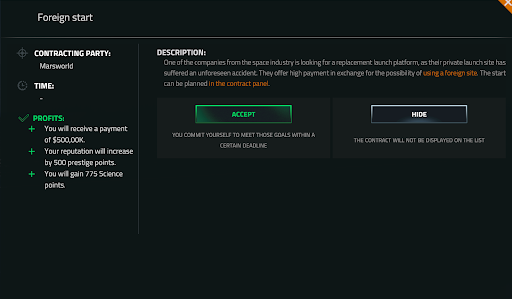
Click “Accept” and then “Planning” to schedule your flight. When the time comes, you will see info like this:
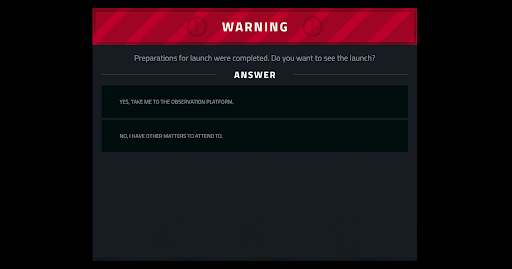
If you want to see the launch, then click the button above and enjoy the show! You will be able to switch between cameras. When the rocket is high enough, then click [esc] button to close the launch scene. After you do this and skip a turn or two, an event will show up. The choice is up to you. After your choice is made, the contract will be complete. Congrats—now you know how contracts work. You pick one, check all the requirements, and then do the required thing. That’s all. Simple, isn’t it?
Managing your budget
If you want to take care of your company, you have to learn to plan your budget. Everything depends on this—your account balance and department points that are used to develop your company, even some contracts, if you get them! Let’s open the Finance window, (left bar, 3rd from the top) and select “Budget”. You will be greeted by a sight captured on the screenshot below. What you see here is the budget of every single one of your departments. You can change certain budgets by clicking “-” or “+” on the “Company funds” label. The higher the financing is, the better this department will develop. The more money you put in certain departments, the more Department points it will get. Along with this, it will get bonuses: when the yellow bar reaches a certain bonus, it will be unlocked and from now on included in your budget. Some quests or conferences will require you to finance certain departments or to lower your financing of the others. There are many possibilities, just remember that every number represented in “company funds” of every department window will add up, and the summed value will be taken from your account every turn. So be careful and don’t go bankrupt fast!
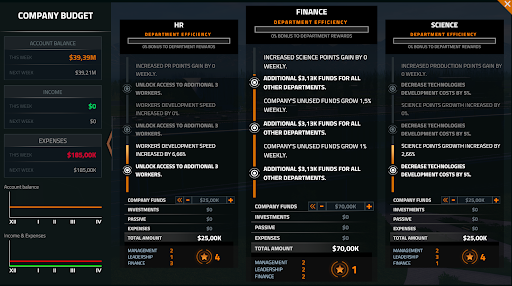
But what do the things below mean: the “Star” and three values “Management, Leadership, Finance”? Well, the star is an indicator of which of your departments develops best. The lower the value, the better it performs. What are these values? These are multipliers that will be used with the department workers. How? You will find out in a second!
Managing HR
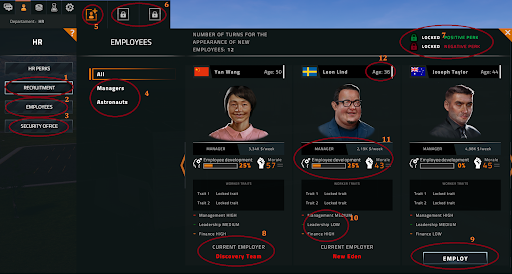
1. Recruitment tab: This is where you will be able to employ your employees.
2. Employees: All current employees will be visible in this window.
3. Security office: For now you don’t need to worry about it, it will be unlocked later in the game.
4. Managers and Astronauts tabs: This is where you will switch between managers and astronauts. Managers will be assigned to departments, and astronauts will be assigned to rockets
5. Assign button: Every manager can be assigned to one department (for now). Normally you can assign your managers right after employing them, but if you don’t, use that button.
6. Locked assign buttons: More buttons will be unlocked later through HR perks.
7. Traits: Every worker has their own set of traits: positive and negative. For example, they could be very well performing in the science field, but also lazy and not efficient. At the beginning the traits are hidden. Unlock them by buying certain HR perks.
8,9. Current Employer and Employ button: Use the Employ button to employ workers. Be careful though, your opponents will also recruit the workers from the pool. The red name of the company means that your rivals have already hired the person.
10. Department values: Remember the weird values in the budget department? Those were multipliers for the values of all your workers. At first they are indicated only by “low, medium, high”, but through HR perks you will be able to unlock the view of all the values. These will be multiplied by the values represented above. For example, if the set values are 2 for management, 1 for finance and 3 for the leadership, and your worker performs well in management and leadership, and is bad at finances, then they will be very efficient the department with higher value multiplier.
11. There are a few things here: The salary that you will have to pay your workers every turn, employee development, where you can send your workers to gain knowledge at the University and experience by working in the departments, and Morale, a value that can be modified by a lot of variables. If it gets low, the worker will leave you and join your rival so watch out!
12. Age: Older workers have more experience and are generally better, but if they reach a certain age, then they will retire.
Perk trees and techtree
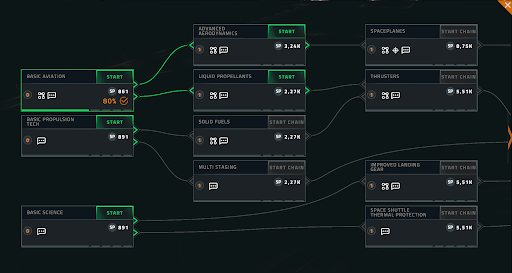
The Science department works differently. The Tech Tree works similar to the perk trees. Instead of auto-buying and applying perk effects, it takes some time and turn-clicking to develop technologies. When they are developed up to 80%, then they are marked as developed. The percentage value from 80 to 100% means that the technology has maximum reliability. Almost every technology gives you access to new rocket components (see Chapter 7: Assembly).
In the screenshot below, there is an option to “Start Chain”. It will show you the shortest path to certain technologies and gradually develop the ones in progress. Remember: developing tech requires Science points, so be patient as it will take time!
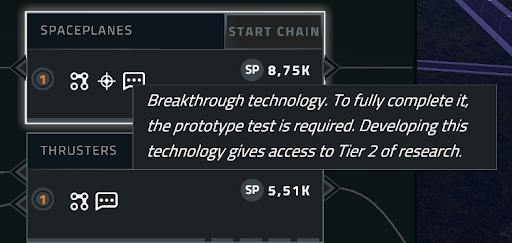
Sometimes the technology will be described as “Breakthrough tech”. After developing it, the tier of the game will increase.
Conferences
You can build a Conference center by buying “Make Yourself Heard” from the PR perk tree and then choosing the Conference center in the building mode.
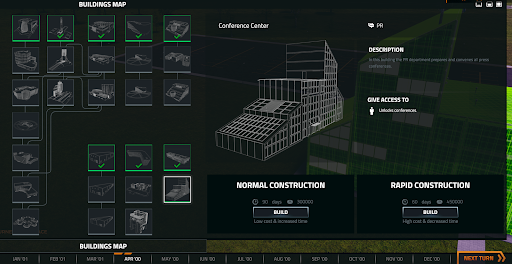
While waiting for the building to be constructed, you can develop other areas of your company. After you’re done, open the Conference window in the PR tab.
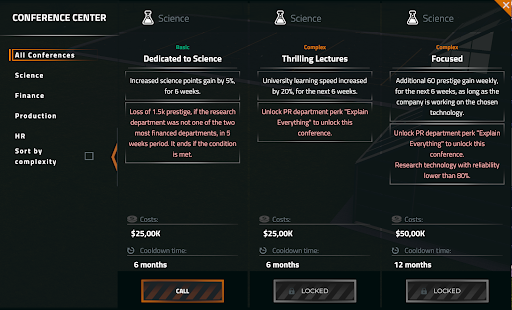
Each conference has a set of requirements that must be met. If you meet them, you succeed. If you don’t, you fail and get punished. Conferences are counted in months as seen on the screenshot above, so you will have to meet all the set requirements during that period. It’s sometimes very hard, but sometimes it’s worth it.
Depot and assembly handbook
By now, you’ve probably got your first contract on developing certain components. Now let’s talk about how to get started. As I said earlier, all the components are unlocked through developing technologies. The more technologies you have, the more components you will be able to produce. What I also recommend is to unlock “Component market” in the Production perk tree. With this you will be able to buy and sell components. But how do you construct these components? Simple: click on the hammer and wrench icon, select the component you want to construct, select the number of them that you want to produce, and then click the “Construct” button.
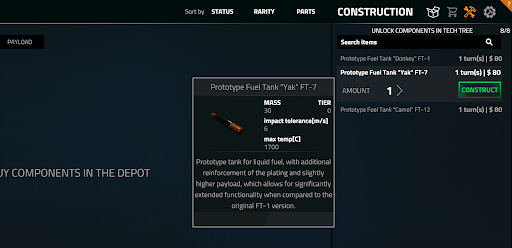
But why construct and buy components? That’s what assembly is for. You will be able to use created or bought components to build your own rockets. You can unlock the Testing Center perk, and then build the Testing Center—the same way you built the conference center. With this, you’ll be able to test the reliability of your built components. The higher the reliability, the better! The less reliability you have, the higher chance of failure during rocket launch or later.

Let’s open the assembly window now. Select the Rocket you want to create, and then click “Confirm” (for the sake of this tutorial – select the “Wolf-3” rocket). All the components you gathered will be displayed on the left, so you will be able to place them in designated places in the rocket.
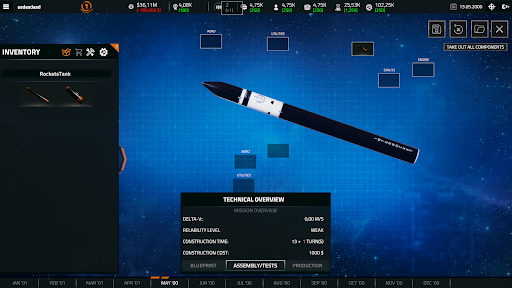
Create all the needed components, if you want, buy them, test them, and then place them in the rocket! After all the windows with SILVER FRAMES are filled (the ones without are optional), you will be able to conduct the building of the rocket, which takes approximately 13 turns. Then, if you happen to get any contract that requires you sending a rocket into space, you know what to do!
Mission control / Atlas
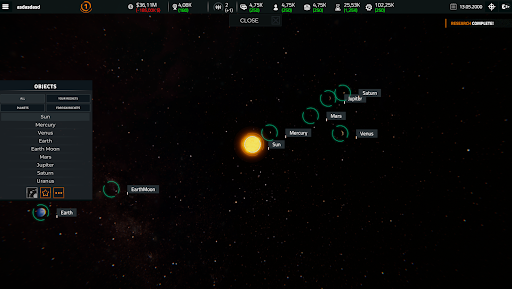
You can open the Mission Control window by clicking the button in the Science department menu. What is atlas? Atlas / Mission Control is the miniaturized version of our solar system. You can observe all the important objects, and later you will be able to see your rockets, space stations, satellites and other stuff that you’ve sent into space!
Investors
Remember the “Prestige / Lobbyist / Investors”? Now’s the time to put that into action. With the certain number of lobbyists you have, you can assign them to certain investors to get certain profits out of them. You can focus on only one of them, to get higher science financing for example, but maybe you will want to add lobbyists to every one of them to increase financing of every department a little bit? It’s your choice!
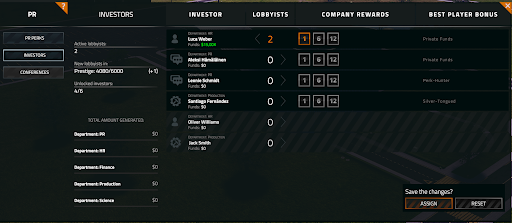
After you make all the changes you want, click the “Assign” button down below. From now on you will get higher financing for a certain department. Remember, other players can also apply their own lobbyists to the investors! The player with the highest number of lobbyists assigned to certain investors will get the “Best Player” bonus. You will be able to spy on your enemies later, through PR perks mainly, and see how many investors they possess.
Loans, diagrams, university, and security office
These are windows that are not as important as the others, so we have kept them all in one chapter. Here’s what they’re for.
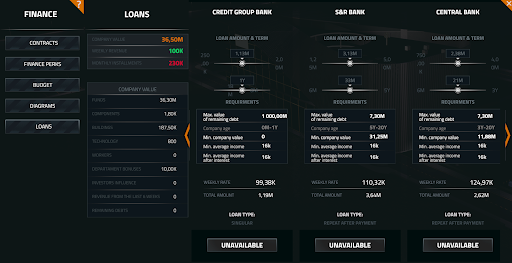
- Loans: If you ever go bankrupt, then this is your last option. Loans work the same as in real life.
- Diagrams: If you want to see how the finances look on the diagrams, this is the place to check it.
- University: This is something you can benefit from mid-game. University will allow you to upgrade the “values” of your workers through learning. They will be able to learn and work at the same time. It will also increase their efficiency and morale. The downside? It costs money. It’s up to you to decide if it’s worth it.
- Security Office: This feature will give you access to spying on and sabotaging your enemies, and defending yourself from their actions. You will be informed by mail about everything you can do there.
Written by All in! Games || Luke
