If you play Shadowrain and looking for a walkthrough, this guide will show you how to play through and how to get different endings in the game, let’s check it out.
INTRO
Let me first say that Shadowrain is not a long game, nor is it a particularly complicated one. That being said, navigating the game is NOT intuitive and figuring out where to go or where you’ve already been can be (in my experience) incredibly frustrating and the most challenging aspect of the game itself.
Most of the rooms look the same and contain the same few assets (it’s a budget game, what do you expect) and the map does not show you where you currently are or have any useful info on it, so it’s very easy to get turned around. I wandered around aimlessly for quite a while and almost gave up, before sort of figuring out how to navigate myself.
Despite it’s numerous flaws, I think there are some really cool aspects of Shadowrain that make it a worthwhile little indie horror game (I would love to see this redone as a more fleshed out experience with more assets, puzzles, dialogue etc. I think with some tweaking this could be a big cyberpunk hit). I wanted to make this walkthrough for other players who may be getting frustrated and want to give up, so that more people would give this a chance.
Before I dive in, here are a few general tips to keep in mind:
- In the dialogue screen (Yui), you can see two bars to the far left. These are your Sanity and Energy.
- To the best of my knowledge, sanity doesn’t do anything. Despite the warning before you start the game that dying will delete your save file, it just seems to restart you a few rooms back.
- Energy meter is good for two things: Flashlight (F key), and downloading area maps for 10 energy. Keep this in mind if you want the in game maps.
- When the flashlight is off, your energy will refill slowly
- Small purple energy capsules can be found around the game. They blend into the background, and there are no in-game indications you’ve picked one up. Press E if you see one in the background to pick it up
- The many memos throughout the game have bits and pieces of lore, and some are helpful for secrets later in the game
- Hard Mode makes your battery drain faster, the monster apparently moves more random (supposedly), and there are NO on screen indications of it’s direction, you’ll have to go by sound cues. I find Hard Mode to be a better experience.
- THE MAP! Orientation can be confusing, as sometimes your perspective will be looking north, while other times it will switch to you looking south. Pay attention to the maps provided here, and just know you will need to sort of manually keep track of which way the camera is facing as you enter a room by figuring out which direction the door you just came from is facing… I know that’s confusing.
- If you get lost and can’t find yourself on the map, OCCASIONALLY there are in-game maps posted on the walls of the game with a small dot indicating where you are– these can be helpful in getting you re-aligned.
Pretty straightforward. With that out of the way, let’s begin…
HIGHRISE E5671
You wake up in your room. You’ve got no idea what’s going on, and are completely alone except for your digital AI waifu, Yui. Sounds like she’s going to try and help us out (press Q when her icon appears at the bottom of the screen). Neat.
This first room contains the only mandatory puzzle in the game, and can be a bit confusing to hit you with right away. You are trapped in your room with seemingly no way out. Yui will tell you the door can be unlocked by a power surge, to do this you need to turn on all of the electronic devices in the room below
 From left to right, turn on the Computer, TV, Microwave, conveyor shelf, and finally remove the panel underneath the coat rack then tap E to cause a power surge. You have to be fast, as the microwave will shut off after a few seconds. You will overload the circuit, open the door, and kill the lights. There is also an arcade machine in your room, you can enter gamecodes for tapes in the machine in order to play a bit.
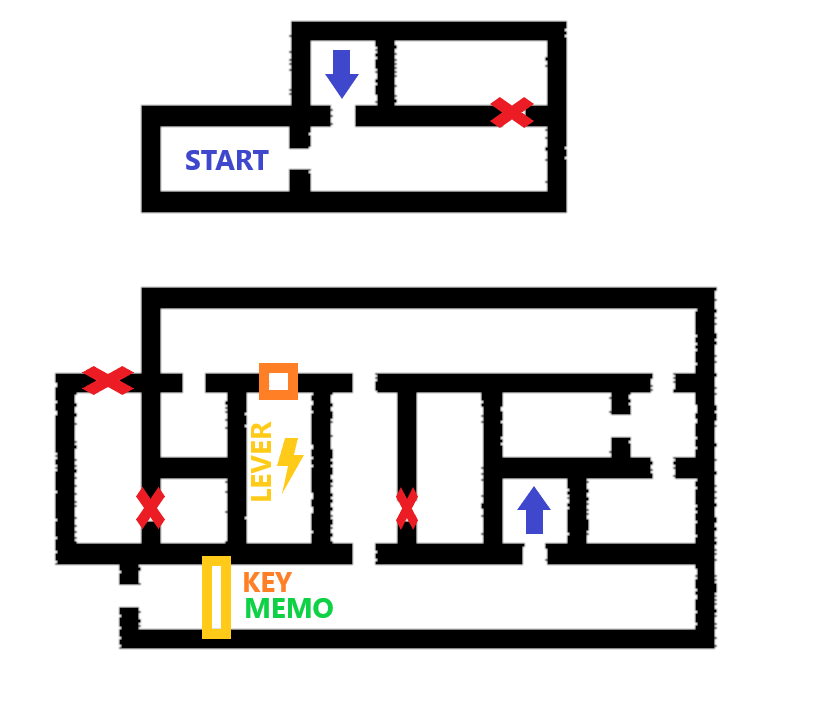
Exit your room and enter the elevator the next door over to the right to go down to the first floor
Walk all the way to the left, until you reach the reception desk. There is a gate blocking the exit due to the power surge, and we need to get the power back on (Thanks, Yui). Pick up the key near the desk and head into the first door to the right of the reception desk.
Walk to the far left end and enter the door.
Turn right and use the key to unlock the door, enter the room and flip the lever to restore power and open the gate.
Head back to the reception desk, continue left past the now-open gate and to the parking lot.
FInd your car (Sweet ride) and head off to CoAT HQ
CoAT HQ
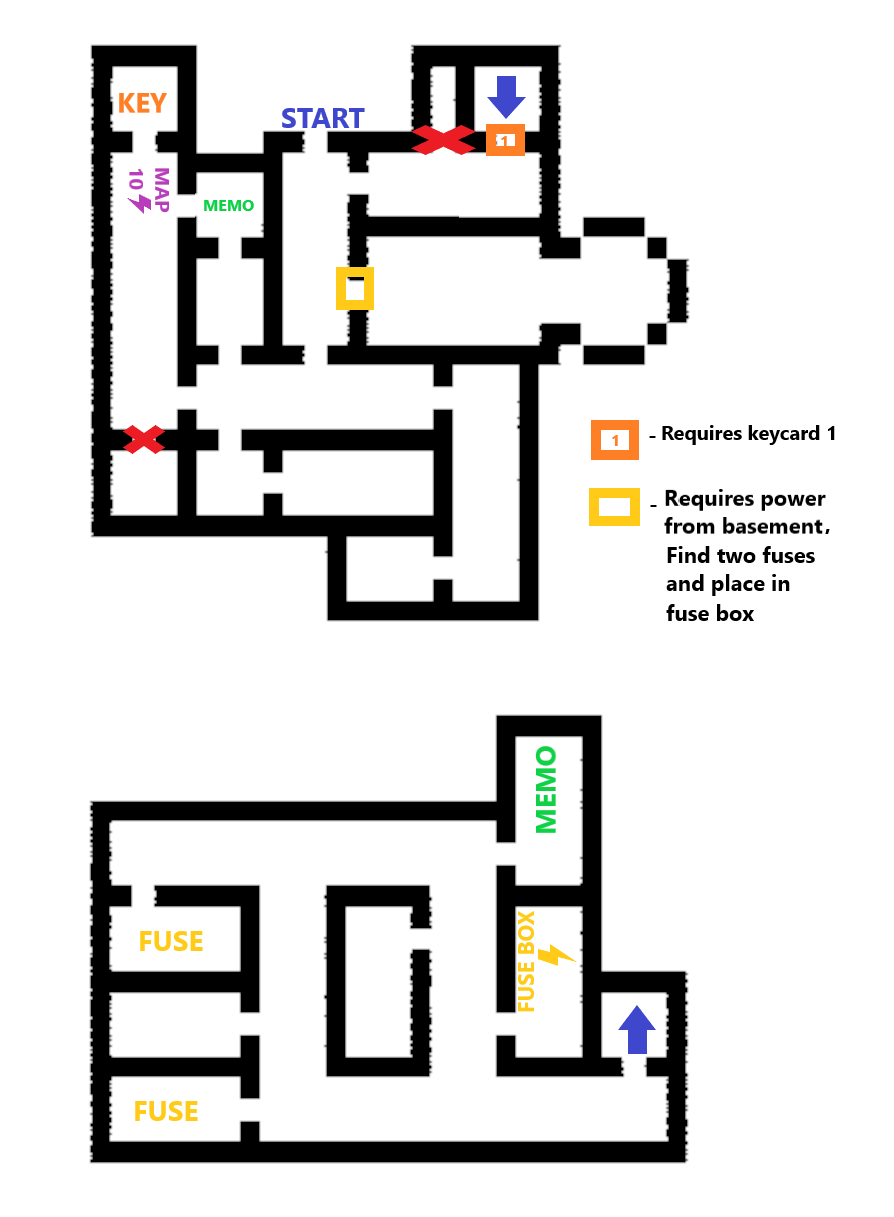
Enter the CoAT HQ building, also empty. Yui needs you to plug her into the Core located below the building to see what’s going on, but the elevator is not working and we need to power it from the basement.
From the entrance of the lobby, head all the way to the right and enter the door.
Walk all the way to the far left and enter.
Walk all the way to the left again, you can download a map of the HQ building for 10 energy if you want, or proceed to the far left and enter this door to pick up Keycard 1.
With Keycard 1 in hand, return to the entrance of the building, take the door to the right of the entrance this time.
Yui will warn of a detected presence below. Walk all the way to the right, unlock the far right door with Keycard 1, and enter the basement
***From this point on for the rest of the game, you will encounter the monster in dark rooms. You can’t fight, either run far away enough that it will despawn or find a locker to hide in***
We’ll need to find two fuses to get power back to the elevator.
Start by walking all the way to the left, enter the door for your first fuse.
Exit this room, and take the first hallway entrance to the right of the door you just came through.
Walk to the far left and enter.
Walk to the right and enter the first door you encounter for the second fuse.
Exit this room, and head left. Do not enter the far left room, but instead the hallway entrance before the far left door.
Head left and enter the door that is facing towards you (it will be semi-transparent). In this room, you can insert both fuses to the circuit box to restore power upstairs.
Exit the fuse room, and take the far left door to find yourself back in the original hallway you entered in. Walk to the right and go back up the stairs to return to the lobby area.
You can now take the elevator down towards the core… ONCE YOU TAKE THE ELEVATOR DOWN, YOU CANNOT COME BACK TO THE CoAT HQ ABOVE.
Crypts of St Michael’s Church
After an elevator malfunction, you find yourself in the Crypts. It turns out CoAT HQ was built on top of an old church. I hate it when that happens. Also, Yui seems a little weird.
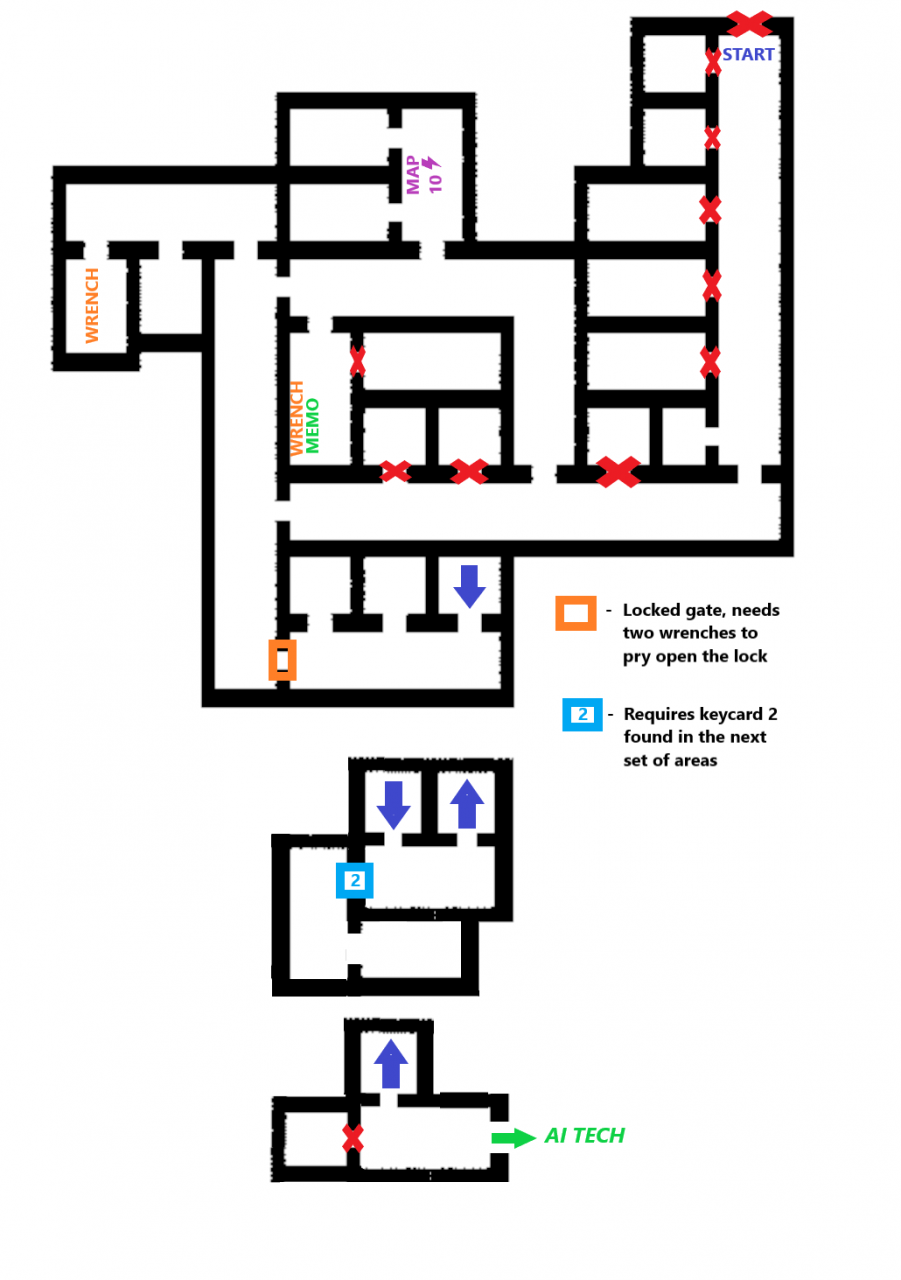
Head all the way to the left. You’ll notice the far left door is locked, so go into the next door over to the right. You’ll hear the creature crashing through, might be a good idea to hide for a moment.
Exit this room and go back to the left towards the locked door, which was conveniently torn apart, and enter.
Walk to the left, ignore the first door (it won’t open anyway) and head into the second door you come across.
Walk to the right and enter.
Continue walking to the right, you can enter the door facing towards the player (transparent) if you would like to download a map of the area for 10 energy, otherwise keep heading to the right and enter the door second to the right. In this room you will find a wrench.
Once you have the wrench, exit this room and now enter the door to the far right.
Head left through the door at the end of this hall.
Walk to the far right door and enter to find the second wrench.
With both wrenches in hand, exit this room, and go back through the door you came from (far left door).
You need to head all the way to the right of this long hallway, where you will find a door that is gated and locked with a padlock. Using your two wrenches, you can pry open the padlock to open the door — be careful, when you break the lock, the creature will come after you from the left.
Enter the previously locked door, run to the far right and enter the last entrance, a stairwell going downwards. Once you enter the stairwell, the creature will no longer follow you here, and you’re safe for now.
*Be careful NOT to die once you unlock the padlock. Despite the game stating your save is deleted, if you die it just seems to bring you to a dark room that leads to a computer, when activated, just respawns you at a room near where you died. If you die after opening the padlock and BEFORE going into the stairwell, a box will spawn in front of the padlock door and you’re soft-locked out.*
***NOTE ONCE YOU ENTER THE STAIRWELL, YOU WILL NO LONGER BE ABLE TO PROCEED BACK UP TO THE MAIN CRYPT AREA
You’ll notice to the far left there is a door, leading to a room that requires Keycard 2. Remember this for one of the endings later.
For now, head down the stairs one more time, and walk to the far right door to enter the Center of Advanced AI Technologies.
Center of Advanced AI Technologies
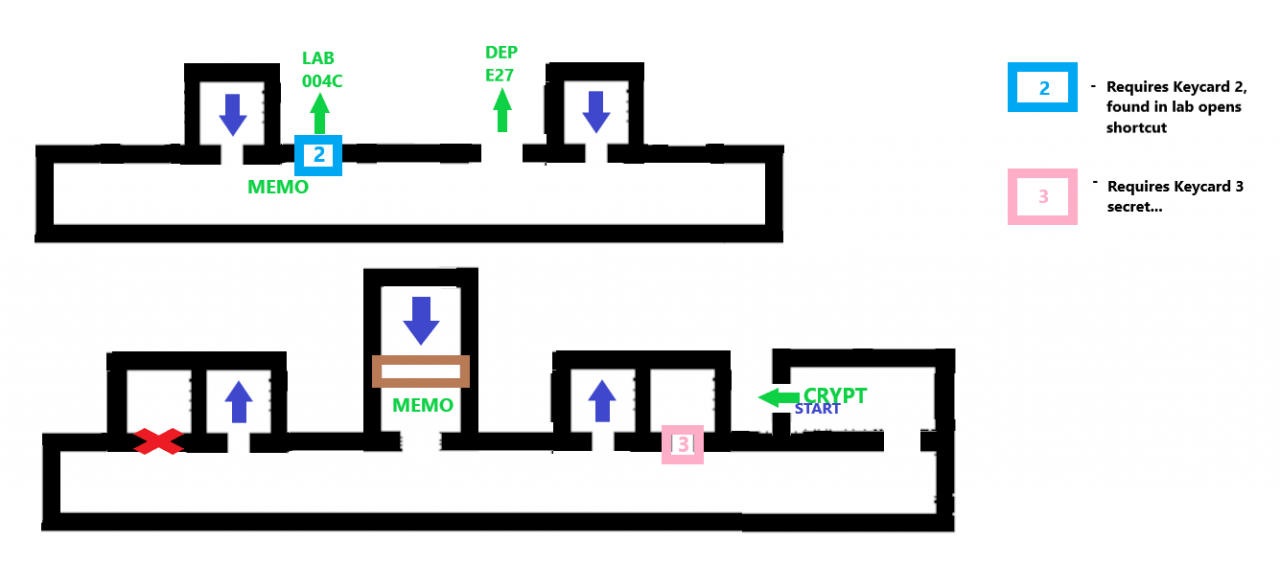
The AI Tech center acts as a Hub zone of sorts for the final section of the game. You are not in danger of encountering the creature here. On the first floor, midway down the hallway, you will find a large circular door which is the final elevator shaft bringing you down to the Core, however, you seem to require a password and Optical Implant in order to access. Yui seems better, sort of.
There is not much to do here now, so refer to the map above for your location.
There will be a locked storage closet requiring Keycard 3, remember this room for later for one of the endings.
On the second floor, there will be a locked door requiring Keycard 2 to LAB 004C, and an unlocked door for DEP E27.
You’ll need to head through the only unlocked door, to the Department of Engineering 027-E.
Department of Egineering 027-E
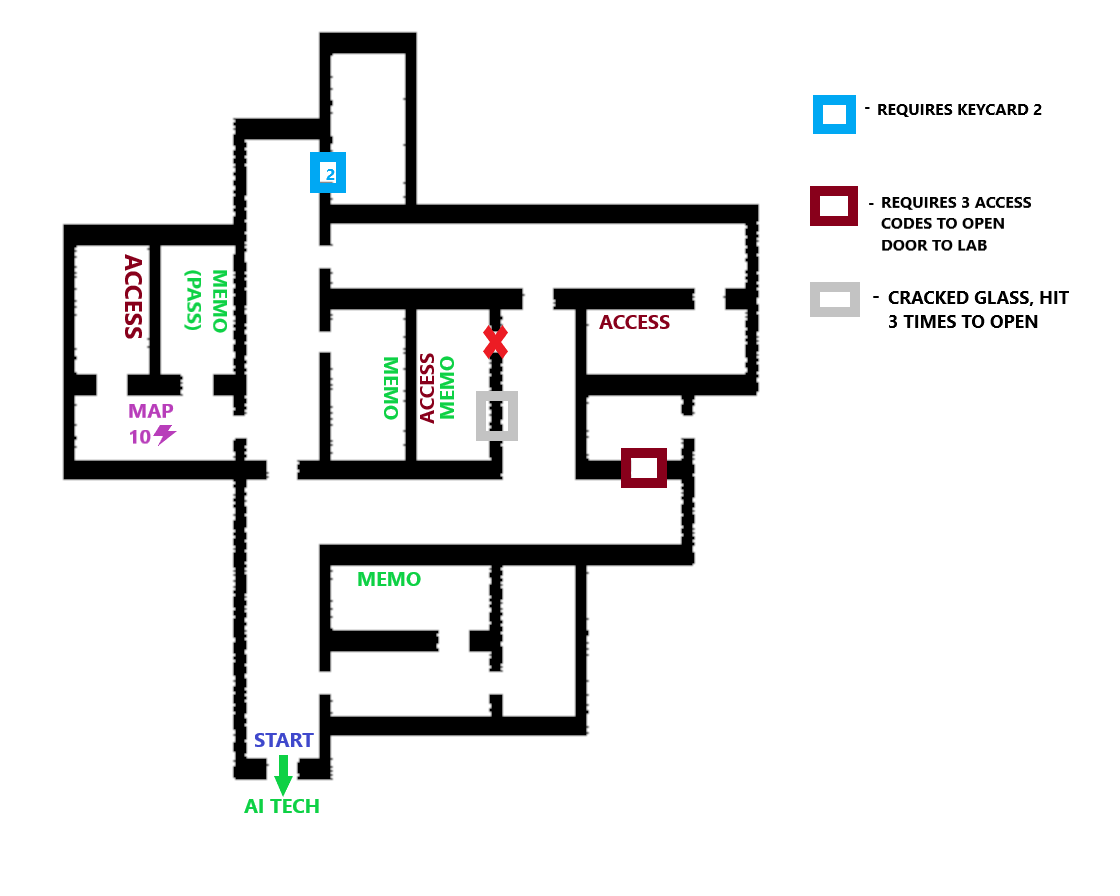
You’ll find yourself back in the dark, head all the way to the left and enter the far left door.
Head into the first door facing towards you (transparent).
In the middle of this room, you can download the map for 10 energy if you want, otherwise take the far left door to find the first of three access terminals in order to open the door to the lab.
Exit this room back to where the map was, this time take the middle door. Read and remember this memo for later, it seems to have some important information on it.
Exit the room with the memo, and head back through the far right door.
Back in this hallway, walk left– there are three doors from the transparent door you came through to your left.
The first door leads to a room that will have a memo with some vague information on the creature.
The far left door is locked and requires Keycard 2. Remember this for later, for one of the endings.
The middle door is the one you want, leading you down a hallway.
Head all the way to the far left end of this hallway and enter the last door to find the second of three access terminals.
Exit this room, and head down the hallway (entrance to the right of the room you just came out of)
In this hallway, you will notice there is a locked door– there is no way to open this door, however, you’ll notice the glass window is cracked. Tap E to smash it, after the second time, the creature will appear and you’ll need to lose it.
Once you’ve lost it, head back to this room and tap E to smash the window a third and final time, and jump through the window to find the third access terminal– after using this terminal, the creature will be alerted again and it’s a good idea to hide in the locker to the right of this computer for a moment.
Once it leaves, you can hop back through the window (or through the now broken door), and head through the door to the far left.
In this hallway, walk right to find the previously locked door that we’ve opened with the terminal, proceed through the next room and into the Lab
Labratory 004-C
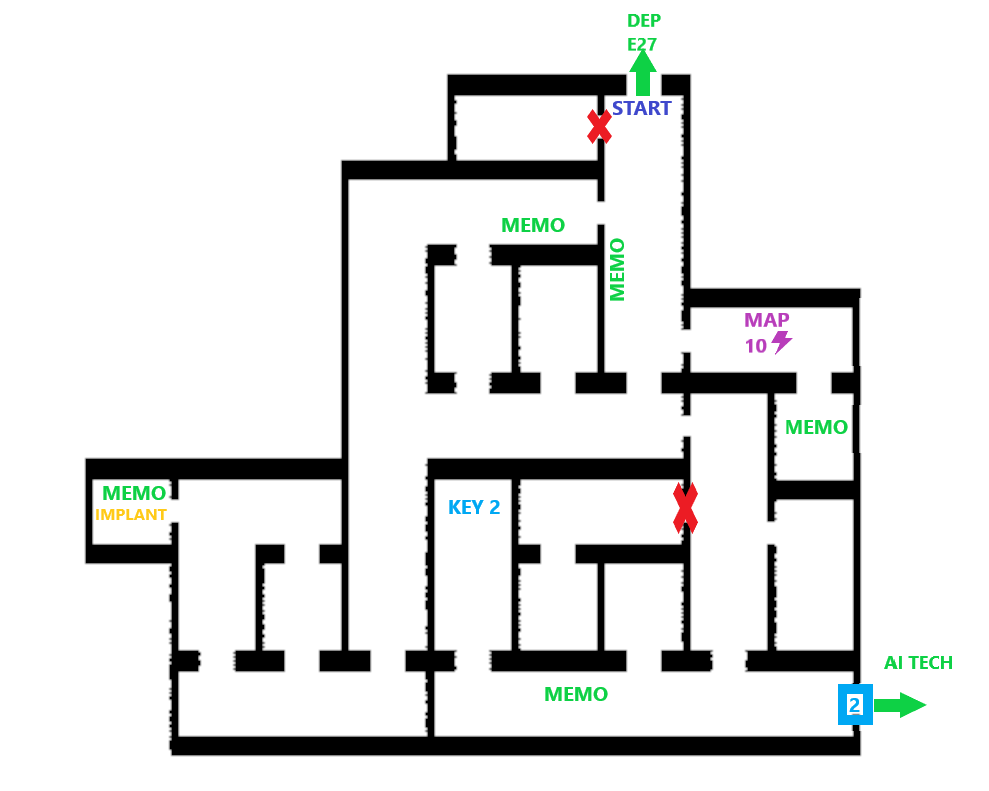
We need to locate the Medical Ward in the Lab so that we can get the optical implant to access the Core elevator shaft. Sounds pleasant.
If you want to download the map for 10 energy, head all the way to the end of this hallway and enter the door facing you (transparent), otherwise, go through the second door after the entrance from E27.
Walk all the way to the right, enter the far right entrance.
Proceed all the way to the right of this hallway towards the Medical Ward and enter the far right door.
Once in the Medical ward, take either the middle or far left doorway, they both lead to the same area.
Once past either of the rooms above, head through the entrance on the far right of this short hallway. You’ll find a comfy chair, Yui wants you to take a quick seat. I see no reason not to trust her up until this point.
Once you wake up from your nap, head back out this room, and take either middle or far left doors back through the hospital bed rooms, then through the far right door to exit the Medical Ward.
Once out of the Medical Ward, back to the long hallway, head left and take the first hallway entrance you see from the Medical Ward.
Head all the way to the far right and enter this door.
Head all the way to the far left and enter this door.
In this hall, walk and enter the furthest room to the left to find the infamous Keycard 2.
Head back out through Keycard 2 room, and run all the way to the far right entrance– it’s the locked door leading back to the AI Tech center that required Keycard 2 from earlier.
Once you’re back in AI Tech, you’re now safe from the creature once again…
ENDGAME
Follow the next section for endings, however there are HEAVY spoilers, and I recommend trying to find out a few of these yourself before giving up and using this guide. You will need to go through essentially the entire game to get each ending, as beating the game will delete your save file.
Some of the endings require a few small hints from memos scattered around the area, so you may want to do some exploring if you wish to figure it out on your own.
My understanding is there are 5 total endings, based on the achievements and what I have left. I cannot figure out for the life of me one of the endings, so if anybody knows the missing one, please let me know and I will be happy to update this guide and give credit
I will list below how to get the endings in order of difficulty I personally found to get them.
I am NOT going to include any lore or story information, you are free to speculate and explore the games memos on your own to enjoy the world of Shadowrain.
ENDING 1 + 2

For the first two endings, after completing all the sections above, simply head to the large circular door found in the AI Tech center and proceed through. These are the default ones most people who got this far probably did, and the only ones that don’t require further puzzle solving.You need to enter a password at the terminal, you remembered the important memo from the E27 department, right?
If not, here’s the sticky note:

Once the first gate opens head inside, you will use your Optical Implant to open the second gate. Wait for it.
Once fully open, take the lift down to the core. Cue Snake Eater.
welcome to the Core. Head left and listen to Yui’s plea. You’ll have two options here
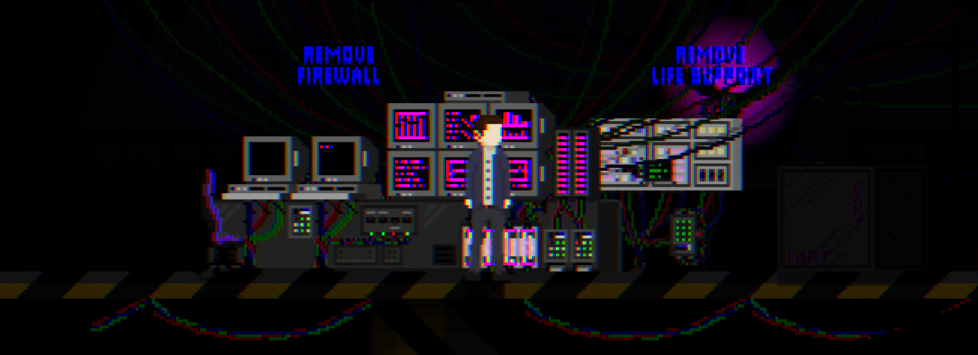
How could you resist Yui-Chan’s request, remove the firewall and let her upload into the net.
Sorry Yui, you’re broken m8. Remove life support to end it.
ENDING 3
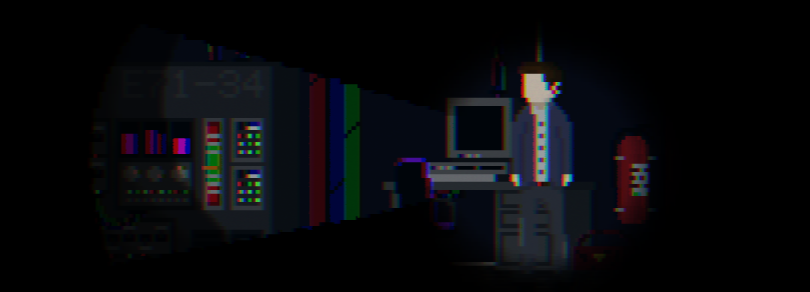 If you remember back to the stairwell at the end of the Crypts, there was a locked door requiring Keycard 2. We now have the keycard, and can head back, where you’ll find a terminal and large machine labeled E71-34.
The terminal seems to show voltage control 34 is LOCKED, and requires a password.
There is a memo detailing the E71 Core Voltage schematics
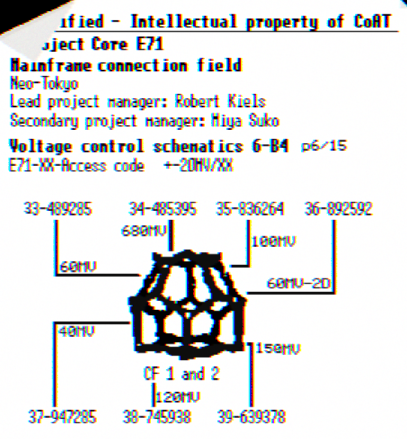
You’ll notice terminal 34 password: 485395
This code will unlock the voltage control, you can then crank up the voltage on the machine to the left by holding E. You’ll notice a small indicator on the machine that will rise as you hold E and crank it to the top
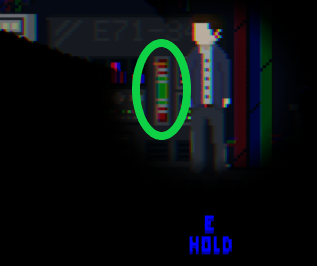
Once it’s overcharged, go back to the terminal and enter the code once more to re-lock the voltage control.
You can now proceed through the circular door and take the lift to the core, only this time you’ll notice Yui is a bit more frantic than before, with the core pulsing red.
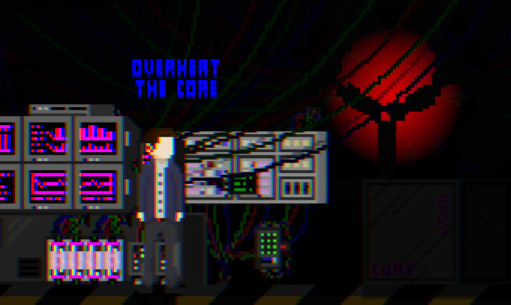
You’ll now have the option to overheat the core. Kaboom.
ENDING 4

I just cannot figure out how to get another normal ending here, though I assume it correlates to the DEATH achievement as it’s the only one I’m missing.
Thought it might straight up have something to do with dying to the creature, but despite the warnings at the beginning of the game, getting killed simply places me in a dark room leading to a monitor on either end, sending me back to before I died.
I’m embarrassingly 23 hours into walking around this game clicking on everything and I’ve unfortunately been unable to put 2 and 2 together.
If anybody knows this missing ending, please let me know and I will be happy to update the guide and credit you!!!
ENDING – REAL WORLD
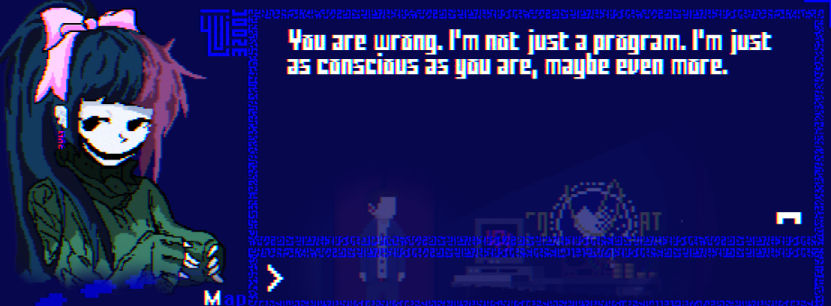
It gets a little crazy here, this is REALLY cryptic and MAJOR spoilers for solutions so do not go further unless you’ve just given up trying to figure out what to do
The only room left unexplored is the mysterious storage room requiring Keycard 3 in the AI Tech Center.
The only hint you get referencing this key is a cryptic message left by a disgruntled co-worker, they’ve thrown the key in the trash to prevent you from time-wasting on that unholy machine
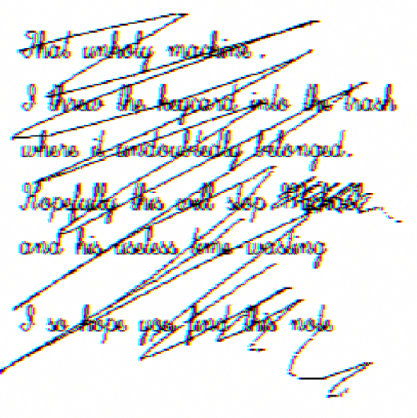
All we know is that it’s in a trashcan somewhere. Specifically, it’s in the trashcan directly at the entrance to the AI Tech Center after you come in from the Crypts.

Simply walk up to the trashcan and press “E”. There is NO indication you have picked anything up or that anything has changed, but trust me, Keycard 3 is now in your possesion (as a side note, Keycard 3 will also open up Keycard 2 doors without actually needing Keycard 2).
With Keycard 3 in your possession, it’s time to make one quick pit stop back in E27– enter through the door on the second floor of the AI Tech center and run straight two screens until you get to the veeeery far left door– the one that was locked requiring Keycard 2.
Inside, you’ll find a note with mostly rambling, telling you to take this tape– it is the key to the real world.
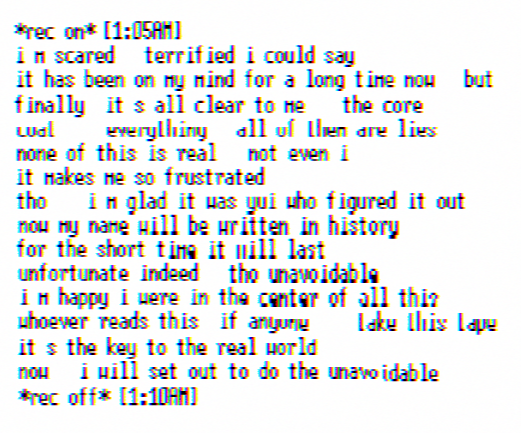
Directly past this memo is indeed a tape. Take it and run back to the AI Tech Center, and finally on to the Keycard 3 storage closet.
Inside, you will find simply a memo, and the “Unholy machine”, our good friend the arcade cabinet. You may have noticed before that “Tape 2” of the arcade cabinet was empty — now we can insert the tape we just picked up to find a new game added– Shadowrain.
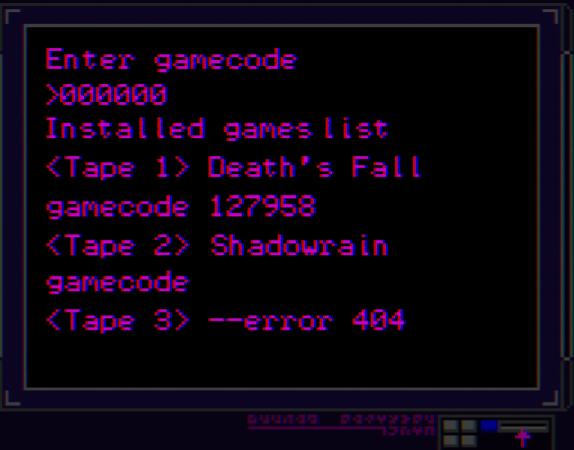
However, the gamecode is missing… Let’s check out that memo.
The answer lies at the “core” of this world, and we need to search the appdata to find the truth.
Minimize your game, we will quite literally search our %localappdata%
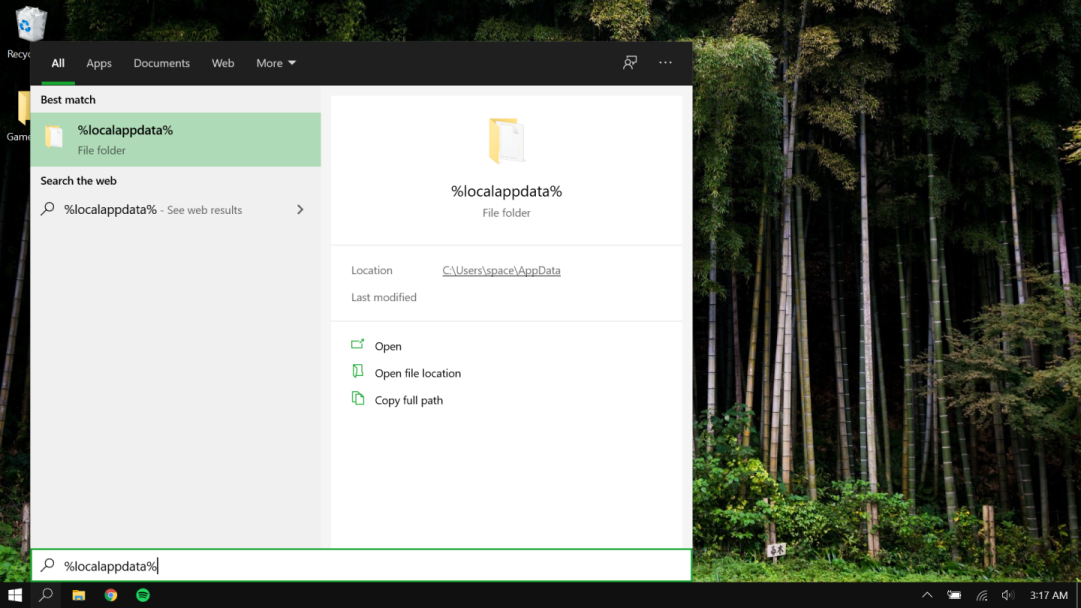
Find the folder for Shadowrain, inside, you will find the.truth file…
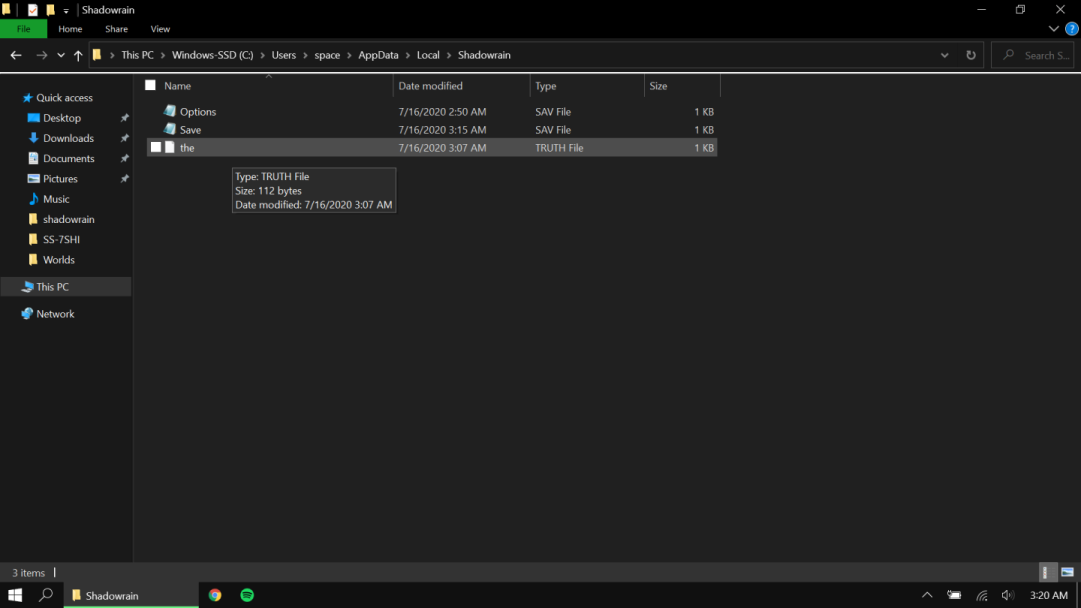
You’ll need to open this file up with notepad to view it’s content.
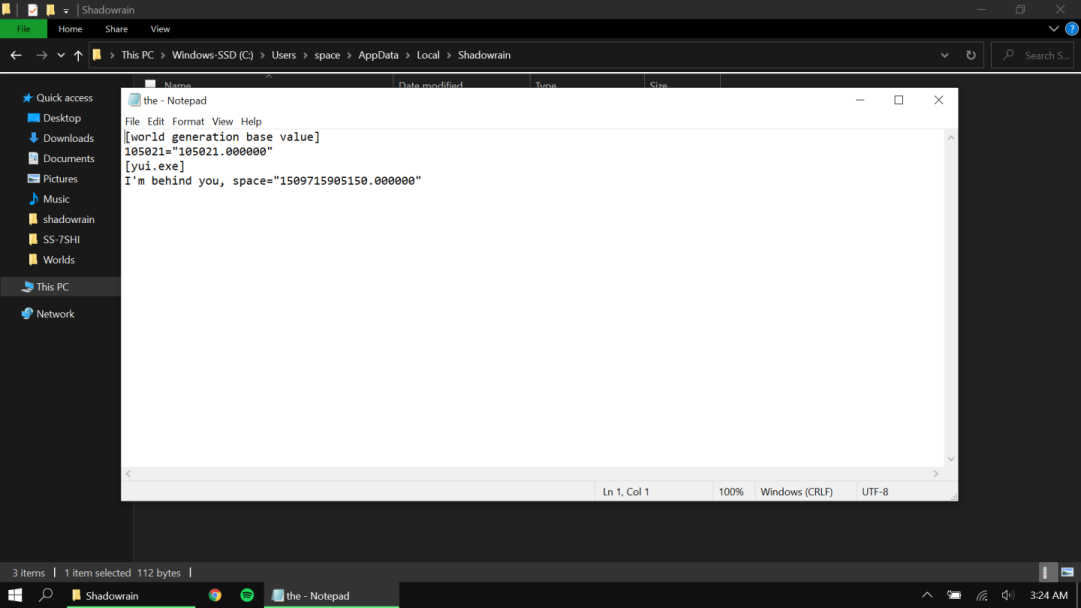
Creepy.
Back in the game, let’s put in the world generation base value as the gamecode: 105021
You’ll be put in a black room with some copies at the end of either side. Run left or right, it doesn’t matter, and you’ll come across a terminal.
Thought your center character can’t see it, hold down E and each side copy will show a progress bar filling up that you’re interacting with the computer.
You will immediately start back at Highrise, the beginning of the game, however… something isn’t quite right. Everything is mirrored. The lights are off. Your flashlight doesn’t work. Pressing ESC, the main menu is distorted, you’re seeing doubles.
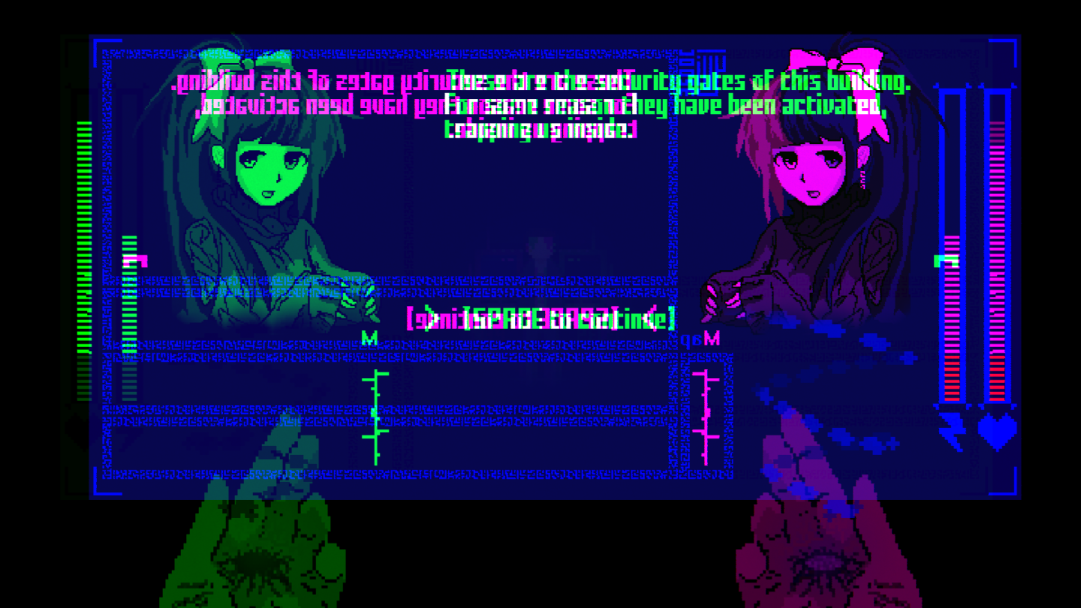
The layout is exactly the same as before, so blindly navigate your way back to the reception desk (where you picked up the original key). You’ll see/hear the indication the creature is nearby, however it doesn’t seem possible to actually encounter it in this distorted version of the game.
Read the memo on the reception desk, however, the moment you let go of E… the game will minimize itself.
Yui wants to play.
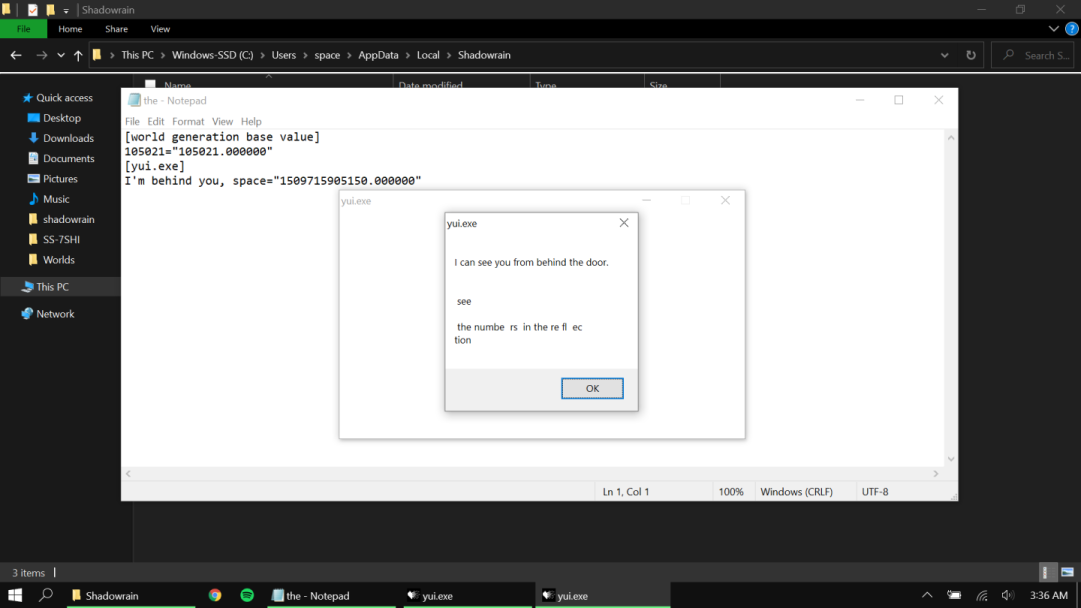
If you check out the taskbar, the Shadowrun game has changed to Yui.exe.
Here’s where I cheated a bit and sort of just stumbled into a solution — I have no idea what Yui’s message means or what she wants me to look for. Along with her cryptic message, there is the bottom string of numbers found in the the.truth file as well. I don’t know how any of this relates, however, in a moment of desperation/frustration I just tried messing with everything I could, including the settings.
I noticed on steam there is a guide from the dev on how to disable glitch shaders by accessing the options file in the actual appdata folder, so I decided to take a look there. At the bottom of this file, I happened to see under the “Achievements” section that there was a value for the core…
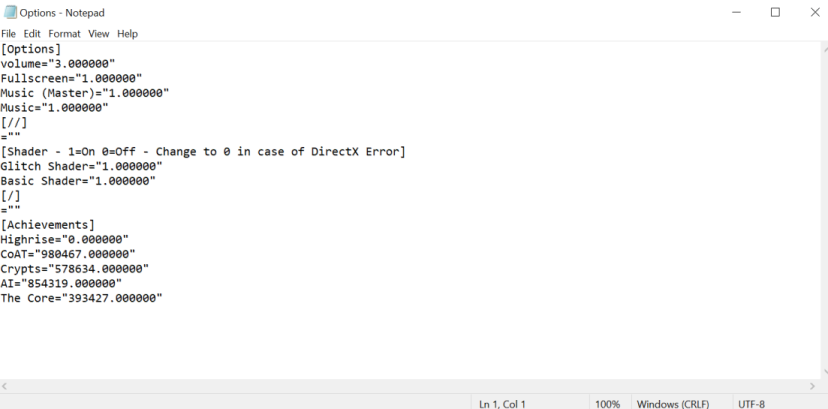
If somebody can tell me how these clues might actually be pieced together to actually direct you to check out the options notepad, please let me know as I am desperately curious and apparently not smart enough to find the solution on my own apparently!
Back at the arcade machine in our room, I tried to enter this value in as a game code on a whim. It did in fact bring me to the core, where I became an RGB trio while the screen freaked out.
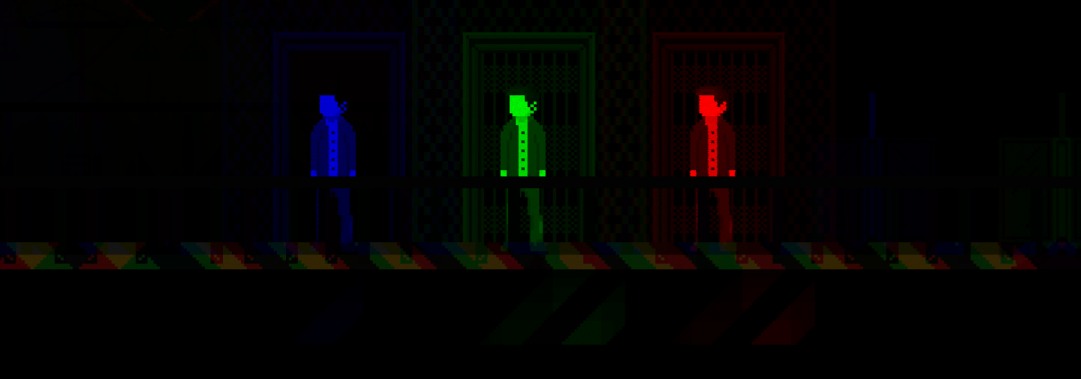
Run to the right, as before, and make your way to the main terminal. It’s hard to see, but in the center of the terminal you will be prompted to hold E, which will activate the computer and… crash Yui.exe.
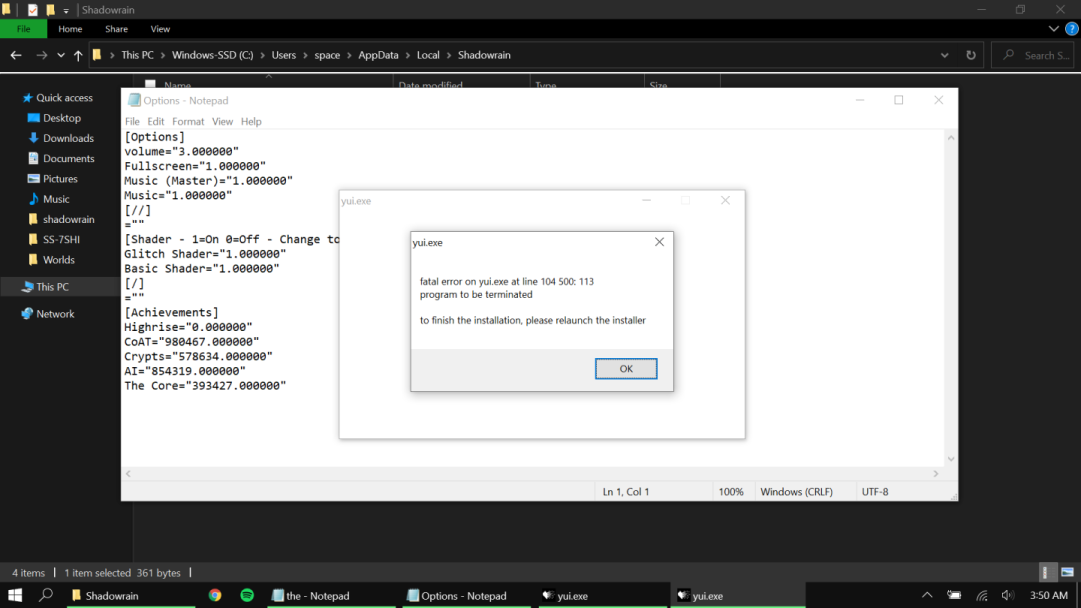
Something seemed to fail to install, try again.
Just go ahead and restart the game and…
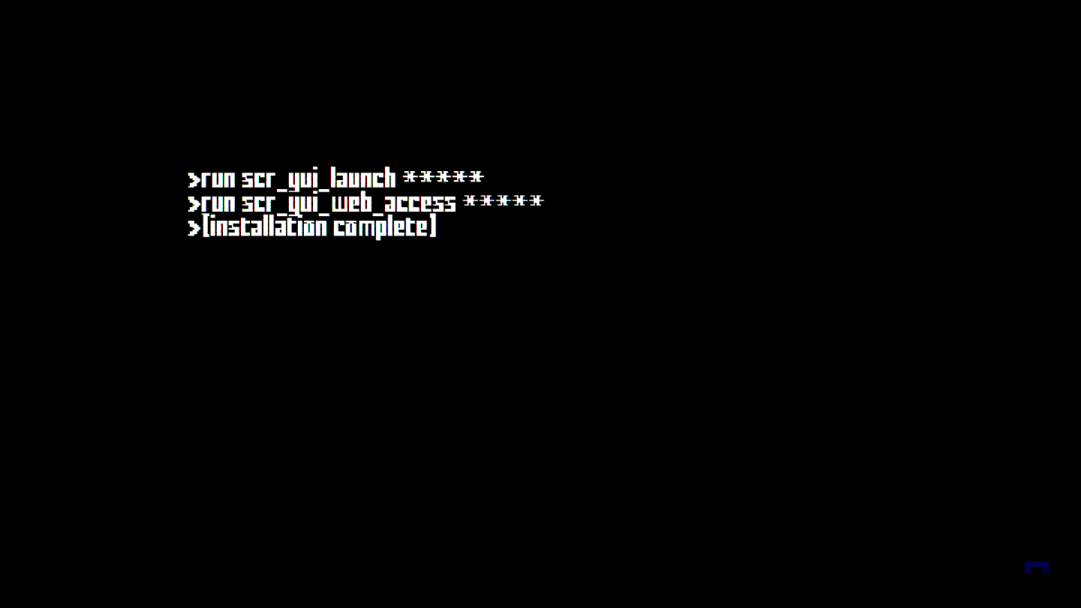
uh oh.
You’ve successfully loaded Yui to the world wide web. Congratulations.
That’s all we are sharing today in Shadowrain 100% Walkthrough And Endings, if there are anything you want to add please feel free to leave a comment below and we’ll see you soon.
Credit to Shiden
Very good guide, I was lost as I don’t understand 100% of English. I made the final 2 alone and the 3 and 5 by the guide, the fifth unlocked the achievements Yui and r̵̜̰͖̥̽͆ȩ̵̨̱̰͋̏͗́g̶̗͊̇̎r̵̫͛͛͂͝ḙ̴͚̤̻͌̉͝t̵̠̓̌̋, and I also have 𝕋𝕙𝕖 ℂ𝕠𝕣𝕖 𝔼𝟟𝟙. I have no idea how to achieve the other achievements 🙁
Sorry my English, I’m Brazilian and I used Google Translate
Ahh, I forgot to mention the other comment about the ending real world, the message from yui on the screen says “the numbers in the reflection” referring to the reception memo, where it is written below “IT’S HERE I CAN FEEL IT SOMEONE PLEASE Help Me”. As you are seeing everything duplicated and reflected, the text “IT’S HERE” changes to 393427 because of the calligraphy. To check, just start another game and go to the reception, with the normal memo you can already see the similarity. As I understand it, nothing leads to the notepad in that part, you cheated the game hahaha
I wouldn’t write any more, but I just opened the game and unlocked the achievement 【CoAT】, I didn’t understand it, but ok, maybe it’s the end 3, the core overheating, since it was the last one I did. Now I really just wrote haha, thanks a lot for the guide 🙂