A game with some guidance, but many features and things that can take a bit of “looking around” before it starts to make sense, and for all those things you’re quick to notice and wonder “what does it mean?”.
This is a quick reference or portal to making yourself seem accomplished and like you know what you’re doing without making all the mistakes in your first run through a game that isn’t always clear about the things that only afterwards has you thinking “if only I knew that a lot earlier”.
Introduction to the world!
Now what!?
There are a few things to help orient yourself before you just start hitting things and follow your “uncle’s” walk through in getting you started and sending you on your merry way to run errands and maybe secure your first successful trade.
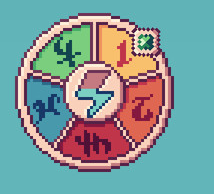
In particular the upper left corner CAN be a bit of a puzzle since there’s no real explanation about what any of it means, and leave you with the sense that you are lacking a lot in the important information, such as the amount of fuel your ship still has, what is in your cargohold, how much cargo you can actually carry and that crew that you’ll sooner or later have to pay.
 If you have a discerning eye, you will notice some things explain themselves, but if you’re a bit like me and not that fast to get fixated on a round colorful thingy in your upper left screen, it may take you a while to figure out what that thing is there for.
Maybe you already have figured it out by just looking at the ‘lightning bolt’ icon in the heart of that circle, but YES that is your fuel gauge. Blue is the fuel and as you fly around the map, will notice how quick it can deplete as you cross distances. And how IMPORTANT it is to keep that from getting drained to nil especially in your starting career, since running out is going to cost you A LOT. You can’t get stranded, but you pay some hefty fees should you run out of juice and need to get towed back to the nearest fueling station.
 This leads us to the first task of your uncle, which is the suggestion you fuel up. In my experience it’s best to ALWAYS top it up completely, but later on in the game when you got a larger fuel tank, you may not want to spend a whole lot in certain places to refuel and settle for only filling up half the amount.
And this is a good thing to remember well, different fueling stations have different prices where it comes for each unit of energy. Early in the game, the only one that’s cheap to offer energy per 1 gold is at the starting island. All others in the central region will offer energy for 2 gold a piece and the highest are the stations on the edges of the map at a whopping 5 gold per unit.
Later on you will be able to make new refueling stations on the islands that you bought. Refer to the base section for more details. The importance of these is that it doesn’t just offer you the cheap 1 gold per energy, but it will allow your ship with limited range to get to places that would otherwise be impossible to reach. There ARE parts of the map where you will not find any refueling stations anywhere and it can get really a futile effort in finding SOME island to refuel at while you try to get to mission locations that are marked in a place you have not been before.
For your starting vessel with a tank of only 3 units of energy that doesn’t seem like much, but there is a ship that has a tank of 100 units. Also, you start with little enough money and may find yourself limited in how much you can trade to make ends meet, when each refuel costs you 15 gold on top of paying your crew and maintenance.
Just saying.
Next there are the two info screens marked with F and X for quick keys. The F key menu when you’re in the ‘city screen’ holds a list of the buildings that are there and can help you select the building important to you without having to go through the whole screen. Especially useful where it comes to your bases which can hold up to 6 buildings beside the resource island that you bought.
The X menu is your information menu with in the bottom left corner two icons that explain themselves. One is the cargo menu, and the other shows you the crew roster. Next to that is a window that shows your fuel in numbers, how full it is and how much you burn per second. Right next to that is an empty box, which for your starting ship is your only UPGRADE slot. More on that in the Upgrades section.
The crew roster will give you 3 bits of information. The maximum number of crew your ship can carry, the OPTIMAL amount of crew and how much crew is present. You don’t NEED optimal crew numbers, but it affects speed.
If you open the cargo menu at the start of your new game should hold 10 lightning orbs designated as batteries already.
BE AWARE that these 10 batteries will be used automatically if you run out of fuel while in flight and recharges your tank by using up 2 batteries. This may seem like a good and convenient thing, but until you unlock some things, these are the only ones you have at your disposal.
Where it comes to your cargo, your starting ship has 4 slots. That means you can only hold 4 different types of cargo, or up to 4 stacks of a certain type of cargo. The size of the stack can range from 10 units to 200 units, depending on the type of cargo. Refer to the cargo types section for details. It also means that you will have to get rid of some if you want or need a different type of cargo. Or you just have to get a bigger ship.
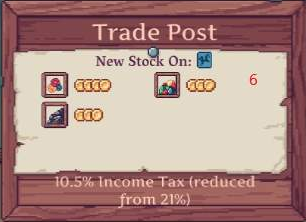
So, after you took your uncle’s request to get a letter to take to another island, it’s time to open up your first market trade menu and you’ll be seeing a bunch of things that don’t make a lot of meaning to you. Such as the income tax and that lower tax option that demands what looks like 3 tickets.
For your first purchase, the tax will not have any meaning. The price of goods when you hover over the value in your current market are the prices you will have to pay. So if that’s 5 gold for sand, then you can do the math easily when you get 10 units. It’s when you SELL your goods, that the tax starts to rear its ugly head, because even if it may seem that you are selling your goods for a marginally higher price compared to where you bought it, tax is automatically deducted from what you earn. This can lead to moving goods at no profit at all, or worse, at a loss.
There are two ways to bring down income tax by a %. The first is the two upgrades for each individual market. For 3 tickets and 6 tickets, you can get a 30% reduction of the % of the local tax. So, if the income tax is 20% it takes 30% off the 20, and not make it -10% (because that’d be broken and really silly). The other way is through your personal development to add another total 50% reduction in income taxes. Refer to the skills section for more on that.
Other things to be aware of is that markets will renew themselves on specific days, which is what those 5 colored panes are about (see the time section). That the market has not just a limited amount of goods, but also a limited amount of funds to buy for goods, and that with each trade a bar will fill up dependent on the size of the transaction. You WANT that to happen, because your local market will have MORE goods and MORE money to buy things from you. Which really becomes helpful later on when you also get more value out of your goods by reducing income taxes.
The sad part is that markets only develop themselves locally and not globally.
One last thing to remember is that while prices WILL NOT CHANGE, the local market will only buy and sell the goods that it has.

When you open up the actual menu to trade, you will also see in the bottom right the goods with a number of coins behind them. These refer to how cheap or expensive they are and they are universal for the ENTIRE map. 1 coin is dirt cheap and 5 coins is insanely expensive. Furthermore it will show the day for new stock and on the bottom the income tax you pay when selling.
And armed with all this, you are finally ready to go forth and multiply! Your net worth, that is.
The World Map!
The whole thing is simple and comprehensive enough, but not everything may be all too clear or be relevant to you when you go on your maiden voyage. (Kind of weird, since you supposedly came sailing TO the island on that ship, but let’s leave it at that.)
Movement across the map can be achieved in 3 ways.
- ASWD to manually fly the ship
- Point & click anywhere on the map.
- From a locations overview list select. (more on that later)
While your map is still completely obscured, this will not be evident from the start, but the map isn’t just some static depiction of the world with locations. It has random hazards and benefits that will not immediately appear. So unless you want to wildly race straight into a hazard while you go your merry way, you may want to WAIT a moment for them to appear.
One particular strategy to not get caught by hazards, since they do have a tendency to spawn straight in your way to any islands you intend to go to and you DON’T want to maneuver all the way around them, is to go back to the island you’re visiting and then get back out.
Okay, so there really is only ONE hazard and that’s the lightning storm. It will not destroy or damage your ship, but it will slow you down, and worse is that while you are slowed down, the rate of consumption remains the same. If you remember from the introduction, energy is consumed per second, not by distance. This will also apply when you use the fast forward button that will appear below the time dial when you are wanting to wait for time to pass by because you are waiting for a restock or something else.
The other three are benefits in their own way. The gust of wind will give your ship a brief speed boost. Good to make more distance with less energy spent. The other two are field of floating crates and a bunch of speckles that are referred to as salvage.
The floating crates allow you to get goods for free, BUT you will need the crane upgrade to do so. Until you pick one up, these are NOT of any interest to you.
The salvage is for fixing your upgrades. In particular the ‘collection’ upgrades. Whether the crane, or any of the tools to harvest from islands, using them will make the green bar reduce. Fields of salvage are the way get them back up, so you will have to remember you can’t harvest indefinitely.
In both cases E is your quick key to clearing the fields, and while you are busy hauling in cargo or salvage, you will NOT lose energy OR time. What will happen is that when one of them disappears something new will span in the vicinity. Which can be storms that block your way back to fuel. The same will apply when you spend a certain amount of time flying across the map, so if you are making a long haul, you may want to take manual control or limit the distances you travel.
![]() Once you’ve visited a few places with markets, the next thing of interest and your GO-TO guide to financial success, is the icon with the scales. This will open up a window with ALL the markets you have found and offers a comprehensive list of the day of their restock, their distance to your current position and which goods they have and whether they are cheap or expensive. Clicking on any of the vertical categories will reorganize the markets in an orderly fashion to be able to quickly tell where you get the best prices for selling the stuff you got on board, or where you can get your best bargains.
Once you’ve visited a few places with markets, the next thing of interest and your GO-TO guide to financial success, is the icon with the scales. This will open up a window with ALL the markets you have found and offers a comprehensive list of the day of their restock, their distance to your current position and which goods they have and whether they are cheap or expensive. Clicking on any of the vertical categories will reorganize the markets in an orderly fashion to be able to quickly tell where you get the best prices for selling the stuff you got on board, or where you can get your best bargains.
My experience, though, is that the cheaper it’s sold the less units the market has to offer. So if you need a 100 wheat, going to the cheapest seller may leave you having to fly all over to gather up enough after all, or have to come back repeatedly.
Lastly, when you hover over the names of different market locations, the map will go into an autofind on the map for you, which you can use to locate the place by closing it and then clicking. Or you can just click on the destination for the ship to set course.
This also applies to a different search window, that you can open with F when you’re in the map screen. It allows you to search on a large number of buildings and owned islands as your criteria search. For instance when looking for a place to hire more crew. Or you need to refuel badly. However, you will need to have FOUND something to meet with those criteria in order for it to show.
