This is a Farworld Pioneers starter guide, it will tell you everything you need to know to get started with this game and make your way to the first boss fight!
HUD Explanation

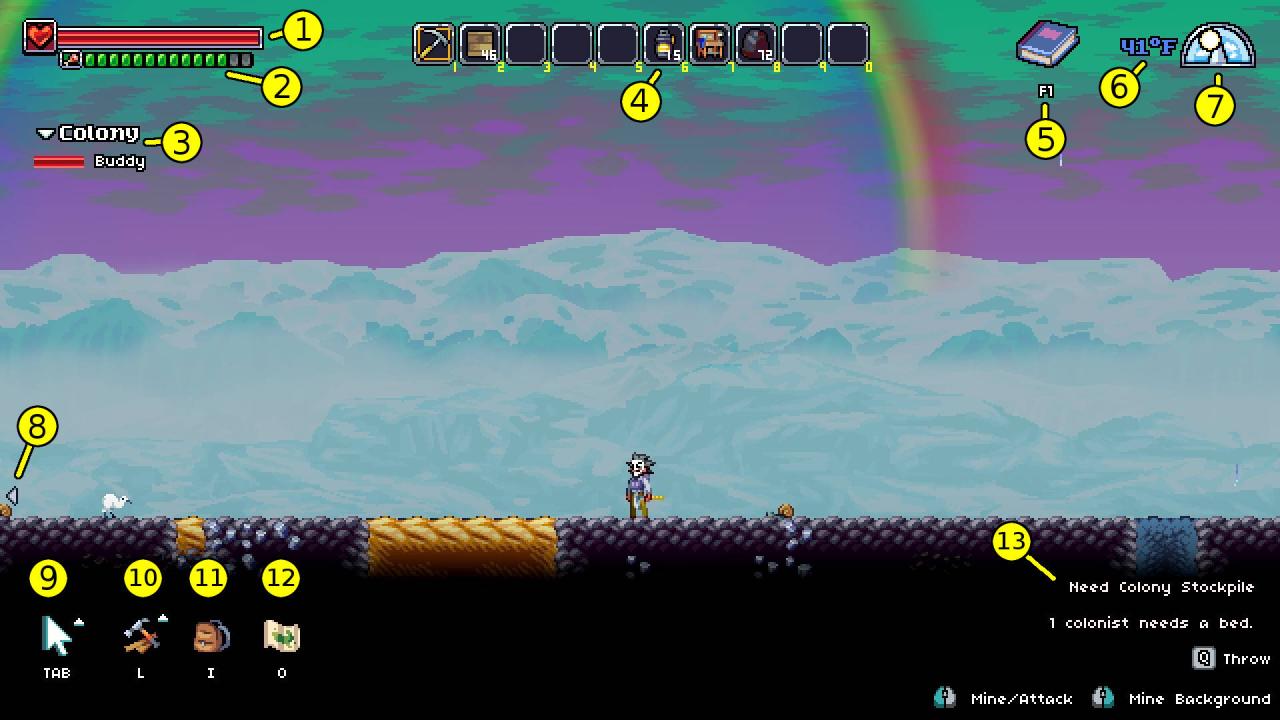
- Health – This is your standard health meter. Damage will not be applied instantly; rather, an orange bar appears and gradually drains after taking damage. The health bar can also turn blue if you’re too cold; if it turns entirely blue, you freeze to death. This same health system applies to your Colonists, too.
- Hunger – How well-fed you are. If this drops to zero, you’ll eventually die. Colonists need to be fed, too.
- Colony Population – This shows the names and current status of every member of your Colony[techraptor.net].
Hotbar – This is a bog-standard Hotbar that shows you all of the items you have equipped. - Buddypedia – The Buddypedia shows your suggested objectives, tips, the tutorial, and the in-game help menu.
- Ambient Temperature – This is the Temperature in the area immediately around your character. If it gets too cold, you’ll start freezing to death.
- Time – This shows the current time of day.
- Colonist Indicator – These grey arrows point toward any active Colonists. These arrows can be useful for finding newly-recruited Colonists who may have gotten lost on the way to your Colony.
Orders Menu – This is where you can designate work for your Colonists such as digging, Farming[techraptor.net], and more. - Build Menu – This is where you can place Workbenches used for Crafting, Furniture, and more.
- Inventory – This button opens up your inventory and the Hand Crafting menu.
- Overview – This menu allows you to see the Map and manage your Colony.
- Colony Messages – These messages will show you any important alerts about the Colony.
Aside from what you see on the usual screen, keep in mind that there is an entire management system in the “Overview” menu. This is where you can more precisely manage your Colony[techraptor.net].
Starter Guide
Our Farworld Pioneers Starter Guide kicks off with the basics of the basics: starting a new game. You can choose to immediately jump into a new game from the main menu or you can click the wrench icon to customize your character and choose a seed for the world. Once that’s done, you’ll start on a freshly generated world.
The First Day
Your adventure begins with your character standing next to a crashed drop pod and an NPC named Buddy. Buddy is your very first Colonist and he can be quite helpful, but you’ll have to get him somewhere safe as quickly as possible. To that end, your first move should be to loot the drop pod and then destroy it with your Crude Pickaxe — this will give you a basic Revolver[techraptor.net], some Rations, and a few other useful supplies.
You should take a moment to decide whether or not you want to deal with Raids. If you turn “Peaceful Mode” on in the menu, you won’t get raided — you’ll only have to deal with combat when you deliberately seek it out, at least when it comes to Raiders. Raiders can be tremendously tough in the early game, so choose carefully!
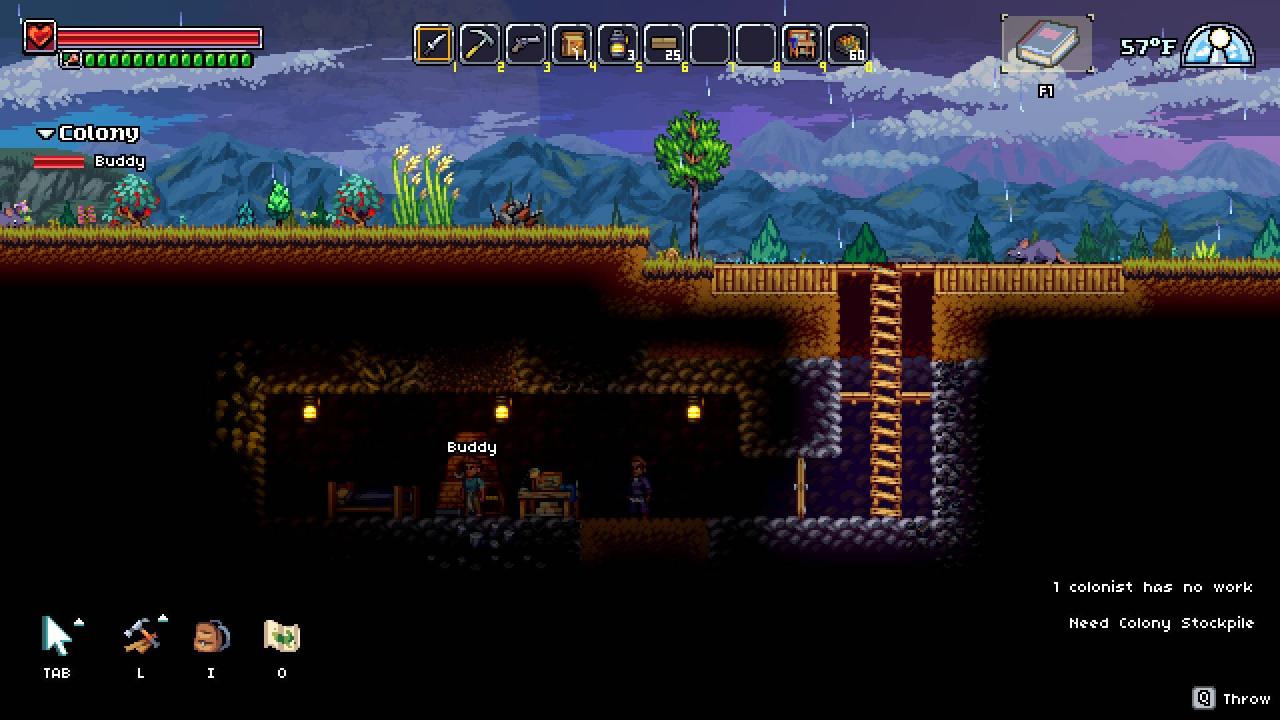
Look around the immediate area and cut down a few trees with your Crude Pickaxe. Then, Craft[techraptor.net] some Wooden Platforms and some Ladders (Wooden) in your inventory. Dig a hole straight down for about 8 blocks or so, then dig a tunnel to the side. It will look like this:

You should then Build the following Workbenches and Furniture inside:
- 1 Workbench
- 1 Wooden Bed
- 1 Smelter (Lo-Tech)
- 1 or more Oil Lanterns
- 1 Wooden Door
This little hole in the ground ain’t much, but it’s enough to get started. Your next step will be to collect Iron Ore and start smelting it. This will allow you to expand your base one step further by adding another level.

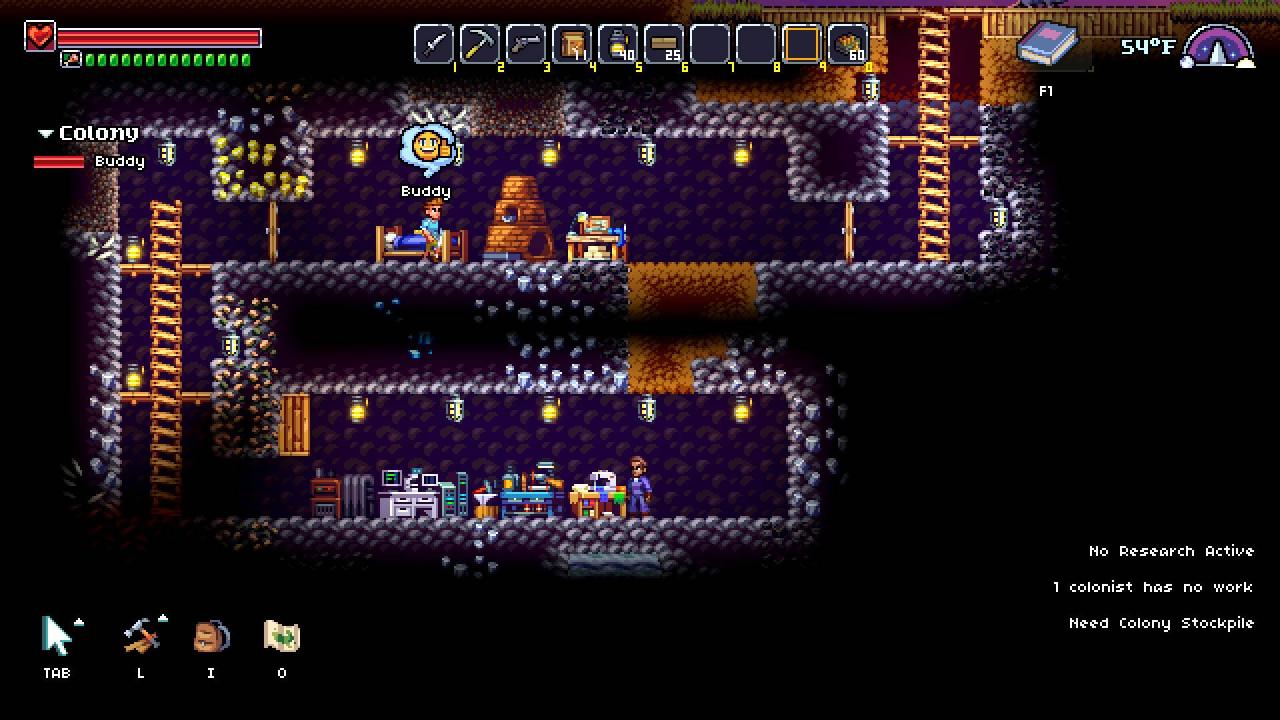
You should add the following to the second level:
- Steam Generator
- Research Bench
The Steam Generator is fueled by Coal; it’s required for powering the Research Bench[techraptor.net] and allowing you to progress along the Research Tree. The Armory and Tailor’s Bench are depicted here, but you won’t have access to them just yet — you’ll have to Research them first.
I also recommend placing some Cage Lights throughout your facility. Although they require an active Steam Generator to stay on, they provide much better light than Oil Lamps. (You should still use Oil Lamps, too, to ensure that there is a backup source of light if the power goes out.)
Finally, make sure to place at least 1 Stockpile somewhere in this area. This will allow you (and your Colonists) to store and retrieve resources as needed, including Food.
Researching the Basics
Now that we have a halfway decent base, it’s time to do some research. At the minimum, I recommend that you Research the following:
- Armory
- Clothing Manufacture
Buddy will help out at the Research Bench[techraptor.net] and speed things up significantly. Once both of these items are Researched, you should Build an Armory and a Tailor Bench. This will allow you to make Guns[techraptor.net] and some Clothing. I recommend that you Craft a Simple Carbine and some Ammo at the Armory ASAP so that you can fend off any raids.
You should also Craft an Axe and a Mining Pickaxe to speed up your
Next, Research the following items:
- Advanced Gunsmithing
- Body Armor
- Medkit
This will allow you to make more powerful Guns and some decent Body Armor to protect you. You’ll need a fair amount of Steel Ingots to make everything, but you should be able to equip yourself with a Battle Rifle and Steel Body Armor without too much work. As time goes on, you can Craft[techraptor.net] Battle Rifles and Steel Body Armor for each of your Colonists[techraptor.net].
Medkits are especially important. Aside from providing better healing and stopping the Bleeding effect, they can also be used to bring back downed Colonists from the brink of death.
That’s all we are sharing today in Farworld Pioneers Basic Guide for Starter, if you have anything to add, please feel free to leave a comment below, you can also read the original article here, all the credits goes to the original author Robert N. Adams
