For Ancient Warfare 3 players, this guide explains everything you need to know to import models and create custom weapons, shields, grenades, armor, weapon attachments and some other equipment.
Introduction
In this guide I will explain everything you need to know to import models and create custom weapons, shields, grenades, armor, weapon attachments and some other equipment. Everything has been designed to be as easy to set up as possible. If you need specific help or have questions, use the comment functionality below this guide, the game’s steam forum or join the official Dicord server[discord.gg]
Using custom equipment
Before I’m going to start explaining all you need to know about how to create custom equipment, let me briefly explain some things about the implementation and usage.
Custom equipment items can be used pretty much anywhere, where you can also use vanilla equipment. In most lists (for instance the equipment lists), there is a small blue symbol next to the item to indicate which equipment items are custom content and which items are vanilla content. Each custom item also has a version number, which is shown right next to the name in lists. This is important, because there could be different versions of the same item in one map.
If you use a custom equipment object in a custom unit, it will be embedded into the unit data, if you include that unit into a prefab, the custom equipment will be stored in the prefab, and if you place the prefab into a battle, the custom equipment will be saved in the battle.
So the custom items you use are always included when you publish something to the workshop and the players dont have to download any additional mods, everything is included in the workshop item.
To prevent stealing of custom items, only the creator can’t load the item in the custom equipment editors. Others can still use it if they subscribe to the workshop item for instance, or if they duplicate a unit from a battle, but they cant modify the item and upload it as their own creation. For this to work, it is required that you are logged into steam when you want to save/load/upload custom items! Otherwise, there is no way for the game to validate that you are the owner of the item and you cant use the custom equipment editors.
You can find custom equipment items of others in the steam workshop in your Steam client or directly in game in the custom equipment editors.
Model Format
Ancient Warfare 3 imports the Wavefront .obj format. It’s a lightweight, free and open format which is supported by most 3d applications. The exported models usually consist of two files: The actual 3d model information (.obj) and material information (.mtl). The .mtl file is optional and not required to import the model into the game, but if the .mtl file is stored alongside the .obj file, the game will try to read material settings (color, reflectiveness, …) from said file.
To ensure that imported models follow the game’s style and dont require too much storage there are some restrictions:
- Textures/UVs will not be imported (if you want to create something like sight reticles create them as a mesh instead of a texture)
- Depending on the item type there are vertex amount limits (see table below)
- Depending on the item type there are material amount limits (see table below)
Vertex + Material limits
Creating/Obtaining 3d models
The best way to get a 3d model is to create it yourself in a modelling software of your choice. I recommend Blender [www.blender.org] which is a free and open source. If you dont know anything about modelling yet, you should really consider learning the basics. Some members of the community learned it pretty quick and already created good looking models for the game.Downloading 3d models
If you can’t or dont want to learn 3d modelling, you can either ask someone to create a model for you or download a free model from the internet (there are plenty of sources). However, models from the internet might need adjustments which can either be done in a 3d software or some basic adjustments can also be done directly in the game (origin, position, rotation, scaling, face normal adjustments). So in any case it’s good to know some very basics about 3d models!
Some models require you to credit the author or do not allow modifications, so make sure to understand the requirements (e.g. credit in the description) to use the model before you upload it to the workshop!
Modelling tips (related to importing)
If you dont want to create models, you can skip this section. Otherwise please read this carefully to make it easier to import the models later!
Multiple objects
When you import .obj files which contain multiple meshes/objects they will be merged into a single object/mesh when importing them. There are some exceptions from this. For instance ranged weapons allow multiple objects (weapon, magazine, iron sight, …).
Origin placement
The origin placement in the 3d editor does not matter, because wavefront .obj will set all origins to the center of the scene. You can adjust the origin of all objects after importing in the game, but it will be easier if you move your objects to the scene origin before exporting.
Move weapons in a way that the world origin is at the grip of the weapon. (they will be held there, but it can be adjusted)
Move all other objects in a way that the world origin is in the center of the object/mesh.
Rotations
Make sure your rotations are either set to 0, a multiple of 90 or any other known value that can easily be edited in game. The reason for this is that wavefront .obj doesnt export rotation information of the objects which will result that whatever rotation was set in the editor will be (x: 0, y: 0, z: 0) after importing the model. If your model is aligned with one axis it will help you to adjust rotations in the game to make sure it’s perfectly aligned when holding it as a weapon for instance.
Triangulation
The wavefront .obj format doesnt store enough information to generate the ‘best possible’ triangulation for faces with more than 3 vertices. Therefore you should triangulate your models before exporting them from your 3d modelling software.
After the triangulation it will be more difficult to edit the model, so you should only triangulate it right before exporting without saving the changes to the model. In blender you can use modifiers to automate this process.
Materials
To create different materials, use submeshes in your 3d modelling software and assign a material to each submesh. This has been tested for blender and was slightly different depending on the version, but if you want to adjust material settings directly in your modelling software, you can use the image below to see which settings map between blender and the game.
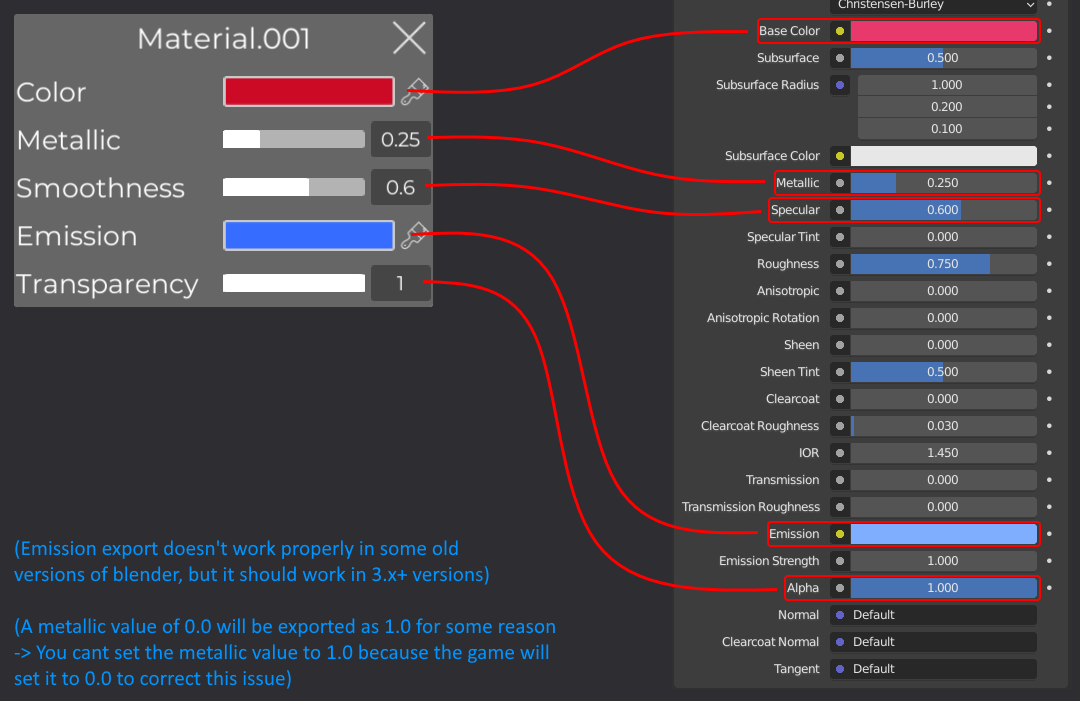 Obviously for this to work, you also have to keep the exported .mtl file alongside the .obj file, because these information will be stored there. And the material settings can always be edited in the game after importing the model.
Importing a model
 Depending on the category of equipment you selected, you can now select the exact equipment type you want to create an item for.
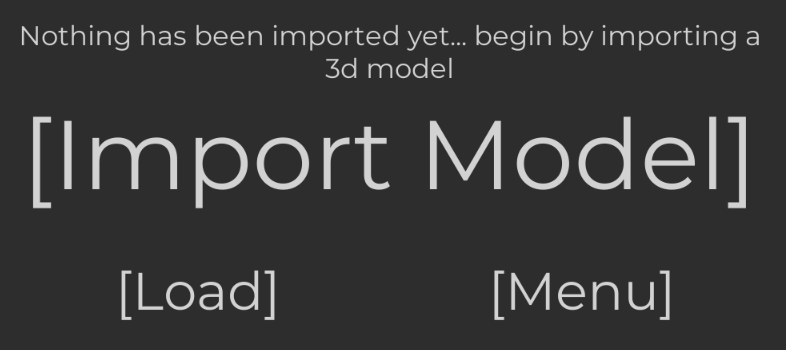
After that, you can either load a saved equipment item of the selected type or click the ‘Import Model’ button to open up the in-game file browser to select and import an .obj file to import it.
Item editor overview
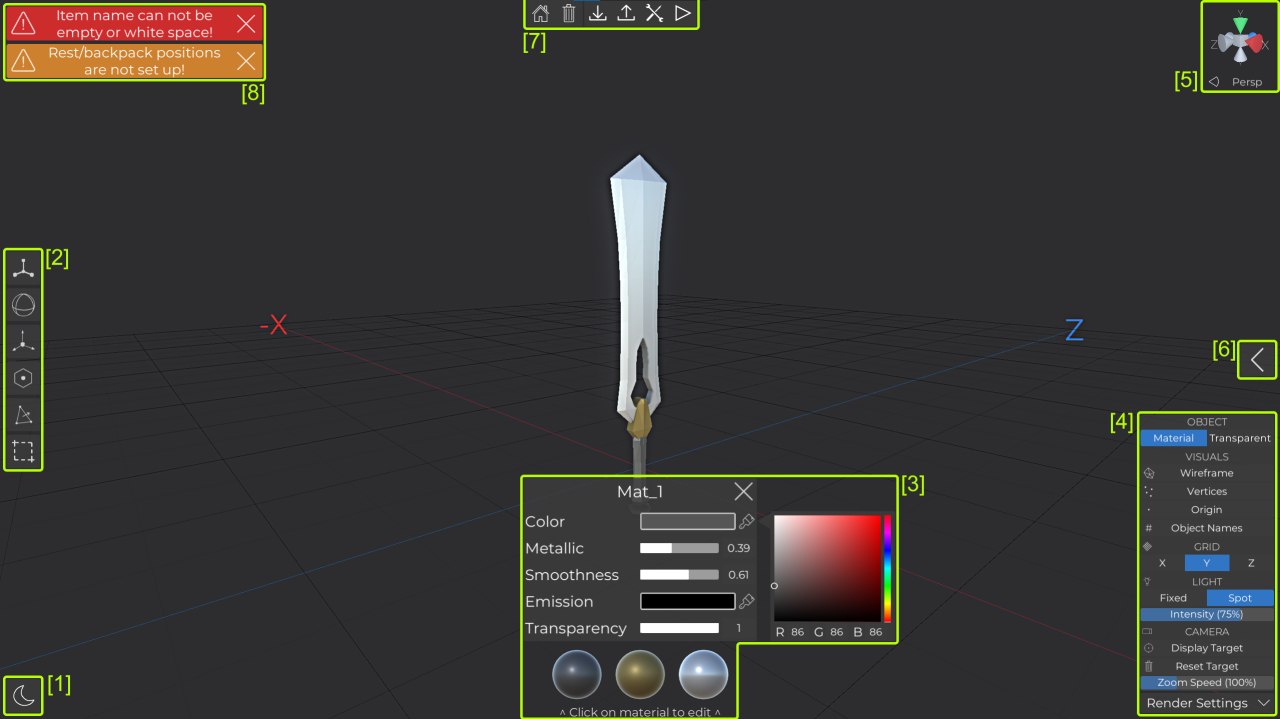
Camera controls
The camera can orbit around the object by dragging while holding lmb/rmb. If you hold left shift and lmb/rmb you can move the camera target (the point you orbit around). The mouse wheel can be used to zoom in and out.
In the bottom left corner, you find a button which can be click to toggle between dark and light mode. Depending on the object’s color or personal preference you can switch at any time and your setting will be saved between sessions.
[2] Model tools
The in-game model tools can be used to modify the scale, position, rotation, origin and normals of the model.
[3] Material settings
All materials of the model are listed in the bottom and can be clicked to adjust the color, metallic, smoothness, emissive color and transparency of the material. In general it’s best to only use materials without emission and transparency for performance reasons, but the game will also inform you about possible performance impacts depending on your material settings.
[4] Render settings
The render settings can be used to adjust the rendering of the scene to help while editing certain options. For instance, you can render all objects in transparent to see through them, which can help while selecting points inside of the object.
[5] Perspective settings
The perspective handle shows the current orientation of the camera. You can also click on one of the axis to align the camera on that axis. In addition you can click on the ‘Persp’ text to switch between perspective and isometric camera modes. For instance the axis alignment and isometric mode can be used to set options like bullet spawn points and colliders in the most accurate way possible.
[6] Item settings
This button opens the actual item settings where you can modify the settings which make the item actually work.
[7] Toolbar
Similar to the other editors, the toolbar at the top can be used to save/load items, use the steam workshop and some item types like weapons can be tested directly in the editor.
Please note that items can only be saved/loaded when you are logged into Steam. This is required to validate your ownership of the item. (More information about that later in the guide)
[8] Notification area
Before saving/uploading/testing/… the minimal required settings for the item type to work have to be set up correctly. Otherwise the item is incomplete and cant be used. If you press one of the buttons (save/load/test) which require a valid item or press the validate button in the item settings, all missing or invalid settings will be shown in the notification area, so that you know what’s wrong.
Item settings
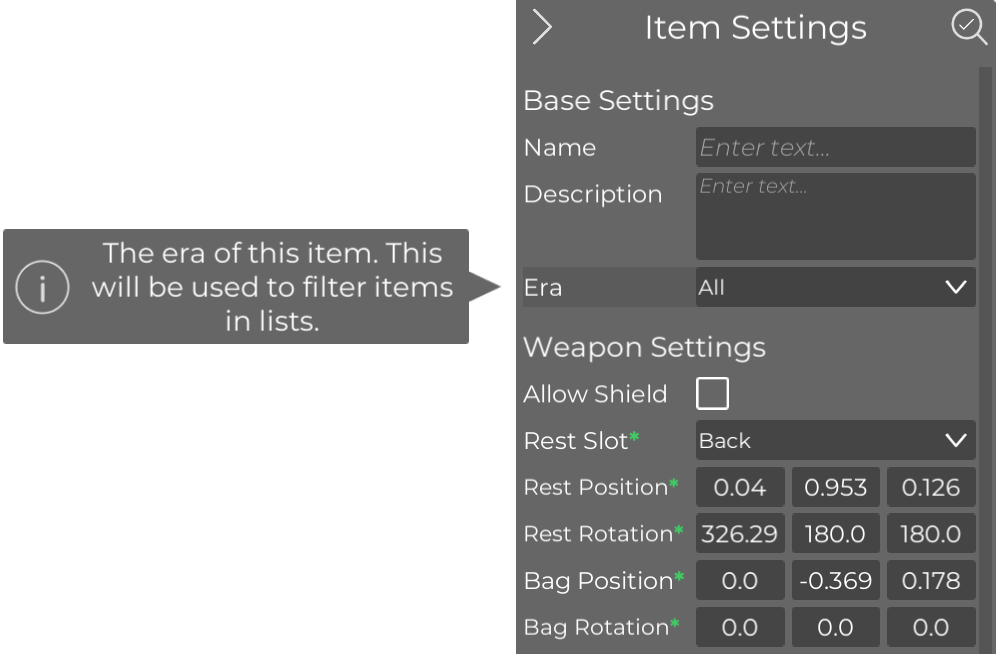 The button to open the item settings was shown in [6] of the previous section of this guide.
They look like this, but the available/required settings depend on the type of item you are creating. And depending on your selected settings, there will be less or additional options available.The item settings were designed to be as easy as possible. You still have to make sure all required are correctly set up, but as mentioned in the previous section, if there are errors and warnings they will be shown in the notification area.
Conclusion
That’s pretty much all you need to know to get started and create custom equipment items. There is no point in explaining each setting for all the different item types in this guide, because the game already explains each setting and helps you in case something is wrong. The best way is to explore all the settings by testing them in the equipment creators. It’s really straight forward so you should really give it a try.
If you want to have look at some of the tools, please check out this preview video which was created during the development of the custom creators:
What is the file type for a custom ranged weapon sound?
Just Wondering.