For The Centennial Case: A Shijima Story players, this guide will explain all you need to know about the game, you’ll find tips, achievements and walkthorugh guide below.
Cognitive Hypotheses
The most confusing gameplay mechanic in the game is the cognitive deduction space. This is where you combine mysteries and clues to create hypotheses (theories/possibilities). The game does a very bad job (in my opinion) of actually explaining the theory behind it, so I’ll try and do a better job.
- The game will produce a series of red hexagons, which contain mysteries/questions, such as “How has person X been behaving unusually?”.
- This red hexagon will have one or more gray, empty hexagons surrounding it. These represent places where clues can be placed in order to provide a possible answer/hypothesis to the question/mystery.
- These gray hexagons are filled in with yellow hexagons that are obtained from cycling through videos shown in the upper-right part of the screen. These represent scenes relevant to the investigation, and any clues obtained from the scene will be included with the scene. If you want more context, you can watch the scene by pressing check scene and then play scene once it is in check mode.
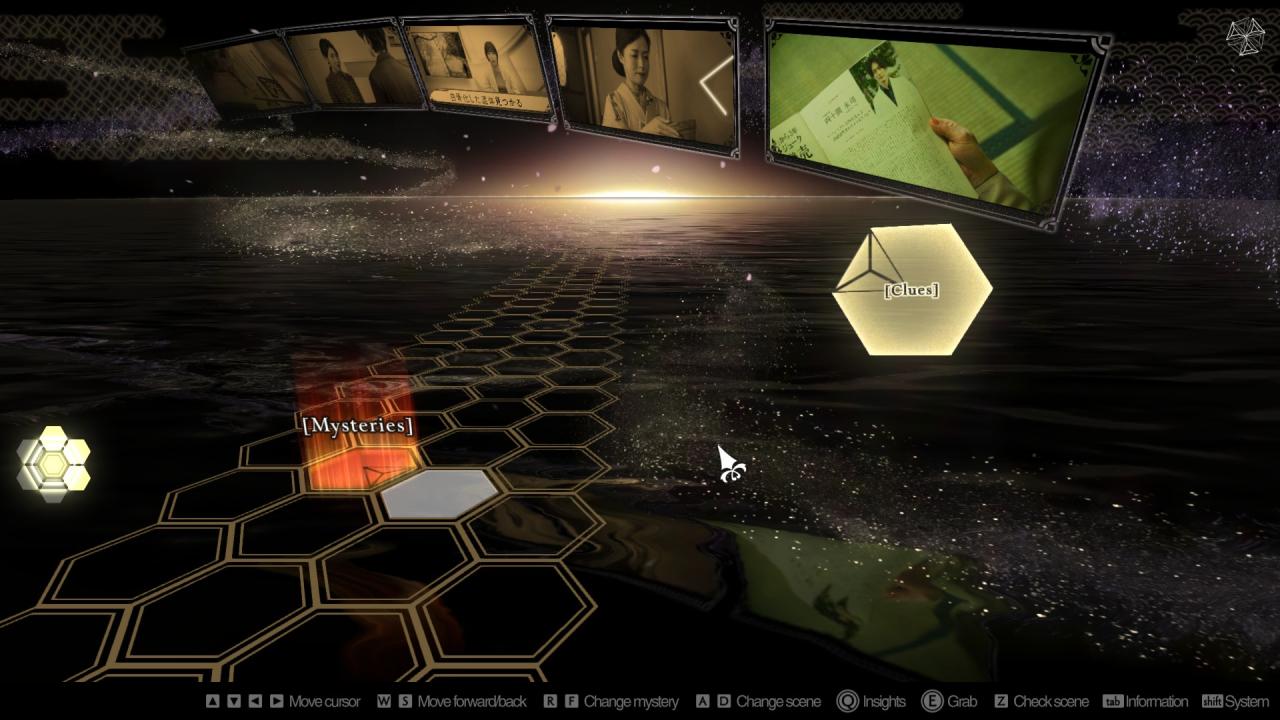
- Each yellow hexagon has one or two triangles on their background. The triangle(s) will have a pattern in. The triangle will perfectly match with one on a red hexagon where the clue is meant to be placed, with the triangles touching. For an example of how this works, please see the screenshots below.
- The patterns also provide an easy method of identifying the correct location of all clues. Hexagons with two triangles are a connecting clue, and are meant to connect the red hexagon, and a second clue at the same time.
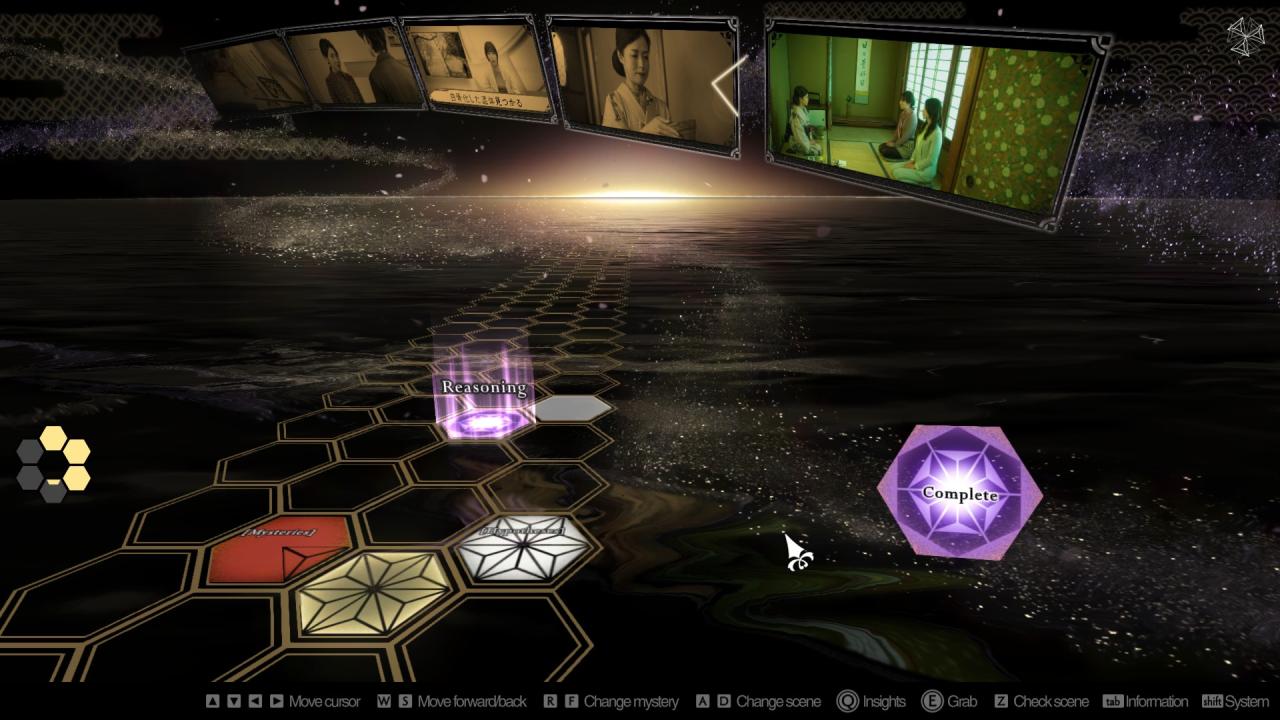
- Once all mysteries/questions have at least one hypothesis, a final, purple hexagon will appear. Once you are satisfied, you may end the hypothesis making.
- After this, for most of these cognitive spaces, you will a chance to go over the hypotheses you made in a review, with hints and advice being given on what they may mean and how they might fit into the wider picture. You can play around here as much as you like, but you must do at least one to continue.
 This shows a cognitive space before being filled in. The yellow hexagon can be clicked and dragged from the appropriate video to the empty gray hexagon. Note how the triangles on the yellow and red hexagons match perfectly.
 Once complete, you can see the purple hexgon has appeared. Also note the white hypothesis that appears next to the yellow clue once it is correctly placed.
Other Gameplay Elements
The remainder of the gameplay is very straightforward, but worth making clear on how it works and what it does.
Pay attention the video, as at times, clues will appear as floating text when something unusual/odd is heard or seen. Pressing the appropriate button (it will show up along with the text) will cause the clue to be collected for later use. Whilst this is not required (any missed clues will be automatically added to your Cognitive Deduction Space when the time comes), you must collect all those which appear for achievements.
At times, dialogue options will appear. These are selected by pressing and holding the appropriate button for a few seconds. So far as I can tell, only those during the revealing phase (i.e. showing everyone whodunnit) have any real impact, with most of them being solely for flavour. Any where your choice does seem to matter I have included in the walkthrough lower down the guide.
Reasoning Evaluations occur at the end of most chapters is the point where whatever mystery has occurred has the strangeness resolved and the culprit identified and (hopefully) made to confess. This is mostly a series of dialogue options, including picking from hypotheses you produced. For each part you do right, you earn 100 points. Earning max points gives you an S rank. Getting an S rank on all of these is required for an achievement.
This section contains spoilers for chapter 5. Chapter 5 goes down a completely different path to the rest of the game, turning into a point and click puzzle game. You can turn your head to see different things and click on hotspots. Hotspots are usually labelled, and always change your cursor so you can easily identify them. Examining things will give either mysteries or clues. You can then swap over to the Cognitive Deduction Space to combine clues and mysteries in order to produce hypotheses on how certain items can be interacted with. The only troubling part is when you have to produce a map by placing items onto it. For some reason, the placing is very precise, so if it isn’t working for you this may be why.
Achivements
Most of the achievements this game offers are either unmissable, or easy to obtain. I’ve listed them all below by name and requirements with spoilers over any plot-sensitive details.
You’ll get these just from completing the game.
- The Cherry Blossom Ceremony. Finish the prologue.
- The Wandering Mummy. Complete chapter 1.
- The Elusive Path of Logic. Complete chapter 2.
- The Fateful Elegy. Complete chapter 3.
- The River of Oblivion. Complete chapter 4
- The Prison of Devices. Complete chapter 5.
- The Scarlet Camellia. Complete chapter 6.
- The Centennial Case: A Shijima Story. Complete the game.
These require you to obtain all the data the game throws at you.
- Rookie/Seasoned/Veteran/Master Sleuth. Perceive all mysteries. Many mysteries in the Cognitive Deduction Space are only unlocked by making certain hypotheses. When you unlock the purple end for each one, go back and ensure every box is filled. On some Spaces, you will end up with more clues than there are places to put them, this normal. However, you will never have empty, gray hexagons.
- Novice/Seasoned/Expert/All-seeing Observer. Collect all clues from pressing a button. These are the floating text clues that prompt you to press a particular button to collect them. Just pay attention during footage and press whenever they come up. There are a lot of them and they can come up at any time, not just during investigations.
- Flash of/Prolific/Exceptional/Omniscient Insight. Create all hypotheses. Much like the Slueth achievements, just ensure every single gray hexagon is filled before finishing a Cognitive Deduction Space and you’ll have no problems here.
- Chapter 5 spoilers. Talented/Intellectual/Accomplished/Relentless Investigator. Obtain all clues for escaping in Chapter 5. Just click every hotspot, and every searchable area within that hotspot. Complete all mysteries with all hypotheses, and keep checking round as more and more hotspots unlock as you go along. If you follow the chapter 5 walkthrough later on, you should unlock all these achievements.
Missable
These are achievements that can easily be missed that are unrelated to simply performing gameplay actions.
- Clairvoyant. Gain an S rank during a reasoning evaluation. Simply put, complete a reasoning evaluation with 0 mistakes. Follow the walkthrough below and you’ll get this without issue.
- Fact Checker. Review a video for a case. In the Cognitive Deduction Space, you can review scenes for context and reminders of what was said and done. The precise instructions are found in the first part of this guide if you are struggling.
- Spoilers for Chapter 5 (again) Dark Secrets of the Shijimas. Find all information related to the Shijima family in The Prison of Devices. There are 8 books with varying degrees of hidden in the cell in Chapter 5 that contain a bit more (somewhat dark) lore about the experiments performed on their ageless subjects. They don’t have markers, but will change the cursor to hotspot mode when hovered over. All are within hotspots you can click on, not within the general looking around mode. All 8 can be found immediately after freeing yourself from the chair. The full list of locations is included in the chapter 5 walkthrough.
- No Stone Unturned. Get all other achievements.
General Deduction Advice
Sometimes, we just need a few helpful bits of advice on how the game “thinks”/works to help remove possibilities and move along our own deductions at home (assuming you’re actually trying to solve the mysteries the game presents). Here are a few bits of general advice concerning ways to help with getting your deductions. Spoilers are tagged where needed.
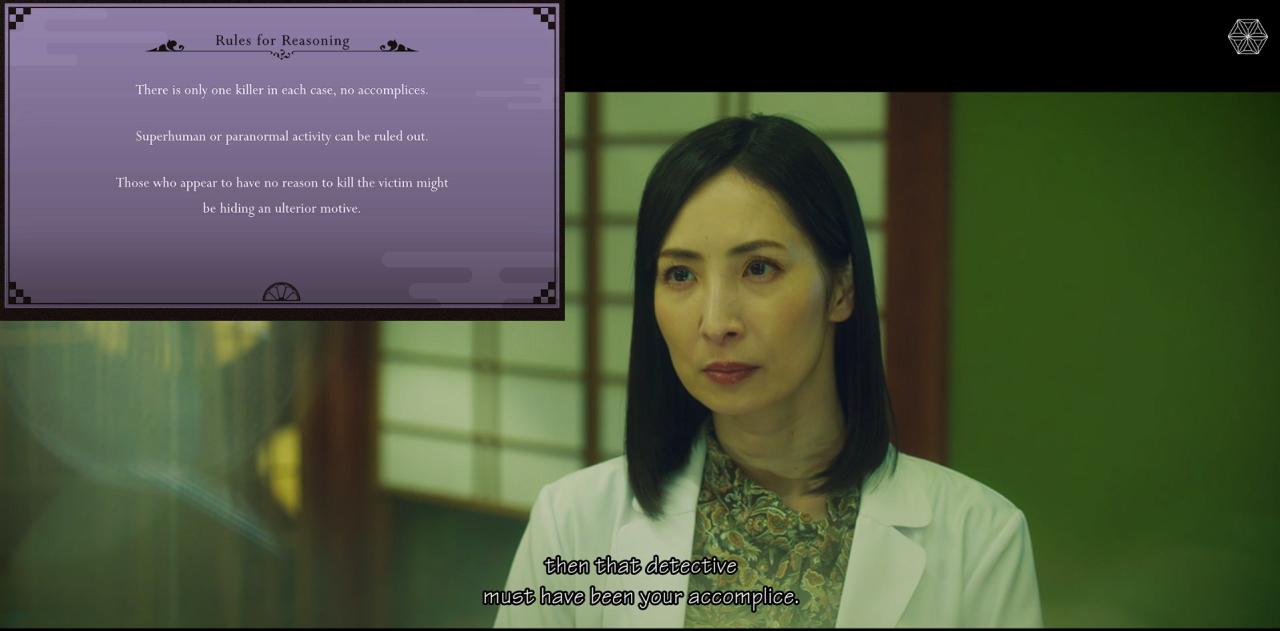
- The game promises that “There is only one killer in each case, no accomplices.” This is a lie to a certain degree within the game. It is untrue in the following: chapters 4 and 6 to be precise with filler to avoid people who don’t want to know guessing based on spoiler length. Whilst the actual act of murder is a single person act, others may support this person in different ways.
- The game promises that superhuman or paranormal activity can be ruled out. Despite this, it does sometimes provide such thing as hypotheses. This rule can be followed except when it can’t be chapter 6, where this may be considered a possibility depending on what you consider supernatural or superhuman. .
- The game’s hypotheses are mostly there to make you think and come up with ways to connect clues into a coherent narrative. Even if they sound silly or outlandish, consider how they might fit together with other hypotheses to form a single storyline. I personally found hypotheses I initially rejected found new life when put into context with other hypotheses.
- Many of the mysteries produced by the game are primarily used in a single thread of story. This is most obvious in chapter 1 where multiple mysteries are dedicated to the idea that the mummy is alive, which goes directly against ruling out the supernatural .
- Always keep an eye out for people who know more than they should. One of the best ways to identify suspicious people is by looking out for those who let things slip that they should be ignorant of.
- If something makes its way into a clue, it is important to the case, even if it doesn’t get used to make a hypothesis. Some are important quotes, or reminders to make sure you consider things in general.
- Take advantage of the summary review after a Cognitive Deduction Space. It will provide hints and advice on how a hypothesis might fit in with other hypotheses, and what to consider to see if it fits. It’ll never give away more than advice, but it can push you towards the right direction.
Just because it amuses me, here is a very spoilery picture (only look if you have finished the game) that is a good lesson in sticking to what you say. 
Walkthrough Introduction
The rest of the guide is dedicated to a walkthrough. The walkthrough is not a full list of everything needed for every choice and achievement in the game. Clue collecting is up to you, as it is simply pressing a button when the prompt appears. Dialogue choices which have no effect on the gameplay are ignored as these are entirely at your discretion. I have spoiler tagged each line individually for Reasoning Evaluations so you can avoid accidental cheating if you just want to confirm your deductions line-by-line to ensure max points or whatever. I have done chapter 5’s point and click section as a single spoiler section as its size and sandbox nature makes doing it one line at a time a pain in the ass for both reader and writer.
Chapter 1
Someone was disguised as the mummy
Not the killer
Ginsaku wouldn’t have given the mummy the key
No-one at the entrance hall was the mummy
Killed after we saw the mummy
Masanori Minami
You hid it somewhere, didn’t you?
Everyone followed Ryoei’s lead at the cherry blossom ceremony
Chapter 2
None of the three man
Mitsunori can’t push the sword in the tree
Takehiko didn’t know the meeting had ended
Kazunaga’s footprints weren’t outside the door
The killer put water in the water can
To make a pendulum (yes, somehow sillier as see-saw effect)
Yoko “I heard thuds…”
Yayoi
She didn’t notice the body even though she passed by it
Yayoi doesn’t leave the estate
Chapter 3
The harasser broke the main mic
Kanako said someone put disinfectant in Saya’s coffee
Kanako knew the main mic was broken
Kanako didn’t know about the poisoned needles
The killer thought the spare mic was safe
The needles were attached before the plan changed
Saya
Because Saya’s the one who poisoned the mic
The dress she was supposed to wear was torn to pieces
A recording
Yayoi is Iyo
Yayoi took revenge on Josui
Chapter 4
This is the last chapter where on-screen clues appear. If you’ve reached the Reasoning Evaluation and still haven’t obtained All-Seeing Observer, you’ve missed some. Go back through the game after you complete it. They start in the prologue.
The rope was tied securely
The killer didn’t know Saeita was at the river
Eizan Shijima
The killer wasn’t in Gen’ei’s room
The kettle was used as a weight
We were meant to hear the vase fall over
The ashtray got caught on the rope
Eizan Shijima (for some reason you need to pick him for points even though he’s the only option)
Borrowing a pencil from Misao
His fountain pen was out of ink
Bloodstains on the tatami mat
Yayoi isn’t the one who hit Nishimari
Chapter 5
Examine your legs.
Use Cognitive Space to get answer
Examine rope
Shake loose nails holding down the chair
Enjoy cutscene.
Examine all available hotspots (you’ll need to move your head from max left to max right to find ’em all)
Use Cognitive Space to make plan.
Examine pillar, break the okame mask to make sharp edge, and washstand basin is within reach if pulled over.
Now we are free, we can quickly get the Dark Secrets of the Shijimas achivement by finding the 8 books. They are found:
Examine books on small table left of wooden bars, click on blue book.
Examine top hotspot on shelf left of table, click on gray book and near the upper-right of the shelf.
Examine bottom of the shelf. Examine around the middle area, and the blue book.
Examine the books on the other small table, on other side of room. Examine the books.
Examine the stack of boxes near the black square on the wall, to the right. Examine the book on the top, and the bottom box.
This should be 8 books total and trigger the achievement.
Examine the black square to reveal it’s a speaking tube.
Examine floor left of speaking tube.
Examine the newly revealed secret door. Examine the hotspot until you insert numbers. They’re wrong.
Back out, examine wall, investigate new hotspots and then return to the speaking tube.
Look up, 5 new hotspots have appeared along the top of the wall around the animal pictures, investigate them.
Enter Cognitive Space and fill in the blanks.
Go back to the secret door lock, and pick “The Myth is the clue to the numbered wheels”. The number order is 5,3,2,1,4.
We now need to produce a house plan of the estate based on the speaking tubes and inspiration within the cell. Go back over all the hotspots in the cell (particularly the now open secret door) until you have 6 vents, 2 cells, and 6 rooms (including info you already started with) on your Cognitive Space.
Room order from left to right: Servants’ room, Kitchen, Eizan, Study, Saeita’s room.
Vent order from left to right: Sixth, Fourth, Fifth, Third, Second.
Yoshino’s cell and first vent are in the storehouse at the upper left.
Josui’s cell is at the far right, off of Saeita’s room.
Take heed of the images associated with certain vents, it’ll help you do the next Cognitive Space.
Do the Cognitive Space.
Examine the question mark on the wall.
Select Look for key, then Eizan’s room.
Examine question mark on the wall.
Select Eizan’s room window, then servant’s room
Examine question mark on the wall (oh baby, a triple!)
Select send smoke to study.
Chapter 6
I’m unsure if these require correct answers as i ran out of time for testing.
She said she bashed her head in with a rock in her confession
She’s covering from the Scarlet Camellia
The next Cognitive Deduction Space is split into three. As you unlock each of them, you can return to other ones by pressing the hotkey you used to enter the space in the previous chapter (it’s noted at the upper left of the screen when you’re in the space too). This is handy for reminding yourself of past hypotheses. You will at certain points have the chance to either press forward by saying something like “Maybe this person” or going back to the deduction space by remaining unsure.
They’re ageless and with us right now :O
Eizan was not the Scarlet Camellia
The red camellia was placed before Eizan returned
The Scarlet Camellia couldn’t enter the room
Towako Nagahama
Towako hated smoking
The Scarlet Camellia fears fire*
The killer stepped on the matchbox
Eizan died after being stabbed in the chest (his other wounds remain unexplained)
Megumi Kiryu
Someone other than you
Josui’s been dead over 50 years
Nishimari wasn’t killed with a rock
Lighter
You were at the club that night
Rather than picking a clear image of her, you have to spot her in the background. I think it’s the eighth image from the start. It has Ryoei and Iyo chatting in the foreground with a woman in a floral dress in the background (the one who had no candle on her table, if you recall).
Eizan Shijima
*Personally I am still convinced that “The Scarlet Camellia couldn’t enter the room without risking setting off the rope trap and alerting people to their presence” is also a pretty good reason for them not entering the room.
Epilogue
You’ll have one last Cognitive Deduction Space. Completing this should get you Master Sleuth and Omniscient Insight.Akari Yamase is Josui Sakaki
You
You’ll have the final final Cognitive Deduction Space at some point here, but since this uses none of the deduction mechanics it doesn’t really count. It’s mostly for show.
Yoshino Shijima (yes, another one-person choice)
Congratulations! You completed the game! And this guide! If you’ve not got the No Stone Unturned achievement at this point, time to go back and see what you’ve missed (assuming you care).
That’s all we are sharing today in The Centennial Case: A Shijima Story 100% Walkthrough Guide, if you have anything to add, please feel free to leave a comment below, you can also read the original article here, all the credits goes to the original author Capt. Pottypie
