

Skip to content
Menu
SteamAH
  • Cheat
  • Guide
  • Tips
  • Privacy Policy
  • Abuse
SteamAH

theHunter: Call of the Wild Need Zones, Class, Difficulty and Diamonds Guide

Posted on July 19, 2020July 20, 2020

If you play theHunter: Call of the Wild, this is a visual wallpaper/background designed to help players quickly sort through all animals, weights, diamond scores and need zones on all COTW maps.

Wallpaper
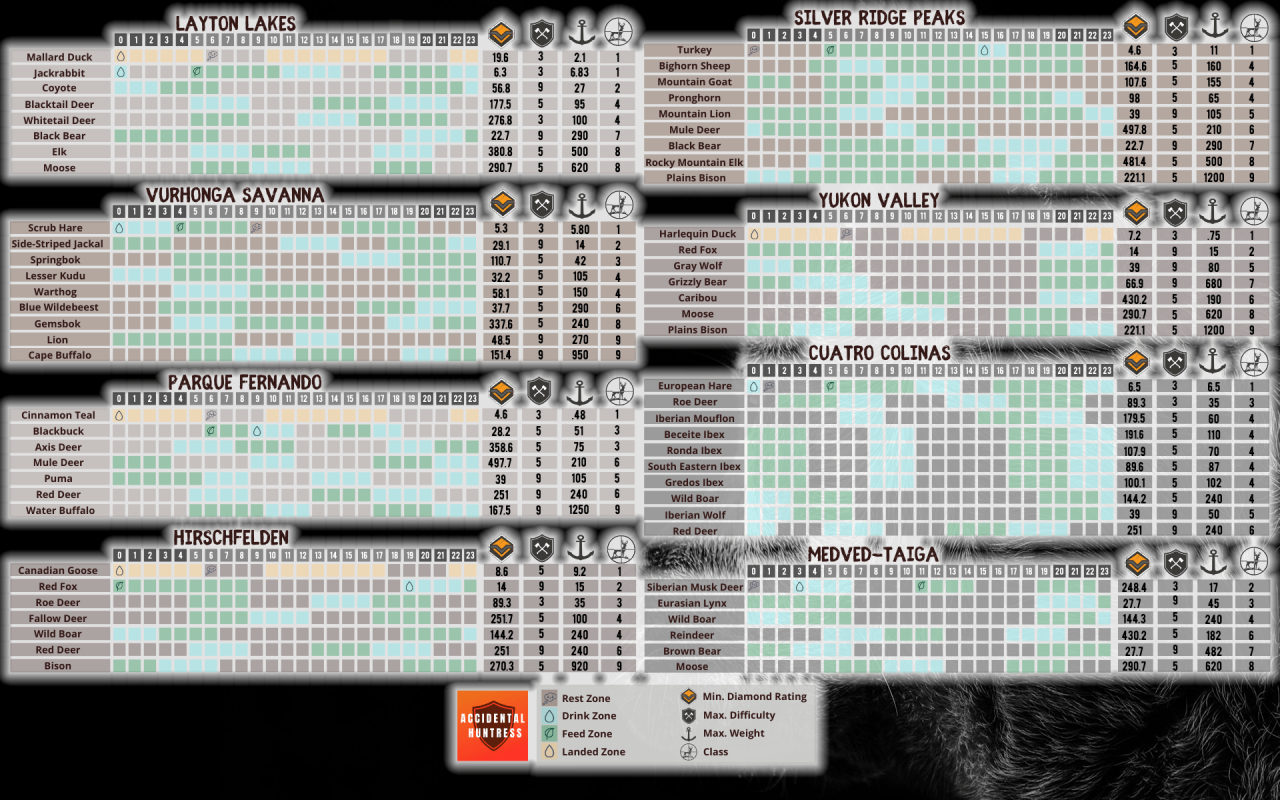
theHunter: Call of the Wild Need Zones, Class, Difficulty and Diamonds Guide


That’s all we are sharing today in theHunter: Call of the Wild Need Zones, Class, Difficulty and Diamonds Guide, if there are anything you want to add please feel free to leave a comment below and we’ll see you soon.

Credit to Accidental Huntress

Related Posts:

  • theHunter: Call of the Wild Best Hunting Spots (Diamonds & Fast Money)
  • theHunter: Call of the Wild Complete DLC Maps Mission List Guide
  • theHunter: Call of the Wild All Info COTW Sheet (Medal Requirements, Fur Types, Rarity)
  • theHunter: Call of the Wild All New Animal Location Maps (High Resolution)
  • theHunter: Call of the Wild Silver Ridge Peaks Map (Outposts & Watchtowers)

1 thought on “theHunter: Call of the Wild Need Zones, Class, Difficulty and Diamonds Guide”

  1. Norm Langevin says:
    May 10, 2021 at am11:11

    Thanks

    Reply

Leave a Reply Cancel reply

Your email address will not be published. Required fields are marked *

Disclaimer

All content cited is derived from their respective sources. If you think we have used your content without permission, Please go to the Abuse Page to contact us and we will be taking it seriously.

Recent Posts

  • Old School RuneScape: A Ruff Situation Quest Guide
  • Borderlands 4: Black Market Location Guide (Sept 4th)
  • Grail 1.0: Beginner’s Guide
  • Forest of the Blue Skin: Walkthrough + Full Save [Build 28]
  • House 2 Complete Guide: All Bosses and Endings
©2026 SteamAH | Powered by SuperbThemes & WordPress