
If you are chasing a clean run through ACE COMBAT 8: WINGS OF THEVE and the game keeps dumping you to desktop, there is a very good chance the culprit is virtual memory — the default Windows setting just is not enough for this one. I put this walkthrough together because this is the kind of crash that looks like a GPU problem or a bad driver, when really it is a paging file that needs to be told what to do. Get it wrong and you will keep losing progress mid-mission; get it right and the crashes simply stop.
What I care about here is that AC8 is not just another arcade flight game you can brute-force. It wants headroom, and Windows will not hand it over on its own. The whole fix takes a few minutes and one restart, but the exact order of clicks matters, so I have laid it out step by step rather than paraphrasing it.
Before You Touch Anything
Two things have to be true first, and I would verify them before opening a single settings window, because skipping either one makes the rest pointless.
- ACE COMBAT 8: WINGS OF THEVE must be installed on an SSD.
- You need at least 10GB of free space on that drive after installation is finished.
That free-space figure is the one I would actually double-check instead of eyeballing. Installers, shader caches, and patches all eat into it, so what looked like plenty of room during setup can shrink fast.
Step 1 — Open the System Properties Window
On Windows 10, this is the path I use:
- Click Start, then go to Settings, then System.
- Select About in the left column.
- Under “Related settings” on the right side, click Advanced system settings.
That last click is what actually opens the System Properties window. If you would rather not click through the menus, you can also just type “Advanced system settings” into the settings search bar and jump straight there — that is honestly what I do now, because it saves a few steps every time.
Step 2 — Navigate to the Virtual Memory Window
This part is nested a couple of layers deep, so it is easy to lose your place. Here is the sequence inside System Properties:
- Click Advanced in the ribbon bar.
- In the Performance section, click the Settings… button.
That opens the Performance Options window. From there:
- Click Advanced in the ribbon bar.
- In the Virtual memory section, click the Change… button.
Now you are finally in the Virtual memory window, which is where the actual fix lives.
Step 3 — Configure Virtual Memory for Your SSD
Start by unchecking Automatically manage paging file size for all drives. Nothing below this works until that box is clear — I have seen people adjust the numbers and wonder why nothing changed, and this is almost always why.
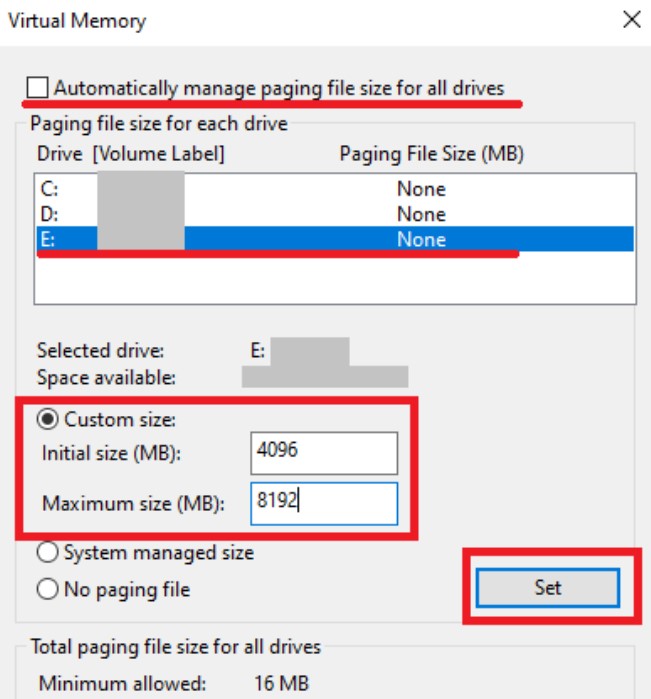
Now set up the drive that AC8 lives on:
- Select the drive where ACE COMBAT 8: WINGS OF THEVE is installed.
- Select Custom size.
- Enter the following values:
Initial size: 4096
Maximum size: 8192
- Click the Set button.
With the target drive handled, deal with the remaining drives so they are not quietly competing for the same space:
- Select each other drive in turn.
- Check No paging file.
- Click the Set button.
Then close everything out in order:
- Click OK in the Virtual memory window.
- Click Apply in the Performance Options window, if it lets you.
- Click OK in the Performance Options window.
- Click OK in the System Properties window.
- Restart your computer.
Do not skip the restart. The new paging file sizing is not locked in until the machine cycles, and jumping back into a mission before that is how you convince yourself the fix did not work.
A Note on DLSS
One more thing worth knowing: DLSS may require more virtual memory than what you just set. If you are running it and still hitting crashes after the restart, that is the first dial I would revisit — DLSS adds its own overhead on top of everything else the game is asking for.