
Every time I start a new survival-style game, the first thing I want to understand is the systems that quietly run in the background — the ones the tutorial barely mentions but that decide whether you’re thriving or slowly falling apart. In Huglings, that means three things: your inventory, your Mood Bar, and the Market. Get a handle on all three early and the rest of the game opens up without much friction. I put this together because these systems are simple once you see them explained in one place, but the game itself doesn’t hand you that overview, and I got tired of tabbing between three different tutorials to piece it together.
The Mood Bar in particular is something I wish I’d understood sooner, because I spent my first while assuming it was a survival meter that could kill me. It can’t. Once that clicked, I stopped panicking over it and started using it properly. Below is everything I know about how these systems connect, and the honest caveats you’ll want before you rely on them.
Your Inventory and What Actually Matters
Your inventory is where you see and manage everything your character is currently carrying. The single most useful thing to internalize here: you don’t need to open your inventory manually during gameplay. The game pulls whatever materials it needs from your stock automatically whenever a recipe, build, or action calls for them. I stopped micromanaging the menu entirely once that sank in.

You can hold up to 999 of each item, so there’s plenty of room before you ever need to worry about overflow. Here’s how the item categories break down and what each one is actually for:
- Rocks and wood: Mainly for building. Once you pick what you want to build, the required materials are deducted from your inventory automatically — no manual selection needed.
- Fish, meat, tomatoes, and cabbage: Used for cooking at the campfire, and also tradeable at the Market.
- Fish, meat, tomatoes, cabbage, or berries: Press G to eat quickly. The game auto-selects whichever item raises your Mood Bar the most.
- Flowers and berries: Used to make tea at the campfire.
- Health Potion: Press H to use one and refill the health section of your Mood Bar. These only become available after completing a certain quest, and you can obtain them or buy them from the Witch.
The quick-eat button (G) is easy to underuse. I leaned on it constantly once I realized it picks the optimal food for me rather than whatever is first in the list — that small convenience adds up over a long session. And if you’re just trying to find your way around before hunting down the Witch or a campfire spot, an external map guide helps more than wandering.
How the Mood Bar Really Works (And Why You Can Relax)
The Mood Bar only affects your character’s facial expression — whether they’re sad or smiling. That’s it. You cannot die in the game, and apart from your character looking a bit down, there are no negative consequences. The emoji next to the bar shows how your character is currently feeling. I want to stress this because it completely changes how you play: the Mood Bar is a comfort meter, not a threat. Keep it happy for the aesthetics and the small conveniences, not because you’re racing a death timer.
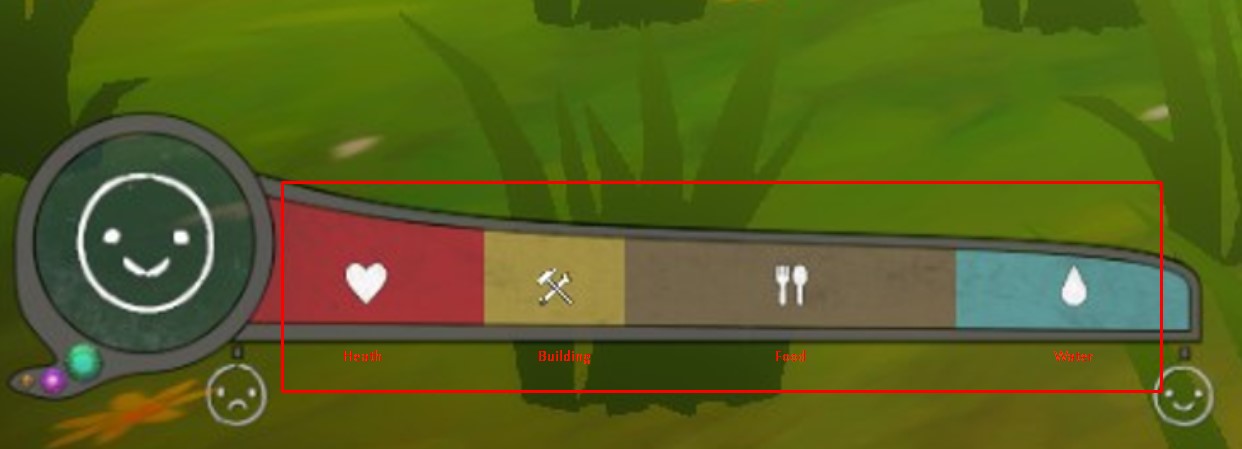
It breaks down into three sections, each with its own drain and its own fix:
| Section | What Drains It | How to Restore It |
|---|---|---|
| Health (red bar) | Goblins hitting you with rocks | Press H to use a Health Potion (available after a certain quest; obtainable from or purchasable from the Witch) |
| Building | Slowly decreases over time if you don’t build | Build tents, campfires, and furniture |
| Food | Slowly decreases over time if you don’t eat | Press G to eat, or cook at a campfire |
| Water | Slowly decreases over time | Eat berries via G for a small top-up, or brew Tea at a campfire for a full refill |
The Health section is the only one tied to actual danger, and even then it’s mild — goblins throwing rocks are your only source of damage. Before you wander into an area with goblins, it’s worth checking your inventory for a Health Potion first. If you’ve got one, a quick H press refills that red bar and you’re fine.
Restoring Food and Water in Practice
Food and water both tick down over time, and they’re the two meters I found myself topping up most often. There are two ways to handle food. The fast way is pressing G to eat straight from your inventory — if you’re carrying fish, meat, tomatoes, cabbage, or berries, the game automatically picks whichever restores the most and uses it for you. The slower but more deliberate way is cooking: build a campfire, light it with Left Click, then press E to choose the food you want to cook. Once it’s ready, stand near it and press E again to eat it and restore your food level.
Water works a little differently, and this is the part I’d have gotten wrong if I hadn’t read up on it. Pressing G to eat berries gives you only a small amount of water back — useful in a pinch, but not a real fix. For a full refill you need Tea. Build a campfire and light it with Left Click, press E, and select Tea. Once it’s ready, stand near it and press E to drink — it instantly refills your water level to maximum. I keep a campfire habit going largely for the tea alone.
Buying and Selling at the Market
The Market is where you buy and sell various items, and it’s genuinely useful when you need something specific or just want to convert the stuff you’ve been hoarding into extra money. You can buy and sell fish, meat, tomatoes, and cabbage at the crates sitting next to the corresponding vendor.
The one thing that trips people up is the signs, which look similar at a glance but do opposite things. When you see the sign indicating a buy, press E to buy the item shown by the icon above it. When you see the sign indicating a sell, press E to sell the item shown by the icon above it. I always double-check which sign I’m standing in front of before mashing E — the last thing you want is to dump a stack of fish you meant to keep.
What makes the Market click for me is how it ties back into everything else. The same fish, meat, tomatoes, and cabbage you use for cooking and quick-eating are exactly what sells here — so any surplus you’re not about to cook is effectively currency. Get into the habit of checking your inventory for overflow before a Market run and you’ll rarely leave with empty pockets.
Conclusion
None of these three systems is complicated on its own, but together they form the loop you’ll be running for the whole game: gather, manage your inventory, keep the Mood Bar comfortable, and trade the excess. The mental shift that helped me most was accepting that the Mood Bar is a mood, not a mortality bar — and that G, H, and E will carry you through almost every situation. Keep a campfire nearby, watch your signs at the Market, and you’ll settle into Huglings a lot faster than I did.