

This guide was assembled from a full hands-on playthrough of the current build, stress-tested across Hell 3 and Inferno 1 repayment runs. Every priority order, contract skip, and mana-management note below was validated in live runs — not theorycrafted from the wiki alone. Time-savers and mistake-avoidance tips are marked so you can route your first clear without burning a reroll you’ll regret.
Quick Preface: What This Guide Actually Optimizes For
This is written for players who want to maximize clear reproducibility — that is, minimize how much your first clear depends on RNG luck. It covers the thinking framework behind surviving to the final repayment, plus a set of pre-game preparation steps. Some of the preparation is tedious; skip any step you don’t need.
Editor Warning: Don’t skip the wiki read-through and special mission clears if you’re seriously chasing a first clear. They look optional. They aren’t — they’re where you learn your actual win conditions.
The Six Core Principles of High-Reproducibility Clears
Understand and follow these six points and your first clear becomes dramatically easier. All six are fundamentals of moment-to-moment play.
1. Use Pause to its Maximum Extent
- Rationale: Running the clock while you can’t produce efficiently is wasted time. Every second spent thinking should be spent paused.
- Minimum standard: At absolute minimum, pause during the time you spend deciding what to do next. That alone banks free time.
2. Think About Where Rerolls Go
- Rationale: Contracts up to the 2nd repayment have probability curves that make strong contracts especially unlikely to appear.
- Recommended play: Rather than burning rerolls early, compromise on what’s currently offered — pick whatever contributes even slightly to cash production or stays useful into the late game. This raises your clear rate more than gambling.
3. Decide How You’ll Earn Cash in the Early Game
- Rationale: An early-game slowdown means more time working inefficiently without contracts — which converts directly into a loss.
- Recommended play: In the opening phase, pick the single most cash-efficient recipe among your currently available ones and keep it producing non-stop.
4. Familiars Are Almost Always Net-Positive When Assigned to Work
- Rationale: If a familiar can produce something, letting it produce — even if it’s fiddly — widens your later options.
- Concrete number: Assigning a familiar to a resource-quantity-1 object for 10 minutes accumulates 500+ resources, which makes filling orders far easier. It also preps you for contracts that consume large amounts of a resource.
5. Study Tax Effects and Reorder Your Setup — Initial Placement, Sponsors, Application Order
- Rationale: If you choose sponsors that let you ignore tax effects, Hell 3 and Inferno 1 are nearly identical in difficulty.
- Key insight: Some taxes look brutal but can be neutralized entirely by taking them at a specific time. If you’re strong enough to clear Hell 3 in 25 minutes, you can simply place the worst tax last and ignore it.
6. Actively Exploit the Map
- Rationale: Inspecting every tile adjacent to your purchased land gives you two pieces of information: what’s placed on the tile, and the terrain type of the adjacent area.
- Practical tip: Memorizing everything is unrealistic. Explore once, then review later — this is what makes strategy formulation easy.
- Two shortcuts to learn: Press F on a purchased tile to warp to it, and place objects directly while the map is open. Learning either one frees up time.
Pre-Game Preparation
Before You Play
- Unlock all Repayment Bonuses: These only make you stronger — unlocking is always correct. Clearing is possible even without all of them. The money-farming itself is fully completed just by running the lowest difficulty.
- Read the Wiki: Knowing what exists, where it is, and what categories of items exist raises your win rate by itself. Reading through all wiki pages once is worth it. Set it up on your phone so you can reference it mid-play.
- Clear Every Special Mission Once: You’ll learn specific win routes from them.
- Decide What You Want to Do in the First Minute: Actions in the opening minute have outsized impact. At minimum, verbalize what you’re trying to build.
Editor Warning: In our testing, players who skipped the first-minute planning step lost the most time re-deciding mid-run, which cascaded into missed repayment timing. Verbalize the plan before you unpause.
Phase 1: From Start to the 3rd Repayment
Whatever build you’re aiming for, reaching the 3rd repayment as fast as possible makes everything downstream easier.
1. Prioritize Cash Earning
- Safe defaults: Unless there’s a specific reason otherwise, keep Slime producing Lemonade and Salamander producing Gunpowder.
- Witch solo priority order: Amethyst > Self-Replication = Jade ≥ Magic Pellet ≥ Cobalt > Ruby.
- Sponsor adjustments: If Lucifer is your sponsor, treat Inscribed Jade as equal priority to Amethyst. If Satan is your sponsor, treat Inscribed Ruby as equal priority to Amethyst.
- Caveats: Amethyst becomes awkward to use once land purchase prices exceed 6.5k. Inscribed Cobalt money-making has poor digestion pace when you have few familiars, so you must manage production volume — there’s no need to force it.
2. Manage Resources Constantly So You Have No Excess or Shortage
- Once you’ve secured what you currently need, think ahead to what will be demanded later.
- Pre-care items: Prepare required resources in advance for things that cause immediate impact if you lack them — Overheat, Multi-Brain, Short Selling Bills, and various staff skill costs.
- Goblin and Raven tend to pile up — use them for producing resources that might be requested.
- Even without Waterways, you can still earn by repeatedly reconfiguring Waterway placement to transport. Keep this in mind.
3. Act with Prioritization
- Low input precision costs you seconds per placement and movement. The more time you spend not producing, the worse the downstream effects. Prioritize arranging your production line first.
- Adjacent map exploration priority: center > four corners > entire map. Resource placement on the map is somewhat fixed, and reaching farther is the priority — so unless you need a specific resource, approximate is fine at worst.
4. Learn to Store in Waterways
- This is your fudge tool. Mainly used when making a Pickaxe with the single Salamander from the Contract: Tool Smithing, or when transporting resources from far away.
- Items in Waterways never disappear if you don’t touch them — you can mask a problem by moving equipment after producing. This needs frequent input, so we recommend placing an operation line at the center of the land so you can operate from the map.
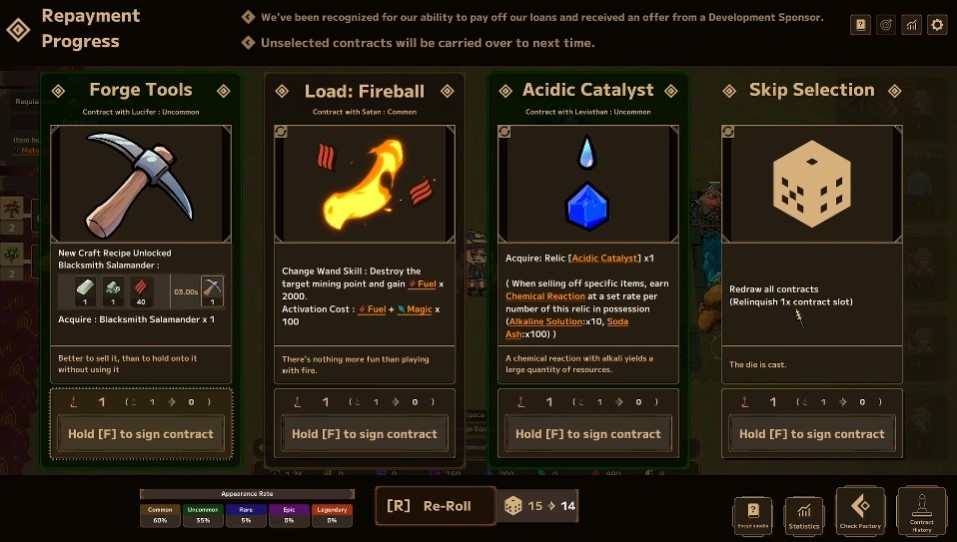
5. Think Through Contract Choices
- If a contract is mediocre, choose skip selection rather than spending a reroll.
- If clearing is the goal, there’s no reason to spend rerolls on contracts before the 2nd repayment.
- Still, reconsider whether the currently shown contract is truly unnecessary. If it has potential to be useful later, taking it at this stage is recommended.
6. Plan Your Tax Order
- Identify which taxes will be crippling if you take them later. For crippling ones, either take them first and eat them quietly, or commit to clearing in 25 minutes.
- Stabilizing a 15-minute clear is unrealistic, so you’ll need to process at least two tax rounds.
Phase 2: From the 3rd Repayment to the 10th
Build Out Your Earning Engine
1. Ask Whether Your Current Production Line Is Really Fine
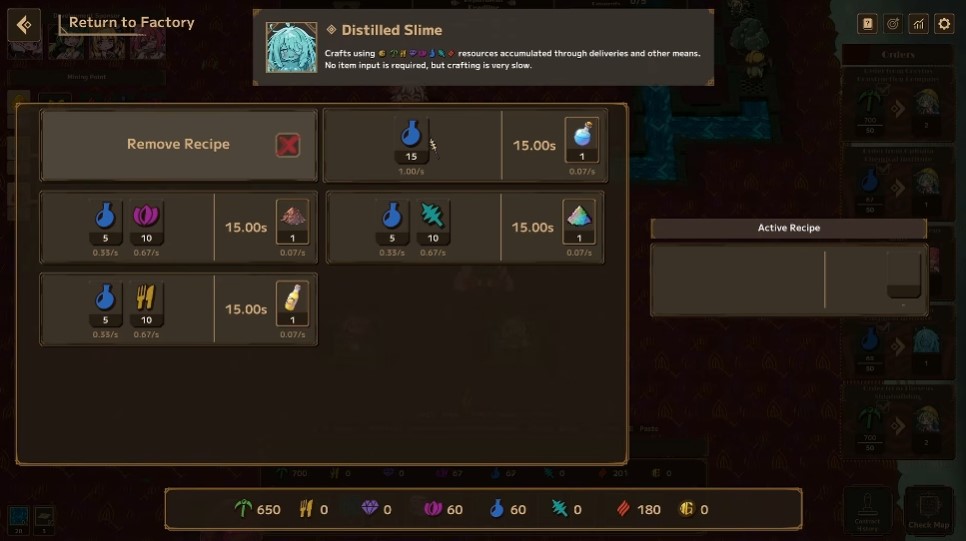
- How should you produce to earn efficiently? Don’t run from complex recipes — recipes taken via contracts are fundamentally strong, so making them buildable even at the cost of heavy Raven and Waterway usage pays off.
- If resources are short: redirect Goblins wasting effort on unnecessary things to mining points that secure even 1 resource, and enable other familiars to produce the related resource.
- When using recipes that consume familiar-produced items: ensure you can supply the required items with neither excess nor shortage. If short, use the three input ports to feed in. If excess, use a Water Flow Splitter to distribute. Inserting a Water Flow Splitter distributes evenly to all connected devices.
2. Select and Discard Contracts
- Identify what’s missing that’s blocking your cash production.
- 80% of the time the problem is either insufficient familiar count or insufficient resources — so pick contracts that address one of those.
- Don’t base choices on a specific Rare-or-above contract being the setup foundation.
- Don’t thoughtlessly take contracts with fixed costs as drawbacks — but also don’t thoughtlessly skip them, since the upsides are large.
- If clearing is the only goal, note that the Contract: Relending from the 5th repayment onward is a landmine pick.
3. Never Neglect Land Management
- Always explore and remember what’s on adjacent map tiles. Efficiency sometimes changes dramatically, so don’t work on autopilot.
Editor Warning: The Contract: Relending trap catches most first-time clearers. We watched runs that were comfortably ahead become unrecoverable after taking it past repayment 5. Skip it unless you have a specific plan for the fixed-cost drawback.
Phase 3: From the 10th Repayment to the End
1. When You’re Running Hot (Ahead of Curve)
- If the current state looks winning, do nothing extra. Just watch it finish.
- If it’s already working, do not take contracts like Multi-Brain or Overheat that move you closer to losing.
2. When Things Are Going Well (Stable)
- Applies when: a specific element is a bottleneck, but you have enough of the necessary winning pieces; or you’re stable but can’t finish repayments as-is.
- Always ask how to raise efficiency. Keep thinking and playing the same way you did in the early game.
- Pausing appropriately to keep thinking makes losing less likely.
3. When You’re in Trouble
- Honest means won’t win. Skip even slightly-above-average contracts and hunt for the ones that actually convert to a win.
- Consider commitment plays: take a recipe you currently can’t build, then chase the means to build it via subsequent contracts.
General Tips & Editorial Verdict
- Pause is a resource, not a crutch. The players with the highest clear rate aren’t faster — they pause more. Treat every unpaused second spent deciding as a resource leak.
- The map is your second production planner. Learning F-warp on owned tiles and direct-placement from the open map are two of the highest time-value shortcuts in the entire game.
- Don’t gamble on Rares. Contract choices framed around a specific Rare+ contract appearing are exactly the RNG-dependence this guide exists to eliminate. Build setups that win with what’s already on the table.