

Tested across multiple early-access runs: the routing below consistently clears every enemy wave on the turn it spawns, and the shopping list is calculated against the genuine worst-case board state rather than a best-case draw.
The One-Turn Kill Thesis
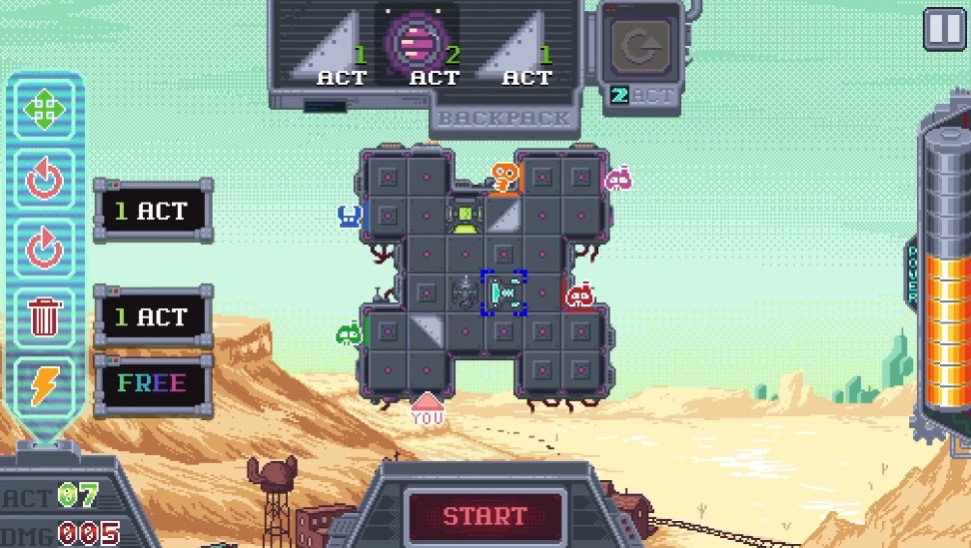
Waterjacked! is a grid-tower-defense hybrid: you place modules on the grid to damage and debuff enemies while healing and buffing yourself, and enemies move along the grid border each turn while dealing their own damage and debuffs back. This guide exists to make every wave of every level solvable on the exact turn it appears — no stalling, no attrition, no luck.
One structural caveat matters before anything else: enemies arrive in waves, so “first turn” here means the first turn of each individual wave, not the level as a whole. If you have zero time in the game, stop and play the tutorial first. The rest of this article assumes you already understand basic placement.
Core Vocabulary You Will Actually Depend On
Corrosive
- Function: This game’s poison equivalent. When an enemy’s turn begins, they take damage equal to your corrosive tick, then their corrosive stack decreases by one before the rest of their turn resolves.
- Worked example: Apply 3 corrosive on your turn → enemy takes 1 damage at the start of theirs, stack drops to 2, and they continue acting.
- Editor Rating: Essential — this is the entire kill engine.
Production
- Function: A player attribute that starts at zero and scales upward. It directly increases how much corrosive your corrosive-applying modules inflict.
- Editor Rating: Essential — the multiplier behind every damage number below.
Foreman’s Clipboard
- Function: Augment granting +1 Production.
- Cost: 4 scrap.
- Editor Rating: Optional — the budget fallback when Caustic Catalyst refuses to appear in the shop.
Leaky Faucet
- Function: Module that applies corrosive to enemies directly in front of it. Unlike other modules whose projectiles fly until they hit the grid edge, the Leaky Faucet only reaches the single square in front of it — it must sit on the grid border to touch anything.
- Scaling: Corrosive applied scales with your Production.
- Cost: 2 scrap. No power required.
- Editor Rating: Essential — the cheapest, most reliable delivery system in the game.
Acid Lobber
- Function: Launches an acid ball that applies corrosive on hit. Unlike the faucet, it can reach the opposite side of the grid. Corrosive amount also scales with Production.
- Drawback: Requires power. You start with only 2 power, and an unpowered Acid Lobber does nothing. Power can be raised via augments, but this build only ever needs the starting two as a backup.
- Cost: 5 scrap.
- Editor Rating: Optional — strictly inferior to the faucet in the current build.
Caustic Catalyst
- Function: Augment that increases corrosive tick damage. With one Caustic Catalyst, an enemy takes 2 damage per turn instead of 1.
- Cost: 4 scrap.
- Editor Rating: Essential — five of these are the mathematical core of the build.
Carpenter Pants
- Function: Augment granting +1 Action Point (AP). AP is the in-battle action currency: placing and rotating modules each cost 1 AP. The sole exception is the starting turret, which costs 2 AP to move.
- Editor Rating: Essential — this is how you afford the repositioning tax.
Technomancer
- Function: The enemy with the effective highest health in the game (arguably). It has 2 health, but each battle start it grants itself 4 shield, meaning it takes 6 damage to kill. It re-shields as the battle drags on, so every turn it survives makes it harder to remove.
- Editor Rating: The threat benchmark — every calculation in this guide targets it.
Shield Battery
- Function: Module granting the player 3 shield — temporary health lasting only for the current battle.
- Cost: 4 scrap.
- Editor Rating: Optional — a comfort pick for shaky early waves.
Defining the Worst Case Scenario
The build is only valid if it survives the genuinely worst board the game can throw at you, so define it precisely: two Technomancers.
- Why Technomancers: At 2 health + 4 shield, they soak 6 damage each — the highest effective HP total of any enemy.
- Why only two: The grid adds at most two new enemies per turn. The board can technically hold up to five, but only two can be real threats at any one time.
The requirement, stated cleanly: deal 6 damage to two enemies, anywhere on the grid. Everything below is the cheapest, fastest route to that number.
The math that makes it work:
- Corrosive delivery: Leaky Faucets apply corrosive to the square in front of them; Caustic Catalysts raise the tick damage. Reaching 6 damage from a single corrosive stack requires 5 Caustic Catalysts (base 1 + 5 = 6 per tick).
- Positioning tax: Worst case, both faucets need 1 move + 2 rotations each, and the starting turret must be moved out of the way once. Moves and rotations cost 1 AP; moving the main turret costs 2 AP.
- AP budget: That totals 8 AP — therefore 4 Carpenter Pants.
Editor Warning: The 5-Catalyst figure is the requirement for killing a Technomancer through its 4 shield in a single corrosive tick. Skipping Catalysts “to save scrap” is the single most common way this run dies — you will stall one damage short, the Technomancer re-shields next turn, and the math collapses.
The Theoretical Five-Technomancer Board (For Fun Only)
Strictly out of curiosity: if the grid ever held five Technomancers, you would need five Leaky Faucets — 5 movements, 10 rotations, and the same single turret move. That is 17 AP, or 13 Carpenter Pants.
Editor Warning: Do not build for this. In the current version of the game, 13 Carpenter Pants is not realistically obtainable — it requires deliberate, contrived effort. Treat the five-Technomancer scenario as trivia, not a plan.
Shopping List & The Invincibility Threshold
| Item | Quantity | Role in Build | Cost Each | Editor Rating |
|---|---|---|---|---|
| Leaky Faucet | 2x | Corrosive delivery, must touch grid border | 2 scrap | Essential |
| Carpenter Pants | 2x (4x worst case) | AP for repositioning faucets and turret | — | Essential |
| Caustic Catalyst | 5x | Raises corrosive tick to 6 damage | 4 scrap | Essential |
| Shield Battery | 0–few | Battle-only damage buffer | 4 scrap | Optional |
| Acid Lobber | Backup only | Faucet substitute, needs power | 5 scrap | Optional |
Total cost: 23 scrap. Twenty-three scrap buys you a board state that can delete two Technomancers in one turn, every turn, regardless of layout. If you assemble this, you have won.
Surviving Until the Build Comes Online
The strategy itself is close to foolproof at this stage of early access, but shop RNG and enemy draw mean you still have to reach the shopping list alive. In our testing the build came together easily and consistently, but the following safety valves exist for rough runs.
- Foreman’s Clipboard as a damage substitute: +1 Production raises corrosive output. If you cannot find Caustic Catalysts, extra Production lets you deal 3 damage over two turns instead of front-loading a kill — slower, but it keeps you moving.
- Acid Lobber as a faucet replacement: If the shop refuses to stock Leaky Faucets, the Acid Lobber serves the same purpose at 5 scrap plus 2 power to activate.
- Balance verdict: The Lobber and the Faucet were clearly designed as parallel options with distinct trade-offs — power cost versus one-square reach. In the current build, that trade-off is not balanced: the Leaky Faucet is objectively superior. Its one-square limitation is a non-issue once you understand border placement, while the Lobber’s power requirement is a permanent tax.
- Shield Battery for bad draws: A few Shield Batteries give you a battle-only damage buffer. Handy precisely when the build has not come online yet.
General Tips & Editorial Verdict
- Learn border placement first: Because the Leaky Faucet only fires one square ahead, internal grid placement is wasted scrap. Every placement decision should assume the module lives on the grid border.
- Buy Catalysts before comfort items: Every scrap spent on Shield Batteries before your 5 Caustic Catalysts is complete is scrap subtracted from your win condition. Prioritize the kill math.
- Early access disclaimer: This strategy is airtight at the time of writing, but the game is still in development. Balance patches to corrosive scaling, Power costs, or module behavior could shift the numbers — re-verify the tick math after any major patch.
There it is — the full waterjacking playbook. Slot the list, respect the math, and you will be clearing waves on spawn like it is routine. You already proved you had the instincts; now you have the spreadsheet to go with them.