For Horticular players, this guide is for how to create modifications to Horticular. This is an online version; a PDF version can be found amongst the game files in the Mod folder.
Fundamentals
is fairly simple, its description is conceptual. It is, therefore, suggested that you check
the Tooling and Resources sections for practical information.
The official method of modifying Horticular is to create a “.mpck” pack file (see the
tools section for how) that contains all the data, including metadata, such as name
and picture. In essence, mods are their own dedicated file that is installed
independently of others by placing it in the “Mods” directory.
Each mod can be seen as a change made to the virtual file system that Horticular
interacts with, whether it be introducing new content or replacing old. In fact, there
is no difference between mods and official game data.
When the game launches, it mounts all pack files to the virtual file system, keeping
track of each file so it can access it when needed. Note that official packs are
mounted first, after which mods are applied.
The following could be the file structure contained within a mod that adds a mega
crab to the virtual file system (more on the details later):
- Root
- data.xml
- MegaCrabModByTheCrabber
- Texture
- mega-crab.png
- Sound
- mega-crab.wav
- mega-crab-hurt.wav
- Texture
Whenever two packages contain the same file, the last mounted package overrides
previous ones for that particular file. Since the base game is read first, some mods
are trivial to make, such as replacing texture assets.
Due to this, it is also good to namespace files specific to your mod by keeping this
data inside a directory with a unique name. It reduces the risk of mods writing over
each other and creating incompatibility.
Some files shouldn’t be namespaced, and you can find them under “Magic Paths” and in
other upcoming sections.
Consider the following structure in a base-game file “Base.mpck”. It has two textures
and a sound effect
- Root
- Texture
- health-bar.png
- alert-icon.png
- Audio
- congratulations.wav
- Texture
Now consider the following mod, “MyMod.mpck”.
- Root
- Texture
- alert-icon.png
- MySuperModByRobert
- Audio
- congratulations.wav
- Audio
- Texture
When the mod is loaded, it overrides the alert icon, re-routing access to the file to
“MyMod.mpck” instead of “Base.mpck”. However, the mod doesn’t affect the sound
effect since it is namespaced into “MySuperModByRobert”.
While mod files are easy to share and install, it would be a hassle to create them for
every change during development. Therefore, you can use a directory as a stand-in
for a pack file, which allows you to iterate on your work quickly. Once the mod is
finished, you just package the directory, and your mod file is ready for distribution.
Both of the following mods are equivalent in effect. The difference is that one has
been packaged and the other is in its directory form:
- MyMod.mpck
- MyMod
- data.xml
- Texture
- tiny-crab.png
NOTE: Directories don’t contain the metadata of a pack file, such as name or image,
and are therefore not suitable for general distribution.
Advanced Concepts
section, this section covers how to make changes that alter how the game plays.
In order to know which files to load as assets, the game uses manifest files with the
appropriate extension “.manifest”. Each line specifies an identifier and the path to an
asset, using the format: “<identifier> <path>”.
To add a manifest file to your mod, you need to add a file called “mod.manifest” at
the root of your mod. All supported assets found in it will be loaded.
While this file will technically be overwritten by the virtual file system, the game
treats it as a magic path and ensures that the manifest is loaded anyway. You can
find more of these in the Magic Paths section.
Textures have optional arguments after the path. It is highly recommended to check
the manifests from the base pack to see them in action.
● Source rectangle <x, y, width, height> (use – for the full texture). Useful if
multiple textures should be defined from the same image file.
● Animation frames <columns,rows>. Specifies how many columns and rows
that the texture is divided into.
● Frame margin. Used with animation frames to add a safety margin for each
frame, effectively reducing the size of the frame by the amount of pixels given.
Used when multiple animations or textures are embedded in a single texture
to make sure textures don’t bleed into each other. As such, a value of 0 or 1
should suffice.
● Frame rate. The amount of frames per second the animation should be played
at by default.
Songs for different weathers are picked up automatically if their identifier starts with
sun or rain.
To define the game content and how it operates, the game uses XML files called
“data.xml”. These should be located in the root of each package and are magic paths,
just like manifest files, that are loaded (see more in Magic Paths).
It is highly recommended that you edit data files with the provided editor (see the
tooling section), as the many types of values would be too cumbersome to learn or
describe in this document.
Each entry has an aggregated ID that includes information on its corresponding
module (pack) and its unique number within the module. As such, they consist of
two parts:
● Module
● Number
For two IDs to be equivalent, the values of these need to be. Therefore, multiple
packs can use the same numbering, as they will be contained in different modules.
NOTE: The ID value is stored as a packed integer. Therefore, it is virtually required to
use the editor for entries with a non-zero Module.
When the game launches, entries with a module of 0 will be assigned one at
runtime based on its load order. This is to prevent conflicts between mods that just
want to add data, as it means authors don’t have to keep track of existing mods.
Should two packs contain the same entry type with the same ID, the latest pack to
load will override the others, just like with assets. This is useful when modifying
existing content.
To add new entries, you need just add them to your mod’s data file and they will be
loaded.
It is strongly recommended to use the 0-module when adding content since it
ensures that you don’t have to coordinate entry numbers with other authors.
However, should you have a good reason for a specific module, you can still specify it,
but beware of its compatibility effects.
Modifying existing entries is done in the same way as adding new ones. The
difference is that you specify the module and ID of the edited entry. Since the base
game comes with pre-defined static IDs, these entries are easy to modify.
It is currently not possible to modify just a single property of an entry, such as the
cost of an item, so the whole entry has to be replicated. This is easily done by copying
it from the base game (or otherwise).
It is also possible to remove entries, although a bit roundabout. This is done in the
same way as modifying an entry, but the data needs to be placed inside a
“data-remove.xml” in your mod’s root directory.
You do not need to specify anything but the ID of the entry to remove (although the
editor will automatically add all the fields).
NOTE: Removing entries has a higher likelihood of breaking the game since other
entries may depend on it (other mods in particular).
Assets referenced in entries will almost always be entered as a path in the virtual file
system, as opposed to its identifier from a manifest. Basically, the entry itself points
out its asset path. As such, most content should not be loaded through a manifest.
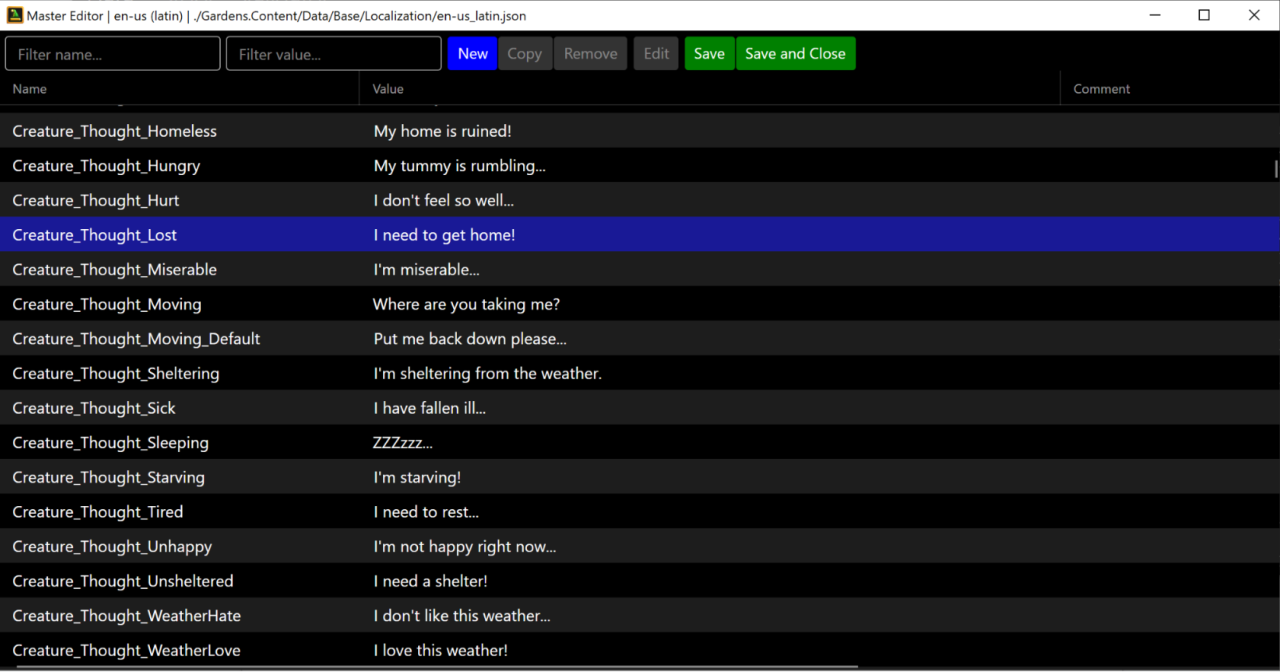
All text is provided in localization files (one per language) containing JSON-formatted
data. The format of the data is:
<Name>: {
Value: <Value>,
Comment: <Comment>,
Revision: <Number>
},
Name = The unique identifying name of the entry.
Value = The text string.
Comment = Comment for anyone working with the file.
Revision = Version information relative to the master file (en-US) and used for
official translations. You likely don’t have to worry about this
meta-information while modding.
Should a requested string not exist (no string has the name) in the player-selected
language, the game falls back to English (en-US), the master language. Should the
string not exist at all, its name will be used instead to indicate a fully missing string.
The available languages are determined by the language files that the game finds. To
add a new one, make a mod that contains a language file in the “Language”
folder.
Language files require a specific name format containing an identifier and a
character set: “<identifier>_<charset>.json”. For example, given the following file
name: “en-US_latin.json” we get American English (en-US) using Latin characters.
Identifier
The identifier is arbitrary but should ideally follow the BCP47 standard using a
language (ISO-639) and region (ISO-3166) code. This allows for automatic defaulting
from the OS language.
Example identifiers:
● en-US (US English)
● sv-SE (Swedish)
● ja-JP (Japanese)
Charset
Fonts do not contain every character and may be specialized for rendering a certain
type of character in the best way. Therefore, each language specifies which charset is
required to render it in the game.
Currently supported charsets:
● latin (Multiple western languages)
● ♥♥♥ (Japanese)
Flag
To associate a flag with a language, a texture asset with an identifier in the following
format needs to be loaded: “flag/<lowercase identifier>”, for example, “flag/de-de” for
German.
The texture can be placed anywhere in the virtual file system. For information on
how to load the flag, see Manifests.
Name
To show a name for the language in the UI, instead of just its identifier, you need to
add a localization entry for each translated language. These have the format:
“Language_<lowercase identifier>”. For example, “Language_de-de” for German.
To modify or add specific text entries to an existing language you must provide a
diff-file in the same directory as the original language file.
The diff-files have the file extension “.diff.json”. For example, if the original language
file is “Localization/en-US_latin.json”, the corresponding difference file would be
“Localization/en-US_latin.diff.json”.
Once a diff-file is supplied, any strings in it will be added to the original language (or
overridden if a string with the name already exists). Multiple mods can alter the same
languages and they will be overridden in the standard mod load order.
NOTE: It is recommended to namespace new strings to prevent future conflicts.
Steam Workshop
in the actual creation. However, workshop mods will not be located in the standard
mod folder. Instead, Steam creates a unique directory per mod:/Steam/steamapps/workshop/content/1928540/<mod_id>
These mod directories do not allow directory loading, but you can still do your
development in the ordinary mod directory.
Furthermore, steam mods are loaded in the order of subscription date, with the
player’s latest subscribed mod being applied last. If there are any mods in the Mods
folder, they will be applied after the workshop mods.
Tooling
All tooling can be found in the “Tools” directory of the game files.
This tool can create pack files and open them for inspection and unpacking.
This view lets you inspect any existing pack file, official and mod alike. Primarily, it is
used to unpack the contents into a directory. This can be used to see how the files
are structured and access its content for editing.
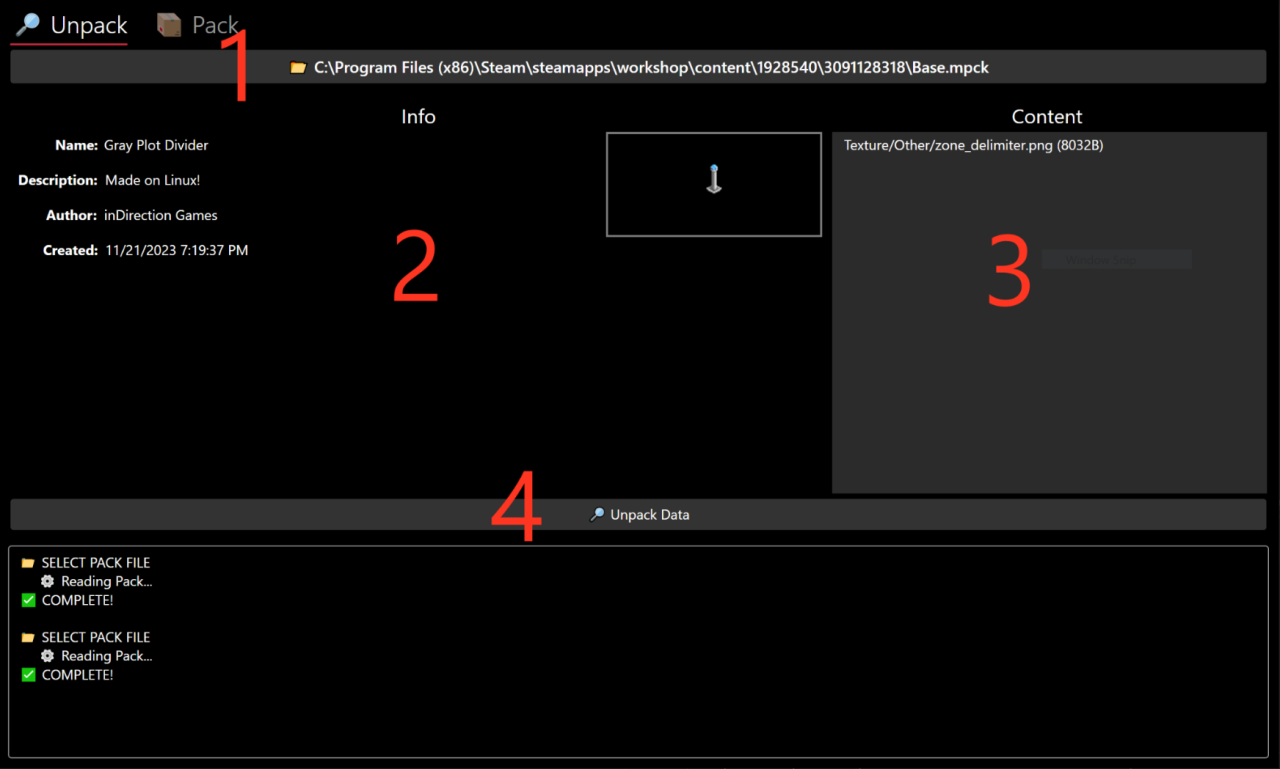
1. Pack file selector. Press this button to select a pack file to open. Once
opened, this button shows the path but is still pressable to select a new file.
2. Pack information. Shows metadata of the pack, including any incorporated
image.
3. Pack content. List of all files included in the pack.
4. Unpack. Press this button to unpack the file into a directory structure.
You probably guessed it: This view packs a given directory into a pack file, ready for
use as a mod.
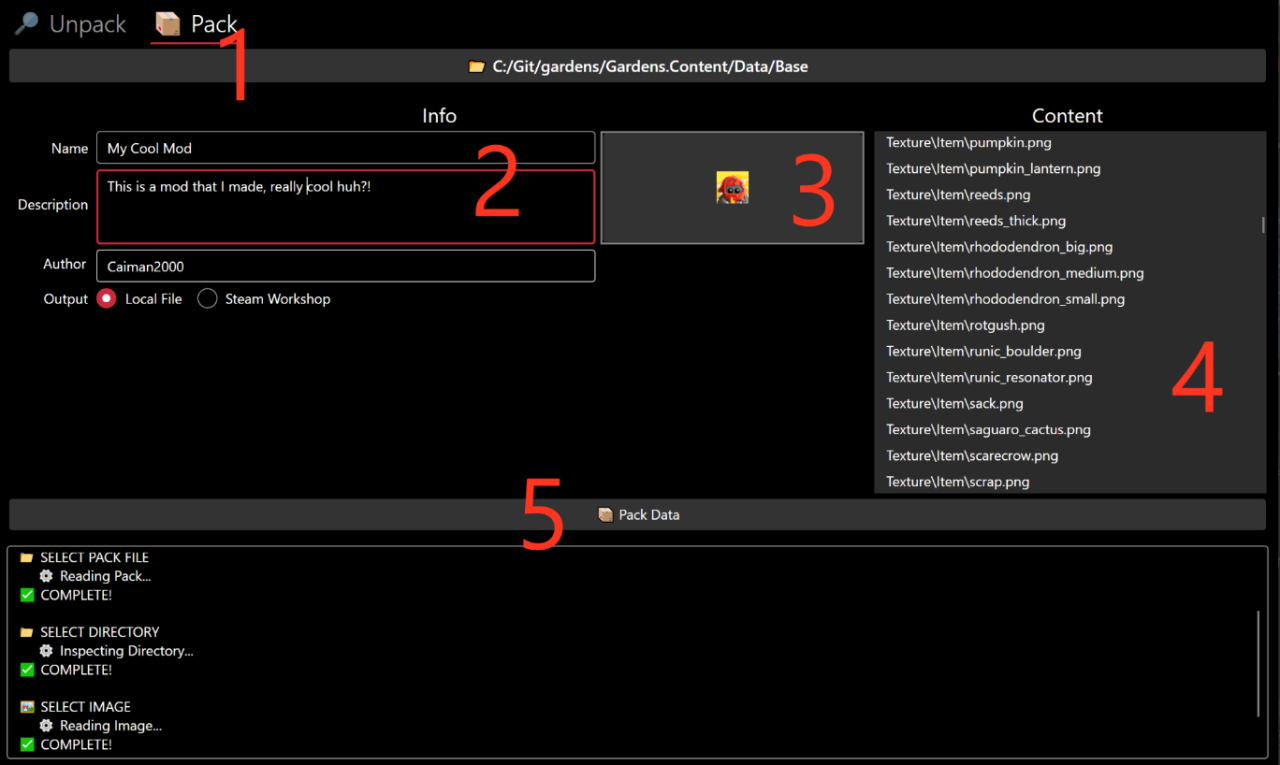
1. Directory selector. Selects a directory to eventually pack. Once selected, it
shows the path but is still pressable to select another one.
2. Information. These pieces of mod information need to be filled in to pack the
directory. See below for additional information on the output toggle.
3. Picture selector. While not required, it is strongly recommended to add a
picture for the mod. Press the picture to open a file picker.
4. Pack content. List of all files that will be included in the pack.
5. Pack. Press this to pack the given directory into a pack file.
When packing, you can select between creating a local pack file or uploading the
data directly to the Steam Workshop.
Choosing “Local File” as output, the resulting file is stored in the same directory as
the directory that was packed. Choose this option if you want to install the mod
yourself or distribute it for installation outside of the Steam Workshop.
Choosing “Steam Workshop” as output, no file is stored. Instead, the data is
immediately uploaded to the workshop. Steam has to be running and logged in to
an account that owns the game for uploading to work!
You will be able to specify a mod ID to update in case this pack is an update to an
existing mod. The ID is the one found in the workshop and is also logged upon initial
upload (no ID provided).
You will also be able to specify tags for the workshop so that people can find your
mod. This is highly recommended, as it also affects visibility within the in-game
mod browser!
DataStudio is the editor that the game was made with. It lets you edit the entries for
every data type. In addition, it comes with integrated string editing and translation
functionality.
To get started with editing or creating entries, you need to create or open a data file
(data.xml). This is done from the File menu, but you can also specify a path as the
first program argument to open it immediately.
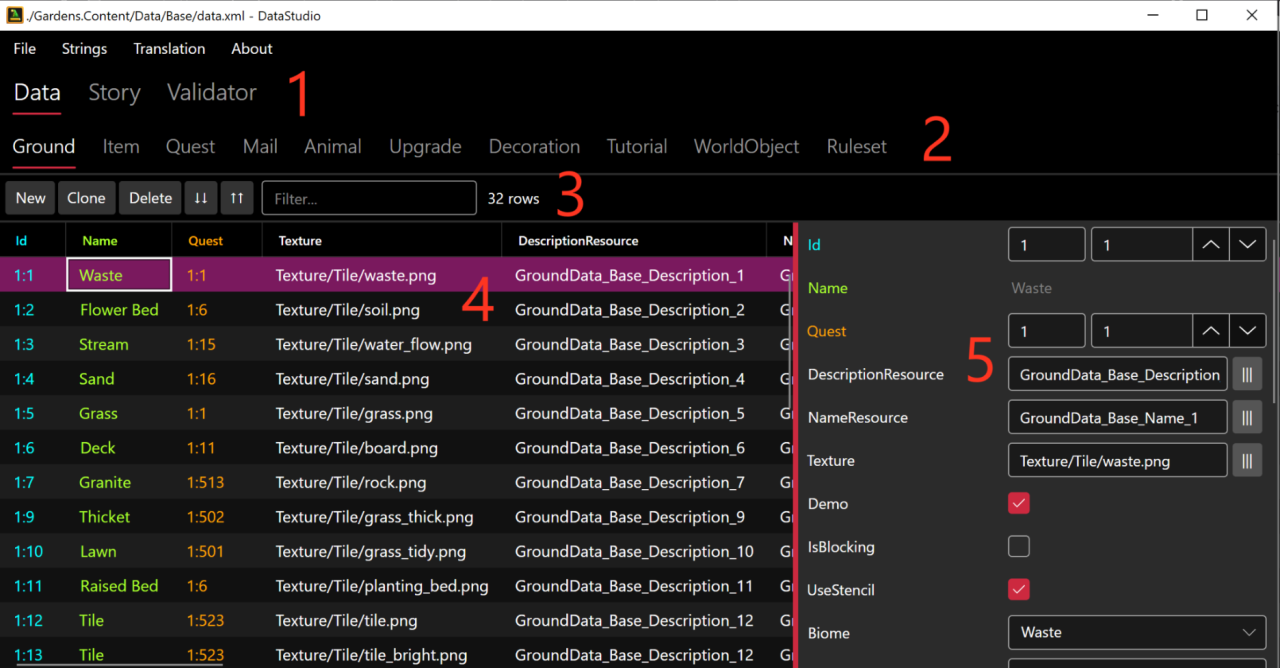
1. Function selection. The Data section is where you view and modify entries.
Story and Validator are covered in separate sections.
2. Data types. Select the data type you wish to change.
3. Entry operations: Add a new entry; Clone the selected entry; Delete the
selected entry; Push selected ID up/down (pushing all conflicting entries as
well); Filter the view to rows with columns containing the given string.
4. Entry rows. These are the entries of the selected data type. Click one to select
it for editing, although some properties can be modified already from the row.
5. Entry details. Shows all properties of the selected entry, editable or otherwise. This is where you make the main adjustments to the game.
Since each type comes with many unique properties, the individual values won’t be
covered here. However, you will note some recurring ones:
● The unique ID of an entry is color-coded blue, shown at the top, and allows
you to modify both module and number separately. Remember that module 0
is what you should use when adding content (see the Data entry section).
● Names are color-coded green. They are not editable but will show the string
value it will have. The actual key/name is specified in a specific string resource
property. Some entries have similar mechanisms for description or other text.
Note: You have to load a string file from the “Strings” menu for this to show a
real value (see String editing).
● References to other entries, whether they be of the same type or a different
one, are color-coded orange and entered the same way as the unique ID. If the
ID of a referenced entry changes and is located in the same data file, this value
will be updated automatically.
This is a tool to visualize the quests and where they lead. Each box is hoverable for
details and can be selected to show previous and following quests.
This tool checks that entry-references seem correct, for example, that all letters are
attached to a quest. Running this gives you an indication of possible issues, but
there are some legitimate cases (such as external modules) that can be ignored.
In the “Strings” option in the top menu, you find the ability to:
● Load a strings file, such as your diff-strings, or a whole language file, such as
en-us_latin.json. Without loading these, you will not see the correct names for
entries in the editor UI.
● Reload strings. If you have made changes to the strings file, you can reload
them without the Load dialog. Note: you may have to navigate away from a
tab and back for reloaded strings to take effect.
● Edit strings. This lets you add and edit strings for the currently loaded file.
● Check stats for the currently loaded file.
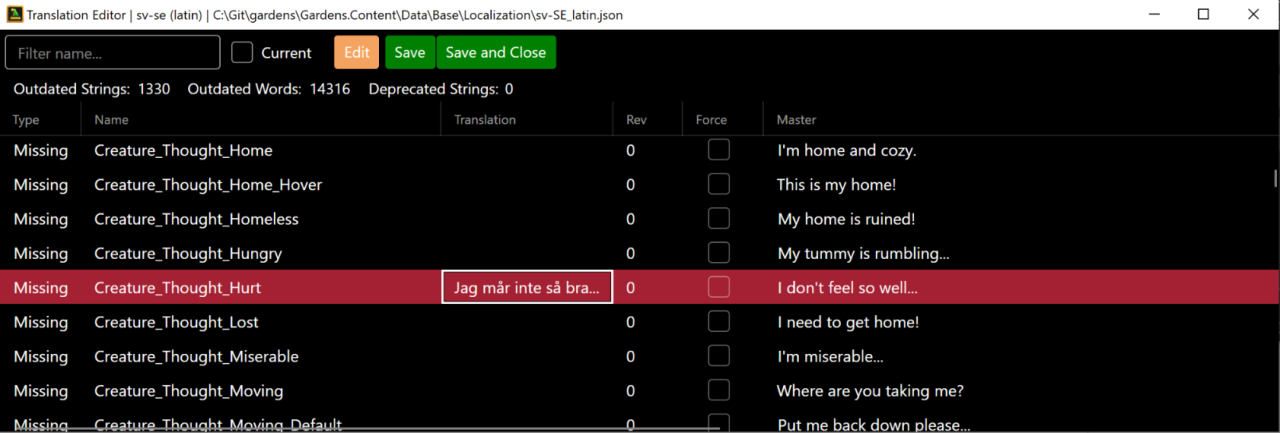
Once strings have been loaded for the master language (en-US), you can select a full
translation file (such as sv-SE) to edit via the “Translation” item in the top menu. After
selecting a translation file, you see which strings need translation and can make
them one by one.
Resources
Following are some helpful resources to get started with mod-making. Most of the examples can be found as workshop items, ready to download and unpack to see how it was made.
Following is a typical workflow for creating a mod.
1. (Optional) Unpack the base game (Base.mpck) found in the Data folder. This
allows you to inspect how the game was made.
2. Create your root mod folder in the mod directory, for example,
“Horticular/Data/Mods/MySuperMod”. This lets you test the mod without
packing the files.
3. Create the mod data and place it in your new folder. Check the additional
resources in this section for how to make specific changes.
4. Test that your mod works by running the game. It should be listed on the
“Mods” page, accessed from the main menu. Iterate until happy!
5. Pack your mod folder once you are ready to show your creation to the world!
Asset replacement is as simple as recreating the directory structure of the base
game and adding your version of assets.
Related sections:
● Anatomy
● Overrides
In this example, we will change the color of the mouse cursor.
1. Unpack the base content. The unpacked directory structure shows us that
the mouse cursor is found under “Texture/Base/cursor.png”.
2. Create our mod root directory, “PinkMouseCursor”, in “Horticular/Data/Mods”.
3. Modify cursor.png with pink coloring and save it to
“PinkMouseCursor/Texture/Base/cursor.png”.
Adding a new translation is pretty straightforward. You’ll need to create translated
text strings for each in the master language. You might also want to include a flag for
it and name it in other languages.
Related sections:
● Adding a Language
● Translation Editor
● Manifests
In this example, we will create a small sample of a made-up language and add its
flag.
1. Unpack the base content. The master language can be found in
“Localization/en-us_latin.json”.
2. Create our mod root: “Horticular/Data/Mods/ExampleTranslation”.
3. Create an empty translation in your mod: “Localization/te-ST_latin.json”.
4. Translate the strings. Recommended is to use DataStudio for this by loading
the master language from #1 and editing the new file from #3.
5. Create the flag. It can be located anywhere, but we’re using the same
directory as the base game: “Texture/UI/Flags/te_st.png”.
6. Create a manifest file in the mod root, “mod.manifest”, to instruct the game
to load the flag asset. The identifier of the asset should be “flag/te-st”.
Adding or modifying text entries to an existing language uses the same
fundamentals as when creating a translation. The main difference is that a diff-file is
used.
Related sections:
● Changing Text
● String editing
In this example, we will make the main menu options uppercase in the English
language.
1. Unpack the base content. The English language can be found in
“Localization/en-us_latin.json”.
2. Create our mod root: “Horticular/Data/Mods/ExampleUppercaseMenu”.
3. Create a diff-file: “Localization/en-US_latin.diff.json”.
4. Add the diff-strings to “en-US_latin.diff.json”. Here, you can either add them
manually using DataStudio (make sure to use the same names) or copy-paste
the entries to change from the original and then modify them.
Adding a new entry will have you creating a “data.xml” file and populating it with the
additions you want to make. For most types, you will have to add a name,
description, and an asset.
Related sections:
● Changing Text
● String editing
● Data Entries
● Additions
● DataStudio
In this example, we will add a blue tulip to the game.
1. (Optional) Unpack the base content. The base game tulips can be used as a
reference.
2. Create our mod root: “Horticular/Data/Mods/NewTulipExample”.
3. Create the asset “NewTulipExampleData/tulip_blue.png”. Note the
namespace directory in case another mod adds a blue tulip. In this case, we
can copy the original asset and color it blue.
4. Add a string for the name by creating “Localization/en-US_latin.diff.json” and
opening it in DataStudio. We add the namespaced string
“ItemData_NewTulipExample_Name”, with the value “Blue Tulip”.
5. Add the data entry by creating a “mod.xml” in the mod root with DataStudio.
We can create the tulip from the ground up, but in this case, we just copy an
existing tulip from the base game. We also change the cost and replace the
Name resource with the one from #4. Important: Change the ID to 0:1!
Modifying an entry is the same process as adding an entry, except that you specify a
specific module to override. As such, this is mostly for modifying base game content.
Related sections:
● Data Entries
● Modifications
● DataStudio
In this example, we will change keepers to have a much higher base speed.
1. Unpack the base content so we can use its data.
2. Create our mod root: “Horticular/Data/Mods/FasterKeepersExample”.
3. Copy the Keeper entry from the base game’s data.xml into our “data.xml” in
the mod root (you might want to use DataStudio to create the mod-data file
since the XML tags need to be correct).
4. Change the speed by opening our mod’s data and modifying the Speed
property of the keeper. NOTE: We keep the ID here since we want to override
the base game and not create a new kind of keeper.
5. Change the animation frame rate by a similar factor. So, for a 2x change in
speed, we probably want a 2x change in frame rate. Note that specific
animation rows may have their own frame rate to change, too.
Removing an entry is similar to other data changes in that you change an XML file.
However, here, you use a special “data-remove.xml” where you specify which IDs to
remove.
Related sections:
● Data Entries
● Removals
● DataStudio
In this example, we remove the pesky goldfish from the game!
1. Unpack the base content so we can see what ID the goldfish has.
2. Create our mod root: “Horticular/Data/Mods/RemoveGoldfishExample”.
3. Create the removal file “data-remove.xml” in the mod root. If you create it
with DataStudio, you do not have to set up the overall XML structure yourself.
4. Add the Goldfish entry either by copying the entry from the base game or
manually adding it to the removal file. Note that only the ID field is required, so
you can safely remove the rest if you want, making the mod smaller.
The following are the magic paths to keep in mind. These files do not override other
packs and should not be namespaced.
mod.manifest = Asset loading manifest.
data.xml = Modification and addition of game data.
data-remove.xml = Removal of game data.
Localization/<name>.json = Adding a translation of the game.
Localization/<name>.diff.json = Adding/changing a string for an existing language.
There are commands that the game can run on quest completion (see the quest
data entry).
Commands can also be run from the developer console (enabled by adding
“console_enabled=true” as a program argument or a line in “settings.ini”), opened
with F1.
Following are some useful commands:
help = Shows all commands or help for a given command if run as “help
<command>”.
set <x> <y> = Set variable x to value y.
get <x> = Prints the value of variable x.
vars = Lists all variables.
crash = Crashes the game! 😳
That’s all we are sharing today in Horticular – Official Mod Guide, if you have anything to add, please feel free to leave a comment below, you can also read the original article here, all the credits goes to the original author inDirection Games
