BASICS
After downloading, MOD will be placed in the corresponding directory:
Mod files should be placed in “YourModName” folder in this location:
\AppData\LocalLow\MuHa Games\MoM\Mods\
Use %appdata% in the computer folders directory path to get easier access to this location
![]()
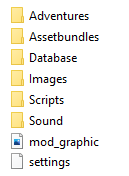
The MOD contains appropriate folders for the files we use to modify the game:
- Adventures – event modules
- Assetbundles – asset packs
- Database – database files
- Images – 2d graphic files
- Scripts – scripting files
- Sound – sound files
In addition, in the main MOD folder there are files:
- “settings.xml” – which contain basic information about the mod
- “mod_graphic.png” – graphics of the mod displayed in the list of mods inside the game
IMPORTANT!
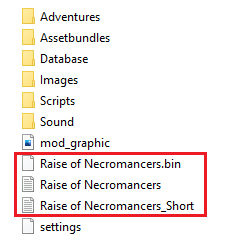
If original units are modified or new ones are added, then additional files will be created in the root directory. Those files are used to determine the strength of those units.
Whenever there are changes to any units, these files must be deleted for the game to redefine strength and generate new files.
To avoid problems when working with example mod or any other mods, there are a few things to keep in mind:
- DB modification – when modifying the databases, pay special attention when modifying already existing elements of the game, as this can lead to conflicts with other mods
- Conflicts – in order to minimize potential conflicts from the use/creation of several mods, it is worth remembering a few rules:
- Minimalism – when modifying the original content, we do not upload entire DB files with minor changes, but only those elements that we change

- Division – it is worth considering breaking one mod into two, where the part with new content will be one mod, and changes modifying the original part in the second mod
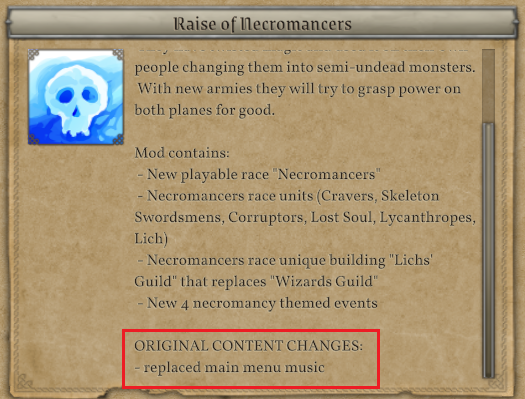
- Description – it is worthwhile to include changes to the original content in the mod’s description or appropriately name the MOD itself, which will make it less problematic for modders or users to use multiple MODs
- Minimalism – when modifying the original content, we do not upload entire DB files with minor changes, but only those elements that we change
A helpful tool for checking any changes or certain aspects of the game is the devmenu, which can be accessed in any game by pressing CTRL+SHIFT+F1.
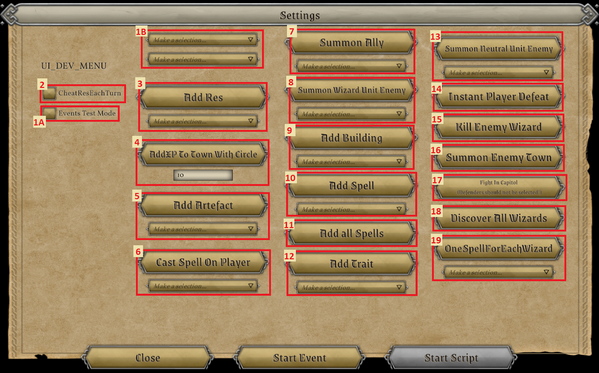
Description of available functions:
- Responsible for handling events
A – Enables launching of the events
B – Allows to select modules and events to launch - Adds resources every turn to the player and finishes casting the current spell
- Adds the selected resource to the city with a summoning circle
- Gives XP in the city with a summoning circle
- Gives the chosen artifact
- Casts the chosen spell on the player
- Gives a selected unit in the city with a summoning circle
- Summons a selected enemy unit – the place of summoning is the position of the last mouse click (will appear on the map where you click on the summoning button)
- Adds selected building in city with a summoning circle
- Gives the player the chosen spell
- Gives the player all the spells
- Gives the player the chosen trait
- Summons a selected neutral unit – under the same rules as in point. 8
- Causes the player to lose
- Defeats a single opponent
- Summons an enemy city – under the same rules as in point.8
- Fight in the city with a summoning circle
- Discovery of all the opponents
- All players have only one selected spell
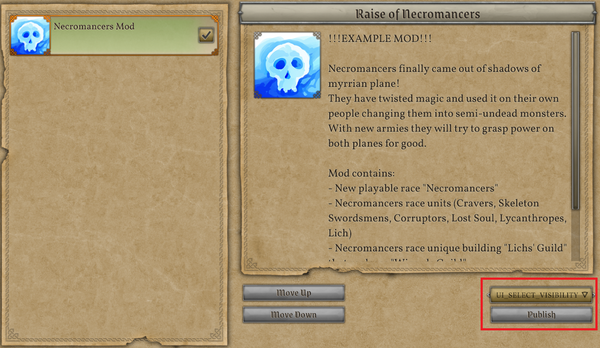
Once you have finished working on the MOD, you can publish it using the in-game option. To do this:
- Select your MOD from the list
- Select the visibility option
- Publish
IMPORTANT !
Exceeding the number of characters over 7000 in the MOD description will cause a problem when uploading the MOD to steam (the upload process will succeed, but the MOD will be empty on steam).
GENERAL GUIDE
Setting up the “settings.xml” file in the MOD main folder is the first thing to do. It is responsible for the basic settings, naming and description of the MOD.
- prefix – used for the purpose of prefixing graphic assets (we use only lowercase letters)
- name – serves as a reference used by other MODs, and also as an identifier of which MODs are used and in what order
- title – MOD name displayed in mod manager
- description – a longer description of the MOD and its content, displayed in the MOD manager after selecting it (it is worth writing what part of the original content was modified)
- author – author signature. The system will try to process it through the localization database, in case someone wants to have a different language-dependent signature displayed
- version – MOD version
- icon – MOD graphic displayed in MOD manager
Event module created via ingame event editor can be moved to “Adventures” folder, but it will be active only if the MOD is active.
To work with asset bundles follow instructions from:
GAME_FOLDER\ExternalAssets\MoMAssetBundlesExporter\MasterofMagicAssetBundleExporter\
Which describe how to create, export and properly use them.
Depending on the elements we want to modify, we need the appropriate files. Here is a list of some of the most important ones:
- DB_ARTEFACT – hero items
- DB_BOOKS_ADVANTAGE – starting spells and research limits
- DB_BUILDING – buildings
- DB_DIFFICULTY – difficulty settings
- DB_ENCHANTMENTS – all enchantments, and/or effects that are applied on units/towns…
- DB_GROUP – groups that are used by events or dungeons
- DB_LANGUAGE – language list
- DB_LOCALIZATION_DES – descriptions of every game element, except the UI (note that they are divided by languages and DLC’s)
- DB_LOCATION – map locations, power nodes and dungeons
- DB_PLANE – races distributed to the starting planes
- DB_RACE – race data for race selection and race tensions
- DB_SKILL – list of all skills that fire instant effects or apply enchantments
- DB_SOUND – game general sounds and music (DB_SUBRACE contains unit sounds)
- DB_SPELL – list of all spells that fire instant effects or apply enchantments
- DB_SUBRACE – all units and hero data
- DB_TAG – game tags
- DB_TAGS_QUEST – tags used in the event editor
- DB_TAX – general tax values
- DB_TERRAIN – basic terrain data
- DB_TERRAIN_RESOURCE – resources data
- DB_TOWN – race main data, productions, possible buildings
- DB_TOWN_NAME – race town names
- DB_TRAIT – wizard traits data
- DB_UNIT_LVL – units and hero level data
- DB_WIZARD – AI wizards dataMODIFY
To modify a piece of original game content, we look for the appropriate segment and copy it, then change the values we are interested in. Example:
In proper segment we only modified one line without messing other elements.

CREATE
When we create new content, we need to create a corresponding segment and add new content to it. Example:
We have copied regeneration skill, changed regeneration value to “2” and updated name/descriptions to make a new skill.
 Image/Sound
We place those files in the proper corresponding folder and use it like shown in the examples above.
There is a GUIDE
on steam about image implementation and file sizes.ScriptsWe can modify scripts in two ways, one, just simple modifications of existing scripts and the other, with using C# knowledge (which will be described later in the guide).
SIMPLE MODIFICATION
With just changing numeric data in existing skills. Example:
We have copied regeneration skill, changed regeneration value to “2” and updated name/descriptions to make a new skill.
 Asset Dependency
It is possible to use graphic assets from other MODs.
To do this, you need to use the prefix of the MOD in question and the name of the asset.To properly use dependency on other MODs with a prefix, we should remember to:
- MOD – which are we gonna refer to should be in proper folders and visible on ingame MOD list
- PREFIX – check what is the MOD prefix (it will be probably different than MOD actual name)
- ASSETS – check if those assets are in the MOD we are referring to
- PREREQUISITES – if we set up all things and dependency works, we should mention that our MOD requires the other MOD/DLC installed, which we can do in settings file PREREQUISITES section or/and in the description
DATABASE INSIGHT (part 1)
In the “Prototype” directory, which is located in “GAME_FOLDER\ExternalAssets\Database\Prototype”, there are templates for each DB element. They contain quite a few comments that can explain the operation of specific mechanisms and inheritance.
In the “Database” directory, which is located in the “GAME_FOLDER\ExternalAssets\Database”, there are DB files (they contain data for many of the game elements described above), which can help you understand how for example races or skills are created.
When working with the DB, there are a few things to keep in mind in terms of naming:
- Root/Elements – they are crucial, it determines how the game reads all DB and information about them can be found in PROTOTYPE folder
- Order – any typo may cause some content not to load or cause an error
- Consistency and originality – if you already come up with what you want to modify, it is worth taking care of the right prefix and naming when creating the content. When it is too generic then there is a chance that another mod using similar naming will cause a lot of commotion.
Almost every aspect of DB has some elements that require description or just simple naming, so remember to fill it in proper DB_LOCALIZATION_DES with proper DB naming.
Many DB elements use TAG’s, some require to update values like “<Tags Amount=”0.3″ Tag=”TAG-MELEE_ATTACK_CHANCE”/>” and other simply are just added with value 1 “<Tags Amount=”1″ Tag=”TAG-MELEE_UNIT”/>”. It depends on context, but some tags work as actual numeric values used in game mechanics and other more of true/false when a unit has flying or is a melee unit.
Specific tags
- TAG-TOWN_DEFENDER_1
<Tags Amount=”1″ Tag=”TAG-TOWN_DEFENDER_1″/> – is used for creating neutral towns defenders based on game settings and town population. Defenders are spawned from units with those tags and each unit in DB has to have this tag with a different number. - TAG-TOWN_STARTING_DEFENDER
<Tags Amount=”1″ Tag=”TAG-TOWN_STARTING_DEFENDER”/> – this tag should be added to one unit, which will be granted at the beginning of the game and when a new city is settled.
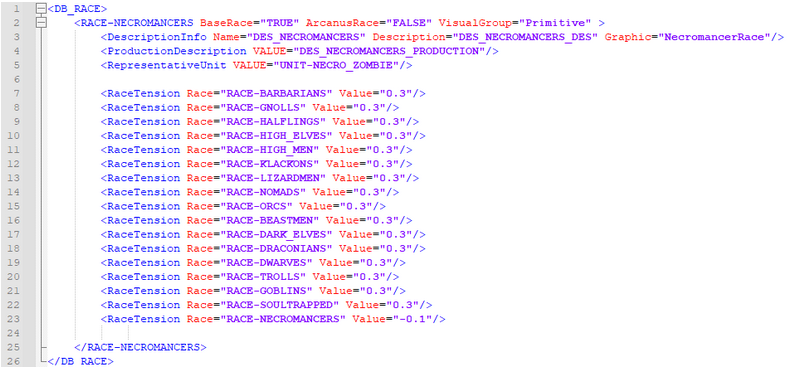
Race tension is stored in DB_RACE of both the game and the example mod, where under race is a list of the races and the tension between them.
The list determines the value of the city’s unrest relative to the race that conquered it (main race).
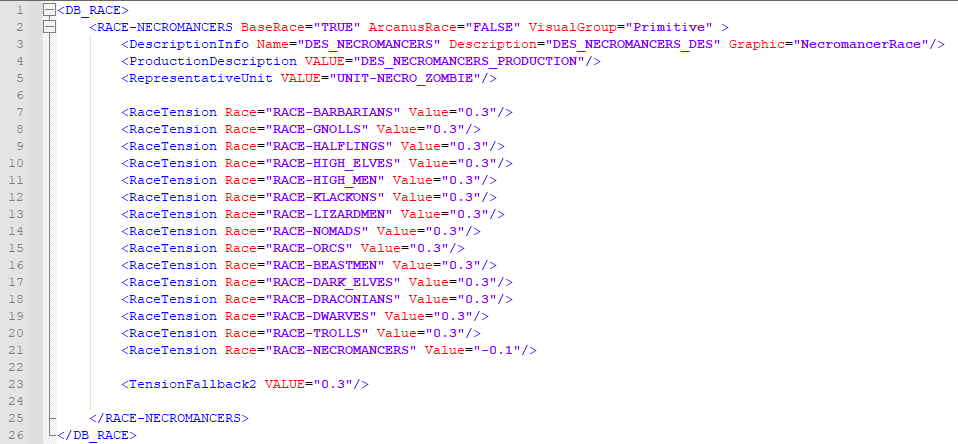
For example, if a city of necromancers was conquered by a race of barbarians, then on the list of tensions of the necromancers’ race, we look for the race that conquered it, that is, the barbarians, and the value is added to the unrest in the city (in this case, it would be +30%).
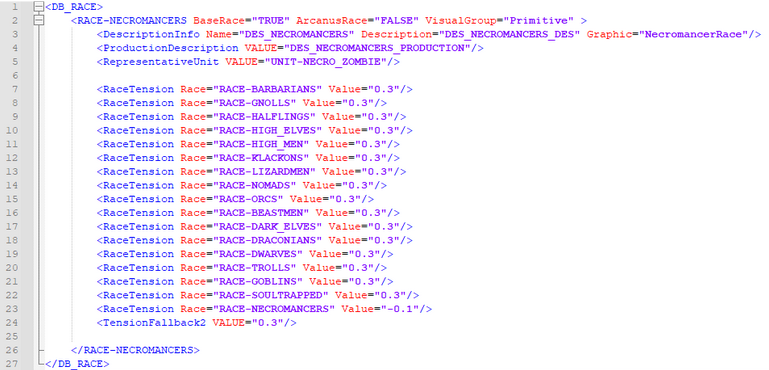
It may happen that the conquered race does not have its conquerors listed, in that case we can use TensionFallback (otherwise the value of unrest as a result of racial tension will be 0%).
If we reversed the situation and the necromancers conquered the barbarian city, the tension list of the barbarian race does not include the necromancer race.
In this situation, the game will perform those actions in that order:
- Will check if necromancers have TensionFallback
- If not, it will then check if the necromancers have TensionFallback2
- If not, the unrest value will be set to 0%
<TensionFallback RACE=”RACE”/>
Going back to our example, where the necromancer race conquers the barbarian city. If the necromancer race had the Orc race entered in TensionFallback, then the barbarian city would look for the Orc race in its tension list and use the racial tension value from that race.
But in our situation, Necromancers do not have TensionFallback, so the system will look for TensionFallback2.
<TensionFallback2 VALUE=”value”/>
This is an arbitrary tension value for all races that conquer the city of necromancers and do not have it on their tension list.
To make it easier for new users to work with MODs, we will describe step-by-step how to create your own race and sample unit.
RACE
Let’s start by creating a new XML file (eXtensible Markup Language file) and call it DB_RACE (it can be named anything, but it’s a good idea to stick to the accepted nomenclature to maintain consistency).
- Root element – We add the root element of race.

- Copy other race – For simplicity we will copy an already existing race, in our case the barbarians.
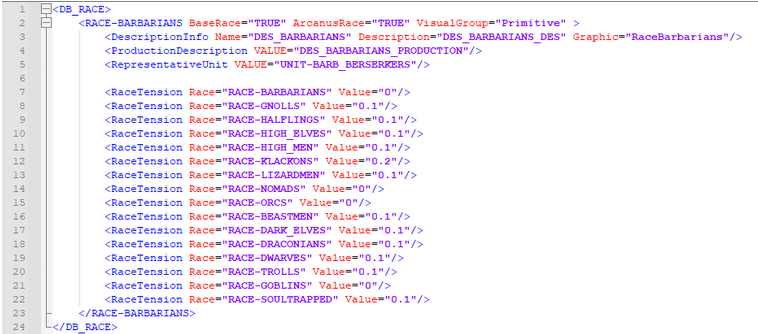
- Race name and description information – We will change the name of our race to NECROMANCERS, set the race as MYRROR, and prepare the fields for descriptions (which we will handle at the end) by changing BARBARIANS to NECROMANCERS, and finally we will designate the representative unit of the race (it will be visible when selecting the race).
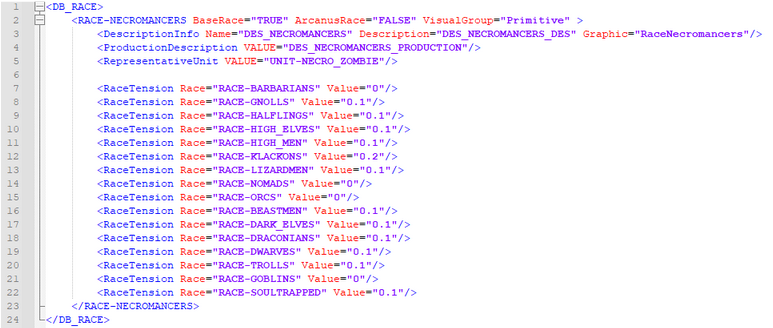
- Race tension – Let’s set the race tension of original races toward our cities and ours as base.
- Tension fallback – As we want other races conquering necromancers to have a negative attitude, and we do not want to modify the original content, we will use tension fallback, so that the attitude of the original races and from other mods will be handled.
PLANE
When creating a race, we must remember to add it to the appropriate plan.
- Root element – We create a document and add the corresponding root element.
- Plane element – Then add a plan element and add our race there.

SUBRACE
In the next step, we will create our representative unit.
- Root element – Create a new document by setting the appropriate root element.
- Copy other subrace unit – We will copy the barbarian spearman unit and modify it.
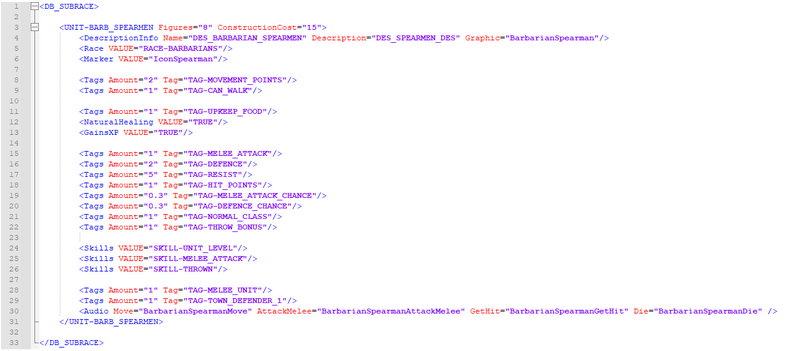
- Unit name and description – Let’s change the name to the representative unit and the corresponding race, and then prepare the description keys.
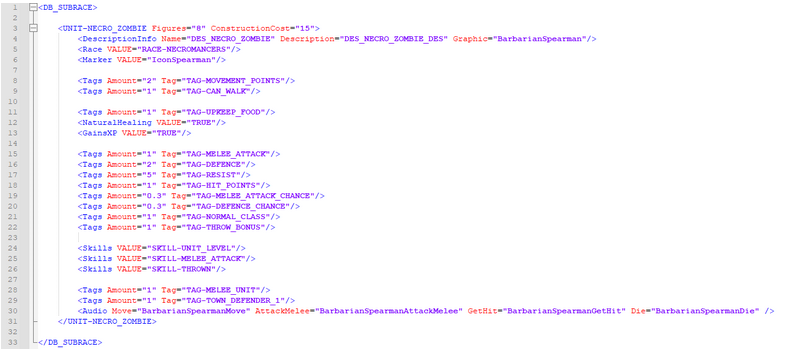
- Graphics and audio – Our unit will be a zombie, so we will use the game’s resources to speed up the process (to use your own assets follow the information in General Guide -> Image/Sound).
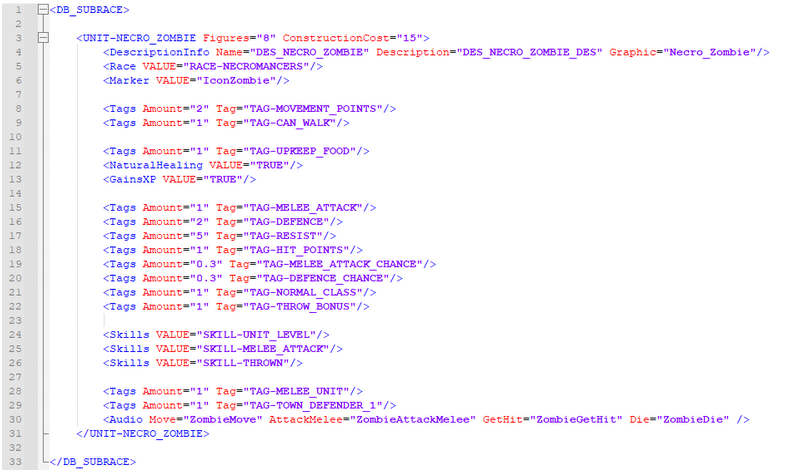
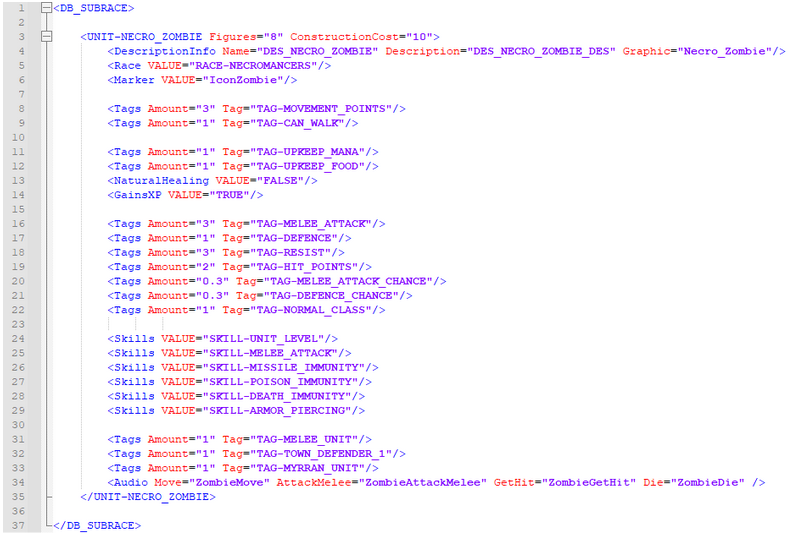
- Basic idea – We want necromancer units to be warped beings, not quite being alive and dead, aided by magic. Therefore, we will modify the cost of upkeep to the idea, as well change the movement speed and that the unit cannot heal naturally.

- Battle values – We will now modify the combat values, increase its attack and life points at the expense of physical and magical defense, and remove the throw bonus.

- Skills – We will add some skills to characterize the undead and remove thrown skill.

- Tags – This will be the basic unit, so we will leave the tag TOWN_DEFENDER_1 and add MYRRAN_UNIT because that’s where the race will come from.

- Finish – At the end we will change the cost of production and our unit is ready (if we would like it to be a unit with which we start the game we would also have to add the appropriate tag: TOWN_STARTING_DEFENDER).
DATABASE INSIGHT (part 2)
The next step is to create a city of our race.
- Root element – We create a new document and the corresponding root element.
- Copy other race town – Let’s copy the barbarian city and modify it.
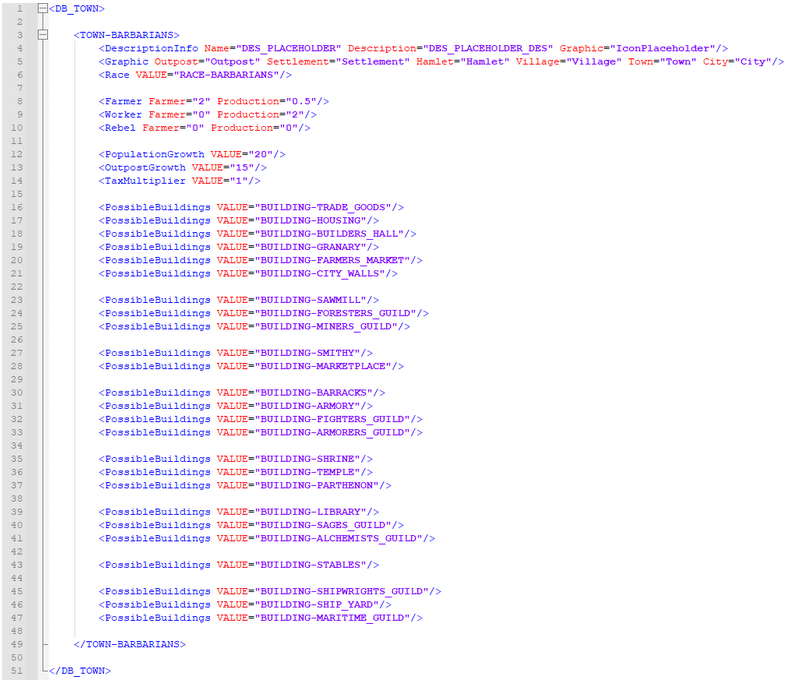
- Town name and description – First we will change the name of the element and the name of the race.
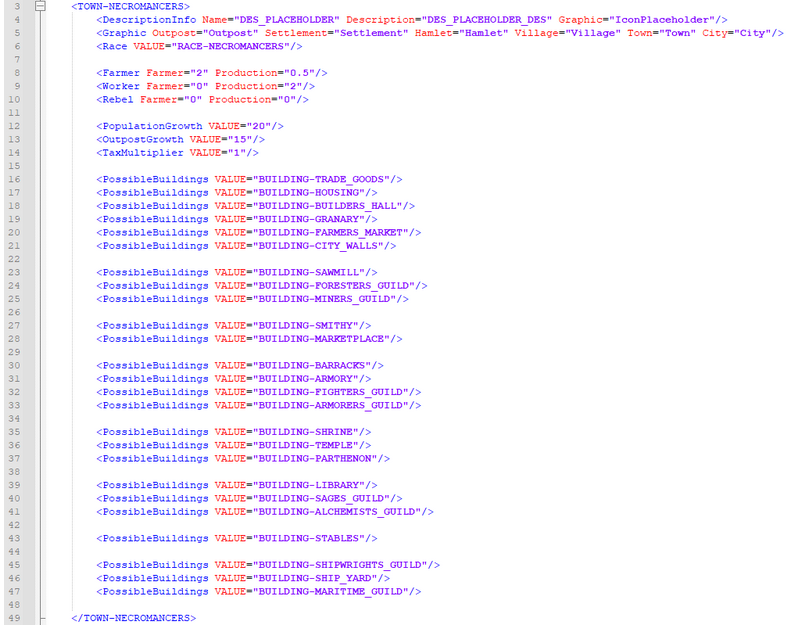
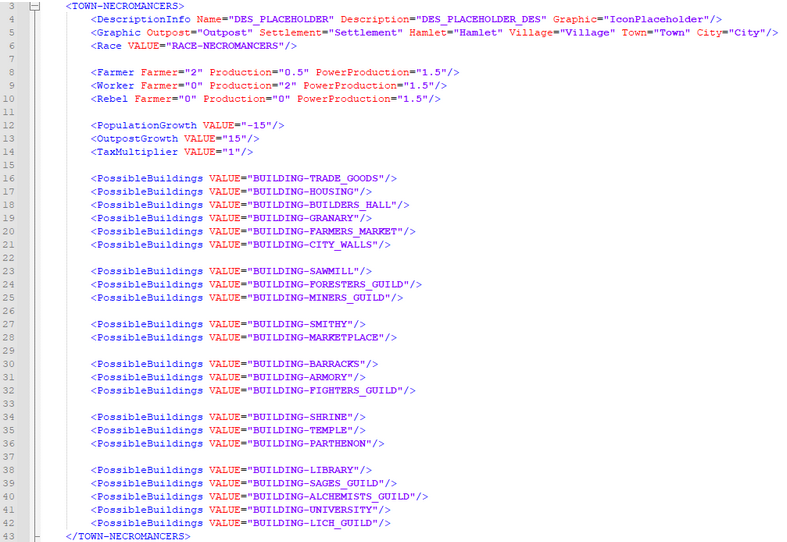
- Production – The next step is to update the city’s production. We added power production because our units cost mana to maintain and we generally want our race to be heavily focused on magic.

- Population growth and tax multiplier – We will only modify the city’s population growth, leaving the speed of outpost development and taxes.

- Buildings – In the buildings section, we will remove the ones we don’t want to use, viz: ARMORERS_GUILD, STABLES and all naval buildings.
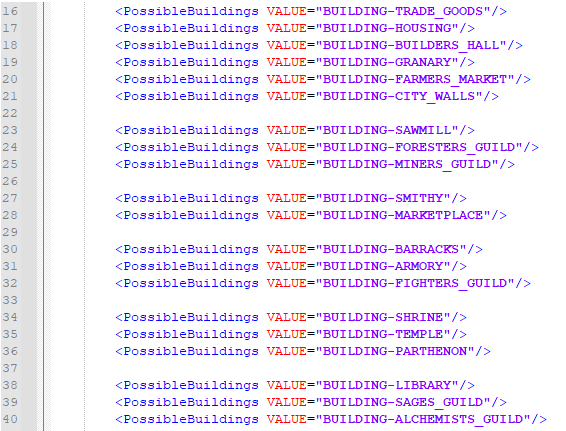
- Special building – We will create a special LICH_GUILD building to replace WIZARDS_GUILD in the building tree. Therefore, we need to add UNIVERSITY, which is required for WIZARDS_GUILD.

- Finish – Our DB_TOWN will look like this.
TOWN NAME
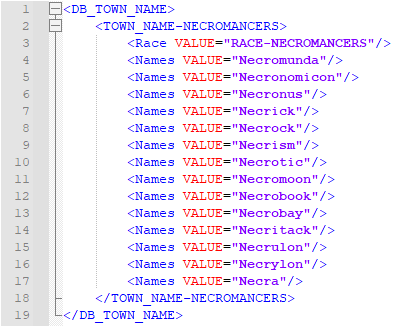
When we finish DB_TOWN we need to create a list of names for the cities of our race.
- Root element – As always, we create a document with the necessary elements.
- Race and town names – Let’s add race and city names.
BUILDING
We have added a new building in the city, so now we will create it.
- Root element – We create a new document with the corresponding root element.
- Copy other building – We want our building to give power at the expense of population growth. To do this, we will use the WIZARD_GUILD building, in whose place we create LICH_GUILD.

- Name and description – To begin with, we will rename and prepare the description keys.

- Building idea – Our building will focus on generating power, so we will change the RESEARCH_PRODUCTION tag to POWER_PRODUCTION and remove the mana cost of maintaining the building.

- Enchantment – The last step is to change the name of the enchantment and the whole thing should look like this.

ENCHANTMENT
Now that we have the building prepared, we need to take care of its properties, which we do with an enchantment.
- Root element – Create a new file and add the appropriate root element.
- Copy – Since we used WIZARD_GUILD as a basis, we will also use its enchantment and modify it.

- Name and description – Let’s change the name of the enchantment to that of the previously created building, we use the same keys as for the building, and leave the graphic because it fits the idea of the building.

- Scripts – Let’s remove the script that increases research and in its place add scripts for power production and population with the values we want. In our case, it will be an increase of 15 powers and a decrease in population growth by 10.

LOCALIZATION
At the very end, we were left with handling all the description keys.
- Root element – We need to create a new file, add the appropriate root element and the localization element of our MOD in the selected language
- Keys – Now we need to collect all the description keys we have used so far.
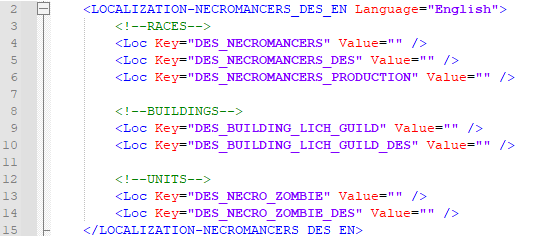
- Fill up – We are left to complete the description information. These can be edited in several ways, for example, starting with a new line requires the use of “\n” in the text, or add a resource icon “{ICON:PowerIcon}”
ADVENTURES INSIGHT
All events that appear in the game are made via an editor system that is available from the main menu.
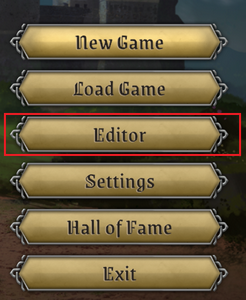
Inside we can pick any module that contains events and modify them or create a new module. Best way to make our own events is to create a separate module and add new events inside that module, as tampering with the existing ones may break the game.
FILES AND FOLDERS
All original content is stored at “GameFolder\ExternalAssets\StoryModules\…” and module files are inside of it.
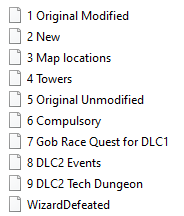
MOD
When we decide that a module is finished, we can use it straight away in our games, but if we wanna move it to MOD, then we can just move them from the StoryModules folder to your MOD adventures folder.
In addition it is worth using the import/export modules option form inside the event editor for generating localisation files (for text corrections and/or localisation).

And the files will appear here:
For new users it might be a bit overwhelming but let’s look how one of them is made and go through it step by step.
Let’s go through the module “Original Modified” and the event “Donation”.
GENERAL VIEW
Inside we see the interconnected nodes, which we consider from left to right starting with “1:Start”
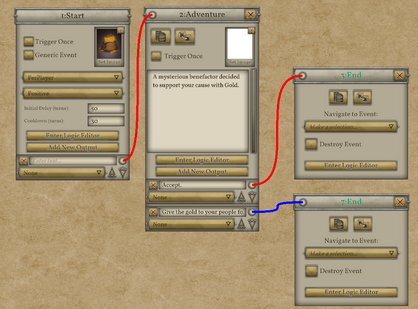
START
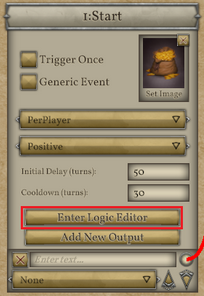
Each event begins with a start node, where we can set the turn from which the event can occur and the time after which it might occur again. To see more specific conditions we need to go into the “enter logic editor” of the node.
Note, in the image below, this event is set for Delay 50, meaning it will not appear until at least turn 50. It also has a cooldown of 30, meaning it will not trigger again for at least 30 turns.
You also see a miniature of the image chosen for this event, if you click on ‘Set Image’ you can change this.
Inside, we will see that additional conditions must be met for the event to trigger. In our case, the active player must have 500 or less gold.
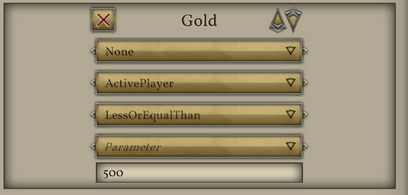
If the above conditions are met the event can fire and the logic of the next node will be used.
ADVENTURE
In this node we describe the situation in which the player finds themselves and the options available to them.
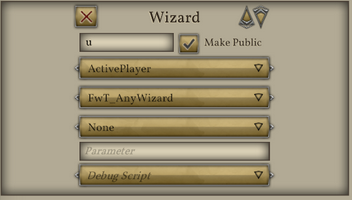
In the logic editor, we define the active player’s wizard variable, which will then be used in modifying the active player’s resources.
END
In this event, we have 2 types of endings.
FIRST (3:END) – we will receive a certain amount of gold
SECOND (7:END) – we will gain fame
It is worth noting that in the case of the node where we can get fame there are requirements and when they are not met then the combined option will not be available to the player.
In addition, rewards are visible and set in the node logic when the mode is switched from requirements to rewards.

NODE LOGIC EDITOR
Inside, we can distinguish four key segments:
Filters – the place where we specify the variables on which we will work and pass on in the logic of the nodes (variables are not visible in earlier nodes, only subsequent ones)
Processing – manipulating variables or groups (merging, filtering)
Results – which is divided into two sections (changed by the buttons on the top right, as shown in the discussion of END nodes)
Requirements – the requirements needed to make the event or the node exist on the basis of basic or created by us variables
Rewards – definition and awarding of prizes
If you want to delve into creating and modifying events we recommend going through this documentation[docs.google.com], which explains in a more detailed way the whole process.
SCRIPT INSIGHT
The scripts are closely connected to the Database. The scripts themselves are responsible for the effects that will be performed by the game and the *.xml files specify which script in which place should be used. Therefore, when working with scripts, it is important to keep both in mind.
- ExternalAssets\Scripts\ – directory where *.cs files containing scripts are located
- ExternalAssets\Database\ – directory where *.xml files are located
When creating new scripts, you should create a new *.cs file in the ExternalAssets\Scripts directory and place your own scripts there, so that they won’t be overwritten when you update the game.
In the ExternalAssets\Database\ directory you can find prototypes of the various database elements, and you can learn from them what values the various fields can take (for example, what types of TriggerType we have, or which fields must be filled in and which not necessarily for the element to work properly). However, I strongly recommend that you do not make changes to the prototypes, as this can corrupt the process of retrieving information from the Database.
- EditorScripts.cs – scripts used in Events
- FwT_ – scripts used in the Filters section to pre-create lists according to set criteria;
- FLP_ – scripts used in Processing section for further processing of previously created lists;
- FRA_ – scripts used in the Results section and return a response as to whether the list items meet the given criteria;
- FMO_ scripts used in Results section and make modifications to list items;
- EnchantmentScripts.cs – scripts responsible for the functioning of Enchantments
- EAPP_ – effects activated when Enchantment is applied;
- EREM_ – effects activated when Enchantment is removed;
- ECH_ – scripts that determine the effect of Enchantments ;
- EFILTER_ – target filter scripts for Enchantments with triggers RemoteUnitAttributeChange and RemoteUnitAttributeChangeMP;
- SJOIN_ – effects activated when a new unit joins the Enchantment owner’s group;
- SLEAVE_ – effects activated when a unit is detached from the Enchantment owner group;
- GroupScripts.cs – scripts responsible for creating groups for Locations and Events
- SkillScripts.cs – scripts responsible for the functioning of Skills
- ACT_ – Skill effect activator;
- ACTPass_ – Skill effect passive activator;
- DSCR_ – scripts that generate the content of the Skill description;
- SAPP_ – effects activated when a Skill is applied;
- SREM_ – effects activated when Skill is removed ;
- SJOIN_ – effects activated when a new unit joins the Skill owner’s group;
- SLEAVE_ – effects activated when a unit is detached from the group of the Skill owner;
- TRI_ – trigger scripts;
- SpellScripts.cs – scripts responsible for the functioning of Spella
- SBAI_ – scripts that estimate the value of casting Spell for AI during combat;
- SWAI_ – scripts that estimate the value of casting Spell for AI on the world map;
- STAR_ – scripts to determine if Spell’s target is correct;
- SBG_ – effects of Spells targeting units during combat;
- SBH_ – effects of Spells targeting hexes (fields) during combat;
- SBW_ – effects that work on Wizards or globally during battle;
- SWG_ – effects of Spells targeting Groups or Cities on the world map;
- SWS_ – scripts that summon objects or units on the world map;
- SWW_ – effects that work on Wizards or globally on the world map;
- SWO_ – other effects of Spells operating on the world map;
- TraitScripts.sc – scripts responsible for the functioning of Traits
- CBKI_ – script that checks the condition that Trait can add a Building;
- CSKI_ – script that checks the condition whether Trait can add Skill to an individual;
- SUS_ – effect adding a starting unit;
- TINIT_ – initial effect triggered when Trait is applied to Wizard;
- TPRE_ – script that checks the requirements to see if the Wizard can buy a given Trait;
- TRAC_ – script that filters the available races if the Wizard selects this Trait;
SCRIPT CONSTRUCTION (part 1)
HOLY WEAPON
Spell that imposes Enchantment on a unit, effective both in battle and on the world map.

- WorldCost – mana cost for casting this Spell on the world map;
- BattleCost – mana cost of casting this Spell during a battle;
- ResearchCost – cost of research points for discovering this Spell in the game;
- UpkeepCost – cost of mana points per turn for maintaining the effect (for each turn in which a unit has a bonus from Spell Wizard must pay 1 mana);
- Realm – the school of magic to which the Spell belongs.;
- Rarity – Spell rarity;
- TargetType – the type of object that can be targeted by Spell, in this case TARGET_TYPE-UNIT_FRIENDLY – an entity belonging to the Wizard;
- TargetingScript – script that determines whether a particular object can be targeted by Spell, in this case STAR_HolyWeapon – it checks whether the unit belongs to the Wizard and is not a fantasy unit, as well as whether Enchantment Holy Weapon is already on it;
- BattleScript – effect a Spell will have when used in battle
- WorldScript – effect that Spell will produce when used on the world map;
- in both of the above cases (SBG_ApplyEnchantment and SWG_ApplyEnchantment, respectively), Spell’s job is to apply the Enchantment specified in the EnchantmentData field to the unit, in this case ENCH-HOLY_WEAPON;
- AIBattleEvaluationScript – script that estimates the value of casting Spell for AI on the world map;
- AIWorldEvaluationScript – script that estimates the value of casting Spell for AI during battle;
- CastEffect – graphic effect that will be used when casting Spell;
- AudioEffect – audio effect that will be used when casting Spell;
DARKNESS
Spell, applying Enchantment to the battlefield affecting units from the domains of death and life. It can also be cast by a unit.

- UnitBattleCost – cost in mana to cast Spell if caster is unit;
HOLY WEAPON
Enchantment modifying the attributes of an unit.

- AllowDispel – indicates whether an Enchantment can be dispelled by an opponent (most Enchantments can). Some, such as Enchantments resulting from Buildings, are immune to dispelling;
- RemoveWhenParentIDChange – Indicates whether the Enchantment will be removed if the ID of the owner (Wizard) changes (in order, for example, not to keep Enchantments on a lost city);
- DescriptionInfo – contains the name of the Enchantment, its description and the icon that represents it;
- UpkeepCost – Enchantment maintenance cost calculated in mana per turn;
- LifeTime – Enchantment’s duration in turns. A value of -1 means that the Enchantment will be active until it is removed, or dispelled;
- EnchCategory – information whether Enchantment is positive, negative, or None;
- Realm – the school of magic to which Enchantment belongs;
ENDURANCE
Enchantment performing an additional effect when applied, and removed from the target.

- EnchantmentApplicationScript – script that is run when the Enchantment is applied to the owner. In this case, it is EAPP_UnitUpdateMove, which updates the number of movement points so that the unit can benefit from the bonus to movement points as soon as it takes the Enchantment;
- EnchantmentRemovalScript – script that runs when the Enchantment is removed from its owner. In this case, it’s EREM_UnitUpdateMove, which updates the number of movement points so that the unit immediately knows how many movement points it has left after losing its Enchantment bonus;
- EnchantmentScript – main component of Enchantment;
- TriggerType – tells in what situation the Enchantment script will be activated;
- Script – Enchantment activator, or its actual function;
- FIntData – parameter setting a numerical value;
- StringData – parameter accepting a text value;
- in this case, the EnchantmentScript section tells us that the ECH_AddTag script will be called every time the unit attributes are recalculated (TriggerType=”AttributeChange”), when this happens the ECH_AddTag script will add 1 point (FIntData=”1″) of the Movement Points tag (StringData=”TAG-MOVEMENT_POINTS”) to the unit attributes;
DARKNESS
Remote Enchantmet, which is applied to the battlefield but affects units. Enchantment gives bonuses to units belonging to the death domain and penalties to units belonging to the life domain.

- new thing here is TriggerType=”RemoteUnitAttributeChange”; it means that Enchantment is imposed on some object (e.g. Wizard, Battle), but it affects units and when units recalculate their attributes, they take this Enchantment into account;
- OnRemoteTriggerFilter – for Enchantment remote you can set a filter that will decide which units the Enchantment will affect. In this case it is EFILTER_RealmLifeOrDeath which selects only units belonging to the domains of death and life;
- EnchCategory VALUE=”None” – Enchantment category is None, because for some units the effect is positive and for others it is negative, regardless of caster affiliation;
SCRIPT CONSTRUCTION (part 2)
MELEE ATTACK
A basic melee attack whose strength depends on the unit’s Melee Attack attribute.

- TriggerType – specifies what type of Skill it is and in what situations it will be triggered;
- TriggerScript – script that determines whether it is possible to use this Skill at a given time, here ATRI_NormalAttack – determines whether the target of the Skill is appropriate and whether the units are at a distance that allows a melee attack (1 hex);
- ActivatorMainScript – activator responsible for generating the pool of damage an attack can inflict taking into account the unit’s chance of hitting and the modifiers of the enemy’s chance of hitting it;
- ActivatorSecondaryScript – activator that allocates damage to the opponent taking into account his defense (attribute and special skills resulting from Skills and Enchantments);
CREATE UNDEAD ATTACK
An attack that deals damage of a special type.

- DamagePool – indicates what type of damage the attack deals, the default is normal damage, in this case it is Undead damage, which if it is 50% or more of the damage dealt to the killed unit will lead to its revival as an undead on the attacker’s side after winning the battle; there may also be Irreversible damage, which cannot be healed or regenerated during the battle;
FIRE BREATH
Skill that adds additional effects to another attack.

- Domain – specifies the school of magic to which Skill belongs;
- TriggerType=”BattleAttackAddon” – this Trigger Type tells us that this Skill is in addition to another attack adding an additional effect to it;
- AllowMeleeVsFly – indicates that the Skill can be used against a flying unit (applies to certain types of melee attacks, such as Breath, Thrown, or Gaze);
RESIST TO ALL 2
Skill affecting all units in the group in which the owner is located.

- OnJoinWithUnit – script that will be executed when a new unit joins the group, in this case the script will add a bonus to the unit resulting from the Skill;
- OnLeaveFromUnit – script that will be executed when any unit leaves the group, in this case the Script will take away the unit’s bonus resulting from the Skill;
- Param=”+2″ in DescriptionInfo is additional information that will be used when creating the text of the Skill description;
- TriggerType=”GroupChange” tells us that Skill will activate when there is a change in the composition of the group of units;
- StringData=”ENCH-RESIST_TO_ALL_UNIT_2″ – text parameter, used by the OnJoinWithUnit and OnLeaveFromUnit scripts to know what effect to apply or remove;
FIRE IMMUNITY
Skill that modifies owner’s attributes when applied.

- SkillApplicationScript – script executed when a Skill is applied to a target, in this case it adds 1 point to the unit’s FIRE_IMMUNITY attribute;
- SkillRemovalScript – script executed when the owner loses a Skill, in this case it subtracts 1 point from the FIRE_IMMUNITY attribute of the unit;
ADAMANTITE WEAPON
Skill that modifies the owner’s attributes.

- ACTPass_AdamantineWeapon – this is a passive activator that will be called every time the attributes of a unit are recalculated (TriggerType=”AttributeChange”);
ALCHEMY

- Cost – number of points you need to pay to buy this Trait;
- InitialScript – script that will be activated when Trait is applied to the Wizard;
ARTIFICER
Trait providing additional starting Spells.

- StartingSpells – additional Spells with which the owner of this trait will start the game;
INFERNAL POWER
Trait with additional requirements.

- PrerequisiteScript – script specifying additional requirements to redeem this Trait, in this case the Wizard must have a minimum of 4 books of Death Magic;
MYRRAN
Trait affecting the races available for selection.

- RaceFilteringScript – script that filters the races with which the player can start the game;
That’s all we are sharing today in Master of Magic Modding Guide, if you have anything to add, please feel free to leave a comment below, you can also read the original article here, all the credits goes to the original author Leto
