This guide of Pawperty Damage will explain how to set up mods and upload them to Steam Workshop, to share custom content more easily!
1. Mod Folder Structure
and any number of custom billboards or character skins (other modifications are
currently not supported.)
The game will look for mods in the Mods directory, at the following path:
To create a new mod, simply create a folder in the Mods directory and make sure it contains…
- A JSON mod description file, named Mod.json
- A preview image, saved in JPEG format, named Preview.jpg
- Folders and assets, for any billboards or character skins you want to add
To add custom billboards or character skins to your mod, simply move their files to folders named Billboards and Skins, respectively—inside the mod’s folder!
(For info on how to organize custom character skin files, refer to the Custom Skins Creation Guide, which you can find in the game file’s Skins directory.)
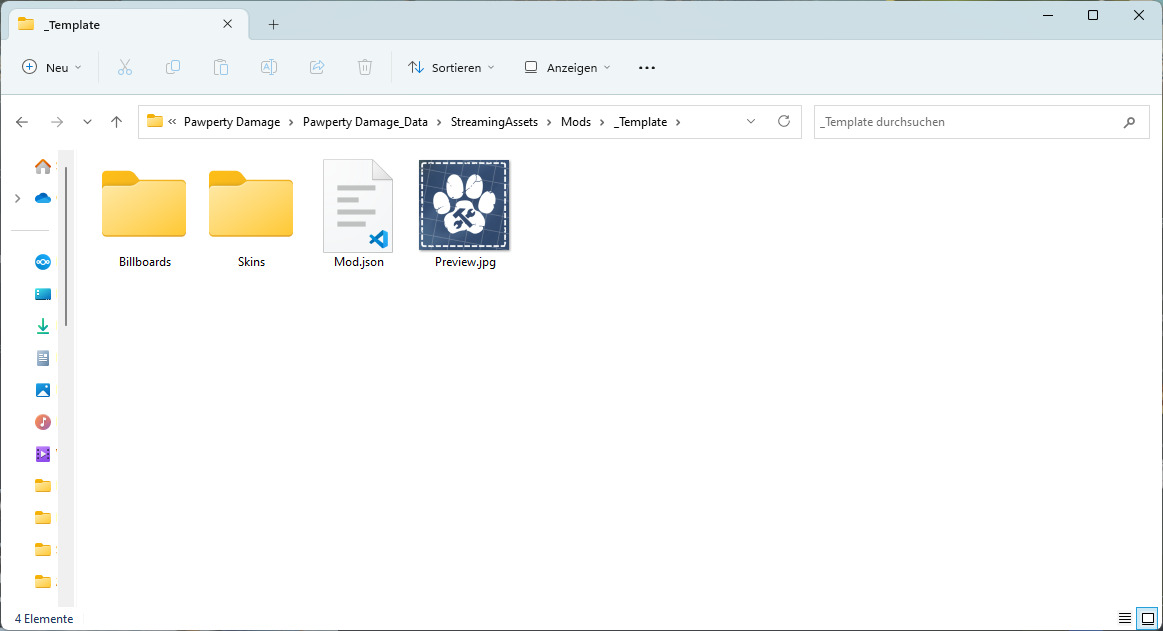
In the Mods directory you will find a template folder called _Template: As a starting point, you can simply create a copy of this folder and rename it to something else (without a leading underscore). It comes with all the necessary files and sub-directories, already in place!
2. Mod Definition
importantly the mod’s title/name and description, which is information that will be
displayed in the game’s mod selection (as well as the Steam Workshop).
The file must be located in the mod’s folder and have the name “Mod.json”.
2.1 Structure
At its most basic level, the definition file will provide these three pieces of information:
- Title:: This is the name of your mod, as it will be displayed in the game
- Description: A short description of your mod
- Author: Name of the mod’s author—this value is optional: When uploaded to the Workshop, the Steam user name will be displayed as author, automatically
Note: The mod’s display name is defined in the JSON description file, it is not
inferred from the the name of the mod’s folder: The folder name can be arbitrary,
but it makes sense to chose a folder name that is identical or similar to the display
name, to keep things tidy.
2.2 Workshop Visibility
the mod definition: The mod’s visibility, when uploaded to the Steam Workshop.
To define who can see and subscribe to your mod, in the Workshop, simply add the
parameter Visibilty to the Mod.json file, and set it to a number from 0 to 3.
The value of the Visibility parameter describes the level of privacy:
Workshop
in the Workshop and can only be accessed via a
direct link
When the Visibility parameter is omitted, the mod will default to “public” visibility: If
you do not want the mod to be accessible to everyone, make sure to set Visibility, in
the mod description.
Note: Alternatively, you can also edit the mod’s visibility in the Steam Workshop
web interface, after uploading the mod to the Workshop. But be careful: If you re-
upload the mod, the mod’s visibility option might get overwritten with whatever you
have set it to, in the Mod.json
3. Uploading Mods to Steam Workshop
- It has a title
- It has a preview image
- It contains at least one custom billboard or character skin
3.1 Uploading a new mod
accessible from the main menu:

And simply click the “Upload” button of the mod you want to upload:
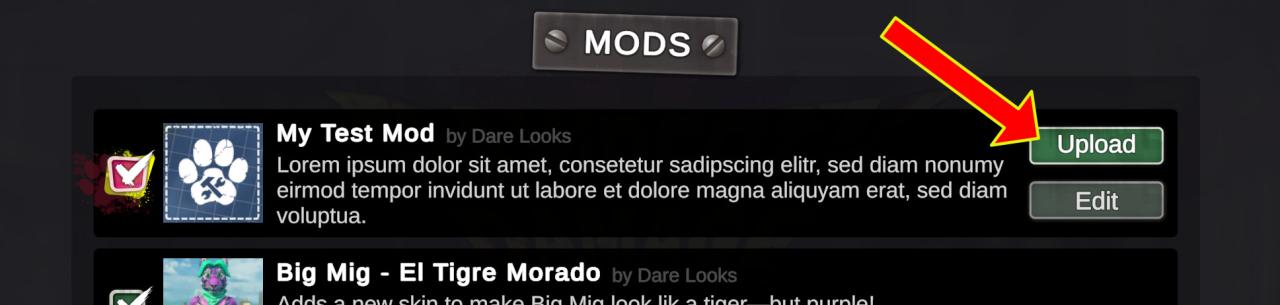
Note: If you can’t see your mod in the list, it means the game was not able to find/load it. Make sure the folder structure is correct and the mod description file is in valid JSON format.
If the upload was successful, the game will re-direct you to the mod’s newly created
Workshop page: From this page you can edit the mod’s details, upload screenshots,
etc.
After uploading a mod, you can click the “Edit” button, in the game, to bring you to its
Workshop page directly.
Tip: Adding screenshots to the Workshop page is optional, but strongly
recommended: Consider preparing a few screenshots, beforehand!
3.2 Updating an existing mod
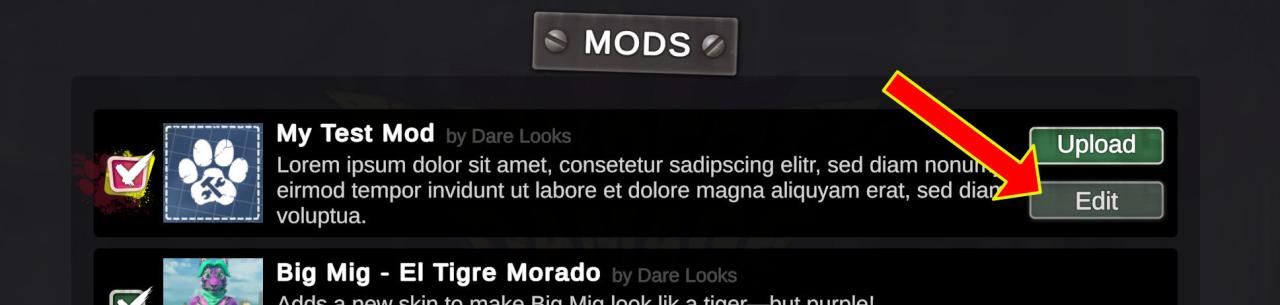 Clicking this button will bring you the this mod’s Workshop page, where you can edit the mod’s details, add screenshots, etc.
If you want to update the mod’s contents, simply change the files in your local mod folder and click the Upload button, to re-upload your mod.
The game will match your mod’s name with the names of mods you have uploaded, before: So if you haven’t changed the name of your mod, re-uploading it will update the version in the workshop.
Note: For this reason, you cannot have two mods with the same name: If you try to upload a
second mod with the name of one that already exists, in the Workshop, the
previous mod of the same name will be overwritten!
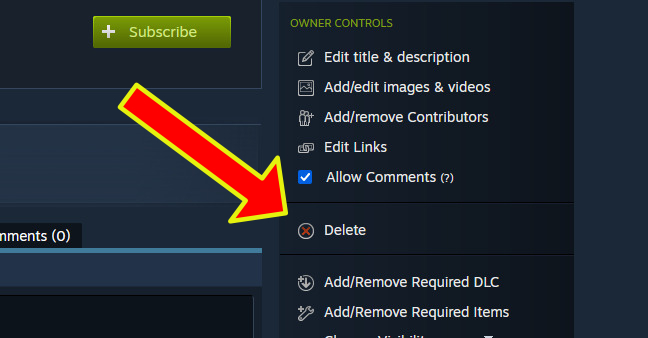
3.3 Deleting a Mod
page and delete it from there: Either navigate to the Workshop page, in Steam, or
access it via the mod’s Edit button, in the game.
That’s all we are sharing today in Pawperty Damage Mod Creation Guide, if you have anything to add, please feel free to leave a comment below, you can also read the original article here, all the credits goes to the original author Dare Looks